
Sostituzione fotocamere posteriori iPhone 12 mini

Introduzione
Vai al passo 1Usa questa guida per rimuovere e sostituire le fotocamere posteriori dell'iPhone 12 mini. Tutti e due i moduli fotocamera (grandangolare e ultragrandangolare) sono sostituiti in un blocco unico.
Nota: Su iOS 18 e versioni successive, puoi calibrare nuovi moduli fotocamera originali utilizzando Repair Assistant di Apple.
Ti servirà dell'adesivo di ricambio per reincollare i componenti quando rimonti il dispositivo.
Cosa ti serve
Ricambi


Strumenti


Mostra di più…
-
-
Spegni il tuo iPhone prima di iniziare lo smontaggio.
-
Svita le due viti Pentalobe P2 da 6,7 mm sul bordo inferiore dell'iPhone.
-
-
-
Misura 3 mm dalla punta del plettro e segna questa distanza con un pennarello indelebile.
Got to step 2 and realized the fix kit doesn't include an opening pick! Looks like a guitar pick, and I have those lying around. Is that expected? Looks like the pick is used in many steps below. There's a little blue crowbar that isn't mentioned in the instructions. Perhaps that replaces the opening pick?
Hi! I can't see which guide you were using when writing this comment. Can you reply here with which guide and fix kit you used?
I see you posted this in Meta. I hope it's resolved soon! In the meantime, a guitar pick may work well enough for your repair.
what fix kit?
My fix kit didn't include an opening pick either
My AliExpress refurbished screen came with a pick that has a coin-like circle that pops out, so no modification was necessary
It's not an Ifixit KIT if it doesn't include everything. You'll need to order the opening pic separately. Or head to Walmart like myself and look for guitar pics. Hopefully, this will work just as well.
No pick in mine as well. It’s really not clear that you have to order this separately when ordering an IPhone SE 202/2022 screen repair kit. Is this the case?
Frustrated, I ordered a compact package where everything was encapsulated. Useless suction tools could not separate the screen. If it is unable to decouple the screen, then why sucking suction tools you have provided.
For my kit the triangle pick was stuck inside the box with the screen not with the other tools maybe it's also there for you
Y’all are getting far, FAR too detailed with some of this stuff…. Measuring and marking the pick that you won’t actually use to open the device?!? lol that’s kinda funny. Just heat it up, grab a spudger, and the back just pops right off! The iFixit tech need to stick to the KISS method more often, you know KEEP IT SIMPLE STUPID!!! Like l, for reals, I’ve been doing this stuff for YEARS and using iFixit guides regularly and this is just ridiculous at this point!
Will the phone still work if the sensor assembly on the back of the screen is damaged?
-
-
-
Applica strisce sovrapposte di nastro adesivo trasparente sullo schermo dell'iPhone fino a coprire l'intero schermo.
-
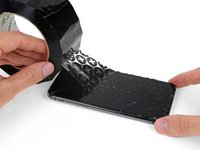
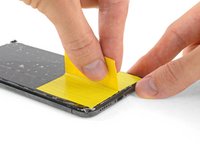
Se non riesci a far aderire la ventosa nei prossimi passaggi, usa un pezzetto di nastro resistente (come il nastro adesivo americano) piegato come per formare una maniglia e solleva lo schermo con quello.
-
-
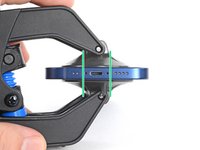
Attrezzo utilizzato in questo passaggio:Clampy - Anti-Clamp$24.95
-
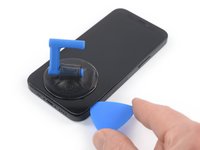
Tira indietro la maniglia blu per sbloccare i bracci dell'Anti-Clamp.
-
Fai scorrere le braccia sul bordo sinistro del tuo iPhone.
-
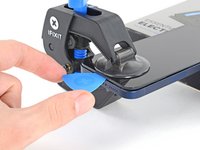
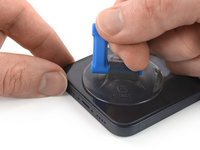
Posiziona le ventose vicino al bordo inferiore dell'iPhone, una sul davanti e una sul retro.
-
Premi le ventose per farle aderire all'area desiderata.
-
-
-
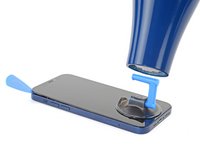
Poggia il tuo iPhone su un oggetto robusto prima di continuare.
-
Usa un asciugacapelli per scaldare lungo il bordo inferiore dell'iPhone. Lo schermo dovrebbe risultare leggermente troppo caldo per essere toccato.
-
Attendi un minuto per dare all'adesivo la possibilità di scollarsi, in modo da creare uno spazio di apertura.
-
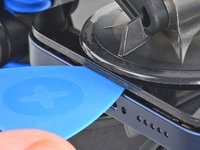
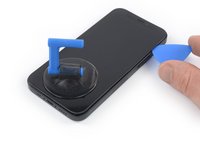
Inserisci un plettro di apertura sotto la cornice di plastica dello schermo quando l'Anti-Clamp crea uno spazio sufficientemente ampio.
-
Salta i prossimi tre passi.
-
-
-
Usa un asciugacapelli o una pistola termica per scaldare il bordo inferiore dell'iPhone per 90 secondi o finché lo schermo non è leggermente troppo caldo per essere toccato.
you need to clarify that you're heating the metal frame, not the glass. I gently heated the glass front with a heat gun and proceeded to pull the display apart, destroying it. :-(
-
-
-
Se stai usando una ventosa, falla aderire al bordo inferiore dello schermo, il più vicino possibile al bordo stesso.
-
Se il tuo schermo è crepato, coprirlo con del nastro adesivo trasparente da pacchi può aiutare la ventosa a fare presa. In alternativa puoi usare del nastro resistente al posto della ventosa. Se hai ancora problemi, puoi usare della supercolla (cianoacrilica) per incollare la ventosa al vetro.
I would recommend starting with a bottom corner, not the bottom middle. If the adhesive isn't softened enough, you will pull the middle out but the sides will still be stuck on, causing extreme flex to the panel and damage to the panel down the middle (white bars down the middle in a worst case). I did this to my phone.
-
-
-
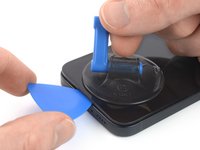
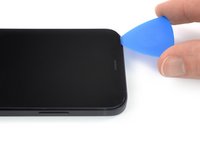
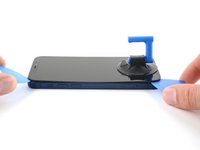
Tira la ventosa verso l'alto con una forza decisa e costante per creare una piccola fessura tra il vetro dello schermo e il telaio.
-
Infila un plettro di apertura nella fessura sotto la scocca di plastica dello schermo.
I ended up separating my screen rather than getting under the scren casing.. BE CAREFUL TO MAKE SURE YOU ARE UNDER THE PLASTIC PART - otherwise you just ruin your screen... No mention of this precaution here and as a result, my phone is more broken than when I started
The plastic frame should stay with the display.
Broke the screen. Too bad. I've done maybe 5 battery replacements before. But this one is very very tight. Got a new phone. :P
Same thing, I broke my screen too. I think the warning should be in all caps and show more clearly where is the right place to put the pick and where is not — without the need to click on the link.
Judging by amount of people who reported it here (and should also account for those who didn't bother to report), I'd say that there is a problem with instructions.
It is honestly not so hard if you know what does mistake looks like and that it is possible to separate the screen so easily from the frame. I repaired more than a dozen phones — screens and batteries — and this is the first time I made such a mistake that costs 100+euros.
-
-
-
Usa un asciugacapelli per riscaldare il bordo destro dell'iPhone (il bordo con il pulsante di accensione) per 90 secondi o fino a quando lo schermo è leggermente troppo caldo per essere toccato.
The pictures show the left side. I know that the left side is the correct one to heat, but for others it might be confusing. 😊
@dviosz You mean the right edge! The picture shows the left edge but the right edge is the correct one to heat. As described in the text next to it. Opening the phone from the left will damage it!
Yeah, sorry, you are right! (tried to make something less confusing and created more confusion by accident… 😃 )
THIS ONE HERE (lolz)
weebeast -
-
-
-
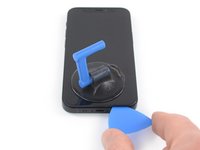
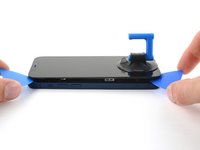
Fai scorrere il plettro attorno all'angolo in basso a destra e quindi in alto lungo il bordo destro dell'iPhone, tagliando l'adesivo che tiene fermo lo schermo.
Be very careful your tool does NOT go in between the screen and the screen frame but rather in between the screen frame and the phone frame. If not you will damage the screen and need a new one. This has happened to MANY people. The screen is attached to the screen frame with an adhesive that can also be accidentally pried apart if not done carefully. This is probably more likely if your tool is too thin, if you dont heat enough, or dont suction and pull enough to create a big enough separation between the screen frame and the phone frame.
Yes, this happens to me, too. It took a long time until I could remove the screen using a heat gun with a heat gun set to 120°C (after trying first with 90° and 100°). Now the right side of the display shows white stripes and the touch doesn't react. -> New display necessary...
-
-
-
-
Usa un asciugacapelli per riscaldare il bordo superiore dell'iPhone per 90 secondi o fino a quando lo schermo è leggermente troppo caldo per essere toccato.
-
-
-
Infila il plettro sotto l'angolo in alto a destra dello schermo.
-
Fai scorrere il plettro attorno all'angolo in alto a destra. A causa dei ganci, potresti incontrare della resistenza.
-
Fai scorrere il plettro lungo il bordo superiore e taglia l'adesivo rimasto che tiene fermo lo schermo.
-
-
-
Usa un asciugacapelli per riscaldare il bordo sinistro dell'iPhone per 90 secondi o fino a quando lo schermo è leggermente troppo caldo per essere toccato.
-
-
Welches Ersatzteil benötige ich, wenn die obere Verbindung gerissen ist?
I accidentally tore the cables off. What can I do?
The display flexy is in the middle of the left side, please update the picture showing the flexy connected and highlight in red, so other users don't damage it as I did :(
Updated -- thank you! Does this look better?
-
-
Inserisci un secondo plettro di apertura nell'angolo in basso a sinistra dell'iPhone.
-
Ruota entrambi i plettri contemporaneamente finché le clip del bordo sinistro non si staccano.
Don't go from just one corner (like on the right side). I've done that (forgot this step) and broke my screen.
-
-
-
Ruota l'iPhone così che il bordo destro sia rivolto verso di te.
-
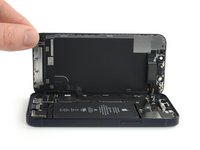
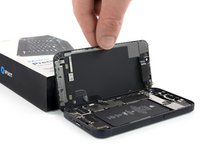
Apri l'iPhone sollevando e ruotando il bordo destro dello schermo come la copertina di un libro.
-
Appoggia lo schermo a qualcosa in modo che resti aperto mentre lavori nel telefono.
-
-
-
Svita la vite tri-wing Y000 da 1,25 mm che tiene ferma la copertura dei connettori della batteria e dello schermo.
hallo, ich sehe in Schritt 17 nur EINE markierte Schraube... (?)
This Shield is garbage and once it's taken out it's next to impossible to get back in. I'm not even going to put the shield back in I'm just going to put kapton tape over it and call it good.
-
-
Attrezzo utilizzato in questo passaggio:Tweezers$4.99
-
Usa un paio di pinzette per rimuovere la copertura dei connettori della batteria e dello schermo.
-
-
-
Usa uno spudger o un'unghia per sollevare il connettore della batteria dalla sua presa sulla scheda madre.
-
Piega leggermente il cavo da parte per allontanarlo dalla scheda madre ed evitare che faccia contatto accidentalmente con la presa e le fornisca potenza durante la riparazione.
-
-
-
Usa uno spudger o un'unghia pulita per scollegare il connettore del cavo del pannello OLED dalla sua presa sulla scheda madre.
-
-
-
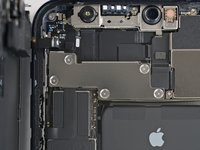
Svita le cinque viti tri-wing Y000 da 1 mm che tengono ferma la copertura del gruppo dei sensori frontali.
what 3 are the small ones? I don't know anymore
in case anyone else reads this, the 3 small ones screw directly onto the board. the two longer ones screw into standoffs (the two top screws, based on the picture above)
Skyejobs -
-
-
-
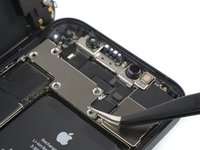
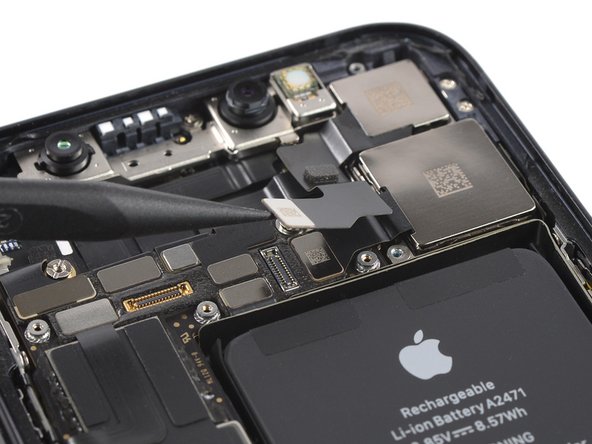
Usa uno spudger o un'unghia pulita per scollegare il connettore del cavo del gruppo dei sensori frontali.
-
-
-
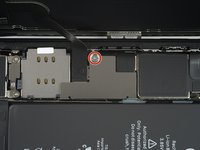
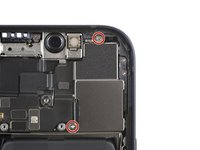
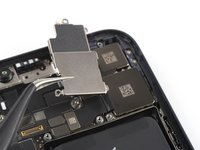
Rimuovi le due viti a croce Phillips #000 da 1,6 mm.
-
-
Attrezzo utilizzato in questo passaggio:Tweezers$4.99
-
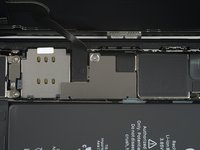
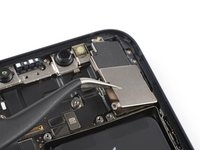
Usa un paio di pinzette per rimuovere la staffa della cover dei moduli della fotocamera.
-
-
-
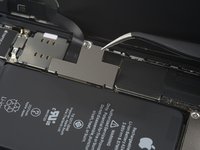
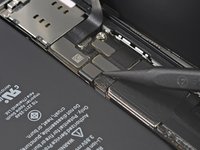
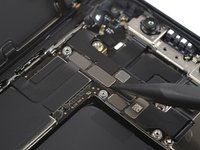
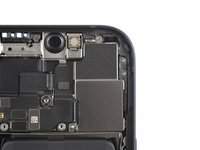
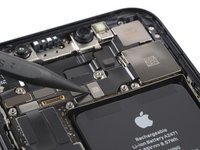
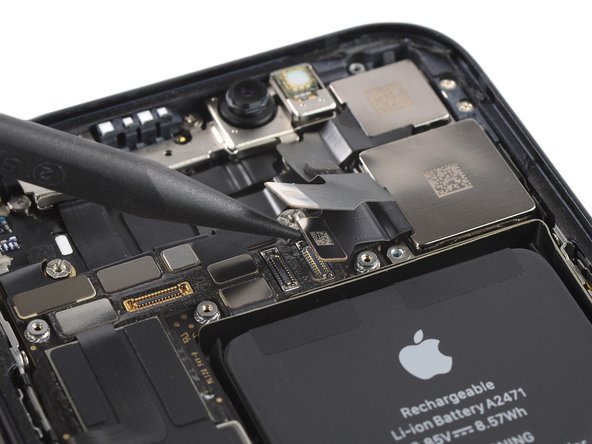
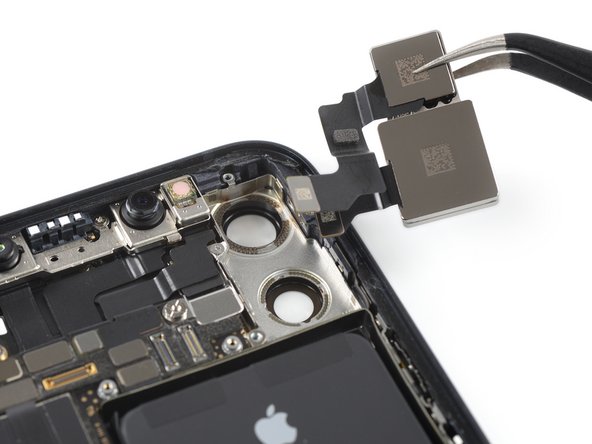
Usa uno spudger per scollegare il cavo a nastro della fotocamera ultragrandangolare sollevandolo direttamente dalla sua presa.
-
-
-
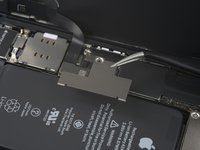
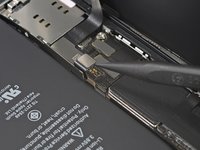
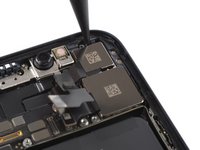
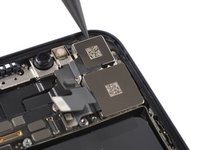
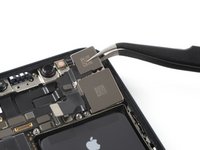
Inserisci la punta di uno spudger tra il bordo superiore del modulo della fotocamera e la cornice dell'iPhone.
-
Usa lo spudger per far leva sul modulo della fotocamera e sollevarlo dal suo alloggio, inclinando lo spudger verso il basso.
-
-
-
Usa un paio di pinzette per rimuovere il modulo della fotocamera.
-


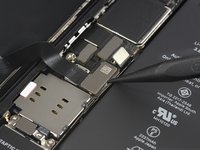
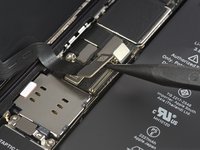


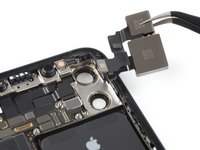
Confronta le nuove parti di ricambio con quelle originali, potresti dover trasferire dei componenti rimasti sui componenti sostituiti o rimuovere degli adesivi dai nuovi pezzi di ricambio prima di installarli.
Per rimontare il tuo dispositivo, segui questa guida in senso inverso. Applica nuovo adesivo dove necessario, dopo aver pulito le aree interessate con dell'alcool isopropilico (>90%).
Dopo la riparazione, a seconda del componente sostituito, potresti essere in grado di calibrarlo utilizzando il Repair Assistant di Apple, disponibile a partire da iOS 18. Aggiorna il tuo dispositivo, vai su Impostazioni → Generali → Info → Cronologia parti e assistenza, tocca Riavvia e completa la riparazione e segui le istruzioni sullo schermo.
Porta i rifiuti prodotti a un centro di smaltimento riciclatore certificato R2 o e-Stewards.
La riparazione non è andata a buon fine? Prova con delle soluzioni ai problemi di base, o chiedi alla nostra comunità Risposte iPhone 12 mini per avere aiuto.
Annulla: non ho completato questa guida.
Altre 13 persone hanno completato questa guida.
Un ringraziamento speciale a questi traduttori:
100%


Questi traduttori ci stanno aiutando ad aggiustare il mondo! Vuoi partecipare?
Inizia a tradurre ›


5 Commenti
Removing these screens is no joke folks. There is a backing on the screen that is also adhered to the phone casing, and it is very easy to separate this from the front of the screen, destroying or at the very least damaging it in the process.
I managed to replace the camera. Now I am stuck with a not functioning foto app, that won't save pictures and a really slow loading time generally. Also I can not switch to wide angle camera mode. how do I fix this?
Yeah head the warnings about the screen, destroyed my screen trying to open this.
is it oem apple battery, because at some photo shows(Ifixit) and another shows (apple) ... wait your answer?
karim - Replica
BEWARE! This screen isn’t the same as older iPhone models’ screens. The iPhone mini 12-screen comes with a thin plastic frame around the screen on its back. Thus, make sure you don’t insert the pick in between the screen and its plastic frame, as you’ll seperate the screen and leave the plastic frame still sitting in the phone’s metal housing (this cost me 100 dollars…). Carefully heat the sides of the metal housing and do not heat directly on the glass, as doing so will potentially loosen the glue from the plastic frame stuck to the screen. My suggestion is that you watch a video of this repair as this step-by-step-guide is undercooked.
Dan - Replica
This is an excellent comment. Following this step-by-step guide to the letter will break your screen; it's by far the worst iFixit guide I've seen to date.
Dormouse -
Ive finished mine and Soooo absolutely dont do this yourself🙌🏽 unless your a mechanic because first of all they didnt send me all of the right tools🤗 and secondly the battery they gave me has an overly large component so it wont fit into my phone. And the absolute HASSEL i had to go through to even just get the package was insane it was a whole month of struggling just for the stuff to not even be right, in conclusion will NEVER order from here again..🤗
Chanell - Replica