
Sostituzione batteria MacBook Air 13" fine 2020

Introduzione
Vai al passo 1Segui questa guida per rimuovere in sicurezza e sostituire la batteria in un MacBook Air da 13" di fine 2020 (M1).
Per ridurre il rischio di danni, accendi il tuo MacBook e lascia scaricare del tutto la batteria prima di iniziare questa procedura. Una batteria agli ioni di litio carica può essere molto pericolosa se forata accidentalmente. Se la tua batteria sembra gonfia, prendi delle precauzioni aggiuntive.
Questa procedura richiede la rimozione di entrambe le casse. Ti servirà del nuovo adesivo per reinstallarle correttamente per evitare vibrazioni o rumori eccessivi.
Cosa ti serve
Kit di riparazione
Questo kit contiene tutti i ricambi e gli strumenti necessari per completare questa guida.

Ricambi


Strumenti


Mostra di più…
-
-
Se il tuo MacBook ha installato Big Sur v11.1 o successive, potresti non riuscire a disabilitare l'Auto Boot. Puoi procedere normalmente, ma assicurati di scollegare la batteria non appeni riesci.
-
Usa un cacciavite Pentalobe P5 per svitare le seguenti viti:
-
Due viti da 7,9 mm
-
Due viti da 7,3 mm
-
Sei viti da 2,6 mm
-
-
-
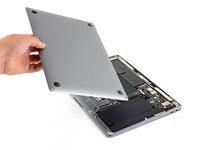
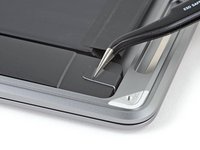
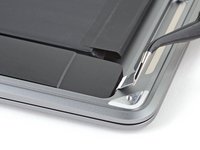
Infila le dita tra lo schermo e la copertura inferiore e tira verso l'alto per rilasciare la copertura inferiore
-
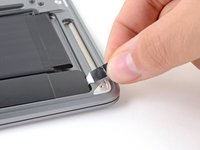
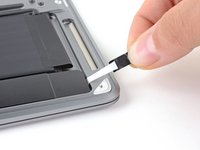
Rimuovi la copertura inferiore.
-
Appoggiala in posizione e premila con decisione per agganciare i ganci nascosti al di sotto. Dovresti sentirli scattare in posizione.
-
-
-
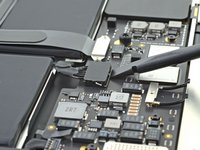
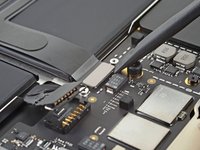
Usa la parte piatta di uno spudger per sollevare e sganciare il braccio di bloccaggio in metallo sul connettore della batteria.
-
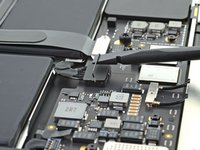
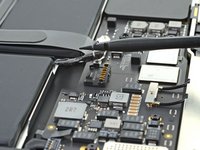
Tira verso l'alto il braccio di bloccaggio in metallo per scollegare il connettore della batteria dalla sua presa sulla scheda madre.
-
Se necessario, spingi prima il lato posteriore del connettore, quello con i fili, nella posizione iniziale, quindi fai oscillare la parte anteriore del connettore nella posizione corretta.
If having difficulty in flipping the bar up, place the machine vertical and not that there is a small “locking nib” that the bar has to clear. You may have to give the bar honest persuasion to clear the nib.
The bar can lock backwards making it very hard to even see let alone move. Great care is needed to shift it. I had to use two thumbnails, one on each side, then once flipped forward it takes more push than I expected to clip it in place. Ensure the plug is fully seated first !
As others commented, it can be hard to click the battery connector back into place. First make sure the bar is not underneath the connector. Then, turning the computer so the connector pins are facing you (LCD hinge end closer to you) can also make it easier to position the connector on top and then click it into place.
Some replacement batteries have a retainer bar that differs from OEM batteries. I had to swap the retainer bar to properly secure it under the "locking nib" to ensure it didn't release on its own (before it could freely swing).
-
-
-
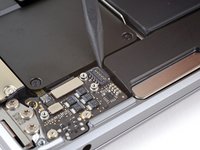
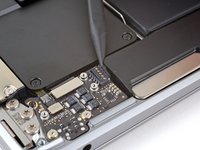
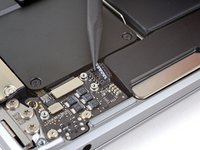
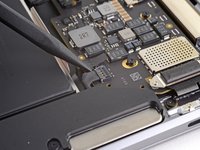
Usa un cacciavite Torx T3 per svitare le tre viti da 1,4 mm che tengono ferma la copertura del connettore della scheda audio.
-
-
-
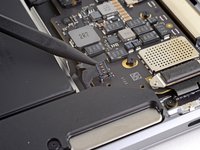
Infila la punta di uno spudger sotto al cavo dello speaker destro e fai leva verso l'alto per scollegarlo dalla scheda audio.
Be careful. I replaced the battery twice (first one was 3rd party crappy one). The second time, I pulled the socket off. The directions should say that there is a socket sodered onto the board and the connector has to come out of the socket. The three images did not help me see what to do
-
-
-
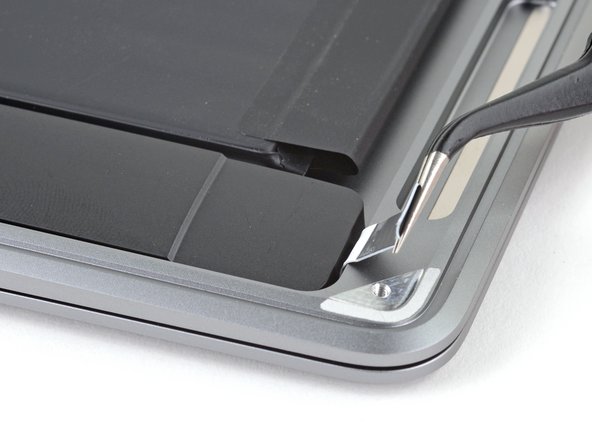
Usa un cacciavite Torx T3 per svitare la vite da 4,2 mm che fissa lo speaker destro al case.
-
-
Attrezzo utilizzato in questo passaggio:Tweezers$4.99
-
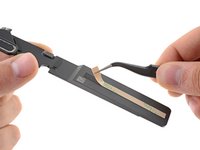
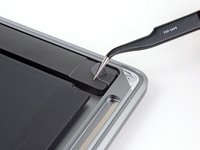
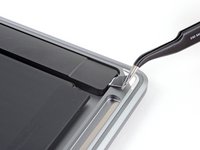
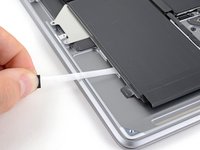
Usa un paio di pinzette per rimuovere l'aletta nera della striscia adesiva estensibile finché non riesci a prenderla con le dita.
-
-
-
-
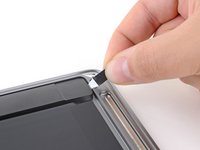
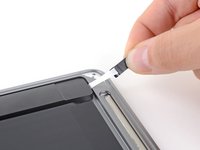
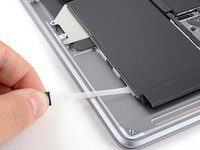
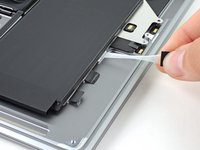
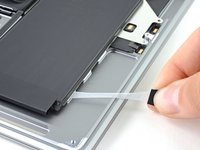
Prendi l'aletta della striscia adesiva e tirala lentamente per sfilarla da sotto lo speaker.
-
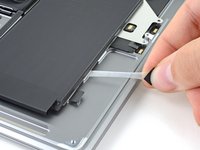
Tira la striscia adesiva fino a rimuoverla da sotto lo speaker.
-
Scalda lo speaker per ammorbidire l'adesivo sottostante.
-
Infila attentamente uno spudger o un plettro sotto lo speaker per separare l'adesivo.
Pulling the adhesive is a delicate balance between strength and speed. It is important to pull as slowly as possible, with a decent force but not to break it. You can also pull a bit and then relax and wait for the adhesive to pull itself out from under the speaker. Then repeat the short pull and wait.
Even with the above, my adhesives broke each time. A hairdryer can help warm the speaker (and the adhesive under it), but don’t warm the battery next to it too much. Once hot, slowly move the spudger under the speaker and loosen it gradually. It will eventually come off in one piece.
-
-
-
Infila la punta di uno spudger sotto al cavo dello speaker sinistro e fai leva verso l'alto per scollegarlo dalla scheda audio.
-
-
-
Usa un cacciavite Torx T3 per svitare la vite da 4,2 mm che fissa lo speaker sinistro alla copertura.
-
-
Attrezzo utilizzato in questo passaggio:Tweezers$4.99
-
Usa un paio di pinzette per rimuovere l'aletta nera della striscia adesiva estensibile finché non riesci a prenderla con le dita.
-
-
-
Prendi l'aletta della striscia adesiva e tirala lentamente per sfilarla da sotto lo speaker.
-
Tira la striscia adesiva fino a rimuoverla da sotto lo speaker.
-
Scalda lo speaker per ammorbidire l'adesivo sottostante.
-
Infila attentamente uno spudger o un plettro sotto lo speaker per separare l'adesivo.
-
-
-
Usa un cacciavite Torx T3 per svitare le due viti da 1,4 mm che tengono ferma la copertura del cavo del trackpad.
-
-
-
Usa la parte piatta di uno spudger per fare leva verso l'alto sul connettore del cavo del trackpad per scollegarlo dalla sua presa.
-
-
-
Usa un cacciavite Torx T3 per svitare le due viti da 2,6 mm che fissano la batteria alla copertura.
I think I lost these two battery tray screws somehow, but they don't seem super critical. Any way to get replacements?
-
-
Attrezzo utilizzato in questo passaggio:Tweezers$4.99
-
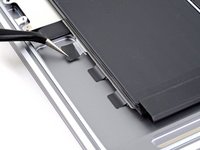
Sul lato sinistro del MacBook, usa un paio di pinzette per separare le tre alette nere delle strisce adesive estensibili finché non riesci a prenderle con le dita.
-
-
-
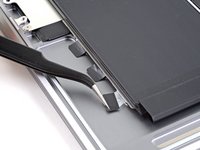
Prendi l'aletta di una striscia adesiva e tirala lentamente per sfilarla da sotto la batteria.
-
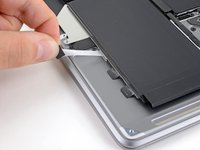
Tira la striscia adesiva fino a rimuoverla da sotto la batteria.
-
Ripeti questa procedura per le altre due strisce adesive sul lato sinistro della batteria.
What happens if you don't put this tape back the way it was? Can it cause the battery to have any sort of issue?
I dont know but Im doing the same thing. On mine its in there pretty good without any tape. The two screws are holding it in place so as long as its not flapping around I cant see an issue. Its a used battery so I dont want to tape it back in.
Can I replace the strips under the battery with the same suggested adhesive tape (Tesa 61395) as the speakers?
-
-
-
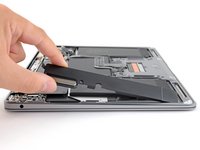
Rimuovi il gruppo della batteria.
-
Caricala al 100% e continua a caricarla per almeno altre 2 ore.
-
Stacca la corrente e usa il dispositivo normalmente per scaricare la batteria.
-
Quando vedi l'avviso per la batteria quasi scarica, salva il tuo lavoro e continua a usare il tuo portatile finché non si spegne da solo per la batteria scarica.
-
Aspetta almeno 5 ore, quindi ricarica il tuo portatile fino al 100% senza interruzioni.
On boot after reinstallation, the fans go crazy during the Apple logo/progress bar, and the bar is very slow. Machine unuseable. I've reset SMC to no avail. Any other ideas?
Solved my own problem: I didn't have the battery connector pushed in far enough. Its edge really sits flush with the containing latch, though it isn't really obvious from the way it connects.
matt -
Matt, glad to hear you got it sorted! Thanks for giving an update on your comment—connectors can be tricky! Hopefully it helps other users that have the same problem in the future. Happy fixing!
-


Confronta la tua parte di ricambio con quella originale: potrebbe essere necessario il trasferimento di alcuni componenti o la rimozione di protezioni adesive dalla nuova parte prima di installarla.
Per rimontare il tuo dispositivo, segui le istruzioni in ordine inverso.
Una volta completata la riparazione, il laptop potrebbe non riaccendersi se non collegato ad alimentazione.
Porta i tuoi rifiuti elettronici a un riciclatore certificato R2 o e-Stewards.
La riparazione non è andata come previsto? Prova delle soluzioni di base ai problemi, oppure rivolgiti alla nostra comunità Risposte per trovare aiuto.
Annulla: non ho completato questa guida.
Altre 67 persone hanno completato questa guida.
Un ringraziamento speciale a questi traduttori:
100%


Questi traduttori ci stanno aiutando ad aggiustare il mondo! Vuoi partecipare?
Inizia a tradurre ›


27 Commenti
You’ve gotta be kidding me…
Hard to believe, but true.. this is an improvement from a couple generations ago, when you had to disassemble the entire computer or futz about with isopropyl alcohol and credit cards (or dental floss) to remove swollen but still glued in batteries. If this has you feeling overwhelmed, go look at the 74-step guide for the 2015 15” MacBook Pro Battery Replacement.
I concur with that. Made the fix for a Macbook Pro 13" 2014 some times ago and it looks really more difficult and stressing, especially with potentially destructive steps. I felt a bit lucky that it worked fine after that and since then...
Ok I have the battery out but where do you buy replacement adhesive strips? Everywhere I look they say they are for iphones or generic lcd repair. I had to take the battery out for other reasons and want to put the same battery back in.
Stephen, the linked adhesive is a generic solution & should work just fine. Apple-specific adhesives are sometimes hard to source. You could also cut and adapt stretch-release adhesive strips to fit. Best of luck on your repair!
Might as well go to apple themselves and get the battery replaced for 129...
What is the price of a replacement with the battery included?
Does anyone know for sure if the Macbook Air M1 will turn on with the battery disconnected, only with the power connected? Not sure if my motherboard is broken or only battery.
I have the same question. My macbook air won't turn on even with battery disconnected and power connected. would love an answer
Kiradon -
Does the battery capacity show 100% after replacing the battery in System Preferences?
I had Air 2015 and changing battery was as simple as possible. No unscrewing speakers, no adhesive strips removing. Just FIVE easy steps.
дякую! ця інструкція врятувала мені бюджет.
Great guide! Completed in about an hour. The Fix Kit DOES include at card adhesion/tape so there is no need to purchase that separately.
What if you don't use the adhesives when you reassemble?
Would it really be much of an issue?
Had two new MBA 2020 to replace the batteries (leftover machines from an insane phone company discount, still in their original sealed boxes), the 1st was done in 65 min. the 2nd in 30 min.) - thank you very much for this guide !
Bonjour @daniel57 orientez-vous à l'adhésif présent d'origine dans votre MacBook. Si vous n'y avez plus accès, pouvez-vous me dire quelle pièce vous souhaitez recoller s'il vous plaît ?
Bjr Claire,
merci pour votre retour, je change la batterie et il y a plusieurs pièces qui nécessitent du double face.
je vais prendre du 10 mm et le retailler au besoin.
cordialement,
Daniel
@daniel57 Avec plaisir et bonne réparation à vous :)
Vielen Dank, hat sehr gut funktioniert. Etwa eine reichliche halbe Stunde brauchte ich.
ONLY 24 steps! ON a slightly older Macbook Pro it's over 60 and the battery is glued down.
Apple clearly hates its own technicians. Why this should take more than 5 minutes is beyond me.
30 minutes? More like 3+ hours. I am sure if you have everything set up perfectly, have done this a dozen times, and rush at a risk of damaging jeweler sized parts, you could do it within an hour. But if you want to be sure everything is done correctly, slow steady and leisurely is the right way to go.
I did the job today, took about an hour, all good. The battery shows 100% max capacity and Battery Condition "Normal" after replacement.
I highly recommend making a little paper template to organize your screws as they come out so you don't lose them!
ESD safe mat, plugged into ground, with a wrist strap, also grounded, are the best best to protect the logic board.
Robin Ray - Replica
Re-Assembly Tip: Before putting the screws back in, snap the lower case on and test to make sure the MacBook powers up. When I first re-assembled, I became very nervous I did something wrong because it would not power on. It turns out I just needed to plug the laptop into a power source for it to power up (despite having a good charge before disassembly). It was the perfect way to test the new USB-C ports!
Austin - Replica
Big points to this one, especially for mentioning needing to plug the laptop in. The bottom case needs to be screwed in and laptop needs to be plugged in before it will boot.
Bayden Yazalina -
Wiha 4PL driver for these screws.
Greg Worrel - Replica
Printing out all the images from this Ifixit guide prior to starting and using duct tape help me keep track of screws.
raju midjdeya - Replica
This Guide has a high chance of not working if an aftermarket display is used as MAC serialization was introduced post ~2023. Likely you will need an original MAC screen replacement and to serialize the display for it to work.
Tron Computers - Replica