Introduzione
Se hai provato a pulire la porta Lightning senza successo, segui questa guida per sostituire l'assemblaggio del connettore Lightning, che include i microfoni inferiori, il cavo del convertitore dell'antenna e il connettore Lightning.
Cosa ti serve
-
-
Inserisci uno strumento di estrazione SIM, una punta o una graffetta raddrizzata nel piccolo foro nel vassoio della scheda SIM.
-
Premi per espellere il vassoio.
-
-
-
Rimuovi le due viti Pentalobe da 3,4 mm sul lato inferiore dell'iPhone.
just how long are those screws- i turn and turn and turn and the lift off is soooo slight, seemingly insignificant…
I would recommend, from the very beginning, dumping all tools out of the kit (if you got it) and using that white paper tool box as a tray to organize the screws and braces in. It’s nice to work over because it catches screws well and makes it easy to see them if you drop any.
That’s a great idea thank you
Screw to the left of the charging port will not come out. Screw on the right came out no problem. Any ideas?
I already replaced my iPhone 8 battery with one from iFixit and honestly I wasn't impressed. It worked well for a few months, but then I started noticing the peak performance capability dropping significantly thereafter. I followed the initial charging instructions to a tee and only let it drop below 20% once a month. Normal everyday use for me... no intense apps like games, etc. I considered having Apple do it this time around, but for these older models they don't keep the batteries in-stock and you have to give them your phone for up to a week. So in the end, I opted to try another battery from iFixit instead. Hopefully this one will last longer.
How with the gigantic kit do I not have a 3 1/2 pentalobe driver the very first screwdriver I reach for and that I need is not in any of these kits. What’s up with that?
-
-
-
Misura 3 mm dalla punta del plettro e segna questa distanza con un pennarello indelebile.
Got to step 2 and realized the fix kit doesn't include an opening pick! Looks like a guitar pick, and I have those lying around. Is that expected? Looks like the pick is used in many steps below. There's a little blue crowbar that isn't mentioned in the instructions. Perhaps that replaces the opening pick?
Hi! I can't see which guide you were using when writing this comment. Can you reply here with which guide and fix kit you used?
I see you posted this in Meta. I hope it's resolved soon! In the meantime, a guitar pick may work well enough for your repair.
what fix kit?
My fix kit didn't include an opening pick either
My AliExpress refurbished screen came with a pick that has a coin-like circle that pops out, so no modification was necessary
-
-
-
I prossimi tre passaggi ti spiegherano come utilizzare l'Anti-Clamp, uno strumento che abbiamo studiato per rendere la procedura di apertura più facile. Se non stai usando l'Anti-Clamp, salta questi tre passaggi e continua con un metodo alternativo.
-
Tira la manopola blu verso la cerniera per disattivare la modalità di apertura.
-
Posiziona la ventosa vicino al bordo inferiore dello schermo: una davanti e una dietro.
-
Spingi sulle ventose in modo tale che possano fare presa sull'area desiderata.
-
-
-
Tira la manopola blu in avanti per bloccare i bracci.
-
Gira la manopola in senso orario di 360 gradi o fino a quando le ventose iniziano ad allungarsi.
-
Assicurati che le ventose siano allineate fra loro. Se dovessero iniziare a scivolare, allenta leggermente le ventose e riallinea i braccetti.
-
-
-
Scalda un iOpener e infilalo tra i bracci dell'Anti-Clamp.
-
Piega l'iOpener in modo che poggi sul bordo inferiore dell'iPhone.
-
Attendi un minuto per dare all'adesivo una possibilità di staccarsi e formare una fessura di apertura.
-
Inserisci il plettro di apertura nella fessura.
-
Salta i tre passaggi successivi.
-
-
-
Il riscaldamento del bordo inferiore dell'iPhone aiuta ad ammorbidire l'adesivo che blocca il display, semplificando l'apertura.
-
Usa un asciugacapelli oppure prepara un iOpener e applicalo per circa 90 secondi al bordo inferiore dell'iPhone per ammorbidire l'adesivo sottostante.
Hello,
What temperature is suitable for removing the front display ? I bought i-Fixit ProTech which is not include the heating "roller" . Thanks for help
Ich habe eine heiße Wärmflasche verwendet. Das hat gut funktioniert :-)
I used a heated tea kettle and a tea towel, it worked!
I put on the furnace vent for 10 minutes to get it warm to the touch but not hot.
I attached it to the after burner of my rocket ship and that worked.
I used a water-filled ziploc bag, heated it in microwave. fast, cheap, worked.
The most effective way to heat up the glue is to leave the phone in full sun - if it's available. In fact I would always wait for a sunny day to repair any glued together Apple device. The heat will be very even and the phone was probably designed to survive anything the sun can throw at it - although it can get very warm. (I'm in the UK) If you leave the phone turned on it will give a warning if it goes near the temperature limit.
I'm sorry but I tried both the hair dryer (for 3 minutes!) and the eye opener (also 3 minutes) and no luck. Not even a hint of loosening the adhesive holding down the display!! Do I send this kit back for a refund or what??!!
No luck, guys. 3 minutes of hair drying and 3 minutes heating up the iopener. What next?
Okay, a half hour later i finally got the screen loose, but not after super heating it for at leat 10 minutes with a hair drying and burning my hand trying to pry it open. Also, watch out for the power button because it inadvertently keeps switching the phone back on while you wrestle with it. More later . . .
. . . and now I need to buy a new phone!!! the cable broke as I was trying to unscrew one of the top screws, so thanks! I FIXed IT but Good!!!!
-
-
-
Applica una ventosa nella metà inferiore del pannello frontale, appena sopra il pulsante home.
Even with using high heat from a blow dryer, I had to put the suction cup over the home button or the bottom edge wouldn’t lift at all. That waterproof adhesive is incredibly strong.
As others have said, this part really stinks, but it’ll work if you keep trying. Agree with multiple rounds of hair dryer on high (did about 60-90s each time), and with having to out the suction cup over the home button. You don’t need a big gap to pry it open - it’ll be slight …
Patience is the key here. Expletives and patience. Like previous comments say, putting the suction cup over the home button (I used packing tape to maintain the seal) will allow you to apply force to the proper location to separate the screen. Good luck!
Get a suction cup pliers. It’ll make this part fun
iSclack EVO opened the iPhone easily even without heating with no fear of accidentally over-opening it like with a simple suction cup.
If you don't have the anti-clamp device, to prevent the screen from tearing open when suctioning it, I suggest some layers of tape around it and the back of the phone (the tape has to be stretchy enough to just minimise the momentum when separating the screen), or some big rubberbands
-
-
-
Tira la ventosa applicando una tensione forte e costante fino a creare una piccola fessura tra il gruppo dello schermo e la scocca.
-
Inserisci nella fessura un plettro di apertura.
Just completed a smashed screen replacement, this is probably the most time consuming part. Used packing tape to cover the screen to help create a suction surface (had to replace it a couple times because it pulls away after a purple good pulls ) Used consistent heat for about 5 minutes, then stuck a pick in the tiniest opening… and pry pry pry!
I failed at this step. No amount of heating, pulling, and rocking opened up enough of a gap to slip in even a knife let alone the blue plastic tool. That's with a phone that has an undamaged screen - just trying to replace the battery. Apple won this round :(
Be really careful here. I placed a sucker to the front and rear to help lever off the screen. However, the whole thing came away much easier than I anticipated and I ripped the front part completely away from the rear, tearing all three connector cables. New iPhone required.
Note that the opening pick they show here does not appear to come with the kit, which is a bummer! The plunger, the mini blue crowbar thing, these are too thick. I ended up using a really thin guitar pick.
Following careful methods can mostly preserve the seal and reusable. Won’t be as water tight but probably still pretty good.
Bottom edge is pull up with suction + separating tool. Use small precision scissor to cut any tape that gets overly stretched upon initial opening.
- For the 2 long edges, use an exacto knife to separate the seal from the screen. This keeps the tape on the chassis. Go slow along the long sides. Becareful to avoid scratching the paint on underside of the screen’s edge.
- Top corners have a thick sealed tape. Best to just use separating tool to twist it open.
In summary, top and bottom edge use separating tool. Side long edges can use exacto knife to gradually gently separate the seal from underside of the screen’s edge.
Intact screen, check. Tool kit, check. Hair dryer hot enough to make the phone too hot to touch, check. Following all instructions, check. Screen still in place and refusing to come off, check.
I heated, reheated, pulled and pulled. I simply could not get it off. Worked at it for an hour and a half, and I’m not a small guy. Yes it is hard to hold, but could get a grip. Just could not get it to budge. Off to the iPhone repair shop tomorrow. Anybody want to buy a repair kit and replacement battery?
After struggling for 30m, I looked up some alternate methods and found this helpful:
https://www.youtube.com/watch?v=25zAK5mG...
- I used a utility knife and pried up right under the home button
- the angle matters! I was trying to go too far down before going in. The top surface of the phone is rather thin, so you go in after barely getting under the chassis lip
- tilt utility knife left to right once you’ve got it under to work it in
- leave the utility knife in, and now add that pick
Pro-tip: don't be an idiot like me. Instead, remove the screen protector you have on the phone before applying the suction cups. Derp.
I struggled with a hair dryer at first and a singular suction cup. However, I tried putting packing tape on the spot where I put the suction job (even though my screen isn't cracked) and I was able to do it first try with ease. Definitely recommend packing tape.
Suction cup pliers. Dead easy
After successful screen replacement, returning to give my thanks here. Excellent tips from you all - if you’re using force, you’re doing it wrong. Heat, very very gentle exact-o knife barely down then fully under the screen below the home button … perfect. Slow and patient around the upper corners, and don’t forget to heat there as well! Thank you all!
The problems with this step are (1) not having three hands and (2) managing to hold the phone in a way that doesn't put reverse pressure somewhere else on the screen. Exacto knife was the best tip. It's a little dangerous. On a misstep you may scratch the screen or jab yourself, but it's what got me in.
I used a razor blade and plenty of heat, and it somehow worked like a charm at the cost of me cutting myself. Definitely be careful when doing this, I used the razor blade on the left side of the iphone then wedged in a small screwdriver and then used the pick to cut the rest of the material away.
-
-
-
Fai scorrere il tuo attrezzo lungo il bordo sinistro del telefono, spostandoti verso i pulsanti del controllo volume e l'interruttore della modalità silenziosa, per rompere l'adesivo che tiene in posizione il display.
-
Fermati vicino all'angolo superiore sinistro del display.
-
-
I was trying to replace my battery, and accidentally cut one of the cords on my screen. I marked my pick, so i don't know how it happened.
-
-
Inserisci nuovamente il tuo attrezzo nell'angolo inferiore destro dell'iPhone e fallo scorrere attorno all'angolo e lungo il lato destro del telefono per separare l'adesivo.
-
-
-
Fai scorrere uno strumento di apertura sotto il display attorno all'angolo superiore sinistro e lungo il bordo superiore del telefono per allentare l'adesivo rimasto.
I did end up using just a smidge of IFIXIT adhesive remover along the edge before opening and that seemed to really help
I have been using the pointed tweezers to pull the adhesive strands apart and out as the display comes off.
This bit was awkward as to get a good grip I kept inadvertently switching the %#*@ phone on!
-
-
-
Apri l'iPhone sollevando il display dal lato sinistro, come per sollevare la copertina posteriore di un libro.
-
Appoggia il display contro qualche tipo di supporto per mantenerlo aperto mentre lavori sul telefono.
Nach RECHTS klappen - nicht nach links!
Als ich das Flachbandkabel auf der rechten Seite sah, hab ich mich auch gefragt, ob die das mit nach Links klappen ernst meinen, und das „Buch“ lieber auf japanische Art nach rechts aufgeklappt. Das sollte dringend in der Anleitung korrigiert werden!
“Up from the left” means lift up the left side.
Which is the same as folding to the right.
“Like the back cover of a book” explains it even more clearly.
Maybe it gets lost in translation?
Fold to THE RIGHT - not to the left!
When I saw the ribbon cable on the right side, I also wondered if they were serious about folding it to the left, and the "book" would rather be opened to the right in the Japanese way.This should be corrected urgently in the manual!
Hi Jim, the display opens from the left side, toward the right side. It should look like the back cover of a book. Hope this helps. Good luck with the repair!
DO NOT LAY THE TWO HALVES FLAT!!! There is a reason why the third photo shows the screen half leaning against a box! This really needs to be a warning in addition to the one about not separating the display.
If you're skipping the screen and taptic engine removal like I did, I suggest you tape the back of the phone to the table, and also tape the screen to the vertical object it lays on, so it stays still. That way you will avoid having to constantly readjust it because of the sliding of the housing of the phone when you're working on it. Be careful where you're putting the tape on the screen though, if you're doing it on the internal components.
-
-
-
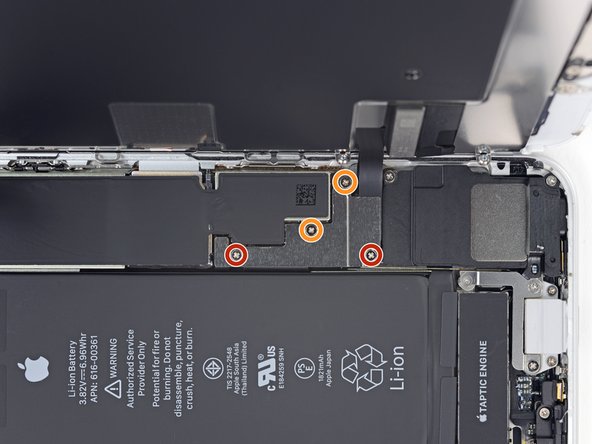
Rimuovi quattro viti a croce Phillips che fissano la staffa del cavo inferiore del display alla scheda logica, delle seguenti lunghezze:
-
Due viti da 1,3 mm
-
Due viti da 2,8 mm
-
Rimuovi la staffa.
Not Y000 this time haha
It is not ideal, but possible for these screws.
using the repair kit i purchased with my screen replacement, i am currently having issues removing these screws with the PH000. please help
I was too, thankfully I had another set that contained the PH00 bit, that worked great for me.
Ok. My screw is stuck. How do I remove it? Philips head is stripped.
Solved it myself. Firm pressure did the trick.
took me awhile to figure out I needed to use PHOO bit for the 2 -1.3 screws
It is important to keep careful track of the screws' position. Have a tidy workplace -- a few times when I tried to re-attach the very tiny screws with the tweezer, they slipped and flew away and I almost lost them.
-
-
-
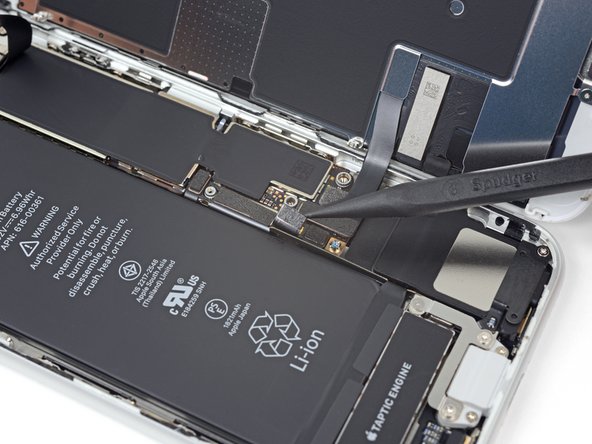
Usa la punta di uno spudger per staccare il connettore della batteria sollevandolo dal suo zoccolo sulla scheda logica.
-
Piega lievemente da un lato, per distanziarlo dalla scheda logica, il cavo del connettore per evitare che questo possa fare contatto con lo zoccolo e quindi alimentare il telefono nel corso della tua riparazione.
Make sure you pry the battery connector off from the right hand side as shown in the picture. Theres a delicate component on the logicboard near the battery connector called a Mosfet which is linked to the battery charging software. If you knock it off accidently you’ll loose battery charging and the phone will boot loop and youll need to have it re-soldered back on.
I can confirm this as I learned my lesson by unknowingly prying the mosfet off. The phone will not charge now and is useless. I really wish they would add a note about this on Step 12 as a warning.
Jeff -
So this is it. You don’t have to go any further removing the screen. You can replace the battery right from this point.
I wish I saw this comment 2 hours ago
If I have to repeat this, I'd also consider removing replacing the battery at this point. The loose display must be then carefully fixed so the connectors don't break. And then it is not possible to re-attach the waterproof seal.
The waterproof seal was included in the kit, but there were no instructions for it so I now skipped that. I later found YouTube video which seems to describe it (starting at 7:40):
This is where I broke my phone, a phone that was working quite well, paid for in full. Just because I had a cracked screen. Be super careful when connecting the cables. I was in a hurry and not paying attention, used too much force when re-connecting and broke those teeny little pins that could not be repaired. A tech tried for an hour to no avail. cautionary tale. Good luck
The display ribbon is a certain length and allows for some give, but behind it is hidden the Home button/TouchID ribbon, which sits against what amounts to a razor blade. This ribbon is much more taut than the display one, and therefore you have far less freedom of movement than you think you do. This is absolutely an intentional trap to discourage replacing your own battery. Quite frankly, it’s despicable.
Anyway, so beware of that, because although I was very careful and did not even swing the screen very far (not more than 90°), the Home button ribbon tore and now needs to be serviced. Home button is disabled now.
Apple should be ashamed of themselves for this. Please do look at the legislation effort that people are doing to try to get this kind of sabotage illegal, as well as all sorts of other gimmicks they pull. For a company that makes phenomenal products, they’re controlling like an abusive spouse.
Dan Knight
That happened to me and I could not figure out how it got broken. It's the home button and fingerprint reader.
But I'm not bothering to get it fixed and I'm not replacing the entire screen. I went into system prefs/accessibility and activated the on-screen home button. Oh, well.
I cannot get the new battery reconnected to the connection port. Any tips/tricks? New and old battery connections appear similar. It wasn't difficult to disconnect to old battery.
Some reports here seem to indicate that the battery must be the very last connector to re-connect because otherwise there might be malfunction in some display components?
It wasn't difficult to disconnect to old battery. But the most difficult part for me was to get the new battery reconnected to the connection port. I tried many times to carefully position and press it down with my fingertip or the flat end of the spudger but it did not hold its position. Maybe I pressed too weak because I was afraid breaking the connector and the mosfet above (?) it. But finally to my surprise it connected (at that point I temporarily booted the iPhone with the loose display to verify that the battery was connected). Whew, it succeeded!
The connectors have very little "click" to them when they do seat properly, and are covered with soft foam. Very challenging to attach them by feel, and having the screen propped up, blocks light from exactly where you need it.
Make sure the new battery connector cable has similar length and width to the one of the original battery. I got a third party battery and the cable was longer and not folded in a "U" way near the connector, like the one in the genuine battery was, only folded at a 90 degree angle. That "U" actually perfectly fits in the small space between battery and connector port, so the cable doesn't stick up thus making connecting it or closing the screen impossible. So fold the cable, connect it, and while holding it to prevent it from disconnecting, stick the battery so the "U" curve of the cable sits down just between battery and connector port.
-
-
-
Usa la punta di uno spudger per staccare il connettore inferiore del display dal suo alloggiamento.
I broke the lower display connector. Is it possible to replace that part separately or do I need to buy a full screen replacement?
You need to buy a new screen
-
-
-
Rimuovi le tre viti Phillips da 1,3 mm che tengono in posizione la staffa sopra il connettore del gruppo sensore del pannello frontale.
-
Rimuovi la staffa.
If you are replacing the adhesive liner, the remaining release liner strips will interfere with the two outer screws. I had to cut a working section out of the liner at each location and move it aside with the spudger.
This part is throwing me for a loop. Having difficulty finding the read head for these screws. Is it the same size as the two small 1.3mm screws in step 12?
These are the same size screws mentioned in Step 17.
ended up getting it with the PH000, I must of just been rushing it.
My bracket looks different and none of the screw heads I have fits.
Mine too? Any help?
These screws did not stick to the magnetic screwdriver. Extremely difficult to get them back in place - but with some patience i succeeded :)
-
-
-
Usa la punta di uno spudger per staccare il connettore del gruppo sensore del pannello anteriore.
Do you have a link for the flex cord shown in the pictures so I can purchase it? Having a hard time locating that exact assembly
-
-
-
Rimuovi il gruppo schermo.
Hi ifixit, if you find my method dangerous, please remove it.
After Step 17, I skipped Step 18 to Step 28.
At Step 29, I lifted up the four adhesive black pull-tabs to expose the white adhesive side. Next, I use hot air gun and blow on the back cover of the iphone for about a minute (maybe a hairdryer will work too) .
Warning: Don't overheat the iPhone, or you may accidentally ignite the battery.
I think the temperature was around 60 DegC.
Extreme Caution: Do Not overheat. I use my hand to gauge the hotness. Careful not to burn yourself or the board.
I was able to pull out all the white adhesive tapes easily as the adhesive soften.
DO NOT TRY this method if you are a novice or inexperience! I am not responsible if you hurt yourself or damage your iphone!
Hey John! I’m glad the repair worked out for you!
From our research, applying heat does soften the adhesive strips, but it also causes them to lose structural integrity and break more easily. That’s why we normally suggest using heat after the strips are already broken. Removing the Taptic Engine definitely takes a few extra steps, but we feel that it gives fixers the best chance of pulling out the adhesive strips intact.
I agree with John, skip 18 through 27. These are to make it easier to remove the battery adhesive. I replaced the batteries on two IPhone 8s. The first one I did all that stuff and the adhesive still broken and I had to carefully pry the battery out anyway. When I reassembled the phone the Home button no longer worked. Looking it up, this is apparently fairly common due to all the fragile wires involved in these steps. The second I skipped these steps and when I reassembled it everything worked fine. Not one of the eight (both phones) adhesive strips came out properly. I fully drained the batteries before doing the repairs. By the way, I use the virtual home button on the one phone, it’s a little annoying, but the phone is still usable if you’re not ready to shell out for a new phone.
I also skipped removing the Taptic Engine. I could only half-way pull the lower battery tapes and completely the upper tapes after carefully prying them loose with the tweezer. I then used a hair-dryer for a minute to warm the battery and the other side of the phone (I used my other hand to make sure I did not apply too much heat. Make sure you do not blow the tiny loose screws away with the hair dryer!) and then slowly lifted the upper battery somewhat with the Opening pics tool, then re-heated the lower remaining tapes and quite easily lifted the battery out.
I had bought two-sided tape to reconnect the battery but it had the tapes pre-installed (I wonder if it is necessary to tape the battery at all?).
I also skipped these steps. I won’t say it was entirely successful - two of the four adhesive strips broke and could not be grabbed with tweezers. But I had gotten most of the adhesive out already and the battery was quite loose, so I used a warmer under the phone, then gently slid a flat plastic blade under one end of the battery and slowly worked it up the phone. (Dental floss would have been safer-don’t do what I did, kids!)
Likely can skip step 18-28 and all the risks. Battery tape is relatively removable by the following method
- use a tweezer to pull up a corner of each tape. Then use fingers to peel back all the black tab on top of battery
- use 2 hands. Index and thumb on both. Pull about 1/4” with one hand, hold the tension and pull 1/4” with the other hand. Alternate, go slow. Pull out all 4 tape completely. I think the pause after each 1/4” while holding the stretched tape firmly prevents the tape from over stretching to become too thin and break.
- Don’t apply heat, I would guess that makes tape softer and break easier.
Have tried other methods and failed in the past. Pulling too fast (tape will snap) or use a tweezer to twist/roll (sharp edges will cut tape) Anyway, just use index/thumb on both hands and alternately pull slowly
I did do 2 iPhone 8 battery change this way. One removed all tape without breaking. Another broken all 4 tape after about 1/3 pulled so likely some factory assembly differeces.
I second this, this method works well in most cases. Removing the haptics helps to keep the angle low and pulling the tape as straight as possible
Howards method for removing the adhesive works like a charm. The only addition I made was to slightly warm the back of the iphone on a rice pack (used for sore neck muscles—haha). Going back and forth between hands is really crucial. While on hand gives a gentle pull, the other holds the phone from moving. Slow back and forth. Thanks.
Struggling with the glued down display, then properly cleaning all the remains of the old seal, then positioning the new seal is 95% of this job. I purchased my phone refurbished and it clearly had already been serviced once, there were remnants of an old seal below the current seal due to improper cleaning and prep that made getting the phone open harder than it needed to be.
For my 2nd iPhone 8 battery replacement, I chose not to remove the display completely, or the Taptic Engine and I was successful. You have to pay extra attention and it is a bit trickier to keep the display from moving around too much, but I think minimizing the amount of screws and connections to take out, the better. You can easily lose the screws and you have to mind which ones go where, as there are so many different lengths. YMMV.
In retrospect, I also would have skipped ahead to step 33. I didn't, but my efforts at removing the adhesive tape were also unsuccessful so steps 23-33 were for naught. Ended up applying isopropyl alcohol, then warming the back, and finally just physically levered the battery out. Battery was slightly deformed and became slightly warm, so as soon as I got it out I just put it outside on a brick.
But the replacement worked.
-
-
-
-
Rimuovi le tre viti che fissano la staffa vicino al Taptic Engine:
-
Una vite tri-wing Y000 da 1,3 mm
-
Una vite a croce Phillips da 2,7 mm
-
Una vite a croce Phillips da 2,9 mm
My phone had Phillips screws in all three places, so I did not need the Y000 screwdriver bit.
I don’t see the point in steps 18-27 if we’re only changing the battery. I pulled out the sticky tape with taptic and all this other jazz still intact. Am I missing something? Reconnecting that taptic connection cost me 5 years off my life, needlessly.
Hey William!
We instruct people to remove the Taptic Engine in order to minimize the chance that the battery adhesive will tear when you try to pull it out. The steep angle you have to pull the adhesive with the Taptic Engine installed dramatically increases the chance that the adhesive will break under the battery.
since the sticky tape will usually tear anyway and it is no big deal, I agree stop at this point and take the battery out. Too many things can go wrong removing more screws and connecting/disconnecting all the connectors. Go to video instructions at this point. Wish I did.
My tape tore away and now my home button does not work, which from what I see is to do with the tapic engine. It seems to be more dangerous to do that than to use heat and pry the battery out (which I had to do anyway). You should at least put in an warning/option for users.
Hi Gary,
The Home button connector is not related to the Taptic Engine and should not be affected by anything close to the battery adhesive. I would suggest carefully disconnecting and reconnecting the screen connectors, and make sure that there is no debris on the contacts. Be sure to disconnect the battery before you do this, or you will risk damaging the screen.
Glad I stopped and watched the video at this point and skipped this step. Totally unnecessary, I used the iopener and heated the back of the phone before removing the battery with a pick and “ifixit card” came out easily. Not my first battery replacement.
Kompletter bullshit!! Im Video wird es anders gezeigt und die Schritte 18-27 werden komplett ausgelassen. Ist auch viel besser so, da so das Risiko, dass man die Taptic Engine schrottet, wie es mir jetzt beim ausbauen passiert ist, einfach nicht vorhanden ist. Ich kann auch nicht nachvollziehen, warum man in einer schriftlichen Anleitung zum Akku Wechsel komplett andere Schritte schildert als im Video. An der Stelle hat iFixit deutlich versagt. Ein Haufen Splasher…
Hallo Maximilian, du hast Recht, im Video wird die kürzere Methode gezeigt. Der Ausbau des Akkus ist für viele Menschen jedoch sehr schwer, wenn die Taptic Engine noch verbaut ist. Deshalb empfiehlt die Anleitung den Ausbau der Taptic Engine.
Kann es sein das dieser Schritt falsch ist? Ich habe einen Y000 Schraubendreher aus dem Iphone 7 Set. Der passt aber nicht bei der roten Schraube.
The new part I received had two Phillips screws, so when you're doing the reverse, you may need to remove the screws from the new part before putting the old screws in, everything fit together otherwise
I really hope you guys not to skip these steps. it is really hard to pull out string with taptic engine. 4 of 3 strings were cutted when I treid to detach batteries with taptic engine. So, I really recommend you to get rid of taptic engine before you start this step. But if you skipped and strings are cutted, there is a way. Use hair dryer 90 secs as maximum hot behind the battries and detach the batteries. It worked to me.
The Y000 screw has an extremely shallow head and the screwdriver provided in the kit I used couldn't grip it at all. I skipped the entire taptic removal and was able to remove the adhesive with it in place by warming the phone then wrapping the end of the adhesive strips around a small screwdriver and gently rolling them out and away.
-
-
-
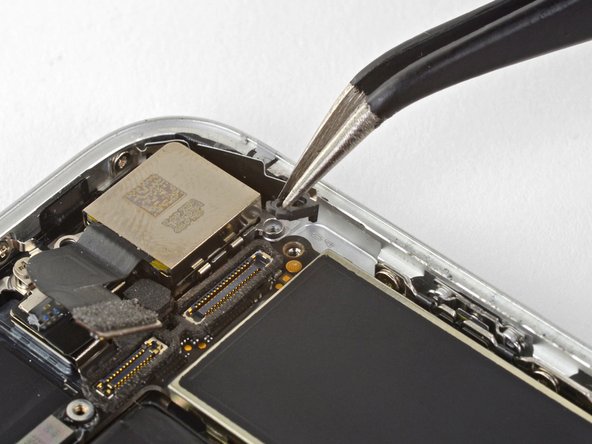
Infila un plettro di apertura sotto il cavo flessibile dell'antenna per tenere giù lo zoccolo.
-
Usa l'estremità a punta di uno spudger per sollevare e disconnettere dalla sua presa il cavo flessibile dell'antenna, usando il plettro per tenere giù la presa stessa.
Don’t worry if the socket lifts up a bit as you get it out. You’ll need to lift it up later (Step 25) so don’t push it back into place yet.
Every instruction online (including your YouTube video) leaves the Taptic Engine in place. This added step did not help with battery replacement, and led to an hour of frustration trying to get the connector back in place.
I noticed the same thing and wondered if it was necessary. Thanks
Yeah, I broke the connector off of my taptic engine trying to get it to reconnect to the lighting connector plate….freaking nightmare with that and the co-axe wifi connector……..I now have a working phone without haptics
dave -
I agree jgrsf
I was glad I had the Taptic Engine removed when I failed to remove the battery adhesives. It leaves more room to work around the battery.
I agree. And when reassembling the wifi antenna, I connected the two plugs first, which worked fine, and only after that stuck the antenna back to its sticky place.
dl7utx -
I was following this for replacing the loud speaker. I found that during reconnecting the antenna flex, I slightly rocked the taptic connector and it came lose. I was frustrated because my pre-close up test had everything working, then I shut it down, made sure everything was connected and put it all together (including a bang-on job on the display adhesive!!) and wham - no taptic responses.
Just finishing reseating it, fought with the antenna flex, then ensured the taptic connector was seated properly underneath. All good now.
i cant get the small screw to tighten to hold the bracket in place. it just spins. the 2.7mm screw that is supposed to go into the lower left bottom. the 2.9mm screw that goes in lower right bottom will also snug down on lower left. I somehow messed up the hole I guess. can i use an extra 2.9mm instead of 2.7 mm ? if i can find one ? thank you
-
-
-
Rimuovi le due viti che tengono in posizione il Taptic Engine:
-
Una vite Phillips da 2,1 mm
-
Un distanziale a vite da 2,1 mm
Why is this screwdriver bit not included in the fix kit?
It’s more important to get this unusual piece than a common Phillips head.
When reinstalling the standoff that connects to the Taptic Engine, I found that the pointy tip of the spudger fits really well into the little hole at the top of the standoff, and helps with getting it into place and screwing it down if you don’t have a screwdriver bit for the standoff. Hope this is helpful!
Be sure to look through all the packaging if you bought the iFixit replacement battery - the Standoff Screwdriver bit was in the package with the battery and screen adhesive (the box labeled “Repair Part”) rather than in with the tools (the box labeled “Repair Tools”).
Thanks! This really saved the day for me.
I just used a sharp knife for the orange one
I broke (twice) the ribbon cable on the tapic engine while trying to reinstall the taptic engine. I ended up taking the loudspeaker out which gave my finger a bit more room to press down and connect the cable to the phone. It was a royal PIA.
Such a nice kit, great instructions, and then not include the standoff bit…what a miss…
During reassembly, I inserted the stand-off screw by holding it with the provided tweezers and pushing it into place with the pointed spudger. While still pushing down with the pointed spudger to keep it from falling over, I turned the stand-off screw using the tweezers until it was firmly seated enough to let go of the spuder without the screw falling over. Then I was able to switch over to my 2.4mm flathead screwdriver and tighten it down. Otherwise the screw was jumping all over the place, magnetically attracted to the other components.
Disappointing that the stand-off screw bit was not provided with the kit. I expect better from iFixit.
It appears that some aspects of the iPhone SE 2022 (3rd gen SE) began to appear in later versions of the 2020 model. I have an SE 2020 (A2275) that has a grounding clip anchored by the Phillips screw on LH side of the Taptic engine. This clip was not present in the original SE 2020 and thus, doesn’t appear in the images for this step. If you want to get a good look at the clip’s location and orientation follow these links to the corresponding steps in the iFixit guide for the 3rd gen model and Apple's own repair guide.
SE 2022 (3rd gen) Lighting Connector Replacement -- Step 27
Apple iPhone Repair Manual for SE 2022 (3rd gen) -- See bottom of page 49
THANK YOU ! I looked through the photos again and again and didn’t find this little thing on them.. now I finally know where to place it :-)
Fabian -
I agree with the previous comments. What I suggest is to do not remove the taptic engine. It's very frustrating to put back the connector, you have a very little space. If you don't remove it, you still have the space to work with the battery.
-
-
-
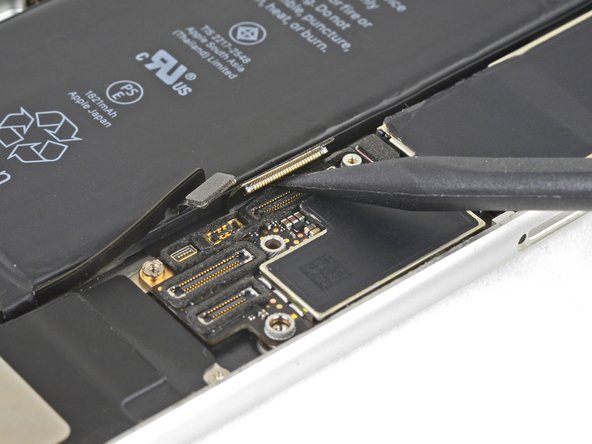
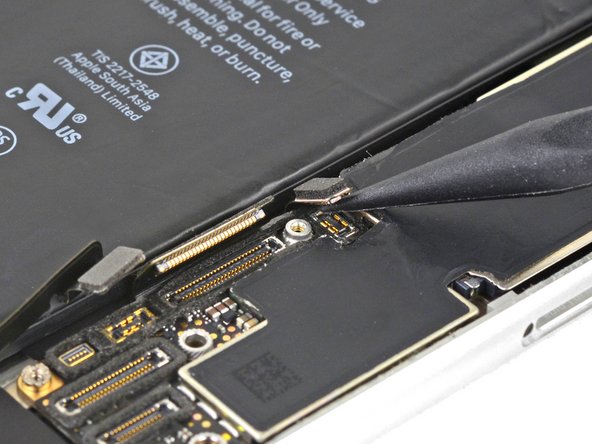
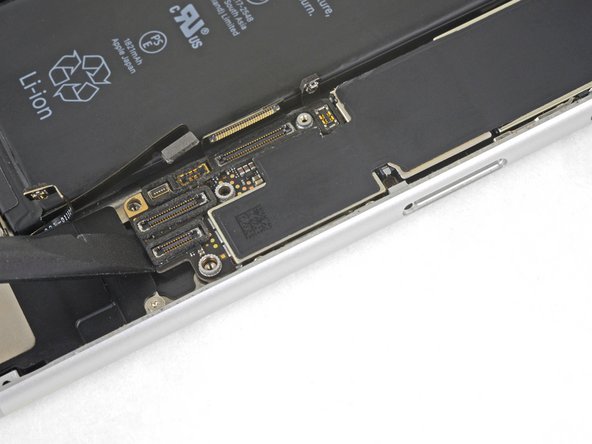
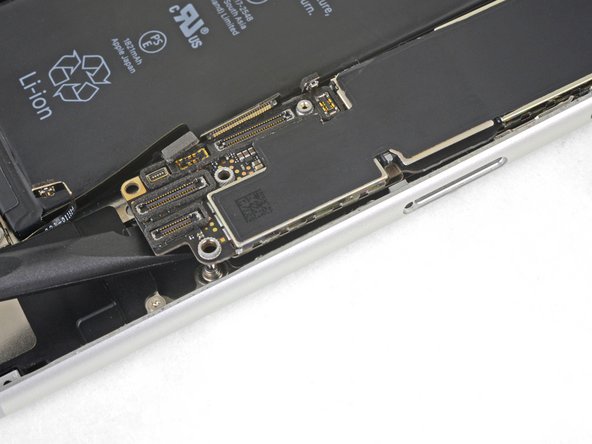
Usa la punta di uno spudger per fare leva sul connettore dell'antenna sollevandolo e allontanandolo dal connettore sottostante.
Just a heads up, I found a small bit of adhesive tape between the antenna cable socket and the connector below.
Yep, I did find it too. Thanks
Hola,
Se me ha roto ese conector pequeño de la antena y no encuentro donde puedo comprar un repuesto. ¿Alguna idea?
Gracias
I also found adhesive between the antenna cable socket and the connector below. I was not able to separate the two (mediocre middle-aged vision and lack of leverage to create the separation), and therefore was not able to fully disconnect the haptic engine. Instead, I gently wriggled the haptic engine out and, leaving it connected, rotated it 180 degrees and out of the way toward the bottom right corner of the phone. I am hoping that I have not damaged the thin ribbon cable. On the up side, for the first time ever I was able to remove the adhesive strips from under the battery (they didn’t break).
I just want to follow up to say that I did not damage the thin ribbon cable connecting the Taptic Engine. I did forget to reconnect it, though. Once I got that straight, it worked fine.
I found that the Antenna cable socket is best to remain attached to the taptic engine cable has i find that it is very easy to brake.
I have in the past also broking the Taptic engine cable when trying to fit it to its sockets. the Taptic engine cable is very easy to brake so would advise that great care is taking when both fitting and removing.
Yep, broke my cable…hoping i can order a replacement taptic engine,,,,phone works without it, but no vibrator or haptics
dave -
What on earth is the secret to reconnecting the Taptic Engine?
I have been messing with it for hours.
-
-
-
Usa la punta di uno spudger per staccare e disconnettere il cavo flessibile del Taptic Engine.
I found that this cable was glued down with similar adhesive to the screen. It pulled away as I removed the taptic engine from the phone (next step).
My taptic engine had two screws on the lh side. still worked the same.
Be really careful here in the reassembly. I managed to rip the cable here, and now best case I won’t have any haptic feedback. :(
I’m sorry to hear that! If you’d like to get that fixed sometime, we do sell a replacement part!
On re-assembly, the taptic engine might not work. Before panicking, ensure that the taptic engine connector didn’t get dislodged when fighting to get the antenna flex reconnected.
on my A1905 iphone 8 - This is not correct!
There is an extra leg coming off the taptic engine’s flex cable with a micro-coax antenna connector going underneath the speaker!
You can’t take the engine off yet!!
I have the same issue and confirm the coax connector under the speaker …. can you buy this Taptic Engine anywhere? The one with the extra leg ?
James -
A hint for reassembly: carefully crease the ribbon cable upwards along the edge of the connector so the stiff ribbon doesn’t touch the engine, pushing the upper connector too far away from the engine to line up with the lower connector. Once the cable isn’t interfering, you don’t have to worry as much about breaking it or having it get in the way. It’s still tricky to get the connectors lined up. I had luck by using one set of tweezers to hold and stabilize the short sides of the upper connector (silver rectangle). I used another set of tweezers (spudger would also work) in my other hand to finesse the connector alignment and push the connectors together. Look carefully at the first photo in this step: the connector is almost exactly centered below the taptic engine screw.
Any suggestion on why the 2.7 mm screw no longer holds down the bracket. 2.9 mm screw works in either hole .but the 2.7 mm no longer secures the bracket, can I swap it out with another 2.9 mm screw?. And where do I find one. Will it work if it’s missing that screw? Space. I have an old iPhone SE maybe I can find 2.9 screw in that . Thanks
Re-assembling the Taptic Engine connector is difficult. After struggling unsuccessfully for 45 minutes I ended up bending up the metal tab on the right side of the phone with tweezers, then with the Taptic Engine tipped on end (not positioned in phone) I could get the cables connected. With the tab on the phone bent upward I was able to slide the mounting tab on the left side of the Taptic Engine under the tab on the left side of the phone case and then bend it back down. This needs to be done carefully to avoid damaging the cable on the Taptic Engine.
Be careful -- there are two cable connectors stacked on top of each other here, and you want to attach the taptic engine to the bottom one. When reattaching the taptic engine connector, make sure that the antenna connector is pulled back -- it is designed to sit right above the connector for the taptic engine, and just by memory it rests back in the same spot. Without reviewing the previous step in reverse, it would be easy to attempt to connect to the top socket, potentially causing damage.
There’s two cables here that are almost impossible to separate. I put some effort on the haptic cable and it immediately sheared off. I have no idea how you’re supposed to properly separate them
The reassembly is very difficult. The connector needs to be closer to the taptic engine than what the stiff ribbon allows. I had to bend the ribbon a bit with tweezers to narrow the gap between the connector and the taptic engine so that the connector would meet with the slot... after I spent half an hour trying to coax it.
I agree with the previous comments. What I suggest is to do not remove the taptic engine. It's very frustrating to put back the connector, you have a very little space. If you don't remove it, you still have the space to work with the battery.
Be careful the taptic engine cable is less then paper thin and tears with less resistance then a peice of paper, use extreme caution!!!!!
i ripped mine and after taking it out and testing the strength of the cable it took less force to tare then tearing a sheet of paper.
there is plenty of room for this cable to be three times as thick with no interference, this is just anti repair design.Taptic engine is hard to put back
Having the phone orientation taptic at the bottom, I used a pick vertically to the right of the connector (to the right of the stand off screw) to align the connector to the right place, then press it into place, glad that the pick is near the exact thickness needed to align the connector
Very difficult to reattach haptic ribbon into socket.
You have to use spluger tip on one side of ribbon connector (wedge on edge of connector) and push it towards the Taptic Engine.
Once the connector pushed against it and while the spluger is still in place holding it in position, then use other hand to gently push connector down to connect
-
-
-
Rimuovi il Taptic Engine.
Where there is the 2,1mm philips srew holding the taptic engine (left), there is a tiny piece of metal under the srewhead. Note its orientation, take it out and dont't lose it taking out the taptic engine, then reinstall it when reassembling. When reassembling, the said fixing hole of the taptic engine is not on top, but has to be pushed under a little metal piece, it won't even fit on top. Then reinstall the tiny metal piece and put the screw in.
So glad someone else mentioned this. This piece may be a late model revision. Looks like it adds additional grounding to a point on the frame. It's easy to misplace!
Demetri -
I damaged the graphite film underneath the battery while removing stubborn adhesive. Can I buy replacement graphite film? Should I remove it altogether since some sections ripped? What purpose does this serve? Thank you for any information.
Hi Anne,
The graphite film helps dissipate heat during wireless charging and to transfer heat out of the battery. It doesn't need to be in one complete piece in order to work—if the film can lay flat, I'd leave it in place.
When putting this back, if yours sounds too loud or odd. tightening the screws is what fixed it for me, don't forget the bottom one where you have to use a flathead screw driver or what they suggested can use if you don't have the screw driver or bit for it. took me a bit to realize i didn't tighten that one. was a pain to get the connector back but see why its useful, the adhesives all ripped on me.
-
-
-
Svita le due viti che fissano lo sfiato barometrico al case posteriore:
-
Una vite a croce Phillips da 2 mm
-
Una vite a croce Phillips da 1,8 mm
-
-
-
Usa l'estremità piatta di uno spudger per scollegare il connettore del cavo della fotocamera sollevandolo verso l'alto dalla sua presa.
-
-
-
Svita le due viti che fissano la staffa della fotocamera posteriore:
-
Un distanziale a vite da 3,0 mm
-
Una vite a croce Phillips da 3,1 mm
The screw and standoff are the other way round in this step. The photo shows the small screw removed and the standoff securing the logicboard is circled incorrectly. Also you may find that the standoff screw is not magnetic, making it a little tricky to replace!
Hi Michael,
You are correct; thanks for catching that! The original image was correct, and for some reason the image was updated, and no longer correct. I have reverted it back to the original image.
These screws are not magnetized! If you are trying to put them back, use some tweezers to align them, and while still using the tweezers, grab your standoff driver and push down, then you can screw it in with ease.
Thanks for the tip.
Habel -
-
-
-
Svita le due viti che tengono in posizione la staffa del cavo superiore:
-
Una vite a croce Phillips da 2,9 mm
-
Una vite a croce Phillips da 1,3 mm
Logically - one wouldn’t need to take out all these things to take out something at the bottom of the phone - but in order to get good access to it, you must remove the logic board - which is long and all the way up at the top connected to the antenna. Follow the steps - it works.
-
-
-
Svita le tre viti a croce Phillips da 1,3 mm che fissano il componente antenna superiore sinistro.
-
-
-
Rimuovi la vite a croce Phillips da 1,4 mm che fissa il componente antenna al bordo superiore del case.
Be careful not to strip this screw...I did and I'm going to try to proceed without taking off the antenna component.
Update: You can still go on with the replacement if you do not take off the antenna component
I think this screw is stripped on my iPhone , shittt. So I can just skip this part? or what?
If you can avoid putting in battery after this screw, that’ll be easier. I wound up using bit only with my fingers to get an initial thread going.
-
-
-
Togli il componente antenna.
-
-
-
Svita le due viti a croce Phillips che fissano la clip di messa a terra al bordo superiore sinistro della scheda madre:
-
Una vite a croce Phillips da 1,5 mm
-
Una vite a croce Phillips da 2,6 mm
-
-
-
Rimuovi la clip di messa a terra.
what happen if don't put this part?
Hi Albert,
It’s hard to tell. Most phone functions will probably work, but you may start getting quirky problems.
If it comes out it must go back in *no spare parts *
J'aurais plutôt dit "...le câble de mise à la masse"
Bonjour @roroancet, merci beaucoup de votre remarque ! Cela nous a donné l'occasion de plonger dans l'univers de l'électricité ! Il s'avère ainsi que la mise à la masse est le terme approprié ici. J'ai corrigé notre erreur. La prochaine fois, n'hésitez pas à le faire vous-même. iFixit est un wiki modifiable par tout le monde. Encore merci pour votre attention !
-
-
-
Svita le tre viti che tengono in posizione la scheda madre:
-
Una vite a croce Phillips da 1,8 mm
-
Un distanziale a vite da 2,5 mm
-
Un distanziale a vite da 2,2 mm
The One 1.8 mm Phillips screw was buried under some gasket material. It took some twezzer work to get that material off.
this is probably the most difficult part because the ‘top 2.5 mm on my version was under a piece of ribbon cable that had to be pulled back. Also notice - this picture is inverted. So the locations are reversed (obviously for clarity)
Buried 1.8mm Phillips easily located under the gasket material by zooming in on the photo to see position relative to connectors. Material is fibrous, so be patient.
I’ve been searching on internet about the black stickers on those parts in the phone and I found nothing about them, what are they? Electrical Tapes? Does it make any differences if we remove them? If yes is, there anything else we can use to replace them? We’re they are for any specific purposes? Thanks in advance if anyone can help me understand
-
-
-
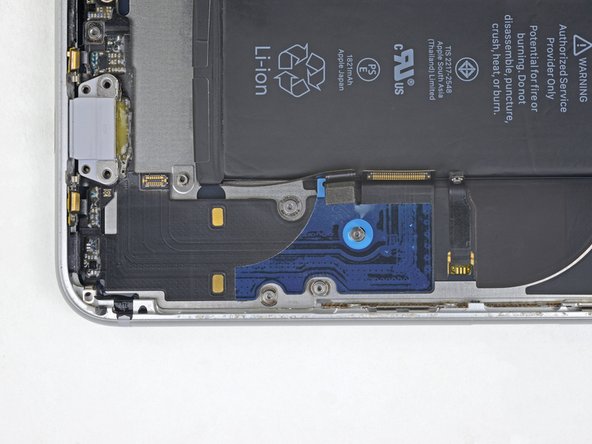
Usa la punta di uno spudger per sollevare e scollegare il cavo del connettore Lightning dalla scheda madre.
Replacement tip - be sure to prepare a U-shaped bend into your new flex cable at this connection prior to installing the adhesive-backed flex cable.
I did not think of this and as a result when I get to reconnecting this part to the logic board, the flex cable had a lot of spring in it and wanted to rebound and lay flat (as it was shipped.) This step really should emphasize how important it is to get that bend formed into your new flex cable.
On reassembly seems to be impossible to make this connection. Male and female don’t seem precisely lined up, even though I lined up the screw holes with this component and followed all the instructions carefully. And if not precisely lined up, then it’s impossible to get this long connector to stick. Seriously disappointing.
Die schlimmste Connection an allen Iphones.
Konnte beim Iphone 8 gerade so, den neuen Connector anschliessen. Nach 6 versuchen und die ganze Klebeverbindung lösen. Das Flexkabel will zurückspringen und der neue Connector muss so exakt montiert/geklebt werden. Habt hier viel geduld!
-
-
-
Con la punta di uno spudger solleva e scollega il connettore della bobina di ricarica wireless.
-
-
-
Adopera l'estremità piatta dello spudger per sollevare con cautela la scheda madre dalla parte del connettore della batteria.
-
-
-
Afferrandola dai suoi lati, solleva la scheda madre vicino al connettore della batteria e toglila.
-
-
-
Svita le due viti che fissano l'altoparlante alla cover posteriore:
-
Una vite a croce Phillips da 1,5 mm
-
Una vite a croce Phillips da 2,1 mm
I beleive at this step you should illustrate the importance of watching that antenna cable next to the speaker. It can easily ‘pop’ off of its co-ax connector when removing the speaker. Mine did and i was wondering where the extra part came from. And reconnecting it IS A NIGHTMARE!!! If you get it alligned correctly I found a metal bit with the same diameter of the co-ax socket needs to be used to press the connector into place, but it never ‘clicks’ or pops so you have to assume its connected when it dosent fall back off
I had a similar issue as Dave. What worked for me was attaching it to the component before installing the whole charging port into the phone’s frame.
-
-
-
Rimuovi l'altoparlante.
-
-
-
Svita le tre viti che tengono in posizione il cavo del connettore Lightning:
-
Una vite a croce Phillips da 1,3 mm
-
Una vite a croce Phillips da 2,2 mm
Pas une, mais deux vis cruciformes de 2.2mm
Oups, vous avez décidément un œil de lynx :) Merci beaucoup pour la remarque ! Je viens de corriger le texte.
-
-
-
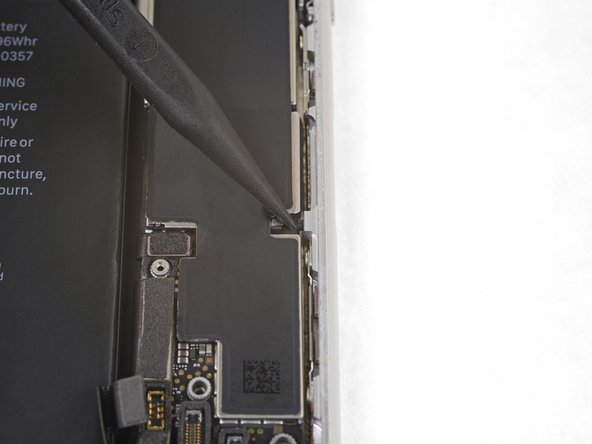
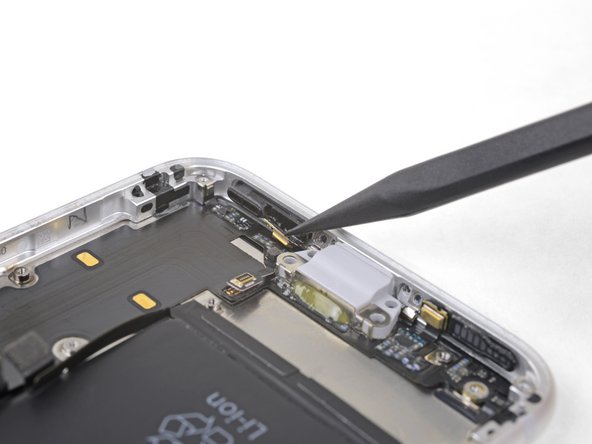
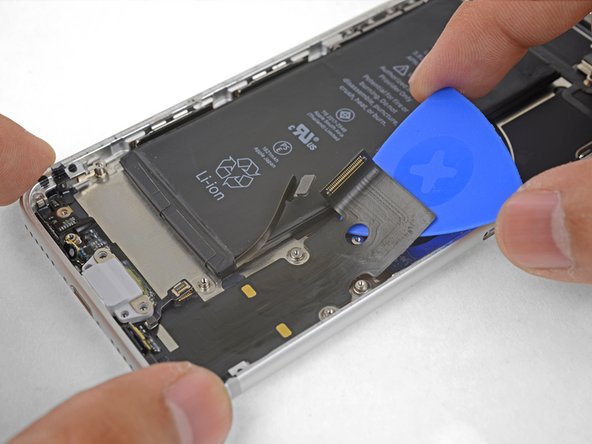
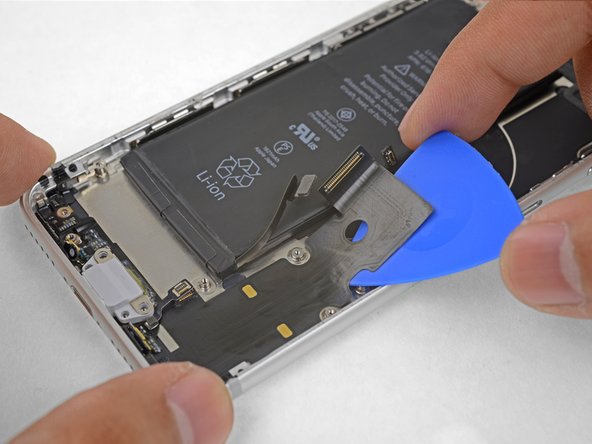
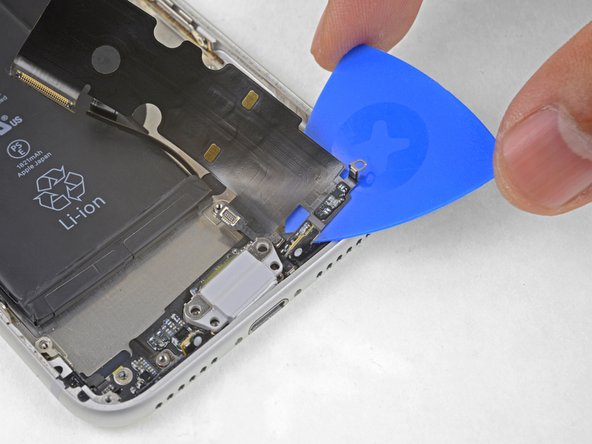
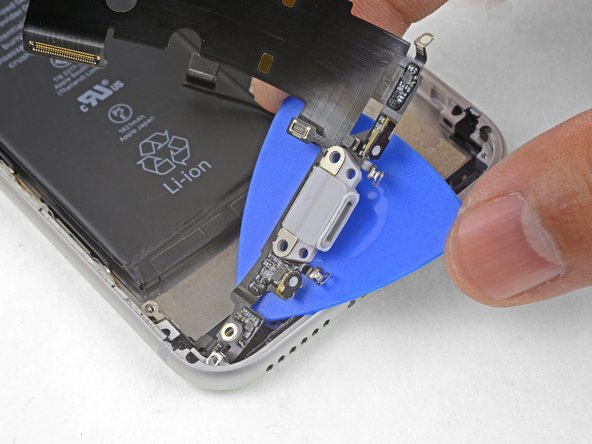
Usa la punta di uno spudger per sollevare con cautela il microfono dal lato della scheda madre e staccarlo dall'adesivo che lo tiene in posizione.
Be patient and use a heat source I used a hot/cold ice pack. When trying to separate, I used the pointed end of a spudger, rolling it between my fingers as I started in the corner as shown in the pictures. With my left thumb, i held the black plastic bracket in place (the chamber where the speaker goes out of the bottom).
I applied a steady pressure against connector with plastic tool and it slowly gave way. I didn’t use heat.
-
-
-
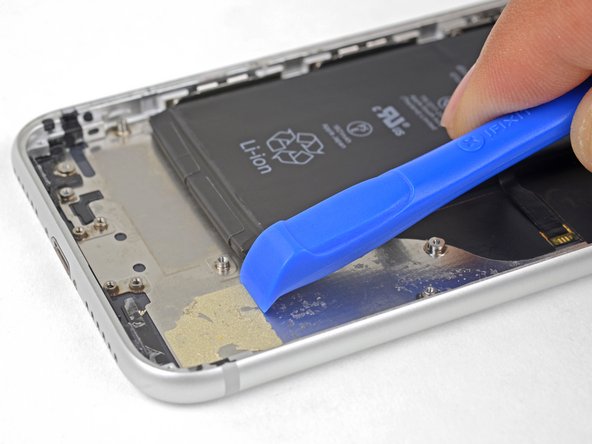
Applica un iOpener riscaldato sulla parte inferiore del telefono, angolandolo come illustrato. Aiuterà a far ammorbidire l'adesivo del cavo flessibile.
-
-
-
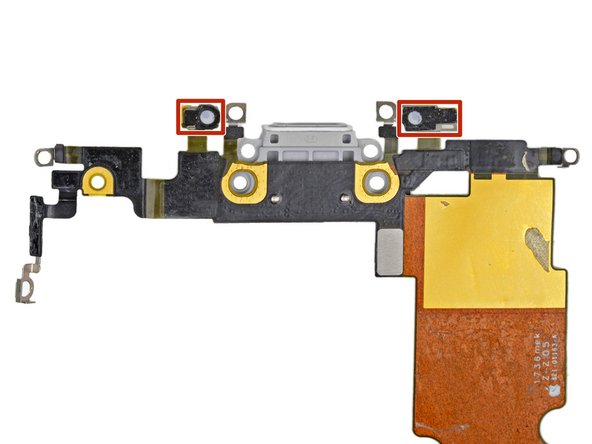
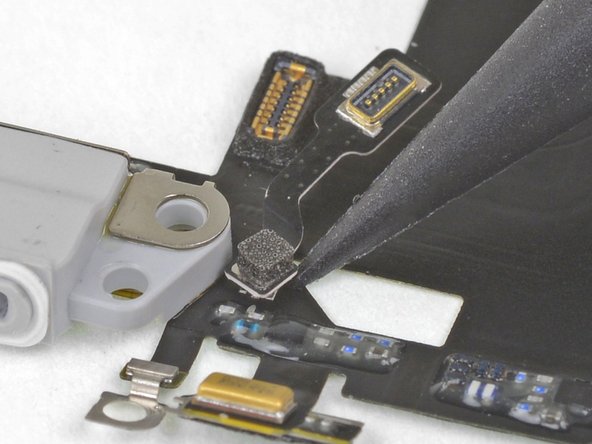
Anche il piccolo pezzo di adesivo sotto ogni microfono protegge il tuo iPhone contro l'intrusione di acqua e polvere. L'ideale è sostituire i due pezzi di adesivo prima di installare il tuo gruppo connettore Lightning.
If you need to replace the adhesive patches shouldn’t they be recommended and sold/included?
Hi fotoband,
Our replacement part should have the adhesive pre-attached and ready for use.
i'm installing this part right now, and it definitely does not have the adhesive pre-installed. my phone will no longer be water-proof after i finish this repair. i whole heartedly agree that that adhesive should be pre-installed.
more-over, the small nightmare antenna connector should DEFINITELY be pre-installed on this piece. having to take a tiny component off the old part to reinstall onto the new part is outrageous for this kind of thing, especially with how high a chance you have of just destroying the small component or the new part. it's kinda ridiculous
Die Anleitung ist klasse, aber “benutze die Spudgerspitze, um das Kabel von der alten Lightning Connector Einheit hochzubebeln und auf die neue zu übertragen” ist mit Abstand der schwierigste Teil der ganzen Angelegenheit. Die ganzen Teile und das Werkzeug alles super, aber dann nehmt 5€ mehr und macht an die Lightning Connector Einheit direkt den Konverter ran. das ist so winzig und fummelig, dass ich an dieser Stelle wahrscheinlich die neue Connector Einheit oder zumindest den Antennenkonverter zerstört habe. Schade
I don’t understand how to change the antenna converter cable. I can pry it off of the old part just fine but it doesn’t click back to the new part? Do you actually need to solder it together?
The cable has a coaxial connector and can be slightly tricky to click back. Make sure to align it properly and press it down firmly with your fingers.
Ahhh… the antenna convertor cable is a NIGHTMARE to re-connect. You need to get it alligned correctly with a pair of tweezers, then I found a metal bit/rod of the same diameter as the co-ax socket and needs to be used to press the connector into place with a stright downward motion, but it never ‘clicks’ or ‘pops’ into it’s proper seating, so you have to assume its connected when it dosent fall back off of the lightning connector plate. THEN, reconnecting the taptic engine right over top of its connector runs the chance of popping the antenna connector back off again. Its a frustrating battle that you need to be fresh for…not at 1AM
The tip with the tweezers really helped me out! Thanks for sharing that!
I was not able to stick the converter cable on the fresh lightning unit, while it stuck back on the original one without issues.
Blunt metal tweezers did the trick. @ifixit: Please make that an extra step of the guide!Well, I thought this was going pretty well, but I’ve just destroyed my new part and the antenna cable trying to mate them together. Not sure this repair is “moderate” enough for me.
Is this piece (the aforementioned tricky converter cable) the cellular antenna? I’m trying to identify which component actually receives the cellular signals. If it is removed and/or left off, Will this completely disable the cellular connection?
This piece looks to convert a coaxial antenna socket into a press connector. If this is removed, whatever antenna this is connected to won’t work.
This part sucks. I got it on once with a nice click, but it flew off when gently touched by another piece. After that, it seemed to not go on again, no more reassuring click. I tried for hours to line it up. So I got it to where it seemed to connect close enough and hot glued it. Terrible, but it works.
My microphone isn’t working when I talk through earpiece or more it’s super muffled, but I sound clear as day when on speakerphone, is there something I can do to fix that? Did I put the lightning connector wrong?
DO NOT: install your RF connector before you’ve installed the lightning connector assembly.
DO: install the Lightning connector assembly into place first, then with a pair of blunt tweezers position the small antenna converter into the general place (not necessarily aligned) and adjust as necessary. I used touch to feel it was positioned correctly, then with bright light and magnification I verified the position. I squeezed the connector into place with the tweezers. With one side of the tweezers on the connector and the other side behind the phone I squeezed the connector into place.
I broke one assembly in the process. Not easy.
I spent an hour or so trying to re-install the antenna converter cable to the new Lightning connector, without success, though it snapped back onto the old part just fine. The new part's lack of ANY 'feel' of the coax aligning set off my alarm bells. I did not want to push straight down too hard and do damage. I removed the sponge pad on top of the coax connector so there's something a little more stable to push on, and using a .093" dia. punch to get a good vertical, square push - nope. Nothing to lose now, so I tried the suggestion to install the Lightning connector assembly first. Nope. The square end of the cable's flex sure looked centered over the coax on the new part, so I slowly increased pressure. Now the new part's coax looks worn and mangled, and never STARTED to seat. Sure looks to me like a diameter mismatch between Apple's OEM and this aftermarket part's coax. VERY DISAPPOINTED. My phone is toast without Lightning AND wifi! Should I risk buying another kit?
After a couple of failed attempts, I realized after careful examination that the antenna converter cable still had parts of the old part’s coax on its connector. I removed this with a pair of tweezers and succeeded in connecting it to the new part with less trouble than expected after reading this comment section. Might help someone!
-
Confronta la tua nuova parte di ricambio con la parte originale: prima dell'installazione potrebbe rendersi necessario trasferire alcuni componenti dall'una all'altra o rimuovere dal ricambio eventuali elementi adesivi.
Per rimontare il tuo dispositivo, segui queste istruzioni in ordine inverso.
Porta i tuoi rifiuti elettronici a un riciclatore certificato R2 o e-Stewards.
La riparazione non è andata secondo i piani? Vai alla nostra Comunità Risposte iPhone 8 per trovare aiuto nella risoluzione dei problemi.
Annulla: non ho completato questa guida.
Altre 109 persone hanno completato questa guida.
Un ringraziamento speciale a questi traduttori:
100%
Questi traduttori ci stanno aiutando ad aggiustare il mondo! Vuoi partecipare?
Inizia a tradurre ›
29 Commenti
I love how you mention the “antenna converter cable” twice but never show what the &&^& that part even looks like??
Sorry about that! It’s actually shown in the 3rd image in the last step. I cropped the photo so that it’s zoomed in more to show it.
I would HIGHLY recommend not attempting this fix. I have done a variety of repairs on iPhones (screens, batteries, etc.) and decided to try this to address a broken microphone. I could make regular phone calls but couldn’t use speakerphone or FaceTime. After replacing the lightening charger using the instructions and the iFixit parts, I still can’t use the speakerphone or FaceTime function. To make matters worse, my phone won’t charge through the lightening connector, won’t wirelessly charge, and people can’t hear me even when I make a regular phone call anymore. In other words, I started with one fairly minor problem and, due to this repair, have a whole bunch of new (much more significant) issues. Don’t make the same mistake I did.
Don’t know about the charging issues, but the reason replacing the microphone didn’t help is because you replaced the wrong microphone.
iPhone 8 has 3 mics.
- One for regular phone calls - which is the one you replaced
- One for the front-facing camera - which is used for the speakerphone and FaceTime and is located near the earpiece
- One for the back-facing camera
Excelente guía..!!
It the port paired to the phone? like Touch ID, or can you just replace it without and issue?
Hi Robinson,
The port is not paired to the phone.
Phone doesn’t turn on. Is there any other tips??
Hi Carl,
You can try some common troubleshooting tips. Hopefully that will resolve the issue. If not, please browse and post on our Answers forum.
Excellent guide. Took just over 1 hour to complete, phone charges and earphones work again. This is my daughters phone so she is very happy.
Repair completed using this guide and the iFixit kit. Took me quite a bit longer than 2 hours (I spent almost an hour making sure ALL the old glue was off before fitting a new seal!) but with the help of the magnetic project board the job went perfectly and I can now charge my phone again. Speaking of the project board, I would consider this an absolute essential to complete this job. The phone has to be pretty much taken apart and you end up with a multitude of differing length/type screws which are easy to mix up….and it’s not that easy to tell a 1.2mm screw from a 1.3mm screw!
Well, that was a pain in the ass… But it works!:)
Does anyone know where I can get the small “antenna converter cable”? Sadly, mine broke and it’s seems to be near impossible to just get the converter cable…I know that the wifi works without it, but I’d rather replace the broken thing…
Thank you for putting this together. The Youtube videos are so fast, you really need the pics and instructions. It was greatly appreciated!
Well, this was by far the hardest repair I’ve ever done. (I’m pretty comfortable with these types of repairs and have done 4-5 screen repairs and home button replacements.) It took about 5 hours. (I had a few mishaps where something was reassembled under something else and I had to take it back apart to get it to seat correctly.) I managed to sever the taptic feedback engine ribbon cable and I couldn’t get the antenna back in, but my phone still seems to make and receive calls with decent signal, use WiFi, and use cellular data, so I’m not exactly sure what that does.
So, TL;DR, the phone dropped in water and wouldn’t charge. Now it does charge, but the haptic feedback on the home button doesn’t work, and I’m guessing it won’t have as strong a signal due to the antenna loss. But it was probably worth it for a ~$20 part instead of replacing the phone for ~$200.
I’ve done a number of iPhone batteries, screens, and even other lightning connectors. This repair is a big job, with almost all of the phone components being removed to replace the lightning connector board. This was also my first iFixit repair that was unsuccessful. At the end of about 5 hours of work and troubleshooting, I was left with no use from the lightning connector, no cellular signal, and a phone stuck in a reboot cycle. I am relatively confident in my work and reassembly and it was quite possibly a faulty part—but at the end of the day I was at a point where I can’t wait days and days for replacement parts to further troubleshoot.
Instructions on this were mostly clear, though there are gaps in the reassembly as there are no specific photos or written directions for the replacement screens and seals around the microphone/speakers/etc. You can see how the old parts were installed, so not a big issue.
I agree, this is a BIG job, especially when doing it three times. I missed “You may need to transfer remaining components…“ in Step 66 and in the Conclusion so back tracked to transfer the tiny wifi flex to charging port transition cable from the old part. New part didn’t allow the phone to charge! Took it back apart and reassembled then it wouldn’t even power on. Disassembled it one more time , put the old part back in, and it worked like it did before - lightening cable won’t stay plugged in.
Ordered a replacement for the replacement part. Also had to order the transition cable (from Repairs Universe, by the way). This cable is very small and fragile and a PITB to connect.
So I’ll try this one more time once I get the parts and forget how difficult this was.
Could not - would not! - have done this without Arthur Shi’s guide. Thank you for the time you spent making it!
That “antenna converter cable“ is a nightmare to transfer over. The circular connector on it enlarges once taken out and now it is so loose that it is impossible to reattach it to the new lightning assembly! I Guess i will be leaving that one unattached. Does anyone know the exact function of that one? Frequency? Does it carry wifi or cellular signal? The iphone seem to work fine without it.
Thanks for that awsome Guide. After there were no spoken messages or face time calls possible due to a not working mic, the change of the connector part was done in approx. 2h. Now everything work quite well.
One which helps me a lot was to connect the connector to the main board before that was re assembled and the flex band was fully glued to the frame. So the position was given by assembling the mainboard and it works perfectly. In the first round the connector was slightly out of position, which ends in a not working mic and charging function, but after re-assembling it with the right position it works.
This took way longer than the 1-2 hours they stated, however this is only my 3rd phone repair and definitely the hardest repair I've done yet, but the guide was definitely complete, and if anyone is reading this, don't be discouraged by the difficult comments, it definitely wasn't as hard as it seems, just very long and very tedious. Side note, this is a great time to replace the battery also, since the taptic engine has to come out anyway.
I got to the last step of re-attaching the antenna converter cable, and the co-ax connector on the new lightning connector piece got bent while trying to press it together. I take responsibility for my own handiwork – but why does the replacement piece not come with the antenna converter cable pre-attached? It's such a finicky and delicate piece that as others mentioned above, is quite difficult to connect properly. This would be a good change for the next iteration of this.
It would be a good idea to mention how to plug in the micro coaxial connector, which is not supplied with the spare part. It is so tiny that it is very difficult to plug it.
Great instructions. 2 hours to complete (installed new battery at the same time) and phone is working great again.
it's somehow easy to take it apart but with a guide I was able to perfectly put it back on without missing anything and also without an headache!






















Prolly goes without saying, but should you power off phone before this step?
jklue - Replica
If you are merely swapping the SIM card, you don’t need to power off your iPhone. If you plan to do any repairs that involve opening the phone, you should definitely power off your iPhone.
Arthur Shi -