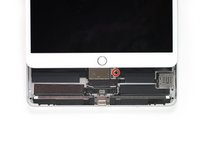
Introduzione
Segui questa guida per rimuovere o sostituire lo schermo di un iPad Air 3, sia per il modello WiFi, che per quello cellulare.
Il sensore del Touch ID del tasto Home è associato alla scheda madre. Per mantenere la funzione Touch ID, dovrai trasferire il tasto Home originale sul nuovo gruppo dello schermo.
Alcune immagini in questa guida sono di un modello diverso e potrebbero mostrare alcune leggere differenze visive, ma non influiscono sulla procedura della guida.
Cosa ti serve
-
-
Potresti dover riapplicare il calore ripetutamente durante questa fase per non lasciare che la colla si raffreddi e si indurisca.
-
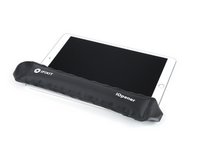
Prepara un iOpener e posizionalo sul lato inferiore dello schermo dell'iPad per circa due minuti.
-
-
Attrezzo utilizzato in questo passaggio:Clampy - Anti-Clamp$24.95
-
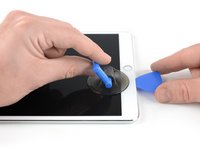
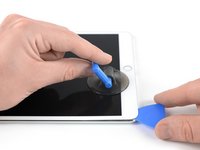
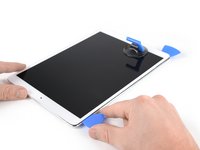
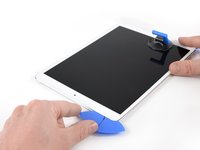
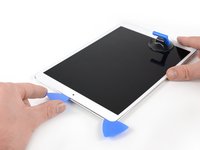
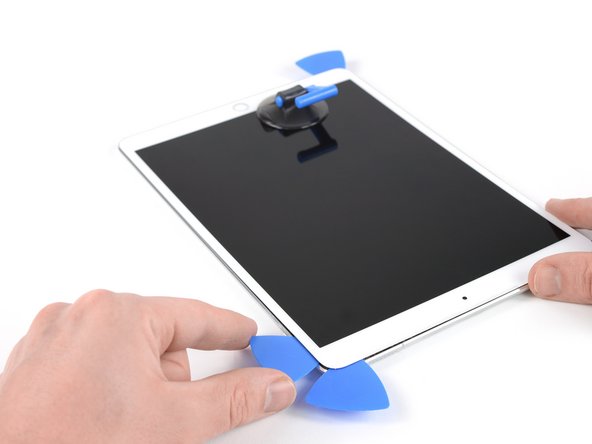
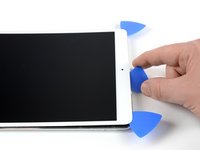
Disponi una ventosa vicino al tasto Home dell'iPad e premila in modo da farla aderire bene.
-
Tira con decisione la ventosa per creare una piccola fessura tra il pannello anteriore e il case posteriore.
-
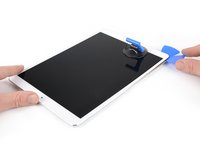
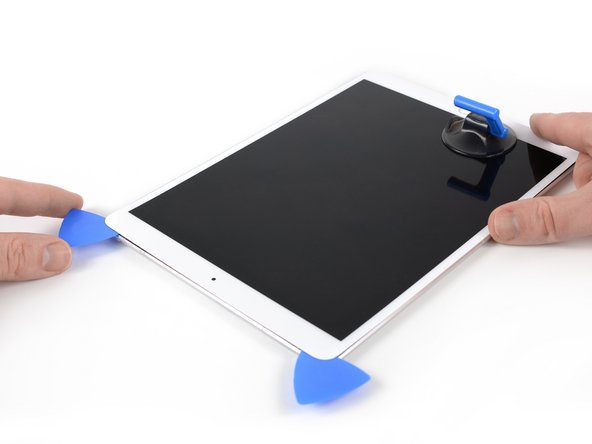
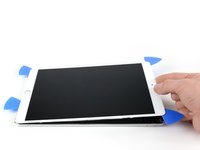
Una volta che hai ottenuto una fessura sufficiente, inserisci un plettro di apertura nella fessura stessa.
i used a proper suction tile puller (small one from DIY store used to hold bathroom tiles) to lift the screen off after heating around the edge using a heat gun. Be careful - It didn't damage anything. The tiny suction things that come with those iPhone kits are not strong enough for this. The one in picture might be good, but looks similar to the kits ones that have key ring.
The suction cup that comes with the iPad battery replacement is plenty large enough and strong enough.
CAUTION, do not push the picks in more than a the width of the replacement screen adhesive strips. You will damage the $200 screen, maybe break the glass. The screen is multiple layers and the picks can get in-between the layers if you push too far in. I got into trouble at the lower left corner. After getting the screen loose, I found that I only need a 2-3 millimeters on the sides and bottom, and four or five millimeters in the corners.
These comments need to be highlighted and added to the guide. The pictures showing the pick placement are very misleading. The thickness of the adhesive is only 2mm as you had mentioned! Waiting now for my replacement screen. Apples products look amazing but now I realize I would have been way better off just living with a one hour battery and or buying a new ipad.
-
-
-
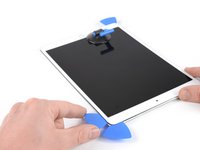
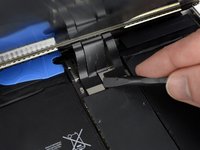
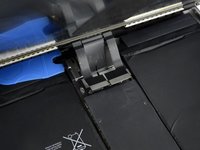
Fai scorrere il plettro sotto il bordo dello schermo verso l'angolo in basso a sinistra per tagliare l'adesivo.
-
Lascia il plettro in questa posizione per il momento, per evitare che l'adesivo si reincolli.
-
-
-
Scalda il bordo sinistro dell'iPad per circa due minuti, o finché non è lievemente troppo caldo per essere toccato.
-
Se necessario scalda di nuovo il tuo iOpener. Stai attento a non surriscaldare il tuo iOpener o potrebbe scoppiare.
-
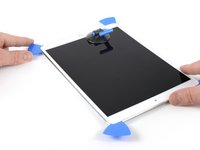
Infila un secondo plettro sotto l'angolo in basso a sinistra dell'iPad.
-
Fai scorrere questo plettro sotto il bordo sinistro dello schermo per tagliare l'adesivo.
-
Lascia il plettro vicino all'angolo in alto a sinistra dell'iPad per evitare che l'adesivo si reincolli.
-
-
-
Scalda il bordo destro dell'iPad per circa due minuti, o finché non è lievemente troppo caldo per essere toccato.
-
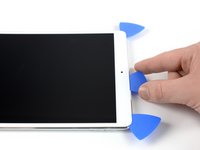
Infila un quarto plettro sotto l'angolo in lato a destra dell'iPad.
-
Fai scorrere il plettro sotto il bordo verso l'angolo in basso a destra per tagliare l'adesivo.
-
Fai scorrere il plettro attorno all'angolo in basso a destra (fermandoti per riscaldarlo se necessario) e taglia l'adesivo rimasto sotto il bordo inferiore, ma fermati prima del tasto Home.
We must be very careful when we are prying left and right size bezel to peel off the screen as there very little gap between edges and LCD. Slightly inside push can crack LCD. We need to pay full care and raising edges very very slowly.
-
-
-
Infila un quinto plettro sotto il bordo superiore accanto (non sopra) alla fotocamera frontale.
-
Fai leva delicatamente con il plettro per separare lo schermo dall'iPad.
-
Se necessario, scalda e/o taglia l'adesivo che tiene ancora fermo lo schermo, se ne è rimasto.
Be very gentle when twisting. My screen broke in this step. I would not twist it but try to remove glue further as there is a aluminium support of the screen in the wide area beneath the light sensors and there is glue on that also preventing in easy lifting the screen. Just be careful not to damage the light sensors and camera.
-
-
-
-
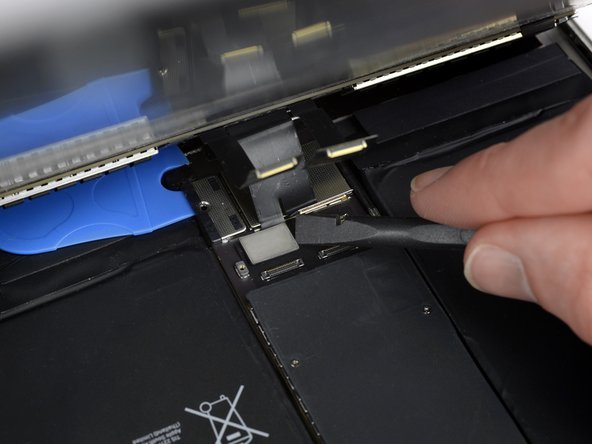
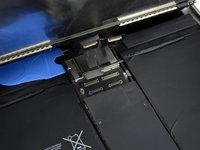
Solleva lo schermo dal suo bordo superiore e fallo scorrere verso l'alto dell'iPad (verso la fotocamera frontale e la presa jack) fino a rivelare la vite in basso che tiene fermo il connettore della batteria.
How do you go about getting to this battery connector as it is covered by a large metal shield above the logic board, if you do not disconnect the battery you risk frying the back light.
The metal shield is not relevant for this. You can leave it in place or remove it if it comes of. Once the screw of the plate is removed you will be able to lift the print a little bit and put someting between the battery connector and the board connector. The connector is beneath the print. Look further on to see a deck card is used for this.
-
-
This picture looks nothing like my A2152 battery connector. I can’t really tell what is happening here.
This is an iPad Pro not an iPad Air which is different.
Dan -
-
-
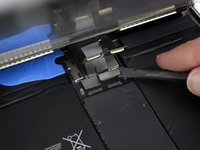
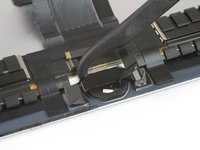
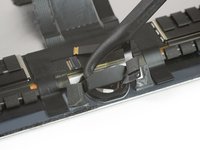
Per scollegare la batteria, infila un dente del blocca batteria o la punta di un plettro di apertura sotto il connettore della batteria per assicurarti che non faccia contatto.
-
Lascia il blocca batteria al suo posto mentre lavori.
I found it very hard to fit something under the battery power connector. I did not have a battery blocker, so I tried a playing card. I was not able to slide it between the springs. The section of the battery power connector, above the cantilever springs, did not seem to want to give at all, like in the picture above. If other people had success, I would love to hear how.
I didn’t have success either, but i kept myself grounded, and avoided battery contact as much as possible.
I used a playing card cut to shape. I had to make a couple, to try a few times.. It does go in eventually. Not deep, but enough to break connection. You can test by trying to switch on iPad.
It took some time but I was able to get it under the back part and slide it forward.
You must disconnect the battery before plugging the new screen. I think i didn't break the circuit in first attempt and shorted the screen, the result was half of the screen didn't work. I used a playing card. Second attempt was successful with new screen.
I believe I have a good solution to this problem. I was dissatisfied with the thickness of the battery blocker, or even a thin guitar pick, for that matter; both required force and I feared bending the springs or leaving the connection intact.
What worked for me was cutting a small strip of non-conductive, static-proof film (the kind that RAM and other sensitive components come in). There was every reason to trust in its non-conductivity but just to be sure, I used a VOM to test; its resistance was out of the VOMs range, meaning that its conductivity was nil. I used a spudger to gently lift the logic board off of the battery contacts and slid the non-conductive strip in between; went without a hitch.
When reassembling, I laid the strip on the battery contacts, laid the logic board on top, installed it, connected the display panel and gently drew the slip out and installed the battery screw. Worked like a charm.
These are some extremely misleading set of instructions and picture. Much better if you have the battery discharged, so don't need to worry about blocking the connector. But DO NOT force anything in the through the socket and certainly do not try to bend up the soldered cover, as it appears to be happening in the picture. You will break the connector, most likely resulting in ipad shutting down every 3 minutes from the notorious "thermal sensor missing" panic system crash.
-
-
-
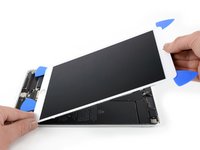
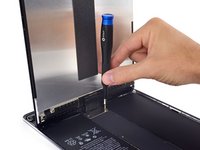
Solleva lentamente il bordo superiore dello schermo, stando attendo a non strappare i cavi a nastro ancora connessi.
-
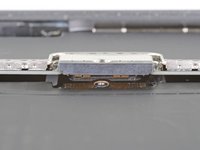
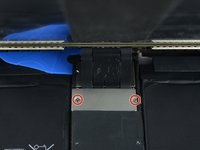
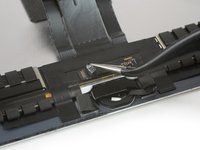
Svita le due viti a croce Phillips da 1,3 mm che tengono ferma la copertura dei connettori dello schermo.
-
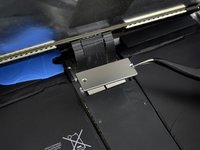
Rimuovi la staffa di copertura dei connettori dello schermo.
Here it is very precocious steps to do. Flx cables to connectors are small in size and we cannot lift the display vertically. Therefore, we may struggle to unscrew the metal shield. We need to use smaller size of philip screw driver or place vertically the display to create enough gap between philip screw driver and the cover bracket. Similarly, when we are replacing new display we need to be carefully connect four flex cable with connectors with logic board.
agree, with re-assembly very tiny screws and awkward positioning, the back two cables pop off if not careful.
I did this step using just the tip of the PH000 screwdriver, it made it much easier to get my hands into the small space, the replacement screen from ifixit had tighter cables that I was not comfortable stretching out to go to a 90* angle to screw back on. Make sure your tip is magnetized for best results :)!
Meaning no disrespect for this excellent guide, I found this photo to be a bit misleading; at least in my case. It clearly shows about 90˚ between the case and the display. I tested the limits with the one I was repairing and could find no way to raise the display far enough to clear a screwdriver without jeopardizing the cables. I resorted to the same solution that Amber Wooldridge discovered; using a PH000 bit and hand-tightening. I had a tiny needle-nosed plier that I used to tighten them a bit (but very gently).
-
-
-
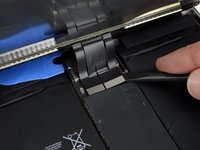
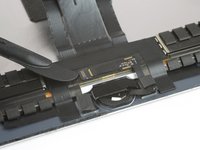
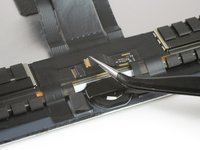
Usa uno spudger per scollegare i due connettori visibili facendo leva delicatamente e sollevandoli dalle loro prese.
-
Per ricollegare i connettori a pressione come questo, allinea attentamente e premi su un lato finché non scatta al suo posto, quindi ripeti per l'altro lato. Non premere nel centro. Se il connettore non è allineato correttamente, i contatti si possono piegare, causando danni permanenti.
-
-
-
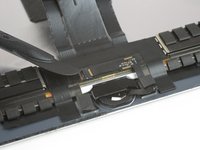
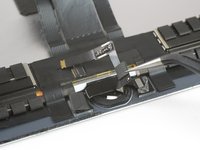
Usa il tuo spudger per fare leva e scollegarli.
I went to replace the LCD assembly on an ipad Air 3, and one of the flex cables on the new LCD assembly broke in half. The flex cables on the old assembly work well and are intact. Is it possible to transfer the old flex cable(s) to the new assembly, or can I solder the broken pieces of the new flex cable together? I have also contacted the part supplier about this and am awaiting a response.
-
-
-
Rimuovi il gruppo dello schermo.
Definitely test your iPad’s functions before sealing it up. I needed to reopen the display to reconnect the display connectors in order to have the display functioning properly. As a result, the adhesive strips did not work as well and I needed to tape some of the edges closed with a small section of strong clear packing tape.
I stuck the adhesive to the chassis first. That was messy because the plastic that covers the adhesive seems to be for screen side first. So you end up exposing both sides and those collect dust. I now realise you're supposed to put the adhesive on screen first. Not sure if it would have made much difference in the outcome (mine screen is not stuck in some places).
I found this out too. I had two sealing kits and they were both meant to be fixed on the screen first. I did not managed to get the screen to stick with the body as well. Now used some B6000 glue in addition.
agrior -
-
-
-
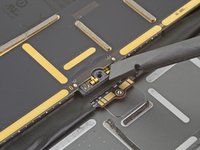
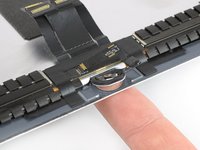
Usa il tuo iOpener o un asciugacapelli per circa un minuto per scaldare la zona del tasto Home per ammorbidire l'adesivo che tiene fermi i componenti del tasto Home.
-
-
Attrezzo utilizzato in questo passaggio:Tweezers$4.99
-
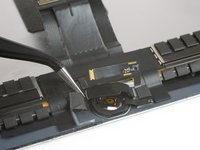
Usa un paio di pinzette per rimuovere il nastro che copre il connettore ZIF sopra il tasto Home.
-
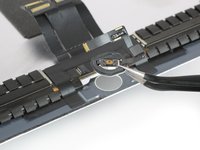
Usa la punta di uno spudger, uno strumento di apertura, o un unghia per ruotare verso l'alto la piccola aletta di bloccaggio incernierata sul connettore ZIF del cavo del tasto Home.
-
-
Attrezzo utilizzato in questo passaggio:Halberd Spudger$2.99
-
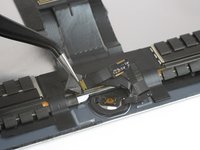
Rimuovi delicatamente la staffa del tasto Home infilando il gancio di un spudger halberd o la parte piatta di un normale spudger sotto la staffa stessa e facendo leva delicatamente verso il bordo inferiore dell'iPad.
-
-
-
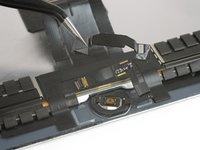
Solleva la staffa del tasto Home iniziando dal lato sinistro.
-
Tirala attentamente verso l'alto, verso lo schermo, assicurandoti di non danneggiare il cavo a nastro del tasto Home.
-
Gratta via quanto più adesivo puoi, quindi puliscilo con dell'acetone o dell'alcool isopropilico ad alta concentrazione (>90%).
-
Fissa la staffa con della colla resistente, della super colla, o del nastro biadesivo resistente. Assicurati che la staffa sia allineata correttamente prima di lasciar far presa all'adesivo, o il tasto Home non si premerà.
You cannot use Tesa or double side tape under bracket. There is some greater technique or material we need to use. I tried super glue even, though, I really not work what original clicking sounds. It happens almost all digital home button related all iPad. We need to strive to find its accurate solution.
What width/size Tesa tape (mm) do we require?
I ordered tesla tape without noticing the width and ended up with 2mm tape. I used three strips of it for this step, so 6mm would be perfect for the home button bracket. Having said that, the 2mm size is probably better if you need it for attaching the display, but I never needed it for that because I loved how the pre-cut adhesive strips in step 16 worked really well.
hdh607 -
-
-
-
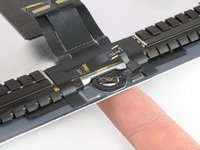
Usa la punta di un dito per premere il tasto Home e spingerlo delicatamente attraverso il lato anteriore dello schermo.
-
Rimuovi il tasto Home.
When we lift home button at very last stage, there is also ring/round plastic bracket that we need to peel off and re-attached to home button when transferring to the new display.
Do you glue the plastic ring on both sides , So is it glued to the lcd but also to the home button ?
Thanks for the tutorial, but it ends way to soon. The instructions on installing the new home button are vague, and there is nothing about when to remove the battery blocker or what adhesive is acceptable to use to reattach the screen. Would be great to see this tutorial cover everything from start to finish.
The responsive click is present, but does not have any function on the screen. Is there any correlation between the click and functionality, or did I maybe destroy the cable ?
If it physically clicks but does not invoke any action then maybe the cable does not sit properly inside the ZIF-connector or the cable might be damaged. Try to re-connect and make sure it’s in the ZIF-connector all the way.
I'v transferred a home button to a new screen and stuck it down with b-7000 adhesive. When I go to test and put the screen in place, I push the button but it seems to not stay stuck to the new screen. What should I do? I also have a white plastic ring that was part of the button. Should I have left it on there or remove it?
I changed the LCD but now its completely dim.
What might be the cause?
Either the cable is not installed correctly or You have blown the backlit ic. You will have to send it for micro soldering to replace the chip. Always make sure you disconnect the battery before any repair is performed.
-
-
-
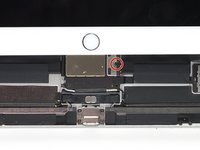
Resta solo lo schermo.
When replacing the screen; the adhesive that came with the new screen is not that great or maybe i'm doing something wrong with it. The first time i used it, i heat gunned the edge, and parts of the screen still wouldn't stick. So i used a second set, and tried not to touch the adhesive, i used tweezers alot. It was a bit better second time, but, the case we have wraps around the edge of screen, and is basically holding giving extra confidence to hold screen on.
-


Confronta la tua parte di ricambio con quella originale: potrebbe essere necessario il trasferimento di alcuni componenti o la rimozione di protezioni adesive dalla nuova parte prima di installarla.
Per rimontare il tuo dispositivo, segui le istruzioni in ordine inverso.
Porta i tuoi rifiuti elettronici a un riciclatore certificato R2 o e-Stewards.
La riparazione non è andata come previsto? Prova delle soluzioni di base ai problemi, oppure rivolgiti alla nostra comunità Risposte per trovare aiuto.
Annulla: non ho completato questa guida.
Altre 18 persone hanno completato questa guida.
Un ringraziamento speciale a questi traduttori:
100%

Questi traduttori ci stanno aiutando ad aggiustare il mondo! Vuoi partecipare?
Inizia a tradurre ›

2 Commenti
I used this guide to remove and replace a cracked screen from iPad Air 3 successfully. My comments are in the sections above , i summarise here (1) i used a proper suction tile puller (small one from DIY store used to hold bathroom tiles) to lift the screen off after heating around the edge using a heat gun. (2) You must disconnect the battery before plugging the new screen. I think i didn't break the circuit in first attempt and shorted the screen, the result was half of the screen didn't work. I used playing card. (3) The adhesive that came with the new screen is not that great or maybe i'm doing something wrong with it. The first time i used it, i heat gunned the edge (adhesive on), and parts of the screen still wouldn't stick. So i used a second set, and tried not to touch the adhesive, i used tweezers alot. It was a bit better second time, but, the case we have wraps over screen, holds it on.
I used the guide as well and the replacement went well except the home button. The touch-id sensor is working, but until I have new glue, I need to use Assistive touch. Guess I need to glue the home button a bit more.