Introduzione
Le batterie degli iPhone sono studiate per mantenere l'80% della loro capacità dopo 500 cicli di ricarica, che significa circa per 18 - 24 mesi per la maggior parte degli utenti. Dopo questo periodo, sarà probabilmente necessario ricaricare il tuo iPhone molto più frequentemente, e iOS potrebbe avvisarti che le performance ne potrebbero risentire (in altre parole il telefono andrà più piano). Usa questa guida per sostituire la batteria e far ritornare le prestazioni del dispositivo come se fosse nuovo.
Se la batteria è gonfia prendi adeguate precauzioni.
Nota: Su iOS 17.6 e versioni precedenti, il tuo iPhone potrebbe visualizzare un avviso sulla "genuinità" della batteria dopo la riparazione, anche quando vengono utilizzati pezzi originali Apple. Se il tuo iPhone funziona normalmente, puoi ignorare l'avviso senza problemi. Su iOS 18 e versioni successive, autentica la tua nuova batteria utilizzando il Repair Assistant.
Per prestazioni ottimali, dopo aver completato questa guida, calibra la batteria appena installata: caricala al 100% e continua a caricarla per almeno altre due ore. Quindi usa il tuo iPhone fino a quando non si spegne a causa della batteria scarica. Infine, caricalo senza interruzioni fino al 100%.
Cosa ti serve
-
-
Inserisci uno strumento di espulsione della scheda SIM o una graffetta nel piccolo foro nel vassoio della scheda SIM, situato sul lato dei pulsanti del volume.
-
Premi con decisione per espellere il vassoio.
-
-
-
Rimuovi il vassoio della scheda SIM dall'iPhone.
-
-
-
Spegni il tuo iPhone prima di iniziare.
-
Rimuovi le due viti pentalobe P2 da 6,75 mm sotto al lato inferiore dell'iPhone.
Please explain how to power off the phone when the broken screen is not responding to touch.
-
-
-
Misura 3 mm dalla punta del plettro e segna questa distanza con un pennarello indelebile.
Got to step 2 and realized the fix kit doesn't include an opening pick! Looks like a guitar pick, and I have those lying around. Is that expected? Looks like the pick is used in many steps below. There's a little blue crowbar that isn't mentioned in the instructions. Perhaps that replaces the opening pick?
Hi! I can't see which guide you were using when writing this comment. Can you reply here with which guide and fix kit you used?
I see you posted this in Meta. I hope it's resolved soon! In the meantime, a guitar pick may work well enough for your repair.
what fix kit?
My fix kit didn't include an opening pick either
My AliExpress refurbished screen came with a pick that has a coin-like circle that pops out, so no modification was necessary
It's not an Ifixit KIT if it doesn't include everything. You'll need to order the opening pic separately. Or head to Walmart like myself and look for guitar pics. Hopefully, this will work just as well.
No pick in mine as well. It’s really not clear that you have to order this separately when ordering an IPhone SE 202/2022 screen repair kit. Is this the case?
Frustrated, I ordered a compact package where everything was encapsulated. Useless suction tools could not separate the screen. If it is unable to decouple the screen, then why sucking suction tools you have provided.
For my kit the triangle pick was stuck inside the box with the screen not with the other tools maybe it's also there for you
Y’all are getting far, FAR too detailed with some of this stuff…. Measuring and marking the pick that you won’t actually use to open the device?!? lol that’s kinda funny. Just heat it up, grab a spudger, and the back just pops right off! The iFixit tech need to stick to the KISS method more often, you know KEEP IT SIMPLE STUPID!!! Like l, for reals, I’ve been doing this stuff for YEARS and using iFixit guides regularly and this is just ridiculous at this point!
Will the phone still work if the sensor assembly on the back of the screen is damaged?
-
-
-
Posiziona strisce sovrapposte di nastro trasparente da pacchi sullo schermo dell'iPhone finché non l'hai coperto tutto.
-
Se non riesci a far aderire la ventosa nei prossimi passi, applica del nastro adesivo resistente (come del nastro americano telato) come una maniglia e alza lo schermo con quello.
-
-
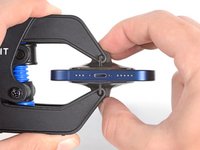
Attrezzo utilizzato in questo passaggio:Clampy - Anti-Clamp$24.95
-
Tira la maniglia blu indietro per sbloccare i bracci dell'Anti-Clamp.
-
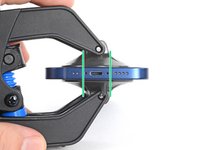
Fai scorrere i bracci oltre il bordo sinistro o destro del tuo iPhone.
-
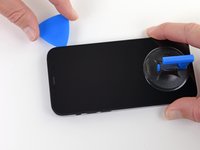
Posiziona le ventose vicino al bordo inferiore dell'iPhone, una di fronte e una sul retro.
-
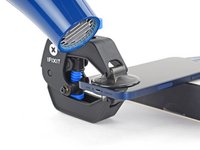
Premi le ventose insieme per farle aderire sull'area desiderata.
-
-
-
Appoggia il tuo iPhone su un oggetto resistente prima di continuare, come un libro con la copertina rigida, così che stia parallelo al pavimento senza tenerlo fermo. Questo rende più facile il lavoro nei prossimi passi.
-
Usa un asciugacapelli per scaldare il bordo inferiore dell'iPhone. Il vetro dovrebbe essere leggermente troppo caldo da toccare.
-
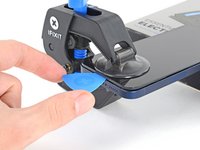
Aspetta un minuto per dare la possibilità all'adesivo di lasciarsi andare e creare una fessura.
-
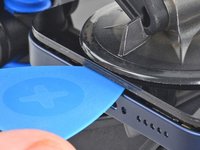
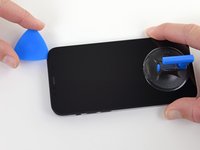
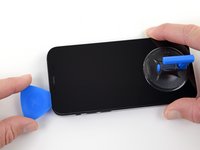
Inserisci un plettro di apertura sotto la scocca di plastica dello schermo quando l'Anti-Clamp crea una fessura abbastanza grande.
-
Salta i prossimi tre passi.
-
-
-
Usa un asciugacapelli o una pistola termica per scaldare il bordo inferiore dell'iPhone per 90 secondi, o finché lo schermo è leggermente troppo caldo da toccare.
-
-
-
Se usi una sola ventosa, applicala sul bordo inferiore del telefono evitando la parte più esterna del vetro.
-
-
-
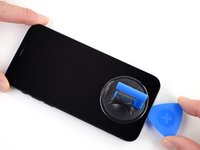
Tira la ventosa applicando una tensione forte e costante fino a creare una piccola fessura tra lo schermo e la cornice.
-
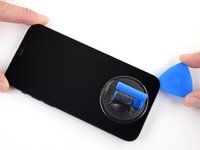
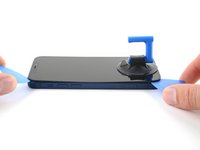
Inserisci un plettro di apertura nella fessura sotto la scocca di plastica dello schermo.
If you have the small single suction cup. You have to get glass up enough to get under glass and touch sensor. I inserted pick too soon and separated glass from screen. $200 mistake. ;) Worth buying suction vise tool to get screen high enough. I would try it again after this mistake. with that vise tool.
-
-
-
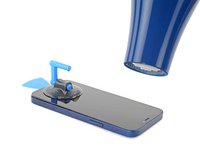
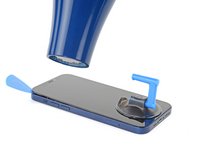
Usa un asciugacapelli per scaldare il bordo destro dell'iPhone (quello con il tasto di accensione) per 90 secondi o finché lo schermo è leggermente troppo caldo al tatto.
-
-
-
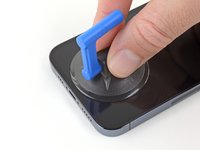
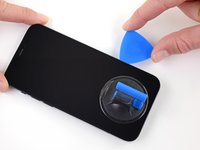
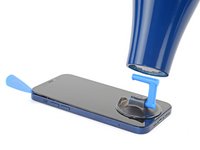
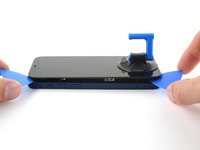
Fai scorrere il plettro di apertura intorno all'angolo in basso a destra dell'iPhone per separare l'adesivo.
-
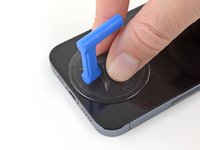
Continua a farlo scorrere lungo il bordo destro dell'iPhone, finché non raggiungi l'angolo in alto a destra.
-
Lascia il plettro sotto l'angolo in alto a destra, prima di continuare.
-
-
-
Usa un asciugacapelli per scaldare il bordo superiore dell'iPhone per 90 secondi o finché lo schermo è leggermente troppo caldo al tatto.
-
-
-
Usa un asciugacapelli per scaldare il bordo sinistro dell'iPhone per 90 secondi o finché lo schermo è leggermente troppo caldo al tatto.
-
-
On the iPhone 12 Pro max the ear and proximity sensor cable on the top is the one to avoid cutting. The display cables are set further in than 3mm so don't worry about the sides too much. It's the ear piece part for the face ID that is most at risk. Yes I damaged it and new part now doesn't allow face I'd to work.
-
-
-
Inserisci un secondo plettro di apertura sotto l'angolo in basso a sinistra dell'iPhone.
-
Ruota entrambi i plettri contemporaneamente finché si sganciano le clip del bordo sinistro.
-
-
-
Ruota il tuo iPhone così che il bordo destro sia rivolto verso di te.
-
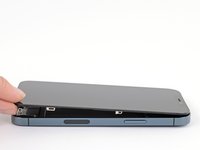
Apri l'iPhone sollevando lo schermo dal lato destro, come per sollevare la copertina di un libro.
-
Appoggia lo schermo contro qualche tipo di supporto per mantenerlo aperto mentre lavori sul telefono.
-
-
-
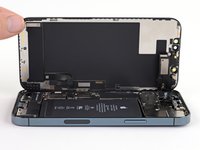
Rimuovi le due viti tri-wing Y000 da 1,1 mm che tengono in posizione la staffa della batteria e del connettore del display.
-
-
-
Usa la punta di uno spudger o un'unghia pulita per staccare il connettore della batteria sollevandolo dal suo zoccolo sulla scheda logica.
-
Piega lievemente il connettore per distanziarlo dalla scheda logica ed evitare che questo possa fare contatto con lo zoccolo e quindi alimentare il telefono nel corso della tua riparazione.
-
-
-
Usa uno spudger o un'unghia pulita per disconnettere il cavo connettore del display.
-
-
-
Usa la punta di uno spudger per staccare il connettore del digitizer dal suo zoccolo.
-
-
-
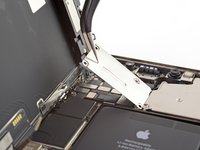
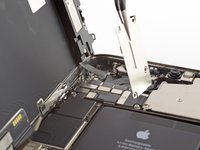
Usa un cacciavite tri-wing Y000 per rimuovere le 4 viti che tengono in posizione la staffa del connettore del sensore frontale.
-
Tre viti da 1,1 mm
-
Una vite da 1,4 mm
-
-
-
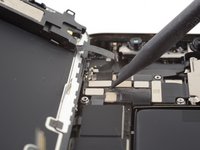
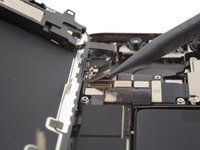
Alza la staffa dal lato sinistro fino a quando la clip sul lato destro non si stacca.
-
Rimuovi la staffa.
-
-
-
Usa uno spudger o un'unghia pulita per disconnettere il connettore del gruppo sensori frontale.
-
-
-
Usa un cacciavite a croce Phillips per rimuovere le 4 viti da 1,6 mm che tengono in posizione l'altoparlante.
-
-
-
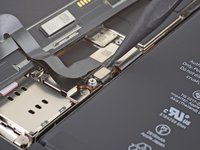
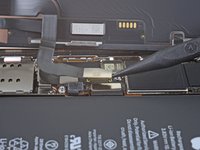
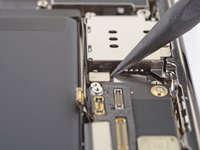
Usa un cacciavite tri-wing Y000 per rimuovere le due viti da 1,4 mm che tengono in posizione la staffa che copre il lettore di schede SIM.
-
-
-
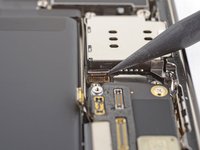
Rimuovi la staffa che copre il connettore del lettore di Schede SIM.
-
-
-
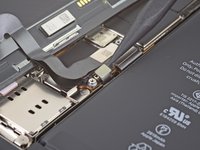
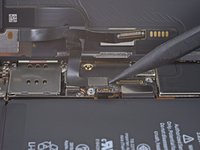
Usa l'estremità a punta di uno spudger per staccare il connettore del lettore di schede SIM dal suo zoccolo sulla scheda logica.
-
-
-
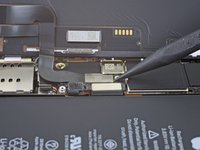
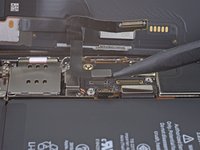
Usa un cacciavite tri-wing Y000 per rimuovere le tre viti che tengono il lettore di schede SIM in posizione.
-
Due viti da 1,4 mm
-
Una vite da 1,1 mm
-
-
-
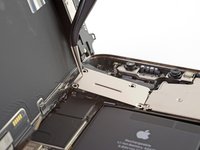
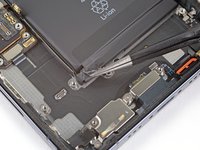
Rimuovi il connettore del cavo del Taptic Engine.
-
-
-
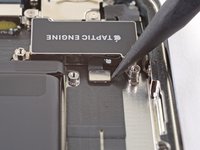
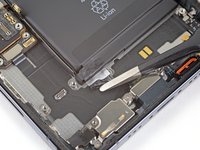
Usa un cacciavite per distanziali per rimuovere il distanziale a vite da 3,1 mm che fissa la staffa del connettore del lettore schede SIM.
-
-
-
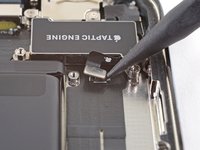
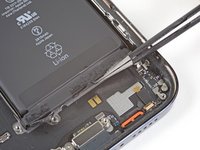
Usa la punta di uno spudger per sollevare il connettore del cavo del Taptic Engine e sfilarlo dalla sua presa sulla scheda madre.
-
-
-
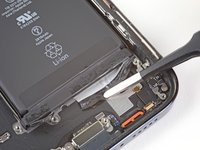
Rimuovi le tre viti che fissano il Taptic Engine.
-
Due distanziali a vite lunghi da 2,8 mm
-
Una vite a croce Phillips da 1,8mm
-
-
-
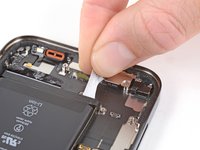
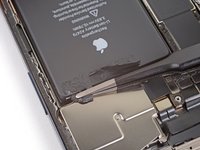
Ogni pezzo di adesivo ha una linguetta nera all'estremità che aderisce leggermente al bordo della batteria.
-
-
-
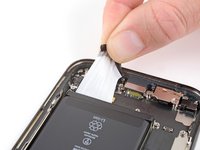
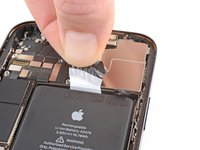
Stacca la prima linguetta adesiva della batteria per staccarla dal bordo inferiore della batteria.
-
-
Attrezzo utilizzato in questo passaggio:Tweezers$4.99
-
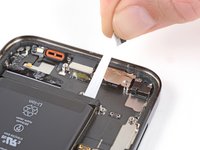
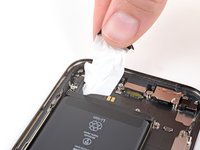
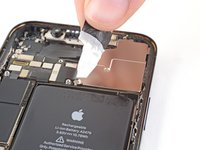
Afferra la prima linguetta con le dita ed estraila lentamente dalla batteria, verso la parte inferiore dell'iPhone.
-
Tira abbastanza forte da mantenere la tensione sulla striscia, ma non forzarla. Dalle tempo per allungarsi e staccarsi da sotto la batteria.
-
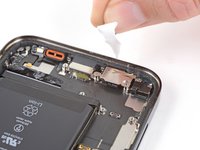
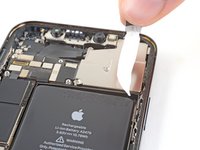
Non premere sulla batteria. Tieni saldamente l'iPhone dai lati.
-
Mantieni la striscia piatta e senza pieghe. Prova a tirare in modo uniforme su tutta la striscia, piuttosto che tirare principalmente al centro o su un lato.
-
Tira con un angolo basso rispetto all'orizzontale in modo che la striscia non si impigli sul bordo della batteria.
-
Se la striscia adesiva si rompe, prova a recuperarla usando le dita o pinzette dalla punta arrotondata e continua a tirare, ma non fare leva sotto la batteria.
-
-
-
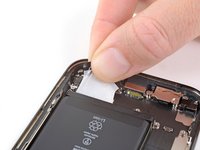
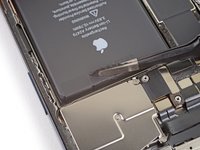
Afferra la seconda linguetta con le dita e tirala via dalla batteria, verso la parte inferiore dell'iPhone.
-
Segui la stessa procedura della striscia precedente: non premere sulla batteria, mantieni la striscia piatta e senza pieghe e tira mantenendo un angolo ridotto con l'orizzontale.
-
Se la striscia adesiva si rompe, prova a recuperarla usando le dita o una pinzetta smussata e continua a tirare, ma non fare leva sotto la batteria.
-
-
-
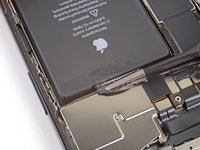
Utilizzando la stessa procedura di prima, tira le due linguette rimanenti, una alla volta, per allungare e rimuovere la striscia adesiva rimanente che tiene in posizione la batteria. Cerca di non impigliare l'adesivo su nulla.
-
Se hai rimosso tutte le strisce adesive con successo, salta il passaggio successivo.
-
Altrimenti, continua con il passaggio successivo di seguito.
-
-
-
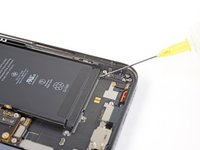
Se hai ancora problemi a rimuovere la batteria, applica alcune gocce di alcol isopropilico ad alta concentrazione (oltre il 90%) sotto il bordo della batteria nell'area delle strisce adesive rotte.
-
Attendi circa un minuto affinché la soluzione alcolica indebolisca l'adesivo.
-
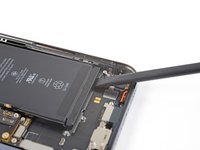
Usa un plettro di apertura o l'estremità piatta di uno spudger per sollevare delicatamente la batteria.
-
-
-
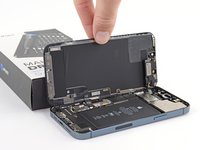
Rimuovi la batteria.
-
Se nel telefono è rimasta della soluzione alcolica, rimuovila con cura o lasciala asciugare all'aria prima di installare la nuova batteria.
-


Confronta la tua nuova parte di ricambio con la parte originale: potrebbe essere necessario trasferire i componenti rimanenti o rimuovere i supporti adesivi dalla nuova parte prima dell'installazione.
Per riassemblare il dispositivo, seguire i passaggi precedenti in ordine inverso.
Dopo la riparazione, a seconda del componente sostituito, potresti essere in grado di calibrarlo utilizzando il Repair Assistant di Apple, disponibile a partire da iOS 18. Aggiorna il tuo dispositivo, vai su Impostazioni → Generali → Info → Cronologia parti e assistenza, tocca Riavvia e completa la riparazione e segui le istruzioni sullo schermo.
Porta i tuoi rifiuti elettronici a un riciclatore certificato R2 o e-Stewards.
La riparazione non è andata come previsto? Prova con le soluzioni di base ai problemi o chiedi aiuto alla nostra comunità Risposte iPhone 12 Pro.
Annulla: non ho completato questa guida.
Altre 45 persone hanno completato questa guida.
Un ringraziamento speciale a questi traduttori:
100%


Questi traduttori ci stanno aiutando ad aggiustare il mondo! Vuoi partecipare?
Inizia a tradurre ›

19 Commenti
Thanks this is incredibly detailed.
Hello! Do you really need to take away the Taptic Engine and so many parts just to replace the battery?
nope, steps 31-40 are not necessary
AEV -
Everything went fine with the iFixit battery but now I have to deal with an "Important Battery Message" which I can't delete, and the badge number over the settings icon.
That is why we need to force apple to remove serial pairing
Apple has a diagnostic mode that allows for a proper reconfiguration.
DIAGNOSTIC MODE
Turn off phone
Hold both volume buttons while plugging the phone into power.
Release buttons when you see apple logo.
Follow on-screen instructions.
That is why we need to force apple to remove serial pairing to logic board
Step 3 references "waterproof seals" around the display which need to be replaced. But there is no description of this procedure, or depiction of what the seals look like. Nor are there any "waterproof seals" available for purchase.
The battery replacement kit includes an adhesive ring for the screen--is this the same thing? Even so there is no procedure shown for how to replace it. I imagine this requires very careful alignment so it would be helpful to have some guidance to make sure it is done correctly.
Please update the instructions to include how to replace the waterproof seals, to make it clear that it is, or is not, the same thing as the screen adhesive, and how to install the adhesive.
Good morning, yesterday i replaced my battery with this instruction. It was late and I reinstalled the screen without ne Sealing.
Yes the black adhesive Ring is the sealing for the phone.
My Question to the people who does often this replacement: Is it nessesary to replace the sealing? - Or will the old sealing also be clueing all together again?
What long-term experience do you have?
Having completed the repair, everything seems to work great other than my phone's battery is constantly showing 1% as the battery level. Has anyone else had this problem?
Caution regarding the waterproof seals, as they could potentially harm the plastic inserts surrounding the display, leaving the screen vulnerable without its protective plastic casing. To mitigate this risk, it's advisable to apply heat to the left portion of the iPhone where the flex cables are located to soften the seals.
Pretty major omission that there is a foil layer and a thin plastic layer between the screen and the electronics. Phone ruined.
Don't use these instructions! Just send it in
What am I supposed to do in this situation?
I had an iPhone 12 Pro to repair (battery change), when I heated up the phone & used a suction cup to get the screen off, the screen separated from the frame (breaking the screen) & the frame was stuck in the phone (like the frame can be if you forget to remove the penta-screws in the beginning, but I had removed those).
It seams like the adhesive between the frame & phone was stronger than the adhesive between the frame and screen, or it was lodged somehow, so the "weakest link" broke.
Is there a way to prevent this?
Or stop it from becoming a severe problem if detected in time?
Thanks!
These instructions are substantially incorrect or incomplete. Apple offers official instructions which importantly include complete instructions for reassembly and resealing the display. I suggest using the Apple instructions on their site.
These ifixit instructions improperly have you remove more than is needed, and offers no advice for resealing.
ALSO: for the comments on the “battery warning” Apple has a diagnostic mode that allows for a proper reconfiguration.
DIAGNOSTIC MODE
Turn off phone
Hold both volume buttons while plugging the phone into power.
Release buttons when you see apple logo.
Follow on-screen instructions.
Please, you can write the link?
I can find this, but don't the official instructions for reassemble and resealing the display.
https://support.apple.com/en-us/101944
Thank You
Be warned. I replaced the battery in my Iphone 12 Pro following this guide and now Face ID no longer works. I must have damaged a cable around the top cameras whilst operating the repair. Now can no longer use Face ID. Battery tabs also broke instantly when I tried to remove so make sure you have Isopropanol Alcohol as a backup method.
Based on my hands-on experience, the steps of removing Tapic Engine, speakers, etc. can be skipped by dripping a few drops of surgical spirit into the adhesive battery tape to dissolve the tape for a less troublesome removal of the battery.
A) It does seem that some of the piece removals to the left of the battery are not necessary based on Apple's own guide but it's not a major issue but B) no matter what I've tried, the battery (and screen) I installed on my GF's iPhone 12 Pro are being recognized by the phone. There's no option to "restart and repair" in the Settings app, and even throwing the phone into Diagnostic Mode doesn't help. Both are recognized as not working 'correctly' but the repair process does nothing to help. I know this is an Apple issue more than iFixit, but it's still annoying that it seems like the phone will never accurately report on battery info (and the screen might be hamstrung too). Anyway, seems like iFixit should provide a little more detail on this as being a potential issue because at the moment, it looks like something you just have to live with on the newer phones. Doesn't make me feel good about doing my 14 Pro at some point in the future.
What is below the Taptic Engine with the two prongs?
Kgraves - Replica