Introduzione
Se lo schermo del tuo iPhone 14 Pro Max è crepato, non risponde al tocco o non mostra nessuna immagine quando il telefono è acceso, usa questa guida per ripristinare il funzionamento del tuo iPhone con un nuovo display, o gruppo schermo.
Questa guida è stata creata usando il modello (internazionale) A2894. Se stai riparando un diverso modello di iPhone 14, potrebbero esserci delle leggere discrepanze visive, ma la procedura dovrebbe rimanere la stessa.
Per la tua sicurezza, scarica la batteria sotto al 25% prima di smontare il dispositivo. Ciò riduce il rischio di un pericoloso evento termico se la batteria viene danneggiata accidentalmente durante la riparazione. Se la tua batteria è gonfia, prendi le precauzioni adeguate.
Nota: Su iOS 17.6 e versioni precedenti, la funzionalità True Tone e la regolazione automatica della luminosità vengono disabilitate dopo una sostituzione dello schermo, anche quando viene utilizzato uno schermo originale Apple. Anche Face ID viene disabilitato, a meno che l'iPhone non stia eseguendo iOS 15.2 o versioni successive. Su iOS 18 e versioni successive, puoi calibrare il tuo nuovo schermo utilizzando il Repair Assistant per ripristinare la funzionalità True Tone sugli schermi originali acquistati da Apple.
Ti servirà dell'adesivo di ricambio per rincollare lo schermo quando riassembli il dispositivo. Il tuo dispositivo funzionerà normalmente, ma molto probabilmente perderà la sua valutazione IP (protezione ingressi).
Cosa ti serve
-
-
Spegni il tuo iPhone prima di cominciare lo smontaggio.
-
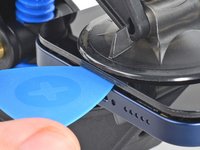
Rimuovi le due viti Pentalobe P2 da 6,8 mm sul bordo inferiore dell'iPhone.
-
-
-
Misura 3 mm dalla punta del plettro e segna questa distanza con un pennarello indelebile.
Got to step 2 and realized the fix kit doesn't include an opening pick! Looks like a guitar pick, and I have those lying around. Is that expected? Looks like the pick is used in many steps below. There's a little blue crowbar that isn't mentioned in the instructions. Perhaps that replaces the opening pick?
Hi! I can't see which guide you were using when writing this comment. Can you reply here with which guide and fix kit you used?
I see you posted this in Meta. I hope it's resolved soon! In the meantime, a guitar pick may work well enough for your repair.
what fix kit?
My fix kit didn't include an opening pick either
My AliExpress refurbished screen came with a pick that has a coin-like circle that pops out, so no modification was necessary
It's not an Ifixit KIT if it doesn't include everything. You'll need to order the opening pic separately. Or head to Walmart like myself and look for guitar pics. Hopefully, this will work just as well.
No pick in mine as well. It’s really not clear that you have to order this separately when ordering an IPhone SE 202/2022 screen repair kit. Is this the case?
Frustrated, I ordered a compact package where everything was encapsulated. Useless suction tools could not separate the screen. If it is unable to decouple the screen, then why sucking suction tools you have provided.
For my kit the triangle pick was stuck inside the box with the screen not with the other tools maybe it's also there for you
Y’all are getting far, FAR too detailed with some of this stuff…. Measuring and marking the pick that you won’t actually use to open the device?!? lol that’s kinda funny. Just heat it up, grab a spudger, and the back just pops right off! The iFixit tech need to stick to the KISS method more often, you know KEEP IT SIMPLE STUPID!!! Like l, for reals, I’ve been doing this stuff for YEARS and using iFixit guides regularly and this is just ridiculous at this point!
Will the phone still work if the sensor assembly on the back of the screen is damaged?
-
-
-
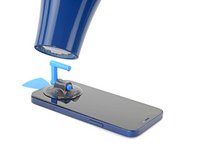
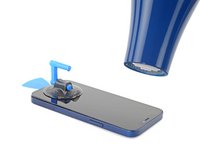
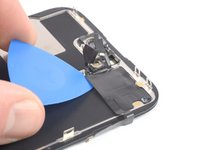
Posiziona strisce sovrapposte di nastro trasparente da pacchi sullo schermo dell'iPhone finché non l'hai coperto tutto.
-
Se, nei prossimi passi, non riesci a far aderire la ventosa, piega un pezzo di nastro adesivo resistente (come del nastro adesivo americano) come fosse una maniglia e usa quella per sollevare lo schermo.
-
-
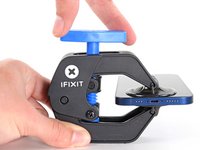
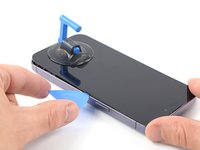
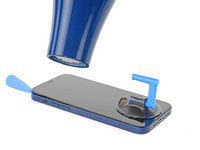
Attrezzo utilizzato in questo passaggio:Clampy - Anti-Clamp$24.95
-
Tira la maniglia blu all'indietro per sbloccare i bracci dell'Anti-Clamp.
-
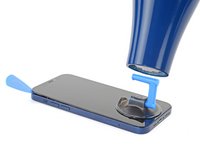
Fai scorrere i bracci sopra l'estremità sinistra o destra del tuo iPhone.
-
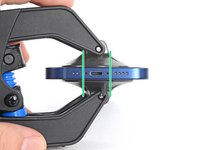
Posiziona le ventose vicino l'estremità inferiore dell'iPhone, una davanti e una dietro.
-
Comprimi insieme le ventose per applicare la suzione all'area desiderata.
-
-
-
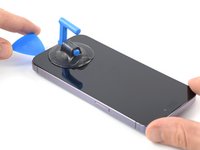
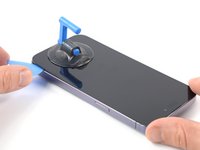
Appoggia il tuo iPhone su un oggetto resistente prima di continuare, come un libro con la copertina rigida, così che stia parallelo al pavimento senza tenerlo fermo. Questo rende più facile il lavoro nei prossimi passi.
-
Usa un asciugacapelli per scaldare il bordo inferiore dell'iPhone. Il vetro dovrebbe essere leggermente troppo caldo da toccare.
-
Aspetta un minuto per dare la possibilità all'adesivo di lasciarsi andare e creare una fessura.
-
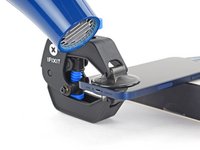
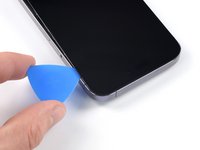
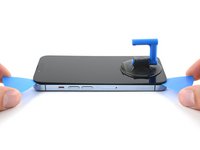
Inserisci un plettro di apertura sotto la scocca di plastica dello schermo quando l'Anti-Clamp crea una fessura abbastanza grande.
-
Salta i prossimi due passi.
-
-
-
Usa un asciugacapelli o una pistola termica per scaldare il bordo inferiore dell'iPhone per 90 secondi, o finché lo schermo è leggermente troppo caldo da toccare.
-
-
-
Applica una ventosa alla parte inferiore del telefono, evitando proprio il bordo.
-
Tira la ventosa con pressione forte e costante per creare una fessura tra lo schermo e la cornice.
-
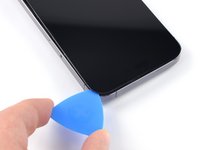
Inserisci un plettro di apertura nella fessura sotto la scocca di plastica dello schermo.
-
-
-
Usa un asciugacapelli per scaldare il bordo destro dell'iPhone (quello con il tasto di accensione) per 90 secondi o finché lo schermo è leggermente troppo caldo al tatto.
-
-
-
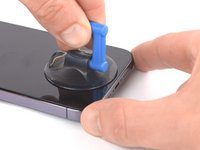
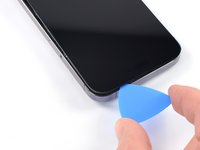
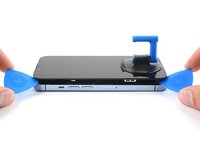
Fai scorrere il plettro di apertura intorno all'angolo in basso a destra dell'iPhone per separare l'adesivo.
-
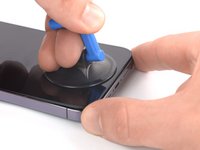
Continua a farlo scorrere lungo il bordo destro dell'iPhone, finché non raggiungi l'angolo in alto a destra.
-
Lascia il plettro sotto l'angolo in alto a destra, prima di continuare.
-
-
-
-
Usa un asciugacapelli per scaldare il bordo superiore dell'iPhone per 90 secondi o finché lo schermo è leggermente troppo caldo al tatto.
-
-
-
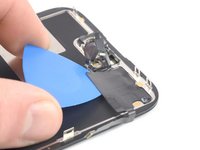
Inserisci il plettro sotto l'angolo in alto a destra del telefono. Fallo scorrere intorno all'angolo in alto a destra, fino a metà del lato, fermandoti appena prima dell'intaglio dell'altoparlante.
-
-
-
Usa un asciugacapelli per scaldare il bordo sinistro dell'iPhone per 90 secondi o finché lo schermo è leggermente troppo caldo al tatto.
-
-
You will need to replace the entire module connected via the damaged ribbon cable, or worse, buying an entirely new screen.
-
-
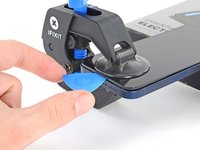
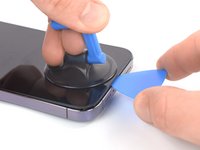
Inserisci un secondo plettro nell'angolo in basso a sinistra dell'iPhone.
-
Ruota entrambi i plettri nello stesso momento finché non si sganciano le clip del bordo sinistro.
-
-
-
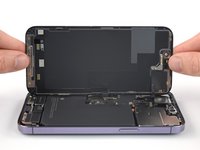
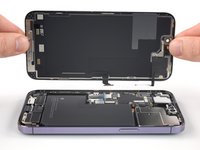
Ruota l'iPhone, posizionandolo con il bordo destro verso di te.
-
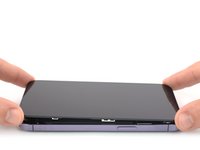
Apri lentamente il tuo iPhone aprendo lo schermo come la copertina posteriore di un libro, partendo dal lato destro.
-
Appoggia il display contro qualcosa per tenerlo sollevato mentre lavori sul telefono.
-
-
-
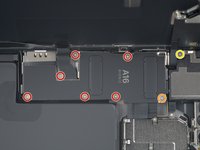
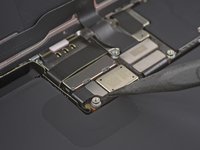
Usa un cacciavite Y000 per rimuovere le 8 viti che fissano la copertura del connettore della batteria:
-
Sei viti da 1,3 mm
-
Due viti da 1,6 mm
-
Una vite da 1,9 mm
You need to correct the guide. Are five 1.3mm-long screws two 1.6mm-long screws and one 1.9mm-long screw.
second 1.6mm-long screw sit a third one counting from left on right side of lcd flex cable
There is a second 1.6 mm-long screw that is placed on the lower standoff screw. The top left (third total from left) is slightly longer to accommodate the standoff screw. Placing this in the wrong spot will cause long screw damage.
The two previous commenters are correct, probably change to notate the two 1.6mm screws.
Nice job, guys!
-
-
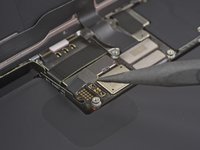
Attrezzo utilizzato in questo passaggio:Tweezers$4.99
-
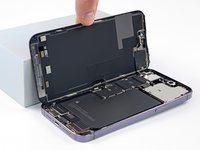
Afferra la copertura del connettore con un paio di pinzette e falla scorrere verso il basso per liberare i cavi a nastro.
-
Rimuovi la copertura del connettore.
-
-
-
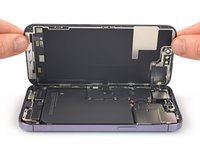
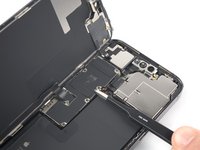
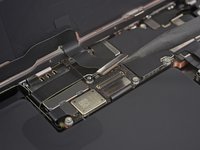
Usa la punta di uno spudger per scollegare il cavo della batteria, sollevando il connettore direttamente dalla sua presa.
-
Piega leggermente il connettore per allontanarlo dalla scheda logica, per evitare che faccia contatto con la presa e fornisca energia al telefono durante la riparazione.
-
-
-
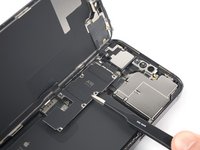
Usa la punta di uno spudger per scollegare il primo cavo dello schermo, sollevando il connettore direttamente dalla sua presa.
-
-
-
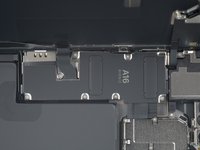
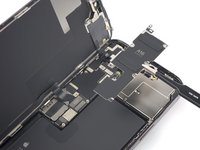
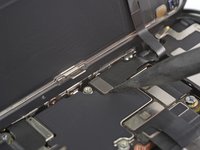
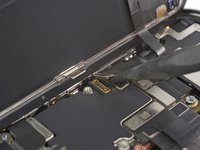
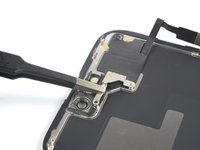
Usa un cacciavite Y000 per rimuovere le due viti da 1,4 mm che tengono ferma la staffa del gruppo del sensore frontale.
-
-
Attrezzo utilizzato in questo passaggio:Tweezers$4.99
-
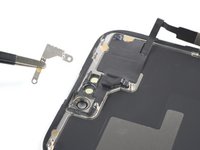
Usa delle pinzette, o le dita, per rimuovere la staffa del gruppo del sensore frontale.
-
-
-
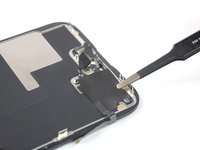
Scalda un iOpener e appoggialo sul bordo superiore dello schermo per due minuti.
-
-
-
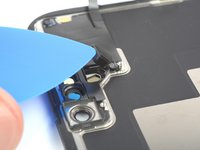
Inserisci un plettro tra il sensore di prossimità e il suo alloggiamento nello schermo.
-
Solleva con il plettro per separare il sensore di prossimità dallo schermo.
-
-
-
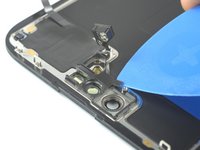
Inserisci un plettro tra il sensore di luce ambientale e il suo alloggiamento nello schermo.
-
Solleva con il plettro per separare il sensore di luce ambientale dallo schermo.
-
-
-
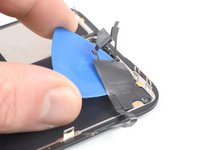
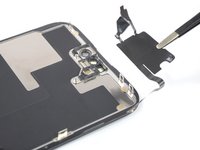
Inserisci un plettro di apertura sotto al bordo sinistro del gruppo del sensore frontale.
-
Fai scorrere il plettro sotto al gruppo per separarlo dalla cornice.
-
-
-
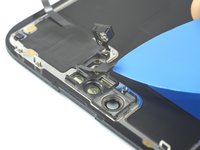
Rimuovi il gruppo del sensore frontale.
-
Collega i sensori ai loro alloggiamenti nella cornice, per aiutarti ad allineare la sezione principale dell'insieme.
-
Usa del nastro adesivo Tesa per incollare di nuovo le sezioni del gruppo che non attaccano più.
-


Se possibile, accendi il tuo dispositivo e prova la tua riparazione prima di installare il nuovo adesivo e richiuderlo.
Per rimontare il dispositivo, segui queste istruzioni in ordine inverso.
Dopo la riparazione, a seconda del componente sostituito, potresti essere in grado di calibrarlo utilizzando il Repair Assistant di Apple, disponibile a partire da iOS 18. Aggiorna il tuo dispositivo, vai su Impostazioni → Generali → Info → Cronologia parti e assistenza, tocca Riavvia e completa la riparazione e segui le istruzioni sullo schermo.
Il miglior modo di fissare il nuovo schermo è applicare un foglio di biadesivo tagliato su misura alla cornice e posizionare lo schermo nella sua posizione originale.
Porta i tuoi rifiuti elettronici a un riciclatore certificato R2 o e-Stewards.
La riparazione non è andata come previsto? Prova delle soluzioni ai problemi di base o rivolgiti alla nostra comunità Risposte per trovare aiuto.
Annulla: non ho completato questa guida.
Altre 28 persone hanno completato questa guida.
Un ringraziamento speciale a questi traduttori:
100%


Questi traduttori ci stanno aiutando ad aggiustare il mondo! Vuoi partecipare?
Inizia a tradurre ›


16 Commenti
Thanks for this detailed guide on how to disassemble my phone screen. I was just checking some Celebrity Heights and all of a sudden my screen went black. I tried hard reset and all different things but it was the screen. I bought on eBay a new screen and used your guide to replace it and luckily everything went smoothly. Thanks again.
Just replaced the iPhone 14 Pro MAX, How do I get rid of the screen error message that the screen is not an authentic device?
you don't. Unless you have a display programmer but I don't think they exist for 14's yet.
Sean -
you can not, unless you separate the module on your old screen, soldering it on to the new screen, which requires some proper tools and skill. or you can just ignore the message.
Tamarind -
Yes, I got the same message.
I use my iPhone on the handlebar of my motorcycle and I have always been able to read the display well. Now, with the display provided by FIXIT, it is impossible to read the display. The contrast has decreased considerably to the point that it is impossible to use it on the motorcycle.
I have already bought some displays on AliExpress for various cell phones. This time I preferred to choose iFIXIT. I paid more for the display but expected better quality. The result was frustration.
Has anyone else had issues with the Proximity sensor not working correctly after the repair? It seems every 14 PM display we've done, the prox always has issues working consistently afterwards. Tried many different tools/alcohol/ pry methods but no matter what it still doesn't work properly. By working properly I mean it'll go black when covered(while on a call), but sometimes it takes a minute or two to come back after uncovering it. Or it'll go black (on a call) without even covering it. Seems in and out. Thought it'd be a alignment issue but even after re-seating it it still has issues.
Does anyone else have an issue with the phone restarting without a command? I damaged the proximity sensor and I'm waiting for a new one, but that's after I noticed smoke. The phone turns on and works normally, but restarts every few minutes or so, do I have to replace the whole mother board now?
If you've damaged the proximity sensor only - good, that's a normal behaviour of the iPhone when it can't reach one of its sensors, it goes every 2-5 minutes in a reboot, and generates a ".panic" file with some information about lack of access to perimetry. Google how to reach it, and analyze with panicfull.com to be sure if that's the only problem
Yabrick -
just want to know what the deal here is.....if i buy this kit, transfer the old sensors to the new screen, and put the new screen on, I'll have issues with proximity sensors, and unoriginal hardware warnings? The advertising for this kit seems a bit dishonnest here....
The unoriginal hardware notification does not affect the functionality of the phone. If you buy a used OEM screen, it will still provide you with this message. Only buying a brand new OEM screen will eliminate this...or so I've gathered from working on them. I'm pretty sure if you buy a non-genuine screen replacement, you will have issues with face ID and auto-brightness unless you transfer the chip from the old screen to the new one(which is annoying and tough, but completely possible with some skill). Heat up the screen from the glass side to remove the proximity sensor. I haven't had any issuues and I do it almost the same way as these guys.
Replaced my screen and the light sensor everything went well but screen comes on and goes off and the. Powers off then back on. When a call or message comes in screen won’t come on but will hear the notification sound what do I do
Hi I have a problem with the proxy sensor seems to be overheating the phone, is it damaged or have I damaged some other way as remove the sensor it doesn’t overheat, but I’ve tried a new sensor and it also makes the phone over heat??