Introduzione
Usa questa guida per sostituire la batteria del tuo TicWatch Pro 3 GPS.
Per la tua sicurezza, scarica la batteria al di sotto del 25% prima di smontare l'orologio. Ciò riduce il rischio di incendio se la batteria viene accidentalmente danneggiata durante la riparazione. Se la tua batteria è gonfia, prendi le dovute precauzioni.
Avrai bisogno di adesivo sostitutivo per rimontare il dispositivo. Il tuo dispositivo funzionerà normalmente, ma perderà la classificazione IP (Ingress Protection).
Cosa ti serve
-
-
Prima di iniziare le riparazioni, togli l'orologio dal caricabatterie e spegnilo.
-
Rimuovi il cinturino.
-
-
-
Usa un cacciavite Torx T3 per rimuovere le quattro viti lunghe 4,1 mm che tengono ferma la cover posteriore.
-
-
-
Applica un iOpener riscaldato sul retro dell'orologio per 5 minuti per allentare l'adesivo sottostante.
-
-
-
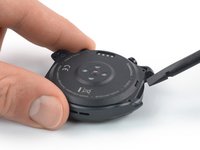
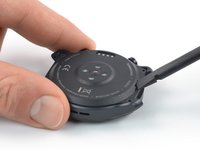
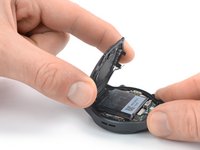
Inserisci l'estremità piatta di uno spudger nell'apertura del microfono sul bordo superiore della cover posteriore.
-
Fai leva verso l'alto per allentare il gruppo della cover posteriore. Questo potrebbe richiedere un po' di forza.
-
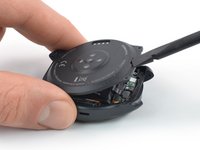
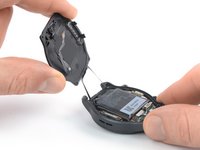
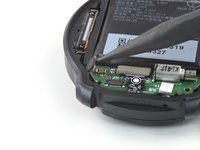
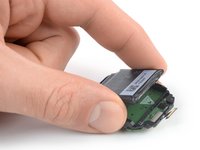
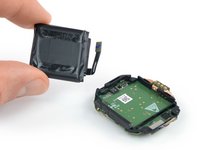
Apri il gruppo della cover posteriore di 45 gradi per accedere al cavo del gruppo del sensore.
-
-
-
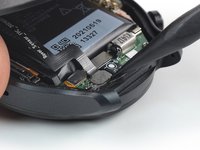
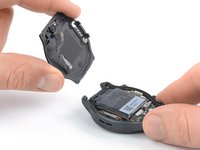
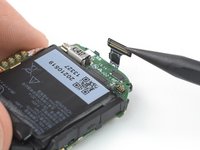
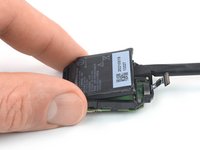
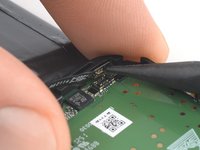
Usa uno spudger per scollegare il cavo del gruppo sensore sollevando il connettore dalla sua presa.
-
-
-
-
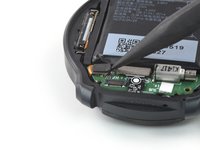
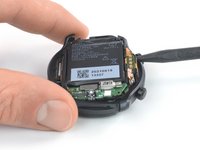
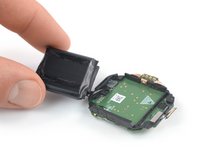
Usa uno spudger per scollegare il cavo del microfono sollevando il connettore dal suo zoccolo.
-
-
-
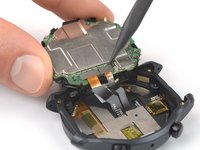
Usa un cacciavite a croce Phillips per rimuovere le tre viti lunghe 4,1 mm che fissano il gruppo centrale.
-
-
-
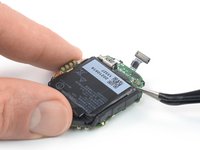
Inserisci la punta di uno spudger tra il bordo destro del gruppo centrale e il telaio dell'orologio.
-
Fai leva verso l'alto per allentare il gruppo centrale.
-
-
-
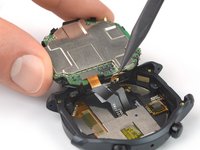
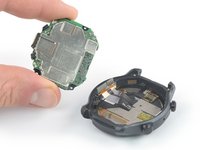
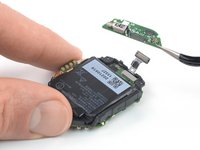
Apri con cautela il gruppo centrale come la copertina di un libro.
At this point, the little transparent plastic square over each button got away on my tear-down.
Those have a black dot in the middle, i though they might only be for waterproofing, but with or without them in place, i cannot push any of the button anymore. I think i just killed my watch.
If i'm not a fluke, i think this need a bit more warning. -
-
-
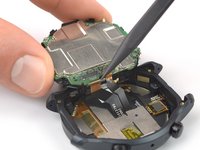
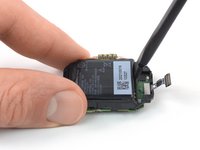
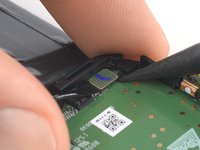
Usa uno spudger per scollegare lo schermo e i cavi del digitalizzatore sollevando i connettori dalle loro prese.
-
-
-
Usa uno spudger per scollegare il cavo di interconnessione sollevando il connettore dal suo zoccolo.
-
-
Attrezzo utilizzato in questo passaggio:Tweezers$4.99
-
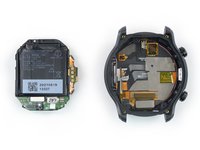
Usa un paio di pinzette per rimuovere la scheda figlia.
-
-
-
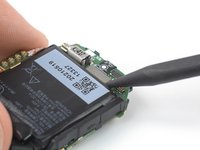
Inserisci l'estremità piatta di uno spudger tra il bordo inferiore della batteria e il telaio centrale.
-
Fai leva verso l'alto per allentare la batteria.
-
-
-
Piega con cura la batteria per accedere al connettore del cavo della batteria.
-
-
-
Usa uno spudger per scollegare il cavo della batteria sollevando il connettore dalla sua presa.
-
-
-
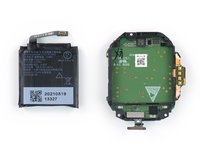
Rimuovi la batteria.
I passaggi dal n° 5 al n° 14 non sono necessari !!! Più connettori si scollegano e più si ha la probabilità di rovinarli quando si andranno a riattaccare !!! Basta fare un po' di attenzione e si riesce a sollevare la batteria senza staccare tutti i connettori indicati in questi passaggi non necessari.
Quando la batteria si gonfia i pulsanti non funzionano più specie dopo una carica completa
Quando l orologio fa una carica completa la batteria si gonfia e spinge sul connettore pulsanti che smettono di funzionare come risolvere .
Forse sostituire batteria?
-


Confronta la tua nuova parte di ricambio con la parte originale: potresti dover trasferire i componenti rimanenti o rimuovere i supporti adesivi dalla nuova parte prima di installarla.
Per riassemblare il tuo dispositivo, segui queste istruzioni in ordine inverso.
In fase di rimontaggio, applica nuovo adesivo dove necessario dopo aver pulito le zone interessate con alcool isopropilico (>90%).
Per prestazioni ottimali, calibra la batteria appena installata dopo aver completato questa guida.
Porta i tuoi rifiuti elettronici a un Riciclatore certificato R2 o e-Stewards.
La riparazione non è andata come previsto? Prova alcuni risoluzione dei problemi di base o chiedi alla nostra comunità Risposte TicWatch Pro 3 per aiuto.
Annulla: non ho completato questa guida.
Altre 33 persone hanno completato questa guida.
Un ringraziamento speciale a questi traduttori:
100%


Questi traduttori ci stanno aiutando ad aggiustare il mondo! Vuoi partecipare?
Inizia a tradurre ›


16 Commenti
Where did you buy a replacement battery (if you did)? I have scoured thru aliexpress, ebay, and tried to find shattered-screen watches I could transplant from, with no luck so far. I guess I'll keep looking. My watch barely lasted a year before the battery life halved. The voltage sag is so bad the watch bootloops whenever it vibrates below 30% voltage.
I've found a listing in aliexpress for an aftermarket battery but need to de-solder the original BMS and transfer to this new battery. Here's the link to aliexpress.
I don't think it's tin welding, but most likely TIG welding.
Difficult to open it, but the less experienced could solder the battery contacts on the top without opening the old solder.
A small problem (solved) that I encountered with the battery purchased as compatible from ali-express is the greater ( >5mm)
distance (compared to the battery) of the original two poles of the battery.
You have to bend them carefully inwards to be able to weld them afterwards.
Hello all,
I bought this battery as marco deirossi but I don't know how to weld them properly. What's the welding method? It doesn't seem like typical welding for me. Also, I have taken off the sticker of the new batter and the new orange foil out of it. Did I do something wrong? Shall I buy new batter?
Best Regards
Paul
Hello... Does anyone know where you can get this battery? since on Aliexpress it appears as out of stock in all the sellers that publish it.
Was able to install a new battery thanks to all the comments here but had to improvise a bit.
I had some trouble connecting the battery adapter to the battery and ended up shortening one of the flat connectors on the battery. Used some copper wire to bridge the gap and make it a bit easier.
After soldering the wires to the original adapter I made a small hole in the flat connectors of the battery, threaded the wire through there and soldered that. Ended up removing the wire insulation to be able to bend it in space. Recommend taping off anything you don't want the wires to touch beforehand if you do try to prevent short circuiting.
Also be mindful of the buttons during repair. Somewhere in the process I somehow lost the tiny clicker on one and misaligned the other. Was able to glue the latter back in the proper spot. Luckily only the one is necessary to do most stuff.
Hope this helps someone
Hi Ribson
the best thing to do is bend the two poles of the battery 90° inwards and give them a spot of soldering directly on the plus and minus contacts of the BCM circuit. It is NOT necessary to extract the mainboard as per the guide because you risk damaging the button contacts. Remove the cover, unhook the sensor flat cable, slightly heat the battery, pry it and unhook it from the flat cable. Open the battery film in the BCM circuit part and cut the two poles of the battery so that only the charging circuit remains in your hand
bend the two poles 90° inwards and solder on the BCM circuit
https://imgur.com/OiLXSrL
Hi Ferdi,
I don't understand why you did all that work,
pull the old BCM circuit out of the old battery.
Bend the two poles of the new battery 90° inwards.
spot solder directly on top without drilling anything or adding bits of wire.
What's the best temperature for iron to solder the terminals? I have a new battery, I have the old dissected and the terminal pad removed. The new battery already came with the poles be t inwards 90 degrees. Do I need to do more to the BCM circuit? I just cut the old poles off the battery.
is that LOSONCOER battery capable to fit to 3 pro ultra ?
or i need to look into another battery?
i've assembled and disassembled this a few times now and get power and screen, but the buttons never work anymore?? And this last time that little tiny brass contact that seems to touch the inside of the watch case metal plate (near the bottom button; you see it touching his index finger in Step 11) snapped off !! is that important (will the buttons work without it even)? or am i really screwed?