Introduzione
Utilizza questa guida per sostituire la batteria del tuo MacBook Pro 16" 2021.
Il MacBook Pro utilizza adesivi a rilascio elastico per fissare la batteria. Alcune strisce sono nascoste sotto il trackpad, quindi dovrai prima rimuoverlo per accedere alle strisce.
Per la tua sicurezza, scarica la batteria al di sotto del 25% prima di smontare il tuo MacBook. Ciò riduce il rischio di incendio se la batteria viene danneggiata accidentalmente durante la riparazione. Se la batteria è gonfia, prendi le dovute precauzioni.
Avrai bisogno di adesivo sostitutivo per completare la riparazione.
Cosa ti serve
-
Attrezzo utilizzato in questo passaggio:Magnetic Project Mat$19.95
-
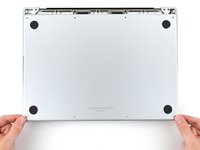
Utilizza un cacciavite Pentalobe P5 per rimuovere le otto viti che fissano il case inferiore:
-
Quattro viti da 9,1 mm
-
Quattro viti da 5 mm
-
-
-
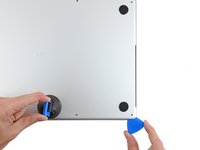
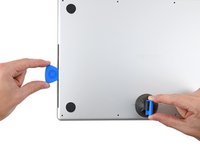
Premi una ventosa vicino al bordo anteriore del case inferiore, tra i fori delle viti.
-
Tira verso l'alto la ventosa per creare un piccolo spazio sotto il case inferiore.
-
-
-
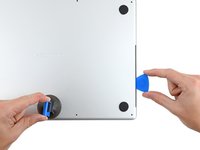
Inserisci un plettro nello spazio appena creato.
-
Fai scorrere il plettro attorno all'angolo più vicino e poi a metà del lato del MacBook Pro.
-
-
-
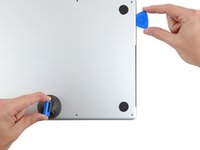
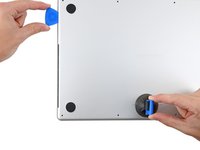
Ripeti il passaggio precedente sull'altro lato, utilizzando un plettro per rilasciare la seconda clip.
-
-
-
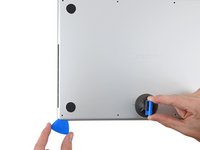
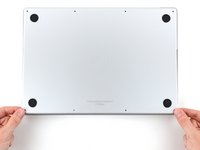
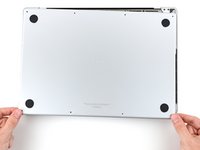
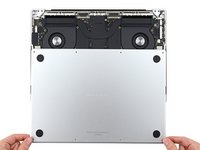
Rimuovi il case inferiore
-
Mettilo in posizione e allinea le clip scorrevoli vicino al cardine del display. Premi verso il basso e fai scorrere il coperchio verso la cerniera. Dovrebbe smettere di scorrere quando le clip si agganciano.
-
Quando le clip scorrevoli sono completamente agganciate e il case inferiore appare correttamente allineato, premi con decisione sul case inferiore per agganciare le quattro clip nascoste sottostanti. Dovresti sentirle e sentire uno scatto.
-
-
-
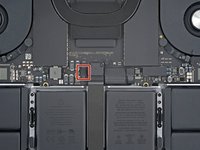
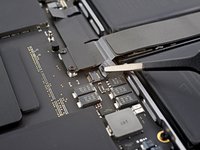
Stacca l'eventuale nastro adesivo che copre il connettore del cavo dati della scheda batteria sulla scheda logica.
This photograph does not match my 2021 Macbook Pro. Fortunately the differences do not impact the removal operation.⏎
There is a different arrangement and number and type of chips to the left of the image.One square grey thing nad five rectangular black things ...
Mine does not have the rows of test points above the track pad cable. -
-
-
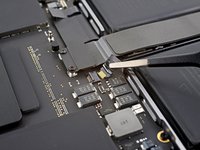
Usa uno spudger per sollevare delicatamente l'aletta di bloccaggio sul connettore ZIF per il cavo dati della scheda della batteria.
This photograph does not match my 2021 Macbook Pro. Fortunately the differences do not impact the removal operation.⏎
There is a different arrangement and number and type of chips to the left of the image.One square grey thing nad five rectangular black things ...
Mine does not have the rows of test points above the track pad cable. -
-
-
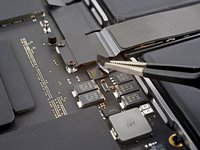
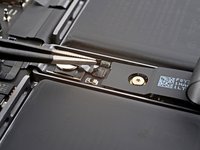
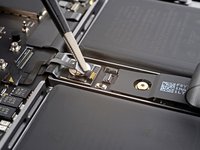
Utilizza un cacciavite Torx T3 per rimuovere le due viti lunghe 2,1 mm che fissano l'attacco del cavo del trackpad alla scheda logica.
Das sind T4 Schrauben bei mir
This photograph does not match my 2021 Macbook Pro. Fortunately the differences do not impact the removal operation.⏎
There is a different arrangement and number and type of chips to the left of the image.One square grey thing nad five rectangular black things ...
Mine does not have the rows of test points above the track pad cable. -
-
-
Attrezzo utilizzato in questo passaggio:Tweezers$4.99
-
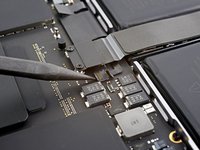
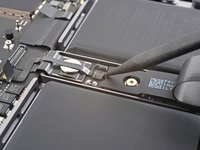
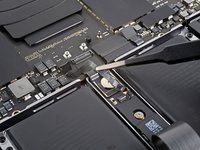
Usa le pinzette o le dita per rimuovere l'attacco del cavo del trackpad.
This photograph does not match my 2021 Macbook Pro. Fortunately the differences do not impact the removal operation.⏎
There is a different arrangement and number and type of chips to the left of the image.One square grey thing nad five rectangular black things ...
Mine does not have the rows of test points above the track pad cable. -
-
-
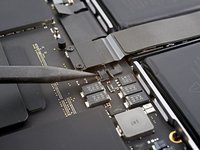
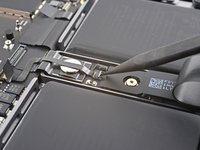
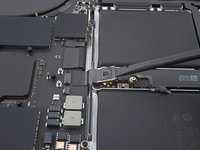
Usa l'estremità piatta di uno spudger per sollevare e scollegare il connettore a pressione del cavo del trackpad dalla scheda logica.
This photograph does not match my 2021 Macbook Pro. Fortunately the differences do not impact the removal operation.⏎
There is a different arrangement and number and type of chips to the top/left of the red circle.One square grey thing nad five rectangular black things ...
Mine does not have the rows of test points to the left of the track pad cable. -
-
-
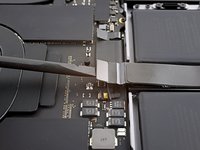
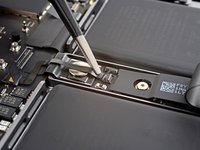
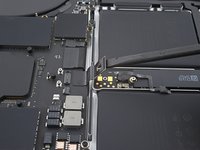
Stacca il cavo del trackpad dal dispositivo, assicurandoti di separare l'adesivo.
This photograph does not match my 2021 Macbook Pro. Fortunately the differences do not impact the removal operation.⏎
There is a different arrangement and number and type of chips to the top/left of the red circle.One square grey thing nad five rectangular black things ...
Mine does not have the rows of test points to the left of the track pad cable. -
-
-
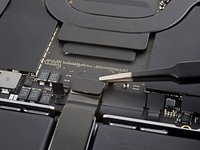
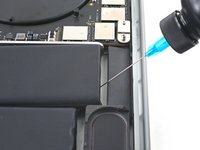
Solleva l'eventuale nastro che copre il connettore del cavo dati della scheda batteria sotto la grande vite piatta.
-
-
-
Fai scorrere le pinzette a punta smussata sotto le aree con adesivo per separare il cavo dal dispositivo.
-
Rimuovi il cavo dati della scheda batteria.
This photograph does not match my 2021 Macbook Pro. Fortunately the differences do not impact the removal operation.⏎
There is a different arrangement and number and type of chips to the left of the tweezers.One square grey thing nad five rectangular black things ...
-
-
-
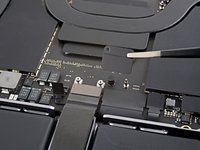
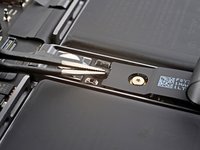
Utilizza un cacciavite Torx T5 per rimuovere la vite piatta da 3,9 mm che fissa il connettore di alimentazione della batteria.
This photograph does not match my 2021 Macbook Pro. Fortunately the differences do not impact the removal operation.
There is a different arrangement and number and type of chips to the top/left of the red circle.One square grey thing nad five rectangular black things ...
-
-
-
Usa uno spudger per sollevare il connettore dell'alimentazione della batteria, scollegando la batteria.
The previous image did not match my Macbook Pro, this one does.
Two square grey things, three rectangular smaller black things. :-) -
-
-
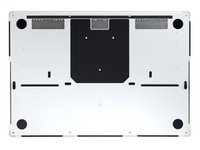
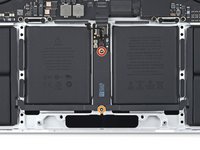
Utilizza un cacciavite Torx T5 per rimuovere le 13 viti che fissano il gruppo del trackpad:
-
Dieci viti da 5 mm
-
Tre viti da 5,8 mm
-
-
-
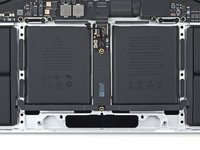
Apri leggermente il display, ma mantieni il MacBook capovolto. Il gruppo del trackpad dovrebbe separarsi e appiattirsi sul display.
-
Fai passare con attenzione il cavo a nastro del trackpad attraverso la fessura nel telaio.
-
-
-
Utilizza un cacciavite Torx T5 per rimuovere le due viti che fissano la scheda della batteria:
-
Una vite da 4,4 mm
-
Una vite da 3,8 mm
-
-
-
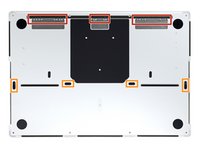
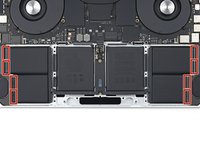
Sono presenti otto strisce adesive a cui si accede dalla parte inferiore del dispositivo.
-
Ci sono altre sei strisce adesive a cui si accede dalla posizione del trackpad sul telaio.
-
-
Attrezzo utilizzato in questo passaggio:Tweezers$4.99
-
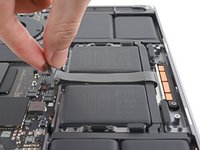
Usa le pinzette o le dita per afferrare la linguetta nera su una delle strisce adesive.
-
-
-
Estrai la striscia lentamente e in modo costante con un'angolazione bassa. Dagli tutto il tempo necessario per allungarsi e staccarsi da sotto la batteria.
-
Se la striscia adesiva si rompe, prova a recuperarla utilizzando le dita o delle pinzette smussate e continua a tirare, ma non fare leva sotto la batteria.
-
Ripeti la procedura per tutte le 14 strisce adesive elastiche.
-
-
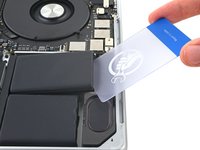
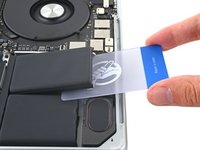
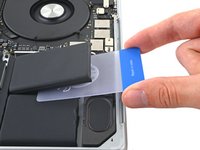
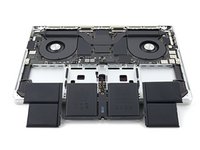
Attrezzo utilizzato in questo passaggio:Plastic Cards$2.99
-
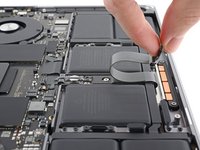
Inserisci una scheda di plastica tra la batteria e il telaio.
-
Fai leva con la scheda mentre tagli l'adesivo per separare la batteria dal telaio.
-


Per rimontare il dispositivo, segui queste istruzioni in ordine inverso.
Per prestazioni ottimali, calibrare la batteria appena installata dopo aver completato questa guida.
Confronta la tua nuova parte sostitutiva con la parte originale: potrebbe essere necessario trasferire i componenti rimanenti o rimuovere i supporti adesivi dalla nuova parte prima di installarla.
Porta i tuoi rifiuti elettronici a un riciclatore certificato R2 o e-Stewards.
La riparazione non è andata come previsto? Prova alcune soluzioni di base per la risoluzione dei problemi, o chiedi aiuto alla nostra comunità Risposte per MacBook Pro 16" 2021.
Annulla: non ho completato questa guida.
Altre 20 persone hanno completato questa guida.
Un ringraziamento speciale a questi traduttori:
100%


Questi traduttori ci stanno aiutando ad aggiustare il mondo! Vuoi partecipare?
Inizia a tradurre ›


16 Commenti
This is what I search for! Such a great guide!
Hi there!
Unfortunately, we are not currently selling MacBook Pro 16" 2021 batteries. We are hoping to sell them sometime soon. You may want to consider checking with other retailers or online sources for the specific battery you need.
Why does step 22 talk about installing a new trackpad? That part left me confused.
Hi Ted!
Great question...and I don't have a great answer in return. So, I have changed the step accordingly!
Months of searching..finally have an answer to my own question having found a battery on my own.
This one fits my Macbook Pro M1 2021 16" model.
https://www.amazon.com/Battery-Replaceme...
Hello, I have received shaking after completing all the steps. Is there an adhesive applyer?
Where are the replacement adhesive pull strips? It's odd they are not part of the iFixit kit.
The kit I received had adhesive already on the back of the battery. It made it easy to place battery in laptop and press down to secure it.
Der Austausch der Battery brachte mir überraschend nichts, bei eingeschaltetem Bildschirm (ohne Tätigkeit) entladete sich die Batterie in kürzester Zeit. Zufällig sah ich aber beim Verkäufer, dass die meisten Käufer auch ein neues Ladegerät mitbestellten: nun habe ich ein Zweifel, ob man nicht etwa genauso ein neues Ladegerät braucht, um die Batterie "richtig" aufzuladen? Finde ich auch seltsam, dass hier im iFixit darüber nichts gesagt wird.........2)meine Frage ist auch, ob man eine Neu- "Kalibrierung" nach der Installation machen muss?
3.) bei der Neuinstallation der SSD NVMe Speicher wird das Volumen erst gar nicht erkannt, "Time Machine" mit Backup ist leer......wo könnte ich eine Anleitung für die Installation bekommen? MacBook Air (13-inch, Early 2015)
Prozessor 1,6 GHz Dual-Core Intel Core i5
Speicher 8 GB 1600 MHz DDR3
I completed this replacement using the battery and tools from iFixit for $150. The replacement process worked well, and my comments for others is to be careful when taking old battery out not to damage the screen. I had to pry the battery out of the case and noticed that I was lucky I didn’t damage the screen when doing this. You can’t see under the battery when you’re prying it, and there are places you could damage screen if you pried in the wrong spot.
The other comment is that my laptop wouldn’t recognize the new battery once I installed it. Perhaps there was something else wrong with my laptop. I paid $850 for Apple do the replacement. The Apple repair site has instructions https://support.apple.com/en-us/100585 Apple sells only the battery, keyboard and top case as one unit for $615 plus $88 credit if you return your parts so about $530.
This looks like one of the most unpleasant mac repairs since I cracked open a PowerMac 6500. How difficult/frustrating is the stretch adhesive?
It'd be frustrating if I'd cracked my screen so be careful of that. The adhesive didn't release with the rubbing alcohol so I just had to pry and pull hard on the battery to get it out. It wasn't pretty, but I didn't care that I was wrecking the battery I was removing. The new battery had the adhesive already applied to it, so it was easy to install.
It'd be frustrating if I'd cracked my screen so be careful of that. The adhesive didn't release with the rubbing alcohol so I just had to pry and pull hard on the battery to get it out. It wasn't pretty, but I didn't care that I was wrecking the battery I was removing. The new battery had the adhesive already applied to it, so it was easy to install