
Sostituzione SSD Mac mini (2024)

Introduzione
Vai al passo 1Segui questa guida per sostituire l'SSD nel tuo Mac mini (2024).
Questa guida è stata scritta con un Mac mini M4 con specifiche di base. Sebbene l'SSD per la versione M4 Pro sia più lungo e in una posizione diversa, la procedura di smontaggio è la stessa.
Mentre l'SSD del Mac mini sembra un normale SSD M.2, manca un controller di archiviazione. Apple integra i controller di archiviazione nel SoC Apple Silicon, il che significa che gli SSD normali sono incompatibili.
Questa guida è puramente didattica su come sostituire l'SSD con un altro dello stesso tipo: non fornisce istruzioni su come produrre gli SSD proprietari di Apple.
Cosa ti serve
Strumenti


Mostra di più…
-
-
Spegni completamente il tuo Mac mini e scollega tutti i cavi.
-
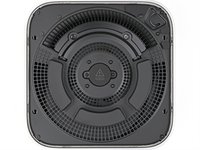
Capovolgi il tuo Mac mini e appoggialo su una superficie pulita e piana per evitare di graffiare la scocca.
-
-
-
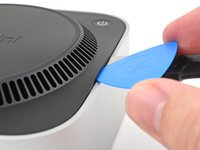
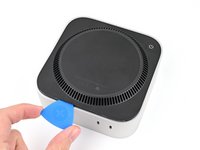
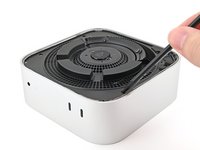
Inserisci un Jimmy nello spazio fra la copertura inferiore e il telaio.
-
Fai leva con il Jimmy per creare uno spazio.
-
Tieni il Jimmy inserito sotto la copertura inferiore.
It is much easier to get the plastic "pick" under the cover by inserting it UNDER the metal blade (between the blade and the aluminum case) while the blade is more vertical, then bringing the blade down on top of the pick, forcing the fan cover edge up higher. From that position, the pick can easily be pushed in further under the cover and to one side. In other words, instead of putting the pick in OVER the metal blade as shown, put it UNDER. This also protects the aluminum from damage marks of the blade.
-
-
-
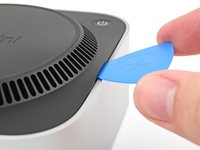
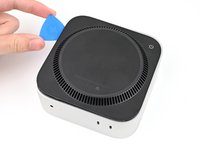
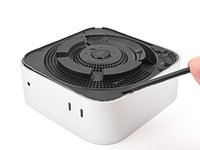
Inserisci un plettro di apertura nello spazio creato prima col Jimmy.
-
Estrai il Jimmy.
-
-
-
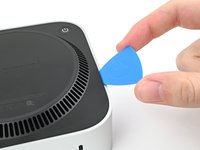
Scorri il plettro di apertura lungo la copertura inferiore finché non senti che tocca una clip.
-
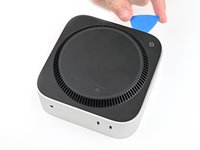
Ruota il plettro per sollevare la clip dalla sua fessura.
-
-
-
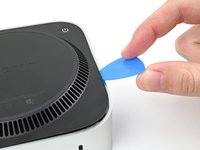
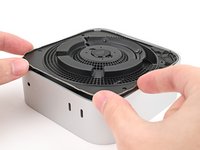
Continua a far scorrere e a far leva con il plettro lungo il perimetro della copertura inferiore per sganciare tutte le clip rimanenti.
"Don't insert the pick more than an inch near the power button" is incorrect wording.
I think you mean "Don't insert the pick less than an inch from the power button".
Hi David!
For that warning, it's about not inserting the pick too deep under the bottom cover that you risk hitting the cable as you work around the perimeter. The wording is confusing though, so I'll change it!
-
-
-
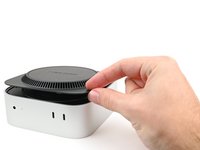
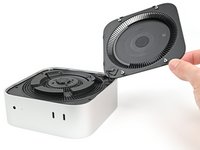
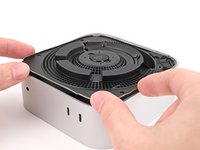
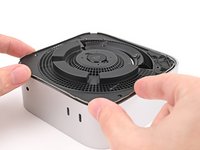
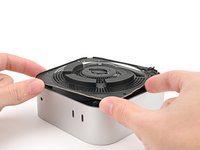
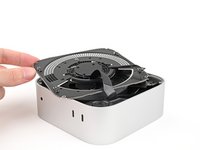
Solleva il bordo della copertura inferiore opposto al pulsante di accensione e capovolgila per esporre il cavo del pulsante di accensione.
There are three electrical connectors in this disassembly operation. Having experienced the fragility of these connectors on previous macs, I chose to NOT DISCONNECT any of them, and it actually SAVES TIME fiddling with them.
IT IS NOT ESSENTIAL to disconnect ANY of these connectors. And it is safer, particularly if you are not experienced. Just take your time and be gentle moving the cover and fan out of the way and resting to the side to get to the SSD screw. It REALLY IS UNNECESSARY TO DISCONNECT ANY CONNECTORS. -
-
-
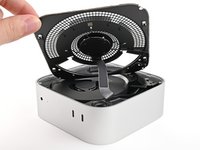
Afferra il cavo del pulsante di accensione vicino alla testa e tiralo via dalla presa per disconnetterlo.
it tore open immediately. DO NOT TRY THIS.
Nicht notwenig man kann den Bodenteil einfach "überlegen"
Change these instructions, I also damaged my connector.
This one is different from other connectors, pull up, not along the length of the cable.Or even better just move it aside or use the 4 Torx to remove it.
How did you fix the connector afterwards? I‘ve the same problem. I broke the connector…
Christof -
another wrecked connector come on fix it change this step
The 13 comments on this step should've tipped me off, but alas, another one bites the dust. On the bright side, I can see this as a grand opportunity to DIY my own power button and glue it onto a sensible place instead of the underside like a psychopath lol
I didn't see the comments at first... was consternated about the direction "...pull it away from it's connector", which isn't clear. As others have said: don't pull it sideways/along the wire, lift it upward, towards your face. Like a Lego block. I was lucky - I didn't break my connector, but was using a small tool to lightly help pry it up.
Another broken connector! Really bad instruction.
Hätte ich nur die Kommentare gelesen! One more broken connector...
-
-
-
-
Prendi la copertura inferiore e rimuovila.
The power button is better to be completely unscrewed then to pull at the connector as it shattered in a 8th of a second.
-
-
Attrezzo utilizzato in questo passaggio:FixMat$36.95
-
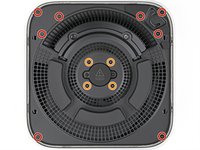
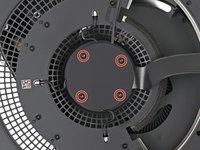
Utilizzare un cacciavite T5 Torx per rimuovere le dodici viti che fissano la piastra interna:
-
Otto viti da 3,4 mm di lunghezza
-
Quattro viti da 2,4 mm di lunghezza
-
-
-
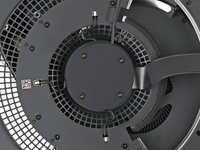
Inserire la punta di uno spudger in una delle fessure della clip sulla piastra interna.
-
Sollevare la piastra interna abbastanza in modo da poter afferrare il bordo lungo dal lato dove si trova il jack per cuffie.
-
-
-
Tirare la piastra interna lontano dal telaio per farla scorrere fuori da sotto il labbro sul dissipatore di calore.
-
-
-
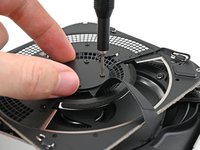
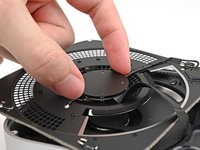
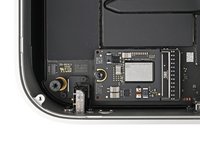
Utilizzare una mano per tenere il modulo wireless durante questa fase.
-
Utilizzare un cacciavite Torx Plus 5IP per rimuovere le quattro viti di 2,5 mm che fissano il coperchio del modulo wireless.
-
-
-
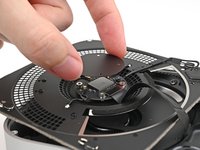
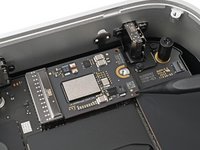
Utilizzare una mano per tenere il modulo wireless durante questa fase.
-
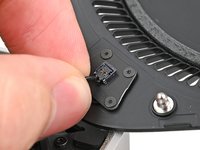
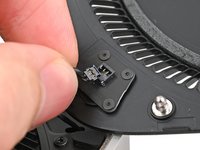
Inserire la punta di uno spudger sotto uno dei bordi corti del connettore a pressione del modulo wireless.
-
Sollevare per disconnettere il modulo wireless.
-
-
-
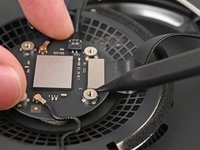
Utilizza un cacciavite Torx Plus 8IP per rimuovere la vite lunga 4,1 mm che tiene fermo l'SSD.
-
-
-
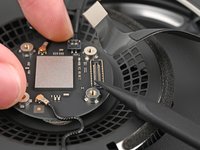
Inserisci la punta di uno spudger in uno dei fori lungo il bordo inferiore dell'SSD.
-
Usa lo spudger per staccare l'SSD dalla sua presa, alternando i lati se necessario, finché non è completamente scollegato.
-
-
-
Afferra l'angolo dell'SSD, inclinalo verso l'alto contro il jack delle cuffie ed estrailo dalla sua presa.
I appreciate the guide, it is very thorough and well laid out as one would expect from iFixit. I did notice that it was not necessary to unplug the fan in my case. That jack that is directly behind the SSD is kind of a pain if you do not pull the drive the right way.
Great. But... where to find compatible SSD?
-


Per riassemblare il dispositivo, segui le istruzioni nell'ordine inverso.
Porta i tuoi rifiuti elettronici a un riciclatore certificato R2 o e-Stewards.
La riparazione non è andata come previsto? Prova delle soluzioni ai problemi di base o rivolgiti alla nostra comunità Risposte per trovare aiuto.
Per riassemblare il dispositivo, segui le istruzioni nell'ordine inverso.
Porta i tuoi rifiuti elettronici a un riciclatore certificato R2 o e-Stewards.
La riparazione non è andata come previsto? Prova delle soluzioni ai problemi di base o rivolgiti alla nostra comunità Risposte per trovare aiuto.
Annulla: non ho completato questa guida.
Altre 27 persone hanno completato questa guida.
Un ringraziamento speciale a questi traduttori:
100%


Questi traduttori ci stanno aiutando ad aggiustare il mondo! Vuoi partecipare?
Inizia a tradurre ›


18Commenti sulla guida
"Apple's unique SSDs aren't sold by Apple and aren't currently available by a third party." is no longer correct. https://expandmacmini.com has tested options to upgrade SSD to 2TB.
Fixed! Thank you!
Thanks, as always, for such a wonderful job in explanation and photos as to how this disassembly and upgrade of the M4 Mac Mini. I and many others thank you for this work that you do so well. I have just purchased an M4 Mini with only 256 GB internal drive, although, I did opt for an upgrade of the RAM to 32 GB; but, as everyone knows, and extra $500 as a charge from Apple for this much extra RAM makes for quite an expensive addition to the cost. But, now that I have an option to upgrade the internal drive to 2 TB, my Mini will be really powerful, with lots of room to spare!
After the installation, (or prior to?) how does one install the OS? Thank you
Hi, I'm looking at tools I need to do this. In the What You Need section, above, it says a Torx Plus 8IP Screwdriver and TR8 Torx security is needed. However, iFixit only has the TR8 Torx Security screwdriver available. I want to know if the TR8 Torx Security screwdriver will remove the single screw holding the SSD in place in the M4 mac mini?
Hello!
Yes, the TR8 Torx security screwdriver will fit the screw holding the SSD! While the screw itself is technically a T8 Torx Plus, a normal screwdriver of the same size will work. Just remember to apply enough downward force to prevent stripping the screw.
Hi can you tell me what is the right fixit tool kit with all the right bit for this operation. I don’t find any Torx Plus 3ip or 5ip listed in a fixit kit
Two risky steps are not needed:
You don't need to remove the plug from the power button (highly likely you damage it), you can just put the cover aside.
You don't need to remove the sticker and plug from the fan (difficult to put back without damaging), you can just put the fan aside.
Thanks James. Was wondering if those two steps are unnecessary.
I confirm, I just replaced my 256GB SSD with a 2TB one without removing the power plug nor the fan plug.
eRudy -
Can Ifixit team upgrade the internal SSD of my M4pro? How much will you charge for that?
M4 Mini Pro SSD replacements are not yet available. Only M4 Mini SSDs as of now (2 April).
Thanks for the guide! It was not necessary to remove the fan cable to remove the SSD.
Have you attempted the same operation with the ‘Studio’?
Warning!!! Do not remove the fan cable. I ruined my Mac Mini M4 by removing the fan cable. When I lifted the cable off with a spludger the socket for the cable came off the circuit board. This would be impossible to repair. I'm still using the Mac Mini without an operational fan but I keep a close tab on the CPU and GPU temperatures with a third party app that monitors the temperatures. It's a good thing I don't do any demanding work like editing videos or this computer would be toast.
Den Mac vorm ausschalten noch vom Account trennen. Sonst kann es zu Schwierigkeiten bei der Neuanmeldung kommen.
MacGyverModeOn - Replica