
Sostituzione SSD MacBook Pro Retina 13" inizio 2013

Introduzione
Vai al passo 1Segui questa guida per aggiornare o sostituire l'SSD in un MacBook Pro Retina da 13" di inizio 2013. Questo MacBook Pro usa un connettore proprietario per la memoria, e quindi non è compatibile con i comuni SSD M.2 senza usare un adattatore.
Prima di eseguire questa riparazione, se possibile, esegui un back up dell'SSD originale. Quindi prendi familiarità con la modalità di recupero via internet o creare una chiavetta USB avviabile in modo da essere pronto ad installare MacOS e trasferire tutti i tuoi dati sul tuo nuovo SSD.
Infine, raccomandiamo fortemente di intallare MacOS 10.13 High Sierra (o successivi) Prima di sostituire l'SSD originale del tuo MacBook Pro. La maggior parte dei nuovi SSD richiedono dei driver aggiornati non presenti nelle versioni precedenti a High Sierra di MacOS.
Cosa ti serve


-
Attrezzo utilizzato in questo passaggio:Magnetic Project Mat$19.95
-
Rimuovi le 10 viti seguenti che fissano il coperchio inferiore al case superiore:
-
Due viti Pentalobe da 2,3 mm
-
Otto viti Pentalobe da 3,0 mm
-
-
-
Rimuovi la copertura in plastica attaccata alla scheda dei contatti della batteria.
My A1502 does not look like this inside.
-
-
-
Rimuovi le seguenti viti che fissano la scheda del connettore della batteria alla scheda logica:
-
Due viti Torx T6 da 2,8 mm
-
Una vite a colletto Torx T6 da 7,0 mm
-
-
-
Usa delle pinzette per rimuovere il piccolo coperchio in plastica posizionato vicino alla parte inferiore destra della scheda del connettore della batteria.
when doing this with metal tweezers as instructed in the video, it was difficult to get off and apparently while i was trying to do it, the tweezers went too far under and i believe made contact with the screw underneath? there was a zzz noise, an orange flicker and a little stream of smoke that came out. i freaked out and put everything back together to see if the laptop even still worked, it turned on and everything but died right away (i drained it before doing the repair anyway, so i was surprised it turned on at all).
i finished the battery repair and did several other things while in there. i have charged it all the way as recommended and will use it later on to see how everything is, im hoping that it’s a okay, but could someone explain to me what happened and the possible consequences?
-
-
-
-
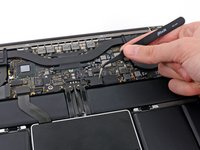
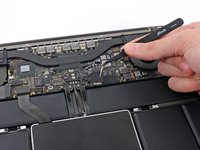
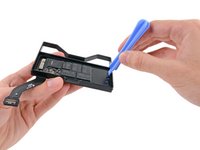
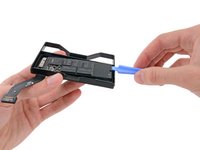
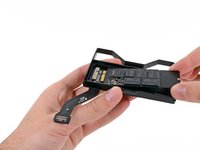
Afferra con delle pinzette l'interposer.
-
Solleval'interposer dalla scheda logica e rimuovilo.
you must lift it absolutely vertically, or it fouls against the locator pin in the corner- you can easily get the impression that it won’t come over the end of this pin- almost like it’s rivetted in. it isn’t. get a good grip on it with the tweezers in the centre hole & one of the sides, & lift it STRAIGHT up.
I would recommend to use plastic tweezers in order to reduce risk of damage.
Second that. If you have thin heat shrink tubing, form some over the tweezer tips. If the tubing is thin and small enough in diameter you’ll see the serrations of the tweezer tips.
wat is the model this SSD
-
-
-
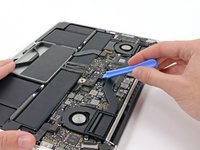
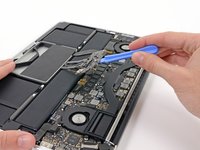
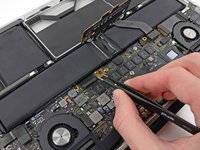
Usa la parte piatta di uno spudger per sollevare il connettore del cavo dell'SSD dalla sua presa sulla scheda madre.
-
-
-
Resta solo l'SSD
A most excellent step by step. I now need to figure out how to grant permission for my backup Air to read my removed Pro SSD files. Perhaps a link from here to that would be helpful.
-


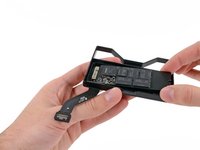

Per rimontare il dispositivo, segui le istruzioni in ordine inverso.
Per rimontare il dispositivo, segui le istruzioni in ordine inverso.
Annulla: non ho completato questa guida.
Altre 55 persone hanno completato questa guida.
Un ringraziamento speciale a questi traduttori:
100%

Questi traduttori ci stanno aiutando ad aggiustare il mondo! Vuoi partecipare?
Inizia a tradurre ›
Preparati per le riparazioni future
Acquista tutti


8Commenti sulla guida
Excelente, muchas gracias
Ok, now that I replaced my SSD - how do I recover my OS?
You can boot your mac to the recovery pressing command + R while you turn on your mac, configure your wifi and then create the partition in the ssd using disk utility, then you can clos disk utility and proceed to the instalation of the OS, the installation will be downloaded from the apple servers so it will depend of your internet speed how long will it take.
Sieht so aus, als würde da eine ganz normale 2,5”-SSD reinpassen, wenn man den Einschub weglässt. Kann man das Kabel am MBP entfernen und ohne den Einschub benutzen?
Geht leider nicht. Die neue NVMe m.2 SSD muss eine Übergangslösung haben. Leicht zu finden beim Internett. Das Übergang ist ein kleines Zeug das Mann braucht der Länge und Datei - Brikett zur passen.
Will it work on a 15inch retina?
Hi, is there a way to install windows 11 on this model? if so, how?
If don’t have one of those neat project mats, then you can use small pieces of flattened blu-tack to hold the screws. If you arrange them in the shape of your mac book cover, and put the screws down methodically, you can get a one-to-one mapping of the screws to the correct screw holes.
Toby Thurston - Replica
Or you can use an ice tray where you put the screws and the parts in separate bays in the same order as they come in the instructions.
timofej.se -
This is great! I used a small magnetic white board, and wrote on it to identify the parts as I went. This whole process, from the fast shipment to the great instructions to the complete, high quality, tool kit has been great. I’m typing this comment on my resurrected laptop. Thank you! Sue
Susan Greer - Replica
It would be a good idea if people recorded in the comments which screws go where so that, if someone lost their screw positions, they could recover them from the comments.
Raymond Shpeley - Replica