
Google Pixel 3a XL Screen Replacement

Introduzione
Vai al passo 1This repair guide was authored by the iFixit staff and hasn’t been endorsed by Google. Learn more about our repair guides here.
Follow this guide to replace a cracked or broken Pixel 3a XL screen, or to get inside the phone and replace a different component.
The OLED display under the glass of the 3a XL screen is fragile—if you plan to re-use your screen after you remove it from your phone, take extra care and follow the directions of this guide closely.
Cosa ti serve
Kit di riparazione
Questo kit contiene tutti i ricambi e gli strumenti necessari per completare questa guida.

Ricambi


Strumenti


Mostra di più…
Panoramica Video
-
-
For reference, the backside of the screen is shown in this step.
-
Note the narrow clearance between the edge of the screen and the OLED panel under the glass. If you plan to re-use your screen, be sure to follow the instructions below closely.
-
Also note the two different seams between the body of the phone and the screen:
-
The screen seam: where the screen meets the rest of the phone. This is where the screen will separate, and where you should pry.
-
The midframe seam: where the midframe meets the body of the phone. This part is held down by screws. Do not pry at this seam.
-
-
-
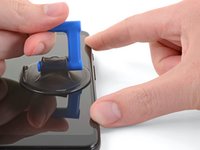
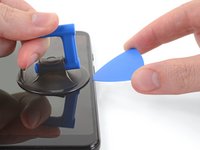
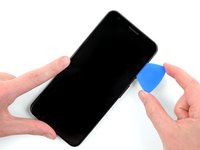
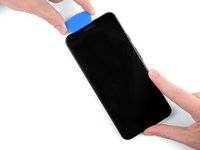
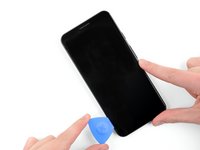
Place a suction cup on the right edge of the screen, just below the volume button.
My screen was SUPER shattered right in this spot — just below the volume button to the bottom right corner and with another shatter diagonal toward the bottom center. You can place the suction cup in a different location and start the prying, as long as you’re not trying to start it at the top or bottom edge. I started above the volume button but below the top edge.
-
-
-
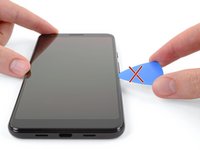
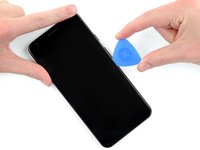
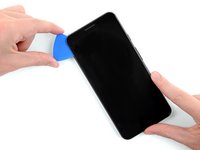
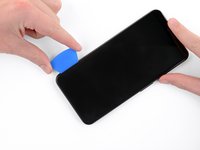
If you aren't careful, the plastic opening tool can damage the fragile OLED display panel underneath the glass.
-
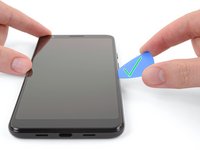
If you want to re-use your phone's screen, make sure you insert your pick at a downward angle, as shown in the second photo of this step.
-
This will ensure the opening pick slides under the OLED panel rather than between the glass and the panel, which will ruin the screen.
-
-
-
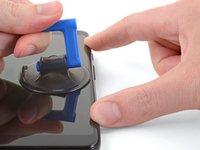
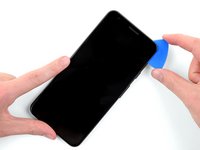
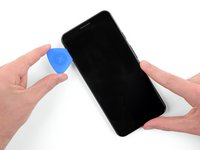
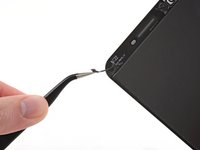
Pull up on the suction cup with a strong, steady force to create a gap between the screen and the phone.
-
Insert your opening pick into the gap.
-
Stop if you feel the tip of the pick hitting against something. The pick may be pressing against the edge of the OLED panel. Angle the pick downward and try again.
-
-
-
If you plan to reuse your screen, heat up the top edge of the phone with an iOpener, a heat gun, or a hair dryer to loosen the adhesive there before you begin slicing.
-
-
-
-
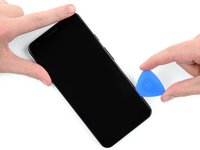
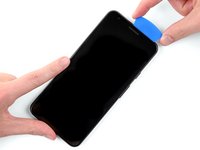
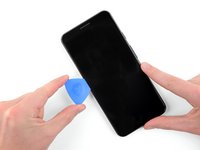
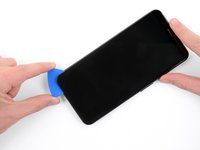
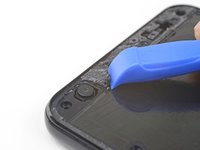
Carefully slide your opening pick around the upper-right-hand corner of the screen.
-
If you plan to reuse your screen, take special care in this step to either keep your pick deep in the phone under the OLED display (as shown in this step's photos), or only insert it 5 mm into the device to avoid coming into contact with the display under the glass.
-
-
-
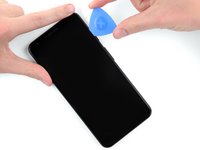
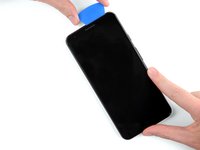
Continue to separate the adhesive along the top edge of the display.
For me, there were multiple cracks/shatters around the bottom edge and bottom right edge. It was a huge pain to get the screen off—I eventually pulled most of the screen off and then had a bunch of shattered pieces still stuck to the bottom edge that I had to take off with the tweezers. If you’ve got some really bad shattering around the TOP edge, you’ll have to be extremely careful here.
-
-
-
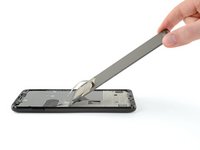
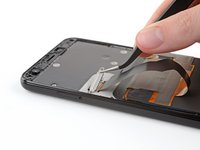
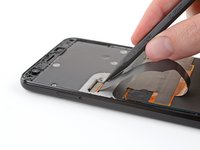
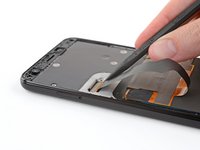
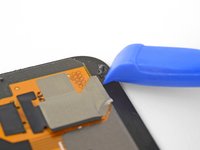
Slide your opening pick along the bottom edge of the phone to separate the last of the adhesive holding the screen in place.
-
If you plan to reuse your screen, take special care in this step to either keep your pick deep in the phone under the OLED display (as shown in this step's photos), or only insert it 5 mm into the device to avoid coming into contact with the display under the glass.
-
Don't try to remove the screen yet! It is still connected to the phone by a display cable.
-
-
-
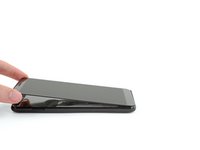
Remove the screen from the phone.
-
Compare your new replacement part to the original part. You may need to transfer remaining components such as the speaker grille and the camera bracket to the new part.
Keep your broken screen! Your replacement screen may be missing two pieces - the top speaker grill and the grey plastic camera surround. You’ll need to salvage these carefully from your old screen. Heat the glue to soften it before removing, if you’re lucky it will still be attached to the pieces and you can simply stick them onto the new screen.
Good point! I will add a note to point this out.
-
-
Attrezzo utilizzato in questo passaggio:Tesa 61395 Tape$5.99
-
Use tweezers or an opening tool to remove all traces of adhesive from the phone frame. You can use high concentration isopropyl alcohol to help with the cleaning.
-
If you plan to re-use the screen, be sure to remove all adhesive residue from the screen. Be careful with metal tools to avoid scratching the screen.
-
Apply pre-cut adhesive or double-sided tape (such as Tesa tape) to re-attach the screen to the frame.
Maybe it’s because I didn’t heat my adhesive enough but it took me FOREVER to get it fully off. I was scraping with the flat side of the black spudger but it would have been better to use the blue scraper, which is in this kit but never mentioned. The kit also includes a single 70% isopropyl alcohol wipe but I needed at least 3. You can buy boxes of hundreds of the little pads at any drugstore—they’re good to have on hand for first aid kits, too. Be sure to get the adhesive off the narrow edges along the sides, I used the pointy end of the black spudger for that.
When you go to apply the pre-cut adhesive, it will be harder than correctly applying screen protectors. Although it’s awkward, align it from the top first without taking the backing off, make sure it’s flush all the way down. fix it in place at the top with your hand and then remove the backing. Hopefully that will help apply it evenly. I started from the bottom and it was a huge mistake. If you mess it up and try to peel it up, the narrow adhesive on the sides will stretch a lot and you’ll have to break it and then sort of carefully nudge it into place millimeter by millimeter. I had to do this and used the pointy black spudger end. Even so, I was able to get it relatively flat and the screen seems pretty flush with the body.
I did all thoses steps but didn’t glued the screen yet and it’s not working do I need to glue it to make it function or is there another problem?
Sealing your phone after a repair won’t interfere with its function. Good choice to test the phone before installing replacement adhesive, though! Sounds like it will need more troubleshooting. Head on over to our Answers community if you get stuck!
-


If your Pixel won't turn on after replacing the screen, there is a chance that the phone has silently turned on when the battery is re-connected. Hold the power button for a few seconds until the phone vibrates off. Afterwards, re-connect the screen, and try again.
To reassemble your device, follow these instructions in reverse order.
Take your e-waste to an R2 or e-Stewards certified recycler.
Repair didn’t go as planned? Check out our Google Pixel 3a XL Answers community for troubleshooting help.
Annulla: non ho completato questa guida.
Altre 31 persone hanno completato questa guida.

22Commenti sulla guida
I replaced the display and when it is turned on for the first time, everything works, but when it goes on standby when I switch it on again the touchscreen doesn't work anymore.
Rensan that is very weird! I would try resetting the phone, if you can? Sometimes that helps smooth out weird bugs with new Pixel displays.
I had the exact same issue, it was really weird. Turns out to be a hardware fault in the display, so I returned it and the new display works fine.
I'm having the same issue, gonna send the replacement screen in for a replacement. I got it from gadgetfix on eBay.
The screens got recalled for a period of time due to this exact issue. i only know about it because my screen had broken, and absolutely no parts supplier online or here locally in Los Angeles could even order the display assembly.
In system settings go to gestures and turn off active edge. That worked for me.
Everything worked fine!
Thank you very much for this work!
Does this apply if I just want to replace the glass, rather than the whole panel?
I got the pre-cut adhesive and I guess I’m a little confused about how to apply it ?
Hi Christopher,
Check this guide for some tips on how to apply the adhesive.
I've done this, but the screen isn't working. When pressing the power button, it vibrates as normal, but the screen doesn't light up. I've disconnected and reconnected the screen several times, but still the same issue. Any ideas?
Emily, that is the worst! I’m so sorry. There are two possible scenarios here. 1: The phone isn’t recognizing the new screen and needs some sort of reset. Try a soft reset—hold the power button down for 30 seconds until the phone power cycles a couple times. If that doesn’t work, reattach your old display and make sure that one is still working. If it is, reconnect the new one and try a factory reset over USB (there are instructions all over, here’s one link you can try). Sometimes it takes a factory reset to get the phone to accept the new display. 2: the second, more unfortunate scenario is you may have damaged your display connector, or perhaps the replacement display is a dud. Again you can find out by reconnecting your old display to see if that one is still working. If it’s a faulty display and we sold it to you, you can reach out to our customer service team and they should be able to get you a working one in no time! Best of luck, I hope this helps.
Excellent guide, Taylor. My phone survived a fall from the top of a roller coaster (my fault, came out of my pocket), screen shattered but mb and frame survived. First screen was a lemon and surprise, the seller is no longer around. Second screen works perfectly, thanks for the great guide!
Also try the full reboot. volume down and power switch for 30 seconds or so, gets you to bootloader screen..
I have some relatively old electronics repair experience (2009-2010 hardware repair for laptops, iMacs, desktops). I’ve done many very similar steps on larger devices, so I wasn’t intimidated. That being said, it still took me 1.5 hours to do—but it did work by the end! I added many comments above at each step that will hopefully help others not spend so much time and not make my same mistakes.
Thanks for leaving comments and feedback! I’m sure they’ll be helpful for future fixers!
Guide worked for replacing my smashed screen.
It took a lot longer than the 30 mins quoted because my screen was very damaged (glass smashed into bits). The screen failed to peel off cleanly and the tops and bottoms still had glass clinging to them as it broke at the cracked areas. I didn’t use heat as suggested since I was worried about potentially overheating it by accident, this might have helped reduce the time.
Overall, the guide was pretty accurate, and the iFixIt part + repair tools I bought provided all the items I needed which is great.
I just finished repairing mine and noticed a bit of plastic sticking out of the side of the phone. It’s probably from the backside of the new screen. Do I have to take it off?
Very Helpful, Thank-you!!
Would like to point out, after reading all the steps and doing a “dry run” in my head. After removing the old screen (especially if damaged and have many fragments of glass) to remove glue, clean off back. Then apply the new glue or tape strips. Once done then attach new screen.
The hardest part which took the most time was getting off ALL the old glue and fragments of the broken glass. Applying the tape and removing the second side also took a bit, think with the new glass attached would have much more of a chance of damaging the new cablle.
Thanks again, Great tutorial
Worked perfectly!!
Touch screen isn't working after replacement with a brand new OEM screen. Any ideas?
so i have a question im thinking of fixing my brothers pixle 3a xl and the full oled display is dead because he cracked the glass and then spilt ice cream into it and the oled lair died with turning into purple slowly in the next few days until fully dyeing and i am thinking of fixing it but none of them are answering my question would it be fixable?
Help pls. I replaced it and it worked great for 1 week, but suddenly the screen went dark as it has died with a horizontal line in the middle of the screen, and it didn't turn on anymore :( Could it be a defect in the part [hardware fault in the display] or was the LCD broken, even it is not visible broken?
The note about the different seams is very helpful! Thank you for including this!
David - Replica