Sostituzione pannello LCD iPad 6 WiFi
Introduzione
Vai al passo 1Sostituisci il pannello LCD danneggiato o difettoso in un iPad 6.
Stai molto attento quando isoli la batteria utilizzando un blocco per batterie. I contatti della batteria si danneggiano facilmente, causando un danno irreparabile alla scheda madre. Se decidi di seguire questa guida senza isolare la batteria, evita di usare degli strumenti in metallo tranne quando strettamente necessario (come per svitare le viti) per evitare di far fare corto circuito alla batteria e danneggiare delle componenti delicate.
Cosa ti serve
Ricambi
Strumenti
Mostra di più…
-
-
Scalda un iOpener e appoggialo al bordo sinistro del dispositivo per due minuti.
-
-
-
Mentre aspetti che l'adesivo si allenta, prendi nota delle seguenti aree che sono sensibili alla leva:
-
Fotocamera frontale
-
Antenne
-
Cavi dello schermo
-
-
Attrezzo utilizzato in questo passaggio:Clampy - Anti-Clamp$24.95
-
Tira indietro la manopola blu per sbloccare i bracci dell'Anti-Clamp.
-
Posiziona un oggetto sotto il tuo iPad così che rimanda parallelo alla superficie di appoggio tra le due ventose.
-
Posiziona le ventose vicino al centro del bordo sinistro, una sulla parte superiore e una sulla parte inferiore.
-
Tieni ferma la parte inferiore dell'Anti-Clamp e premi con decisione sulla ventosa superiore per farle fare presa.
-
-
-
Aspetta un minuto per dare all'adesivo la possibilità di separarsi e creare una fessura per l'apertura.
-
Se lo schermo non si sta scaldando abbastanza, puoi usare un asciugacapelli per scaldare lungo il bordo sinistro dell'iPad.
-
Inserisci un plettro di apertura sotto il digitizer quando l'Anti-Clamp crea una fessura abbastanza grande.
-
Salta il prossimo passo.
-
-
-
Una volta è caldo al tatto, appoggia una ventosa con manico al bordo sinistro dello schermo, il più vicino possibile al bordo.
-
Solleva lo schermo con la ventosa per creare una piccola fessura tra il digitizer e il telaio.
-
Inserisci un plettro nella fessura tra il digitizer e il telaio.
I had a screen that was lightly cracked, and when I pulled up on the glass it cracked even further and made a mess of my removal. So, I would recommend taping cracks even if you can get suction so that you don’t induce even more cracks.
I actually had a really badly cracked digitizer. Using the suction cup did nothing but shatter the digitizer more. I intentionally drove a flat head screw driver into the digitizer to reveal the recess in the body where they are showing the opening-pick. Working around the edge, the glass shattered. You still need to be careful at all of spots noted in step 2.
Do not go under the digitizer more than the 1 mm along the sides or 3-4 mm at the corners as shown in step 29 using the flat grey ring around the edge for a reference. Direct all of your tool force into the body to prevent slipping into critical parts.
The antennas at either side of the home button were the trickiest part as they were thin and slightly attached to the digitizer. I would recommend using a plastic tool for these parts if you are having to 'scrape' the glass off of the tabs of the antenna.
-
-
-
Inserisci un secondo plettro nella fessura che hai appena creato.
-
Fai scorrere il plettro verso l'angolo in basso a sinistra del dispositivo per separare l'adesivo.
-
Lascia il plettro nell'angolo in basso a sinistra per evitare che l'adesivo si rincolli.
-
-
-
Scalda un iOpener e appoggialo sul bordo superiore del dispositivo per due minuti.
-
-
-
Fai passare il plettro intorno all'angolo in alto a destra del dispositivo per separare l'adesivo.
There is a lot of adhesive in this corner, so if the glass is very shattered here, this procedure is extremely difficult. Even when heated up and glass surface taped, the adhesive is stronger than the shattered glass. This means that attempting to move the pick below it will shatter the glass even more, rather than separate the digitizer from the adhesive.
-
-
-
Fai scorrere il plettro di apertura lungo il bordo superiore del dispositivo, fermandoti appena prima di raggiungere la fotocamera frontale.
-
-
-
-
Scalda un iOpener e appoggialo sul bordo destro del dispositivo per due minuti.
-
-
-
Gira intorno all'angolo in alto a destra del dispositivo con il plettro per separare l'adesivo.
-
-
-
Inserisci un nuovo plettro di apertura e fallo scorrere verso il centro del bordo destro dell'iPad.
There are sensitive display/digitizer cables no less than five inches from the bottom edge of the iPad. Insert the pick further down than this, or deeper than 1mm beyond this point and you risk irreparably damaging these cables.
Three inches is much too far down this side of the iPad to use picks.
-
-
-
Scalda un iOpener e appoggialo al bordo inferiore del dispositivo per due minuti.
-
-
-
Fai scorrere il plettro in basso a sinistra verso l'angolo in basso a sinistra per separare l'adesivo.
-
Lascia il plettro inserito nell'angolo in basso a sinistra prima di passare al prossimo passo.
-
-
-
Inserisci un nuovo plettro nella fessura che hai appena creato sul bordo inferiore dell'iPad.
-
Fai scorrere il plettro oltre l'antenna, fermandoti appena prima del tasto home.
-
Lascia il plettro a sinistra del tasto home prima di continuare.
-
-
-
Inserisci un plettro di apertura nella fessura che hai appena creato.
-
Fai scorrere il plettro sotto il tasto home e verso l'angolo in basso a destra, accertandoti che solo la punta si trova tra digitizer e telaio.
Be careful with this step. Only insert the tip, 2-3mm. I broken the touch id and home button. No replace or fix to get the touch id working again.
-
-
-
Scalda un iOpener e appoggialo al bordo destro del dispositivo per due minuti.
-
-
-
Mentre supporti il digitizer, fai scorrere un plettro di apertura tra i due cavi dello schermo per separare l'adesivo rimasto.
-
-
-
Una volta che tutto l'adesivo è separato, apri il digitizer come un libro e appoggialo parallelo all'iPad.
While reassembling, REALLY make sure the display cables and the home button cable won't be folded / bent while closing the digitizer. I'm not exactly sure what I did, but I broke the home button and touch ID since I bent the home button cable to the point that it broke. These ribbon cables are SUPER fragile.
-
-
-
Rimuovi i pezzi di nastro adesivo che coprono le viti del pannello LCD.
-
-
-
Svita le quattro viti a croce Phillips #00 da 4,3 mm che tengono fermo il pannello LCD.
Both of the iPad 6th gen models i have seen so for (note they were cellular also) had the LCD secured with a grey silicone kind of adhesive in each corner under the screws. So you can’t just lift the LCD as you normally would after removing screws, it would break. I found you could pick at the corner closest to the rear camera easiest, slightly lift that corner and gently separate the other side next to the headphone jack. Then while supporting the LCD , lever the other end free with a up-and-down motion making slight progress each time.
On my iPad 6, there were small rubber tabs covering the two screws on the front camera side. I carefully held them out of place with tweezers while unscrewing the screws.
-
-
-
Usa la parte piatta di uno spudger per sollevare il pannello LCD dal suo alloggio il sufficiente per poterlo prendere con le dita. Ci potrebbe essere della colla attorno ai fori delle viti che va tagliata con un coltello.
-
Apri il pannello LCD come un libro, sollevandolo dall'estremità della fotocamera anteriore e girandolo attorno al bordo del tasto Home sulla copertura posteriore.
-
Appoggia il pannello LCD sulla sua faccia per accedere ai cavi dello schermo.
When you replace the LCD be sure to make sure it is screwed in fully. It is easy not, especially on the cornet where the digitizer cables are. The LCD is very sensitive and if you bend it then it can stop working. I was just pressing the digitized in place at the end of a repair and the screen was covered in white lines.
I have no idea of what the logic board looks like !!!
-
-
-
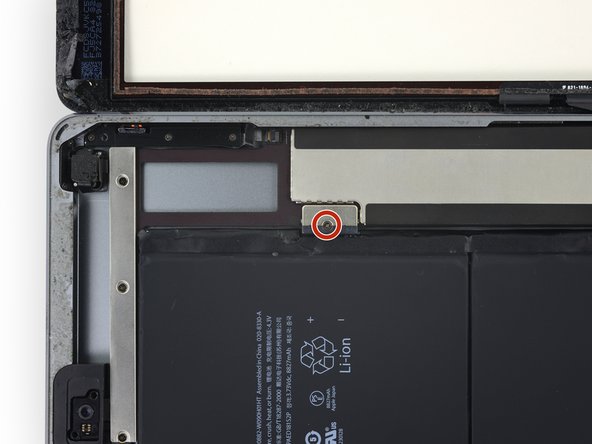
Svita la vite a croce Phillips #000 da 2,3 mm che fissa il connettore della batteria alla scheda madre.
-
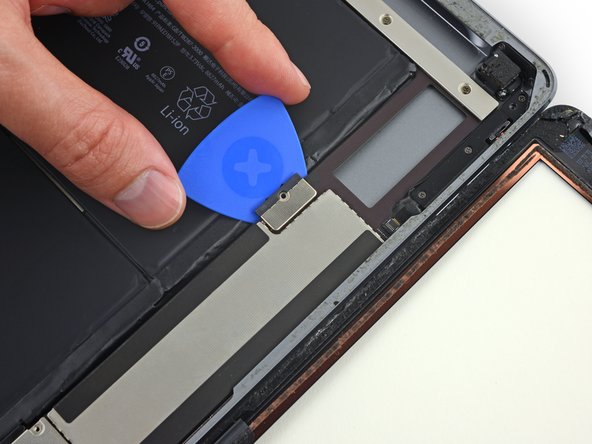
Infila il blocco batteria sotto il connettore della batteria della scheda madre ad un angolo di 35°.
-
Lascia il blocca batteria al suo posto mentre lavori.
If you insert a regular pick without a gap then you can damage this connector and will need a new motherboard. If in doubt just insert into the left corner enough to raise it a tiny bit. Arguably, if you are not sure, then it is safer just power off and don’t power back on until everything is fully connected. A photo of how this connector looks with its cover off would really help for people that have not seen this type of battery connector before. You just need to get it to lift a tiny bit, Do not try to slide anything under the contacts….
I bumped this darn thing several times, it was twisted and skewed making me freak out but the iPad still works. I am thinking you should pull it out and put the screw back in right after the LCD is removed. Then use it again just before putting the LCD screen back in. The pick is sticking out there waitng to be be bumped.
Hi Robin,
Unfortunately, there is no easy way to pull the battery connector out of the logic board. If you try to pry this connector off, you will irreparably damage it. The easiest solution is to insert the battery blocker in-between to cut the power.
The battery isolation pick or battery blocker is an outdated way of isolating the battery, as you risk damaging the battery pins underneath the logic board.
So what is the new method?
This is my question as well. Seems like this phrase contradicts the instructions. Confusing. Any reply?
We are currently working on a better isolation procedure! In the meantime, I’ve updated the warning to hopefully clarify the issue.
Why do you need to “To reduce the risk of a short”? There does not seem to by any risk of a “short” in this process. I can see other reasons for disconnecting the battery. I am an electrical engineer so I would appreciate a professional grade answer to this question.
I’ll give it a shot!
When you remove the screw, it doesn’t disconnect the battery, as the connector uses spring contacts to touch the battery pads.
If you leave the battery connected, it leaves the logic board energized. As there are many exposed traces and SMT components on the logic board, there is a chance that you accidentally bridge a trace with a metal tool, resulting damage. In addition, the display connector contains tiny pins, and the pinout is such that if you pry the connector from an energized logic board, there is a chance that a voltage rail pin may accidentally touch something it shouldn’t, blowing out the backlight circuitry.
My battery was dead when i did the repair. Did not really need to perform this step
Take a waterproof playing card, cut out the shape of the battery blocker and slide that under. Battery blocked and pins not at risk of damage. Got that from a YouTube video made by a microsolder repair tech fixing the damage caused by jamming a blocker in between the contacts.
Thanks for the tip Melody! I’ve updated the instructions to include the playing card method.
I could not for the life of me get the playing card in there, but my iPad was turned off, so I decided to ‘risk’ a short, instead of potentially damaging the battery connectors by jamming the card in there as hard as possible. My repair went fine, no short, however I realized AFTER closing everything up that I forgot to put the battery screw back in. Really hoping this doesn’t become an issue long term, because I don’t want to pry this brand new screen off just to put the battery in.
Let us know! I wasn't able to use the screw again after removing the battery blocker. Now my iPad turns off and on every so many minutes and when it restarts it's 1% and then shows actual charge.
When you come to screw this back together, do not overestimate how little force it takes to strip the thread on this #000 screw. I did, and I now I can't screw this back down and have the problem where the iPad restarts every 3 mins 20 sec after you turn it on due to a poor connection here. I've used card to pack this out so the LCD puts a little clamping force on the terminal once you screw it back in, but it's not really enough so the iPad still suddenly restarts occasionally.
I use a small screwdriver and pry underneath that brown bracket from the top edge by the camera (with the elongated metal cover removed of course) all the way before the battery, then lift up just enough for me to unhinged the battery out of the secure post. I don't know why Apple has to go through ALL THIS just to connect the battery since there is a small screw AND ADHESIVE securing it anyway. Nonetheless the whole job (replacing the lcd screen and battery was a major pain in the neck!
-
-
-
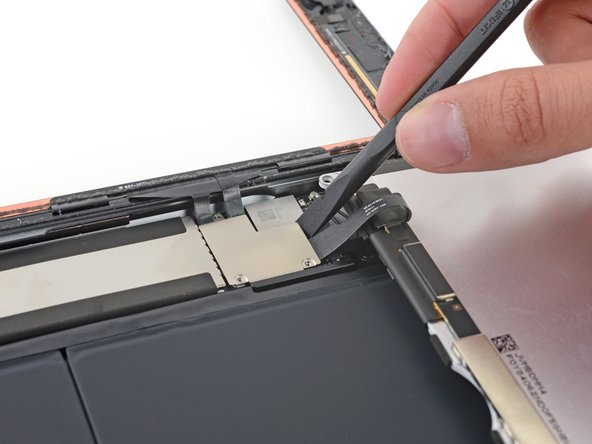
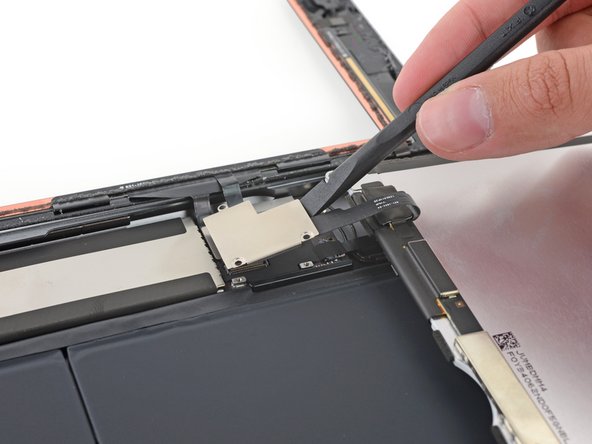
Svita le tre viti a croce Phillips #000 da 1,4 mm dalla copertura del cavo dello schermo.
I believe these are also Phillips #00, not Phillips #000.
I lost a 1.4mm screw where can I buy these small screws and how big are they? 1.4mm x? flared or flat head
-
Per rimontare il tuo dispositivo, segui le istruzioni in ordine inverso.
Per rimontare il tuo dispositivo, segui le istruzioni in ordine inverso.
Annulla: non ho completato questa guida.
Altre 27 persone hanno completato questa guida.
Un ringraziamento speciale a questi traduttori:
100%
Questi traduttori ci stanno aiutando ad aggiustare il mondo! Vuoi partecipare?
Inizia a tradurre ›
Preparati per le riparazioni future
Acquista tutti12Commenti sulla guida
No comments…. No one is brave enough to attempt this :)
I tried to replace the LCD with the iPad AIR 1 LCD and is NOT compatible. It fits and the connector is the same but shows just like tv static noise.
I have same issue, but with LCD iPad 5, some idea to make it compatible.
I replaced the front screen and now the number 9 on the passcode keypad isn’t working. I don’t get it.
I’m having the same issue! Different numbers, but same issue. Just certain sections of the screen won’t respond to touch.
I did this (screen replacement) on my iPad 6 LTE about a month ago. Was wicked difficult because my the screen was completely shattered and removing all of the shards was, well, a major PITA. It wasn’t all that bad otherwise as long as you TAKE YOUR TIME getting it apart in the first place. The only real issue I had otherwise was getting it back together with new adhesive strips because the screen doesn’t set on top straight down. You have to almost put one side down with the screen at an angle then lay it down but because of the adhesive strips, you can’t lay it down then adjust it. So that was not fun. Otherwise it wasn’t all that bad IF you are like me and savvy with electronics repair. *** also, once back together and fired up, I have some dead spots where there is zero registration of any touch on the screen. No clue as to why, and it’s frustrating because of the cost of these things and the replacement parts. Better than no usable screen I guess.
Please excuse any typos should you encounter any.
Hi Bryan,
If you haven’t yet, I would suggest checking two things. It sounds like either the digitizer cable may be having bad connectivity, or the digitizer may be shorting on something. Check, clean, and re-seat all of your display cable connectors as well as making sure the connectors have no debris. What is this (possibly conductive) gray foam adhesive called and where. Maybe that will remove the dead spots.
This was extremely difficult! But it was a little easier for me as I am an IT professional. Some helpful pro tips: definitely spend time just heating the adhesives over a period of a couple of days. The hardest part of the repair was separating the broken screen from the rest of the ipad. On re-assembly, check to make sure that the home button and touch are functioning properly before putting on new adhesives. This way you can correct any mistakes. Otherwise, you will have to undo the work you just did. Take your time, don’t rush so that you don’t make mistakes or break anything. The guide is very helpful and I was able to repair my ipad 6th generation.
Kevin
Ugh. This has been a PITA. I damaged the connector for lcd screen. bought replacement screen and now won’t work. HELP! Do I need to remove the old heat shield and attach it to the new lcd? What was I thinking?
Ive used 3 brand new LCDs and can’t get any of them to show a picture, when i plug in the old broken one it lights up just fine but is shattered beyond use. im starting to wonder if you can’t just replace the LCD without some sort of trick that only apple knows about
at least you have some dead spots. I just replaced LCD and digitizer. LCD was fine except I threw the LCD cable bracket away because I thought it came with the new one as it was attached to the old one. Needless to say I have no LCD cable bracket. The digitizer does not respond at all though and LCD screen works.
Managed to repair a few of these over the years... my 3 kids al had 6th gen's and 2 had cracked glass (digitizers) that I've done... today I did an LCD swap for an older one at work that had backlight strobing. No issues with the repair. Heat gun for adhesive along with the Anti-Clamp (great tool btw) and a iSesame opener tool... didn't bother with the battery disconnect. Just removed the LCD bracket/cable and installed "new" LCD I purchased from iFixit... though it was clearly used... it did have a plastic film on the screen but was VERY dirty on back and had old adhesive on it. But it worked fine. I did pick up a new digitizer in case I broke the glass removing the old one, but didn't need it. I had some extra adhesive laying around that I used to replace some of the marred adhesive from opening this one up. All-in-all, pretty straightforward ipad repair. And yes, had the glass been shattered, it is a MUCH longer and annoying repair. Been there before. Take your time cleaning it all up first.


