Introduzione
Usa questa guida per sostituire la guarnizione del Force Touch del tuo Apple Watch Series2. Questa guida mostra la procedura da attuare se lasci connesso il display. Se invece preferisci scollegare il display o devi comunque sostituire lo schermo, passa a questa guida e sostituisci la guarnizione del Force Touch dopo aver rimosso il display.
Se la funzione Force Touch funziona correttamente e hai solo bisogno di nuovo adesivo per risigillare il tuo orologio, segui invece la guida alla sostituzione dell'adesivo.
Cosa ti serve
-
-
Prima di iniziare la riparazione, stacca l'orologio dall'alimentatore e spegnilo.
-
-
-
Prepara un iOpener (oppure usa un asciugacapelli o una pistola termica) e scalda il quadrante dell'orologio finché non è lievemente troppo caldo da poter essere toccato.
-
Lascia l'iOpener sull'orologio per almeno un minuto per scaldare completamente lo schermo e ammorbidire l'adesivo che lo fissa alla scocca.
I have heated up the iOpener to 165 degrees and left it on for more than a minute. No way I can lift the screen off with the exact knife. Tried different angles in various places, but no go. I also used a hair dryer un til the watch screen was too hot to touch and even tried a very hard cutting tool blade and also no go. Could n ever get the blade under the face I applied enough force where I could see that the blade left small marks, not very big, but could never get anything to move or lift. What am I doing wrong? I spent 47 years at a global computer company and I am used to taking apart small things and applying force when required. I don’t know what I am doing wrong. Please help me.
Getting the initial gap is not easy. Maybe a playing card could work its way in the tiny gap and cut some adhesive. After that there might be some success with an exacto knife. Or you want to try a piece of aluminum foil (folded for more rigidity) for cutting the adhesive. Be aware of the force touch gasket and that it might get damaged during that procedure.
I finally used a hot air gun set to 150 deg. C heating up the edges by slowly spinning the watch around before the technique worked. Difficult is the level noted and it’s correct. Finally worked and watch perfectly functioning.
I used a heat gun, too. I was worried after reading comments that it would burn up the LCD, so I heated it a little bit at a time, rotating it like you did, and checking to see if I could get my knife under it. I must have hit one of the buttons because it did turn on, but that did reassure me that the display was okay.
It's open. Now that the watch and I have had a few minutes to cool down, I'm ready for the next step. Not as difficult as I thought it could be. Tomorrow, I'll be replacing the battery in an iPod Touch 6th Gen.
bester -
I had to heat the iOpener 2 times and leave it on top of the watch for 10 minutes.
-
-
The Watch 3 stainless Steel has an additional Frame. Where do i have To Open it?
I wore thick gardening gloves just to be safe 😅 and it took a while but the screen did come off.
-
-
Infila il bordo di una lama curva nella sottile fessura tra il display e il case esterno. Inizia sul lato corto del display, vicino alla Digital Crown.
-
Premi fermamente esattamente verso il basso nella fessura.
-
Una volta inserita la lama, torcila per sollevare lievemente il display.
It’s difficult to grip case in a way that keeps fingers safe from the blade but doesn’t hit the side buttons and turn the device on!
If it’s a struggle to get the display to release, warm case for a few more minutes.
I have tried so may times to get the display to release but nothing works. Should have bought a new watch LOL. Kept the iOpener on 2 times for 10 minutes and it still won't open. There must be a better way.
Hi Susan,
if you're struggling to get the adhesive loose enough a hair dryer, heat gun, or hot plate may also be used, but be careful not to overheat the device. The edge should feel slightly too hot to the touch.
-
-
-
Una volta che hai aperto una piccola fessura con la lama curva, rimuovi la lama stessa e inserisci nella fessura la parte più sottile di uno strumento di apertura.
-
Spingi nella fessura lo strumento di apertura, ruotandolo e usando il pollice come fulcro per sollevare ancora un po' il display.
-
-
-
-
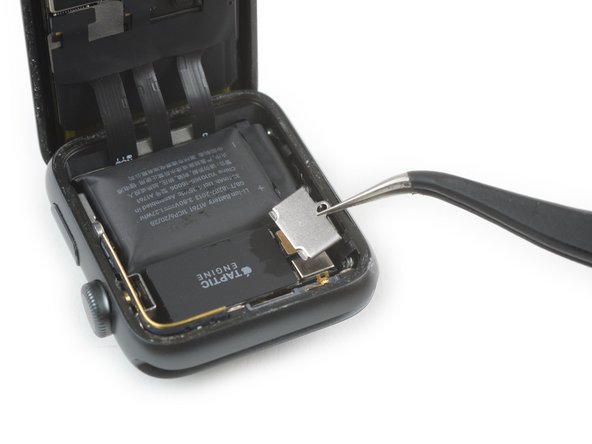
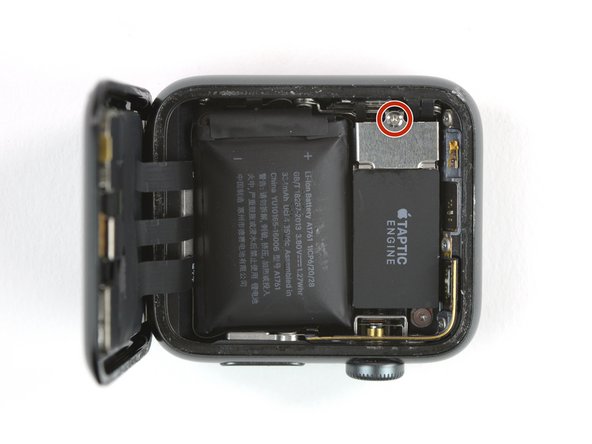
Usa un cacciavite Y000 per rimuovere la vite tri-wing che fissa la cover metallica del connettore della batteria.
-
Rimuovi la cover.
-
-
-
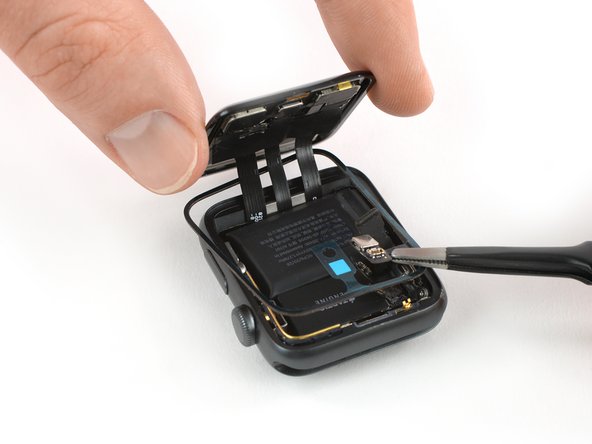
Usa la punta di uno strumento per fare leva per scollegare la guarnizione del Force Touch sollevandolo dal suo bordo esterno.
-
-
-
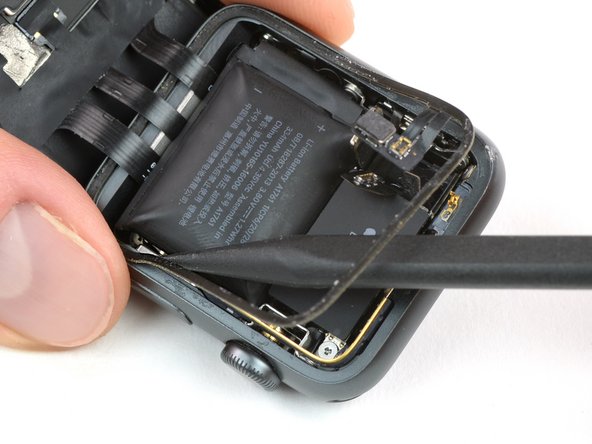
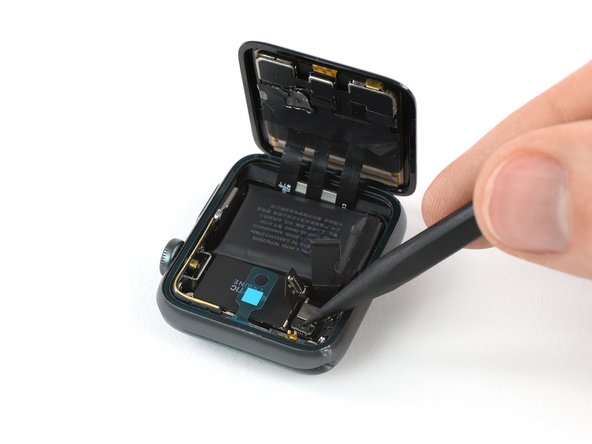
Solleva la piastra di connessione della guarnizione del Force Touch.
-
Fai scorrere le pinzette o uno strumento di leva sotto la guarnizione per separare l'adesivo sottostante.
-
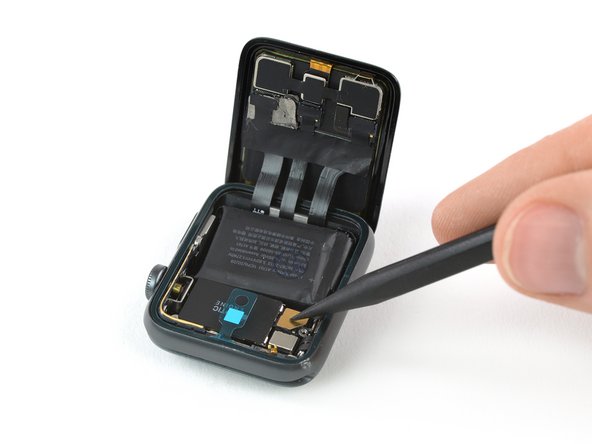
Separa la colla tutto attorno al perimetro all'orologio eccetto il bordo dove ci sono i cavi del display, per evitare di strapparli accidentalmente.
-
-
-
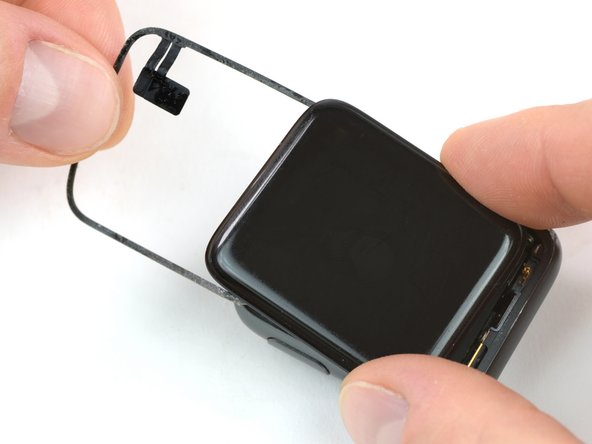
Facendo molta attenzione, tira la guarnizione del Force Touch al di sopra e quindi attorno al display.
-
Se il display è già scollegato perché lo stai sostituendo, è più facile lasciare il nuovo display scollegato per ora. Collega il display dopo aver sostituito la guarnizione Force Touch (cinque passaggi dopo).
-
Ripiega il display fino quasi a chiuderlo in modo da poter staccare la guarnizione del Force Touch dal bordo rimanente.
-
Rimuovi la guarnizione del Force Touch.
-
-
-
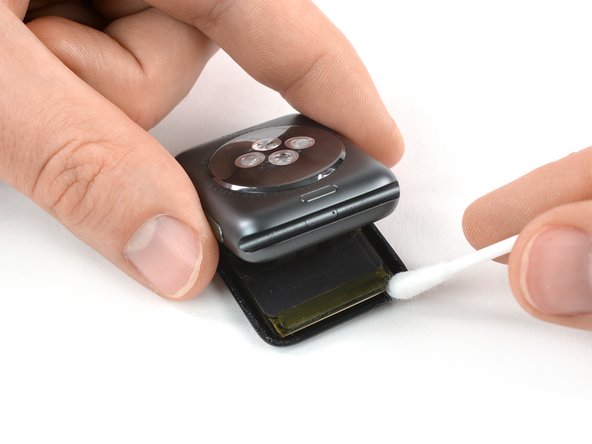
Applica dell'alcol isopropilico (>90%) su un cotton fioc oppure usa un panno adesivo di pulizia per rimuovere ogni traccia di adesivo dalla guarnizione del Force Touch.
-
-
-
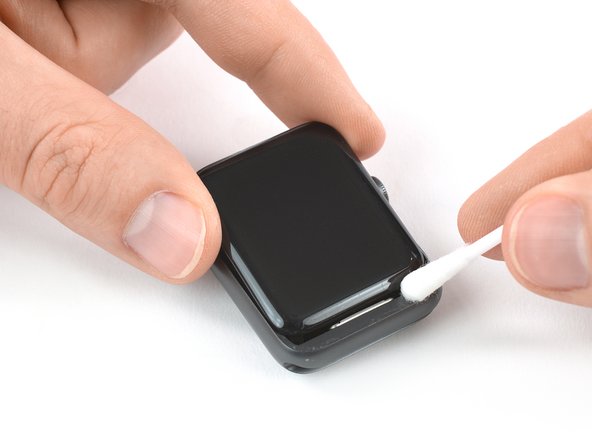
Gira al contrario l'orologio in modo che il display sia disposto di piatto a faccia in giù mentre tieni parzialmente sollevato il case.
-
Rimuovi con attenzione dal retro del display ogni parte di adesivo residua.
-
-
-
Usa un paio di pinzette per rimuovere con cura il liner protettivo dal fondo della tua nuova guarnizione Force Touch, esponendo l'adesivo sottostante.
-
Assicurati che la guarnizione sia orientata con i pin del connettore rivolti lontano da te, altrimenti rimuoverai il liner dal lato sbagliato.
There’s a clear plastic stiffener that must be removed at the same time as or just before removing the protective liner. Be careful to remove only the plastic and not the protective liners, it is possible!
-
-
-
Tieni la parte adesiva sostitutiva in diagonale per farla passare attorno al display.
-
Piega lievemente in avanti il display in modo da poter allineare la guarnizione con il telaio.
-
Iniziando dall'angolo opposto al connettore della guarnizione del Force Touch, disponi la guarnizione sul telaio e premila nella sua posizione.
-
-
-
Usa un paio di pinzette per rimettere nella sua posizione originale la piastra metallica che copre il connettore della batteria.
-
Rimetti al suo posto la vite tri-wing #000.
-


Porta i tuoi rifiuti elettronici presso un riciclatore certificato R2 o e-Stewards.
La riparazione non è andata come previsto? Prova qualche risoluzione dei problemi di base o chiedi aiuto alla nostra comunità Risposte.
Porta i tuoi rifiuti elettronici presso un riciclatore certificato R2 o e-Stewards.
La riparazione non è andata come previsto? Prova qualche risoluzione dei problemi di base o chiedi aiuto alla nostra comunità Risposte.
Annulla: non ho completato questa guida.
Altre 48 persone hanno completato questa guida.
Un ringraziamento speciale a questi traduttori:
100%


Questi traduttori ci stanno aiutando ad aggiustare il mondo! Vuoi partecipare?
Inizia a tradurre ›

Team

7 Commenti
Hola, Me presento como nuevo y NOVATO. Me llamo Jaime, y Yo creo que os mereceis un 10. La caña de España.
Hola Jaime! Bienvenido! Muchas gracias por tu comentario. Nos alegra que te guste nuestro sitio. Cualquier duda que tengas, no dudes en consultarme. Soy la moderadora y líder de la comunidad hispanohablante.
The gasket comes with all the necessary adhesive or you need to put he the sealing adhesive separately? I need to replace my screen and I got the gasket and screen but don’t know if I need glue to waterproof it?
I bought iFixit’s battery replacement kit and the gasket which I received had adhesive on both sides, just like in this guide.
The repair kit does comes with extra gasket adhesive, which confused me at first. The extra adhesive is included in case you manage to open the watch without damaging the original gasket.
I have no idea why they include the extra adhesives. When I tried to use one the screen sat too high and it looked bad.
Thank you for an awesome guide. It got a little dodgy for a second there, but I replaced the screen, Force Touch Gasket and Battery. It works as new!
Congrats, welcome to the club of fixers :)
Verify your model. The back of the Cellular model just says GPS, so be sure to check the groves where the watch band goes to determine you model. I made the mistake of just reading the back of the device and since I’d been gifted the device didn’t know it was cellular. Cellular has a different type of touch force gasket, different screen, and different battery connections.
Ryan Holt - Replica
From what I just read on Apple, the only differences in watch series 3 is 38mm and 42mm.
mcr4u2 -
As a consumer all you need to know are 38mm and 42mm
Michael Adoga - Replica
The back will say GPS LTE if it’s the cellular version. If it doesn’t say LTE it is only the GPS version. The displays are different whether or not it is LTE(cellular).
themepark - Replica
This alternative method only reboots the watch.
Gregg Stanley - Replica