Introduzione
Usa questa guida per rimuovere e sostituire il gruppo della fotocamera frontale (da selfie) di un iPhone 12. Nota che, se sostituisci questa parte, il Face ID non funzionerà più. Questa riparazione ripristinerà il funzionamento di una fotocamera da selfie guasta, ma solo Apple o un tecnico "autorizzato" Apple possono ripristinare il Face ID.
**Nota:** Se sostituisci questo componente, **Face ID non funzionerà più**. Questa riparazione ripristinerà il corretto funzionamento della fotocamera frontale rotta, ma su iOS 17.6 e versioni precedenti solo Apple o un tecnico “autorizzato” da Apple possono ripristinare Face ID. Su iOS 18 e versioni successive, puoi ricalibrare le nuove fotocamere frontali originali utilizzando Assistente di riparazionedi Apple.
Cosa ti serve
-
-
Spegni il tuo iPhone prima di iniziare lo smontaggio.
-
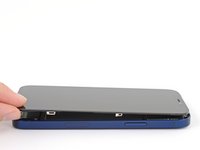
Svita le due viti Pentalobe P2 da 6,75 mm sul bordo inferiore dell'iPhone.
-
-
-
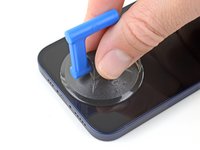
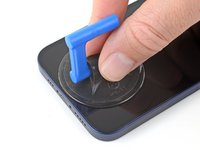
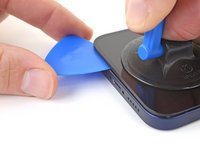
Misura 3 mm dalla punta del plettro e segna questa distanza con un pennarello indelebile.
Got to step 2 and realized the fix kit doesn't include an opening pick! Looks like a guitar pick, and I have those lying around. Is that expected? Looks like the pick is used in many steps below. There's a little blue crowbar that isn't mentioned in the instructions. Perhaps that replaces the opening pick?
Hi! I can't see which guide you were using when writing this comment. Can you reply here with which guide and fix kit you used?
I see you posted this in Meta. I hope it's resolved soon! In the meantime, a guitar pick may work well enough for your repair.
what fix kit?
My fix kit didn't include an opening pick either
My AliExpress refurbished screen came with a pick that has a coin-like circle that pops out, so no modification was necessary
It's not an Ifixit KIT if it doesn't include everything. You'll need to order the opening pic separately. Or head to Walmart like myself and look for guitar pics. Hopefully, this will work just as well.
No pick in mine as well. It’s really not clear that you have to order this separately when ordering an IPhone SE 202/2022 screen repair kit. Is this the case?
Frustrated, I ordered a compact package where everything was encapsulated. Useless suction tools could not separate the screen. If it is unable to decouple the screen, then why sucking suction tools you have provided.
For my kit the triangle pick was stuck inside the box with the screen not with the other tools maybe it's also there for you
Y’all are getting far, FAR too detailed with some of this stuff…. Measuring and marking the pick that you won’t actually use to open the device?!? lol that’s kinda funny. Just heat it up, grab a spudger, and the back just pops right off! The iFixit tech need to stick to the KISS method more often, you know KEEP IT SIMPLE STUPID!!! Like l, for reals, I’ve been doing this stuff for YEARS and using iFixit guides regularly and this is just ridiculous at this point!
Will the phone still work if the sensor assembly on the back of the screen is damaged?
-
-
-
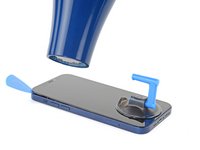
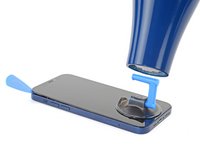
Posiziona strisce sovrapposte di nastro trasparente da pacchi sullo schermo dell'iPhone finché non l'hai coperto tutto.
-
Se non riesci a far aderire la ventosa nei prossimi passi, applica del nastro adesivo resistente (come del nastro americano telato) come una maniglia e alza lo schermo con quello.
-
-
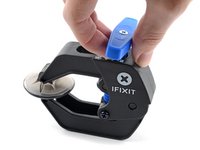
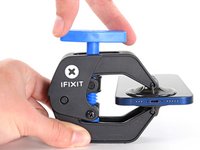
Attrezzo utilizzato in questo passaggio:Clampy - Anti-Clamp$24.95
-
Tira la maniglia blu indietro per sbloccare i bracci dell'Anti-Clamp.
-
Fai scorrere i bracci oltre il bordo sinistro o destro del tuo iPhone.
-
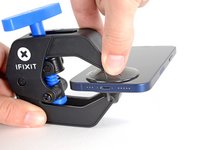
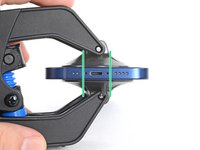
Posiziona le ventose vicino al bordo inferiore dell'iPhone, una di fronte e una sul retro.
-
Premi le ventose insieme per farle aderire sull'area desiderata.
-
-
-
Appoggia il tuo iPhone su un oggetto resistente prima di continuare, come un libro con la copertina rigida, così che stia parallelo al pavimento senza tenerlo fermo. Questo rende più facile il lavoro nei prossimi passi.
-
Usa un asciugacapelli per scaldare il bordo inferiore dell'iPhone. Il vetro dovrebbe essere leggermente troppo caldo da toccare.
-
Aspetta un minuto per dare la possibilità all'adesivo di lasciarsi andare e creare una fessura.
-
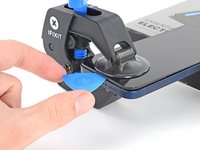
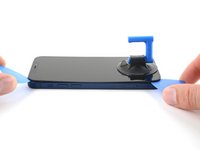
Inserisci un plettro di apertura sotto la scocca di plastica dello schermo quando l'Anti-Clamp crea una fessura abbastanza grande.
-
Salta i prossimi tre passi.
-
-
-
Usa un asciugacapelli o una pistola termica per scaldare il bordo inferiore dell'iPhone per 90 secondi, o finché lo schermo è leggermente troppo caldo da toccare.
Also: 3D Printer's heated bed set to 70-80 degrees Celcius for a few minutes does the job, as it basically works the same way heating mats used in professional repair shops do.
-
-
-
Se stai usando una ventosa, falla aderire al bordo inferiore dello schermo, lasciando un piccolo spazio dal bordo stesso.
-
-
-
Tira la ventosa verso l'alto con una forza decisa e costante per creare una piccola fessura tra il vetro dello schermo e il telaio.
-
Infila un plettro di apertura nella fessura sotto la scocca di plastica dello schermo.
This seems impossible. I've been trying for an hour with heat and rocking, and the screen doesn't budge. :(
Don’t give up! Use more heat and a tad more force. I know you may fear breaking it more, but as long as you don’t stick the prying tool too far or tug too hard, you can do it! I have faith that you can do it!
I'm in the same boat, this isn't coming off. I've tried the hair dryer as well as the heating pad from ifixit. Any other ideas?
The suction cup comes off before the screen will
Is there a better tool for this? Just saw a video on YouTube where a kid pryed it open with no heating/etc. in 5 seconds.
I've changed the batteries in probably a half dozen iphones of different models. But 25 minutes of heating and pulling had no effect on iPhone 12
Welp. I finally ended up breaking the screen attempting this. DO NOT ATTEMPT THIS REPAIR! Not worth the broken screen and losing the cost of shipping both ways when you return the battery.
thx, I ll go to an apple repair center
Back (and bad...) experience ! Even if you heat a lot, the screen is hardly sticked. Take care, before sliding the mediator under the screen, this one should be moved up, at least 2 mm. On my side i have slided around 1 mm and .... inserted the mediator between the glass screen and the screen structure ring.... result : glass break and screen to change (my initial exercise was the battery removal !). I feel that next time i will visit a repair center...
Pro tip for anyone having trouble with this. You have to use multiple rounds of heat and pulling. Use a hair dryer and not the iOpener that comes with the fix kit and get it just too hot to touch then quickly start pulling and wiggling it up and down. Once it cools down grab the hair dryer again and repeat it a couple times until you start to get a big enough gap.
I just did this yesterday and it took around 5 rounds of heating and pulling to get it to seperate enough from the body.It's important to insert the pick under the bezel. I just delaminated my screen. The screen was probably fine, but it was glitching, so I wanted to check for a bad connection. Anyway, now I get a new screen.
Under the bezel, eh.
After reading this almost a year later to the day I last commented on it, I now know that the best way I have found to remove a screen, from pretty much any phone, not just this one, is heat (I use a heating pad on 80 degrees celsius) and before putting the phone on the heating pad, I use 91% isopropyl alcohol around the edges that you will be sliding your pry tools in, and I leave it on for 10 min. I then take it off, add more alcohol, and then put it back on the pad for another 5 min. Also, while I am sliding my tools around the screen, I continuously add more alcohol, and if it takes a really long time, then more heat as well. Heat, alcohol, and patience, lots of patience, and you should be good. Hope this helps, good luck!
Can confirm, this does indeed work. Just keep warming it up, lifting up and down, and repeat when phone goes cold. After around 10 rounds it would move enough to where I could see inside the phone when lifted. You can then insert pick
Tip: You can also try to apply heat and lift the other corner, just enough to make it move slightly. This will ease pressure needed to separate the glue on the other side as-well.
No worries guys! it’s completely doable! You just need to be patient and keep trying multiple times
I don't doubt that you folks eventually got this open, but how on earth do you not lose your mind with the suction cup popping off every 5 seconds? Agree with Ryan above, have replaced batteries on several other iPhone generations with nowhere near this much effort. Still working on it going on 1 hr, about 10 rounds of hair dryer heat. Did Apple use a stronger adhesive for the 12?
Success. iOpener doesn't get the phone nearly hot enough. Multiple rounds of hair dryer + isopropyl alcohol dribbled in b/w case and screen while pulling up on suction cup. For me, the bottom left hand corner (volume rocker side) seemed to lift up first, so I moved the suction cup to that corner while doing the heat + alcohol.
When I changed the battery on a 7+ instead of the suction cup/heat method I used an Cacto blade inserted horizontally along the bottom edge to break the seal. Would this work on the 12?
I struggled with this step, but eventually got it. Use LOTS of isopropyl alcohol, and soak the entire perimeter. Let it sit for 30 seconds after application, then heat it up, then pull with the clamp and rock back and forth. Reapply the alcohol and repeat until it works. Took me about 30 mins, but I eventually got it up just enough for the first pick. The iOpener is completely useless, I just used a shrink wrap gun and made sure to hold it 8-12 inches from the phone on the lowest heat setting.
iOpener along the bottom edge, the Anti-Clamp, and three tries about 5 minutes each worked for me. Never popped off, just needed lots of patience and 1.5 screw turns on the clamp. Bottom left corner was first, like another commenter.
-
-
-
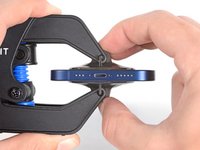
Usa un asciugacapelli per scaldare il bordo destro dell'iPhone (quello con il tasto di accensione) per 90 secondi o finché lo schermo è leggermente troppo caldo al tatto.
-
-
-
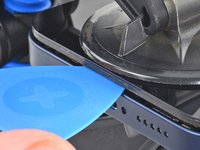
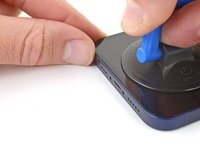
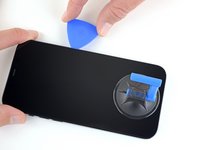
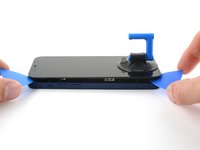
Fai scorrere il plettro di apertura intorno all'angolo in basso a destra dell'iPhone per separare l'adesivo.
-
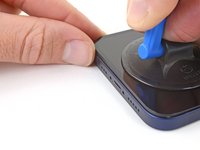
Continua a farlo scorrere lungo il bordo destro dell'iPhone, finché non raggiungi l'angolo in alto a destra.
-
Lascia il plettro sotto l'angolo in alto a destra, prima di continuare.
There is a spot on this side where a slight ridge in the iPhone frame makes the pick stick. Eventually I used two, one twisting a bit to open a path for the other. But if you're not expecting it you feel like you're going to break something.
-
-
-
-
Usa un asciugacapelli per scaldare il bordo superiore dell'iPhone per 90 secondi o finché lo schermo è leggermente troppo caldo al tatto.
-
-
-
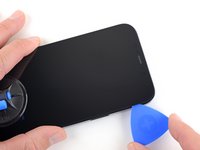
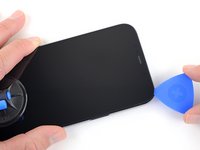
Fai scorrere il plettro intorno all'angolo in alto a destra dell'iPhone per separare l'adesivo superiore.
-
Lascia il plettro sotto l'angolo in alto a sinistra prima di continuare.
-
-
-
Usa un asciugacapelli per scaldare il bordo sinistro dell'iPhone per 90 secondi o finché lo schermo è leggermente troppo caldo al tatto.
Also: 3D Printer's heated bed set to 70-80 degrees Celcius does the job - it basically works the same way professional heated mats that are used in phone repair shops.
-
-
I kinda forgot about this step when I opened my first iPhone 12.
For the next one, I'm going to mark that edge of the phone with blue tape roughly where each cable is to help me remember.Also FWIW, I got the 70 cent adhesive cutting tool from Apple with my genuine battery and used that for all my display prying needs after getting the first opening propped with a guitar pick.
It worked great and did not damage anything so no need to sweat inserting something too far and causing damage.
Could you PLEASE move this to step 13?? I tore the front sensor cable. 😭
-
-
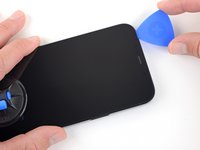
Inserisci un secondo plettro di apertura sotto l'angolo in basso a sinistra dell'iPhone.
-
Ruota entrambi i plettri contemporaneamente finché si sganciano le clip del bordo sinistro.
-
-
-
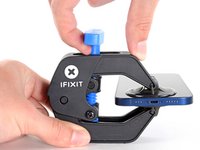
Ruota il tuo iPhone così che il bordo destro sia rivolto verso di te.
-
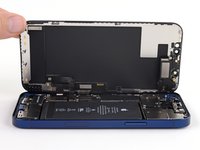
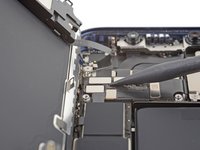
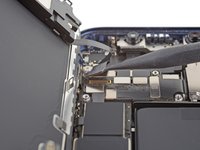
Apri l'iPhone sollevando e ruotando il bordo destro dello schermo come la copertina di un libro.
-
Appoggia lo schermo a qualcosa in modo che resti aperto mentre lavori nel telefono.
i did this and the shroud with the earpiece speaker still stuck with the phone so its just wedged in there i cant get it out
-
-
-
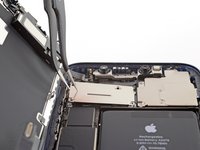
Svita le due viti tri-wing Y000 da 1,1 mm che tengono ferma la copertura dei connettori della batteria e dello schermo.
Ouch, I see a broken flat here…
Can I use a y 0.6 if I don’t have y000
Yep! The measurements for Y000 are 0.6 mm.
-
-
-
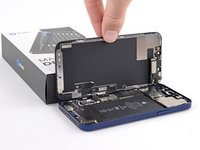
Rimuovi la copertura.
Hi
On my original display on an iPhone 12, there is no metal hinge as shown here and therefore no place for it when closing the phone. Have double-checked model and the original display - and it is just not there. Is there another model based on serial number?
Hinge marked: https://www.dropbox.com/scl/fi/asztgi60g...
Best regards,
Carsten
-
-
-
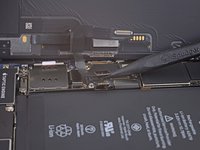
Usa uno spudger o un'unghia per sollevare il connettore della batteria dalla sua presa sulla scheda madre.
-
Piega leggermente il cavo da parte per evitare che faccia contatto accidentalmente con la presa per evitare dei corto circuiti durante la riparazione.
-
-
-
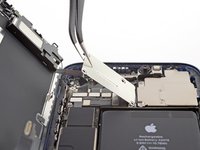
Usa uno spudger o un'unghia per scollegare il connettore del cavo dello schermo.
-
-
-
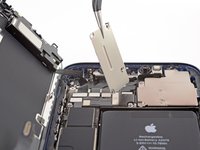
Usa uno spudger o un'unghia per scollegare il connettore del cavo del digitizer.
-
-
-
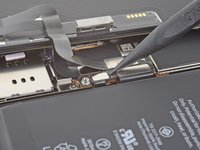
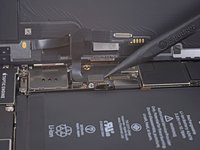
Usa un cacciavite tri-wing Y000 per svitare le quattro viti che tengono ferma la copertura dei connettori dei sensori frontali:
-
Tre viti da 1,1 mm
-
Una vite da 1,4 mm
-
-
-
Solleva la copertura dal bordo sinistro finché il gancetto su quello destro non si libera.
-
Rimuovi la copertura.
-
-
-
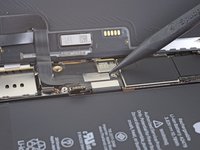
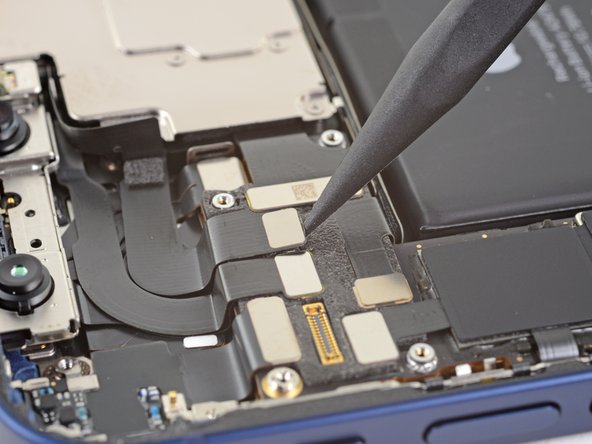
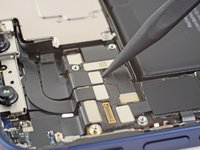
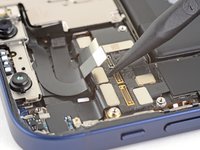
Usa uno spudger o un'unghia per scollegare il connettore del cavo del gruppo dei sensori frontali.
-
-
-
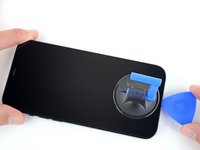
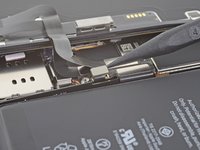
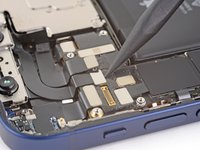
Usa un cacciavite tri-wing Y000 per rimuovere la vite da 1 mm che tiene in posizione il gruppo della fotocamera frontale.
-
-
-
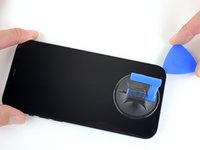
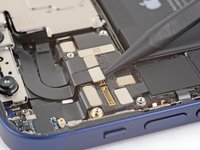
Alza e rimuovi la staffa della fotocamera frontale.
-
-
-
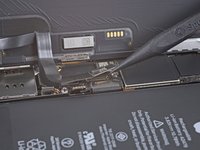
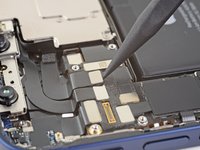
Usa uno spudger o un'unghia per disconnettere il cavo del proiettore di punti del Face ID dal suo zoccolo sulla scheda logica.
-


Confronta le nuove parti di ricambio con le parti originali che stai sostituendo, potresti dover trasferire dei componenti rimasti sui componenti da sostituire o rimuovere degli adesivi dai nuovi pezzi di ricambio prima di installarli.
Per rimontare il tuo dispositivo, segui questa guida in ordine inverso.
Dopo la riparazione, a seconda del componente sostituito, potresti essere in grado di calibrarlo utilizzando Assistente di riparazione di Apple, disponibile a partire da iOS 18. Aggiorna il tuo dispositivo, vai su Impostazioni → Generali → Info → Cronologia parti e assistenza, tocca Riavvia e completa la riparazione e segui le istruzioni sullo schermo.
Porta i tuoi rifiuti elettronici a un riciclatore certificato R2 o e-Stewards.
La riparazione non è andata come previsto? Prova con la risoluzione dei problemi di base, o chiedi alla nostra comunità Risposte iPhone 12 per trovare aiuto.
Annulla: non ho completato questa guida.
Altre 14 persone hanno completato questa guida.
Un ringraziamento speciale a questi traduttori:
100%


Questi traduttori ci stanno aiutando ad aggiustare il mondo! Vuoi partecipare?
Inizia a tradurre ›

Un commento
Tausch hat gut funktioniert, nur muss Face ID von Apple noch konfiguriert werden, das machen sie aber nicht wenn sie die frontkamera nicht selbst ausgetauscht haben. War das letzte applegerät.
Do you sell the waterproof seals separately or are they included in the kit?
Heather Furnas - Replica
Do you sell the waterproof seals separately or are they included in the kit? (I would like to know this as well.)
CaliforniaGunner - Replica
I just got my Fix Kit and it includes the seals. Not sure if a "part only" version would, though.
Neal Sofge - Replica