Introduzione
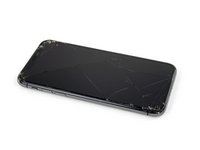
L'iPhone XS utilizza insieme l'altoparlante principale e l'altoparlante voce per creare una sonorità stereo. Usa questa guida per sostituire solo l'altoparlante principale nella parte più bassa del telefono. La sostituzione di questo elemento può aiutare a risolvere problemi come la mancanza di suono e la bassa qualità o distorsione del suono.
Cosa ti serve
-
-
Spegni il tuo iPhone prima di iniziare lo smontaggio.
-
Rimuovi le due viti Pentalobe lunghe 6,9 mm sul lato inferiore dell'iPhone.
-
-
-
Misura 3 mm dalla punta del plettro e segna questa distanza con un pennarello indelebile.
Got to step 2 and realized the fix kit doesn't include an opening pick! Looks like a guitar pick, and I have those lying around. Is that expected? Looks like the pick is used in many steps below. There's a little blue crowbar that isn't mentioned in the instructions. Perhaps that replaces the opening pick?
Hi! I can't see which guide you were using when writing this comment. Can you reply here with which guide and fix kit you used?
I see you posted this in Meta. I hope it's resolved soon! In the meantime, a guitar pick may work well enough for your repair.
what fix kit?
My fix kit didn't include an opening pick either
My AliExpress refurbished screen came with a pick that has a coin-like circle that pops out, so no modification was necessary
It's not an Ifixit KIT if it doesn't include everything. You'll need to order the opening pic separately. Or head to Walmart like myself and look for guitar pics. Hopefully, this will work just as well.
No pick in mine as well. It’s really not clear that you have to order this separately when ordering an IPhone SE 202/2022 screen repair kit. Is this the case?
Frustrated, I ordered a compact package where everything was encapsulated. Useless suction tools could not separate the screen. If it is unable to decouple the screen, then why sucking suction tools you have provided.
For my kit the triangle pick was stuck inside the box with the screen not with the other tools maybe it's also there for you
Y’all are getting far, FAR too detailed with some of this stuff…. Measuring and marking the pick that you won’t actually use to open the device?!? lol that’s kinda funny. Just heat it up, grab a spudger, and the back just pops right off! The iFixit tech need to stick to the KISS method more often, you know KEEP IT SIMPLE STUPID!!! Like l, for reals, I’ve been doing this stuff for YEARS and using iFixit guides regularly and this is just ridiculous at this point!
Will the phone still work if the sensor assembly on the back of the screen is damaged?
-
-
-
Posiziona strisce sovrapposte di nastro trasparente da pacchi sullo schermo dell'iPhone finché non l'hai coperto tutto.
-
Se non riesci a far aderire la ventosa nei prossimi passi, applica del nastro adesivo resistente (come del nastro americano telato) come una maniglia e alza lo schermo con quello.
-
-
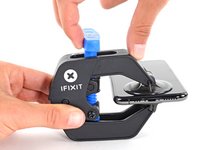
Attrezzo utilizzato in questo passaggio:Clampy - Anti-Clamp$24.95
-
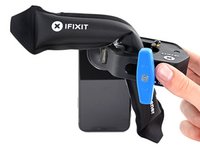
Tira la maniglia blu indietro per sbloccare i bracci dell'Anti-Clamp.
-
Fai scorrere i bracci oltre il bordo sinistro o destro del tuo iPhone.
-
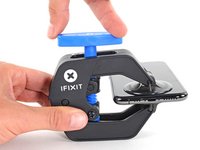
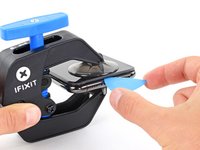
Posiziona le ventose vicino al bordo inferiore dell'iPhone, una di fronte e una sul retro.
-
Premi le ventose insieme per farle aderire sull'area desiderata.
-
-
-
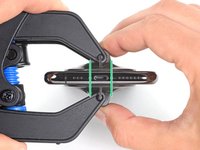
Scalda un iOpener e infilalo tra i bracci dell'Anti-Clamp.
-
Piega l'iOpener in modo che si appoggi sul bordo inferiore dell'iPhone.
-
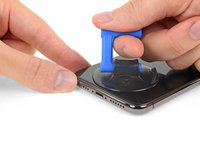
Aspetta un minuto per dare all'adesivo la possibilità di scollarsi e creare un'apertura.
-
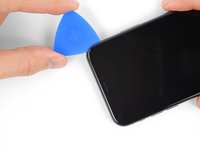
Inserisci un plettro di apertura sotto lo schermo e la scocca di plastica, non solo sotto lo schermo.
-
Salta i prossimi tre passaggi.
-
-
-
Usa un asciugacapelli oppure prepara un iOpener e applicalo per circa un minuto al bordo inferiore dell'iPhone per ammorbidire l'adesivo sottostante.
-
-
-
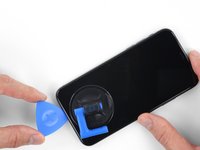
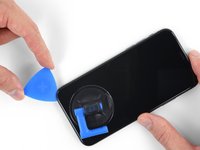
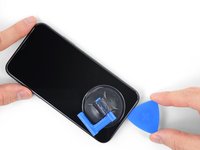
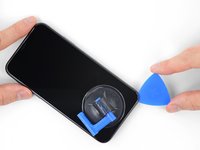
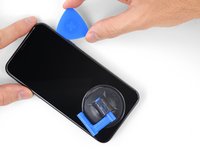
Tira la ventosa applicando una trazione forte e costante fino a creare una piccola fessura tra il pannello frontale e il case posteriore.
-
Inserisci un plettro di apertura nella fessura sotto lo schermo e la scocca di plastica, non solo sotto lo schermo.
It seems like I need a third hand to do this. To hold the phone; hold the suction cup; and push the pick in the space.
-
-
-
-
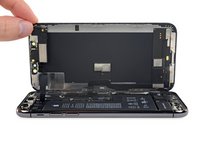
Apri l'iPhone sollevando il display dal lato sinistro, come per sollevare la copertina posteriore di un libro.
-
Appoggia il display contro qualche tipo di supporto per mantenerlo aperto mentre lavori sul telefono.
-
-
Attrezzo utilizzato in questo passaggio:Magnetic Project Mat$19.95
-
Rimuovi le cinque viti che tengono in posizione la staffa del connettore della scheda logica, delle seguenti lunghezze:
-
Tre viti tri-wing Y000 da 1,0 mm
-
Una vite tri-wing Y000 da 1,3 mm
-
Una vite a croce Phillips #000 da 3,7 mm
FYI: I used a tiny piece of scotch tape to hold those 1mm screws in place while aligning the magnetic screwdriver. Otherwise they are so tiny the magnetic bit pulls them right out the hole.
-
-
-
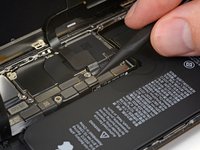
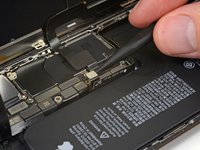
Usa la punta di uno spudger o un'unghia pulita per staccare il connettore della batteria sollevandolo dal suo zoccolo sulla scheda logica.
-
Piega lievemente il connettore per distanziarlo dalla scheda logica ed evitare che questo possa fare contatto con lo zoccolo e quindi alimentare il telefono nel corso della tua riparazione.
-
-
-
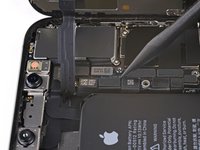
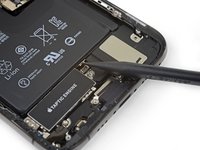
Usa la punta di uno spudger o un'unghia per staccare il connettore del gruppo sensori del pannello frontale.
In my phone the connector made poor contact with the socket resulting in no sound audible through the phone receiver/headset. There was an overhang of insulation close to the socket which I believe may have prevented a good connection. So if you have these kinds of audio problems you might see if this is the problem.
-
-
-
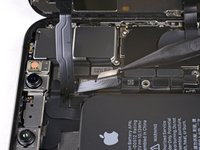
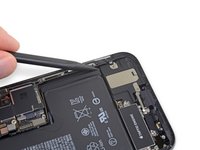
Usa uno spudger o un'unghia per staccare il connettore del cavo del pannello OLED.
-
-
-
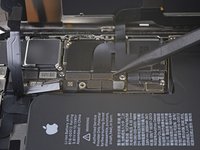
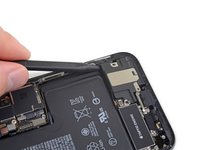
Usa uno spudger o un'unghia per staccare il connettore del touchpad dal suo zoccolo.
Reassembly: reconnecting the press connectors upon reassembly was so hard, even for the ones not seated in a recessed location !! It took me two days to get them reconnected. What helped me was to shine bright lights on all sides of the iPhone and then hold the iPhone vertically like a book and press it in that way. They are now all in, but the touchscreen functionality has disappeared :( so I will need to reconnect that one.
-
-
-
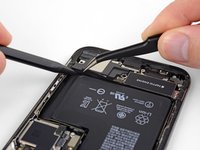
Solleva delicatamente il cavo finché non si stacca.
Will replacing camera and sensors fix damaged face I'd
No, FaceID will be disabled because the original sensors are paired with the logic board.
-
-
-
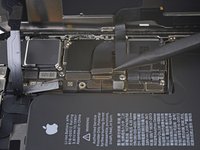
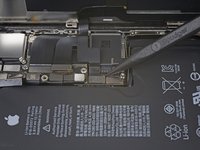
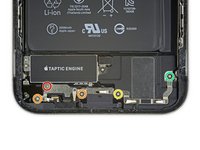
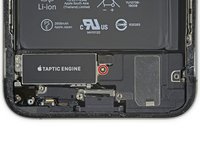
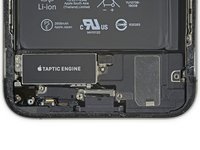
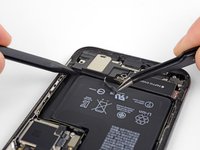
Rimuovi le cinque viti di fissaggio delle due staffe sotto il Taptic Engine e l'altoparlante principale:
-
Una vite tri-wing Y000 da 1,0 mm
-
Due viti a croce Phillips da 1,3 mm
-
Una vite a croce Phillips da 1,7 mm
-
Una vite a croce Phillips da 1,8 mm
Bonjour,
Plus pratique avec une Y000. Dans mon cas c’était impossible en Y00.
Bonne journée. :)
got stuck on the 1.8 mm screw and had to abort. The Phillips head provided “PH000” didn’t quite fit and stripped the screw.
I ended up skipping this step through 32. It’s not necessary to take the speaker and taptic thing off. I just used the thin black spudger flat edge and pried under the battery on the L-shaped edge and dislodged the adhesive and then did the same on the top edge. You will end up bending the old battery but that’s ok—just don’t poke it. keep poking the flat edge of the spudger in there kind of like a knife to break the adhesive. once you get at least two spots of the adhesive pulled, the rest comes up quite easily when you lift the whole battery.
I agree with R.J. The bracket screws are minute. They are much easier to remove than to put back. Avoid taking them out if you can.
-
-
-
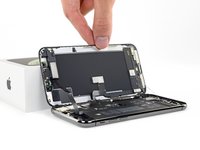
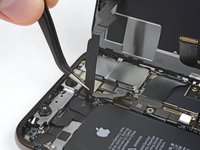
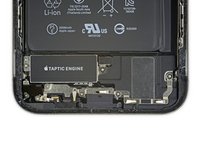
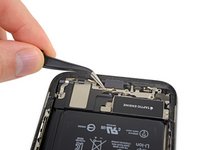
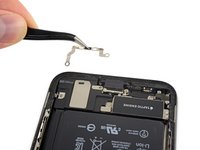
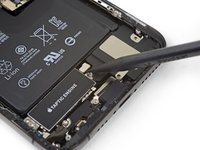
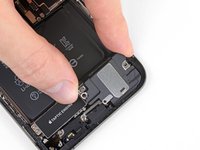
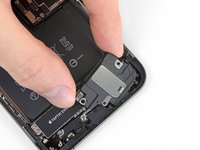
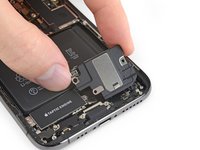
Solleva delicatamente ciascuna staffa per staccarla e rimuoverla, stando attento a non piegarla.
-
Se necessario, applica un po' di calore con un asciugacapelli o una pistola termica per ammorbidire l'adesivo. (È sconsigliato disporre un iOpener sulla staffa, perché questo potrebbe piegare i contatti a molla disposti sulla parte superiore).
-
-
-
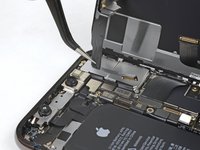
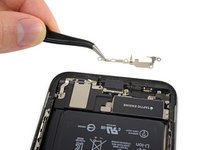
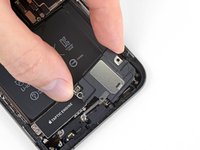
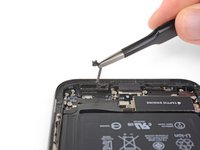
Rimuovi l'altoparlante.
I thought my speaker gasket was also missing, however looking back into the part box I found it tucked under the flap at the other (unopened) side of the box. Glad I took a second (and closer) look. IFIXIT needs to do a better job securing very small parts as it is very easy for these types of parts to get jostled during shipping and then could fall out or stuck in the box unnoticed. I've purchased iFixit products for more than 10 years and am super satisfied their quality in parts and provided instructions. Hopefully they'll make some adjustments to their shipping containers as I'd love to continue using them.
My speaker gasket was stuck to the inside of the box also. Unfortunately it has the back peal removed and has stuck itself to the cardboard box. I tried to remove it but it was firmly attached. Bummer. This is my first iFixIt. Please package it more carefully as the other person said.
I can't find mine in the part box. Is it possible it was excluded?
It might have fallen out. Search in the crevasses of the box. If you still cannot find it contact iFixit.
Update to last comment, I looked again at the listing for the battery with and without the "fix it kit". I ordered without, and apparently, the speaker gasket is part of the kit. Will need to order separately and take the phone apart again and replace the seal and battery adhesive again to install the gasket.
It's kind of ridiculous that the gasket is ONLY included with the kit, that includes a bunch of tools that I already have too many of (yes, I've bought several screen kits...). The fact is, to properly do the repair, you require the gasket. As such, it really should be included with the battery part and not only sold with the entire kit. Most of us do not need yet a nother suction cup, more screwdrivers (ok, maybe the bits), etc. My first few orders, I bought the kit because the extra cost gave me more bits, handle, spudgers (always need more), etc. However, I didn't need any of those for this repair so I opted for only the part - the battery.
I am so irked that I have to redo this again just because ifixit put the gasket with the kit and not the part that requires it. It's not even highlighted AT ALL that the gasket is required and not included. I'll have to find a way to bring this up to ifixit.
-


Confronta il pezzo sostituito con quello originale, potresti dover trasferire componenti rimasti sulla vecchia parte o rimuovere adesivi sul retro del componente nuovo prima di installarlo.
Per riassemblare il tuo dispositivo, segui i passi descritti in ordine inverso.
Porta i tuoi rifiuti elettronici a un riciclatore certificato R2 o e-Stewards.
La riparazione non è andata secondo i piani? Vai alla nostra comunità Risposte per trovare aiuto nella risoluzione dei problemi.
Annulla: non ho completato questa guida.
Altre 17 persone hanno completato questa guida.
Un ringraziamento speciale a questi traduttori:
100%


Questi traduttori ci stanno aiutando ad aggiustare il mondo! Vuoi partecipare?
Inizia a tradurre ›


2 Commenti
hi there need a little help need the bracket part where the five screws go one of the tabs brock on the one i have
Had the same problem. One of the little tab / springs was damaged on the bracket below the main speaker. Didn't think it would be that much of an issue until I started using phone. On occasion, pressure on the lower part of screen creates crazy phantom touchscreen activity. Cannot locate a replacement anywhere on the site.
ELLO WEE -
Der Original Akku ist codiert. Egal, ob man einen zweiten Apple Original Akku oder einen neuen Fremdakku einbaut erscheint bereits in den Einstellungen eine "Wichtige Batterienachricht" mit einem roten Punkt. "Unbekanntes Bauteil" und die "Informationen zum Batteriezustand" sind nicht verfügbar. Diese Nachricht verbleibt immer und nervt auf Dauer immens.
Der Akku muss angelernt werden und dieses können von jetzt an nur authorisierte Apple Servicebetriebe und diesen ist es durch Apple verboten die notwendige Info weiterzugeben.
Dies ist nicht zu verwechseln mit der bereits bekannten Rekalibrierung seit iOS 14.5.
Seit dieser neuen Codierung kostet der Akkutausch bei Apple auch nicht mehr 75 € sondern aktuell 99 € (Stand Novmber 2023 in Deutschland).
Damit sind künftig alle nicht authorisierten Servicebetriebe raus - denn wer will schon dauernd diese Mitteilung auf dem Bildschirm haben?
Überlegt vorher, ob unter diesen Bedingungen ein eigener Akkutausch noch sinnvoll ist .....
Manfred Wachtel - Replica
Lieben Dank @manfredwachtel ! Mehr Infos dazu haben wir auch in unserem Blog zusammengefasst: https://de.ifixit.com/News/78890/teileko...
Sandra Hiller -