Salta al contenuto principale
Instant Pot IP-DUO80 V2 LED Display Replacement

Instant Pot IP-DUO80 V2 LED Display Replacement

Kayla Meacham

Kayla Meacham e 3 altri collaboratori

Ultimo aggiornamento il March 10, 2025

10 minuti
Moderato
Guida Studente in Evidenza

Introduzione

Vai al passo 1

The LED display is how you communicate with your Instant Pot. This guide will show you how to remove the display from the front of your device.

Cosa ti serve

Strumenti

  1. Instant Pot IP-DUO80 V2 LED Display Replacement, LED Display: passo 1, immagine 1 di 3 Instant Pot IP-DUO80 V2 LED Display Replacement, LED Display: passo 1, immagine 2 di 3 Instant Pot IP-DUO80 V2 LED Display Replacement, LED Display: passo 1, immagine 3 di 3
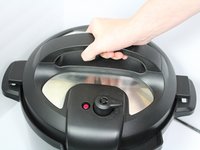
    • Open the lid by turning it counter-clockwise and lifting up.

    • Remove the inner pot.

  2. Instant Pot IP-DUO80 V2 LED Display Replacement: passo 2, immagine 1 di 3 Instant Pot IP-DUO80 V2 LED Display Replacement: passo 2, immagine 2 di 3 Instant Pot IP-DUO80 V2 LED Display Replacement: passo 2, immagine 3 di 3
    • Turn the Instant Pot upside down.

    • Remove the single 12-mm screw by using the T-15 head screwdriver and turning it counter-clockwise.

    • Turn the plate counter-clockwise and lift it off the Instant Pot.

  3. Instant Pot IP-DUO80 V2 LED Display Replacement: passo 3, immagine 1 di 2 Instant Pot IP-DUO80 V2 LED Display Replacement: passo 3, immagine 2 di 2
    • Remove the three 19-mm screws in the black plastic base's edge using the PH-1 head screwdriver and twisting counter-clockwise.

  4. Instant Pot IP-DUO80 V2 LED Display Replacement: passo 4, immagine 1 di 2 Instant Pot IP-DUO80 V2 LED Display Replacement: passo 4, immagine 2 di 2
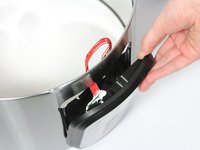
    • Pull the power cord out of its slot.

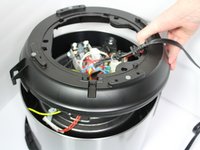
    • Pull up on the edge of the black plastic base to remove the base.

    Tengo una olla Instant por necesito repararla está con golpe

    sonialrodriguezv - Replica

  5. Instant Pot IP-DUO80 V2 LED Display Replacement: passo 5, immagine 1 di 3 Instant Pot IP-DUO80 V2 LED Display Replacement: passo 5, immagine 2 di 3 Instant Pot IP-DUO80 V2 LED Display Replacement: passo 5, immagine 3 di 3
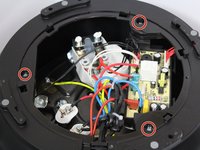
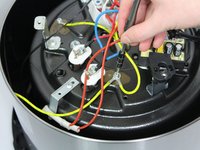
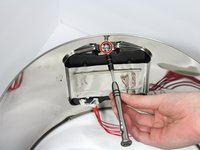
    • Disconnect the two green-striped yellow wires that are connected onto the bottom of the heating element. Use a PH-1 head screwdriver and turn counter-clockwise to remove the 10-mm screw holding them in place.

    • Be careful not to lose the small washer that comes with this screw.

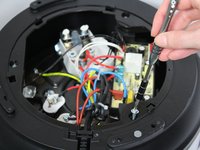
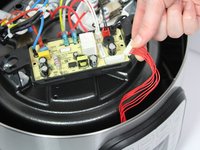
    • Pull up on the cn101 connection to detach the LED display from the motherboard.

  6. Instant Pot IP-DUO80 V2 LED Display Replacement: passo 6, immagine 1 di 1
    • Lift the silver outer shell off of the top black ring.

  7. Instant Pot IP-DUO80 V2 LED Display Replacement: passo 7, immagine 1 di 3 Instant Pot IP-DUO80 V2 LED Display Replacement: passo 7, immagine 2 di 3 Instant Pot IP-DUO80 V2 LED Display Replacement: passo 7, immagine 3 di 3
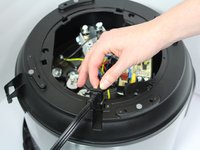
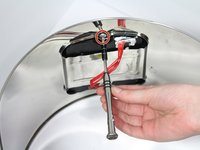
    • Remove the two 10-mm screws connecting the LED display to the outer shell using a PH-1 head screwdriver and twisting counter clockwise.

    • Pull out the LED display by pulling on it gently.

    You say no parts? But I don’t see how you rectified the issue just by removing the LED display. Do you need a replacement LED display?

    bryonkarren - Replica

    Okay..took instant pot apart as shown..do I need to buy a new led display..if so, where? Or do I just reinstall the old one?

    g locke - Replica

Conclusione

To reassemble your device, follow these instructions in reverse order.

Altre 7 persone hanno completato questa guida.

Team

Cal Poly, Team S18-G2, Livingston Winter 2018 Membro di Cal Poly, Team S18-G2, Livingston Winter 2018

CPSU-LIVINGSTON-W18S18G2

4 Membri

12 Guide realizzate

2Commenti sulla guida

Where can I get the replacement for the display?

Starfish Doodle - Replica

Hola disculpa, donde puedo conseguir la pantalla led de mi instat pot DUO PLUS MULTI-COOKER 9in 1

Evaristo - Replica

Aggiungi Commento

Visualizza Statistiche:

Ultime 24 Ore: 2

Ultimi 7 Giorni: 7

Ultimi 30 Giorni: 50

Tutti i Tempi: 7,316