Infant Optics Antenna broke
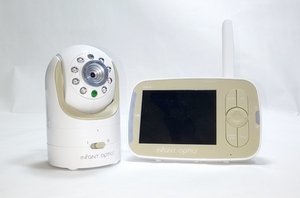
My daughter broke the antenna off of our Infant Optics 8 monitor. Is there a way to replace/fix that?
Questa è una buona domanda?
Punteggio
1
Ottieni un rapido accesso alle guide, ai componenti e alle risposte per i tuoi dispositivi
Rep: 13
![]() 1
1
My daughter broke the antenna off of our Infant Optics 8 monitor. Is there a way to replace/fix that?
Questa è una buona domanda?


Rep: 16,5k
![]() 11
11
![]() 17
17
![]() 19
19
Hi misstif03
Based on the specs, it is running on a private 2.4Ghz frequency.
https://www.verywellfamily.com/infant-op...
There is a way, but you need proper soldering tools.
You can try this
and this
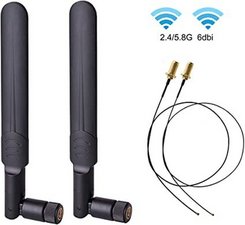
WiFi RP-SMA Antenna and connector.
I suggest to buy in set, to avoid mis match, look around on online, price should be reasonable.
In Summary,
Open up the device as ifixit follows, and remove till step 3
Infant Optics DXR-8 Back Cover Prerequisite
https://d3nevzfk7ii3be.cloudfront.net/ig...
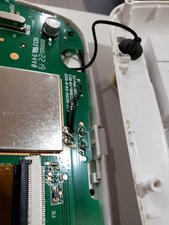
Desolder the antenna from the mainboard.
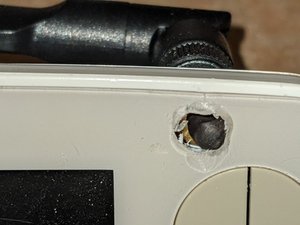
Remove the broken antenna parts from the casing.
Fit in the new SMA connector, you might need to drill or work into it.
and solder the pigtail end to the mainboard.
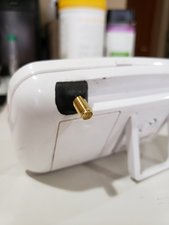
End product should be like this as an example.
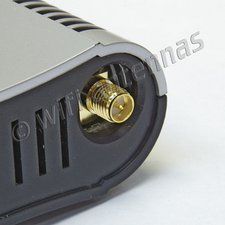
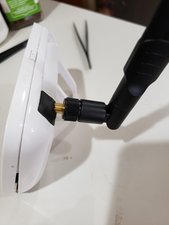
And you connect the sma antenna to it.
Questa risposta è stata utile?
THANK YOU! This worked perfectly. Followed the instructions exactly -- picked up a $10 soldering iron + wire and these antennas on amazon: https://www.amazon.com/gp/product/B07R21...
How did you solder it? Did you just take the wire and cut off that small connector bit then strip wire and solder? Or did you just solder the connector?
Before soldering anything - I pressed the connector up to the small ball of metal inside the white box (under the ANT1 text) - you'll need to plug back in the battery and verify good signal simply by touching together. No need to cut any wires, I soldered a large glob onto the antenna connector and another glob on top of that ball. With a good amount of solder stuck to both ends first - it was easy to connect them together.
Did you have trouble with the male connector being too long and preventing the shell from closing? I used the same antenna from the link above. I had to trim the end of the brass connector and resolder the wire back into the male connector. The device works, but it doesnt matter whether or not the black antenna is attached. So i may not have reconnected the wire successfully. Thanks
Rep: 37
![]() 2
2
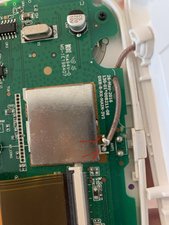
The trick to making this work is to connect both the inner core of the wire and the shielding (outer conductive layer) to the respective spots on the board. Usually the shield is grounded and the inner core is the connection to the antennae. If you buy the amazon linked antennae above it is easiest if you remove the small snap-on type connector. If you pry up the two edges it pulls right off leaving you with a tiny wire in the middle and the shielding exposed. They are separated by an inner jacket. It was the perfect length for me to use the existing solder to attach it. Here are some pictures to hopefully help. Thank you to all who previously posted, saved me a bunch of money.
#1: snap-on type connector with two edges pried up.

#2: soldered to the board. Be mindful that you need two separate connection points. If solder bridges between the two or you only connect the inner core your range will be severly impacted like the above person said.
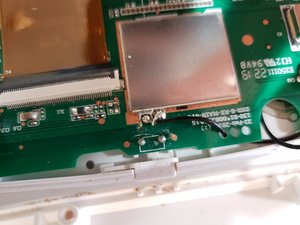
#3: zoomed out showing connection and wire placement.
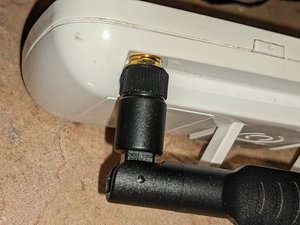
#4: The SMA connector is too long to use the existing hole (couldn't close the case), so I used Sugru to hold it a little further outside of the case.
#5: with the antennae connected. It does stick out the back a bit and can't lay flat, but I use it with the kickstand most of the time so no big deal.
Questa risposta è stata utile?
It is a bit heavy opposite the kickstand, so it tips over easily. I've been using the antennae as a stabilizer. I would consider orienting it differently or positioning closer to the kickstand if I did it again.
Thanks for the tip about the sugru. I used JB plastic weld to build up the shell and used a drill bit to counter sink the SMA connector. This left plenty of room to close the shell. To solve the awkwardly large antenna from the original link, I purchased a 2.5 dbi antenna that is much smaller and doesn't sacrifice much distance. It still covers my whole house. And I still have the large antenna if I need the additional coverage. Here is a link to an image of my repair. https://ibb.co/rHVTKFC. Anyway. Thanks for all the effort.

Rep: 25
![]() 1
1
Appreciate the prior tips - very useful.
To deal with the long SMA connector, I drilled a hole in the front of the case to make room for it.
Works like a charm.
Questa risposta è stata utile?

Hey @salmonjapan @jsprachyl ,
could you send a pic of the mainboard after changing the antenna? I noticed that the antenna brown cable is connected to two parts on the main board
thanks in advance!
Questa risposta è stata utile?
Hi @winz ,
This is normal for antenna cables
Usually antenna cable have a metal shielding wrapped around but insulated from the inner conductor. The shield is then covered in insulation. The shielding is used to reduce electrical interference to the signal received
Here's an image of what I mean. Outer insulation - metal shielding - insulation - inner conductor
If you take off the clamp you may find that the inner conductor is soldered to the board but the clamp is actually only touching the shield and not the inner conductor
I just soldered it to the ball inside the white box, the lower red arrow in your photo. No need to cut any wires.
Stripped the wire and then soldered it to the little bit of wire left in the antenna, but range got worse. Then soldered it directly to the board and the signal almost doesn't work now unless your fairly close.
Doesnt make sense that it wouldn't work since it is clearly connected to where it needs to be, but maybe these dual band antenna aren't compatible.
Buying a new monitor with ticked tail :-)
Questa risposta è stata utile?
See post below - you need to connect both the shield and inner core separately.
Ultime 24 Ore: 2
Ultimi 7 Giorni: 25
Ultimi 30 Giorni: 105
Tutti i Tempi: 14,331
1 Commento
Followed the guide. Fixed it! Thanks.
da brendon wong