Introduzione
Se lo schermo del tuo iPhone XS Max è rotto, non risponde al tocco oppure non mostra alcuna immagine all'accensione del telefono, usa questa guida per far funzionare di nuovo il tuo iPhone con un nuovo schermo, ovvero un nuovo gruppo display.
L'insieme altoparlante voce + gruppo sensori attaccato al retro del display è accoppiato in fabbrica al tuo esemplare di iPhone, quindi devi in ogni caso trasferirlo dal tuo vecchio display a quello nuovo quando sostituisci lo schermo. Comprende l'illuminatore flood, parte integrante del Face ID, il sistema di sicurezza per l'accesso. Se danneggiato o sostituito, il Face ID smetterà di funzionare, quindi presta una particolare attenzione a non danneggiare nessuna di queste parti nel corso della procedura. In caso di danneggiamento, solo Apple può ripristinare le funzionalità Face ID.
Nota: la funzionalità True Tone resta disabilitata dopo la sostituzione lo schermo, anche utilizzando uno schermo Apple originale.
Cosa ti serve
Panoramica Video
-
-
Spegni il tuo iPhone prima di iniziare lo smontaggio.
-
Rimuovi le due viti Pentalobe lunghe 6,9 mm sul lato inferiore dell'iPhone.
-
L'apertura del display dell'iPhone comprometterà le sue tenute impermeabili. Procurati tenute di ricambio prima di procedere al passo successivo oppure stai attento ad evitare di esporre il tuo telefono ai liquidi se non sostituisci le guarnizioni.
-
-
-
Se il tuo iPhone ha lo schermo in pezzi, applicando del nastro adesivo sulla superficie eviterai ulteriori rotture e la possibilità di farti male nel corso della riparazione.
-
Disponi strisce sovrapposte di nastro da pacchi sul display dell'iPhone fino a ricoprire tutta la superficie.
-
Se la rottura del vetro rende difficile far aderire una ventosa come indicato nei prossimi passi, prova a ripiegare un pezzo di nastro adesivo molto tenace (come il nastro americano) attorno a una maniglia e usalo al posto della ventosa per sollevare il display.
How to detect my Iphone what screen it is, OLED or LCD?
It’s OLED. You can find the specs here, https://support.apple.com/en-us/HT201296
When you find your phone, at the bottom of the description click on, See the tech specs…
mcr4u2 -
The included suction cups were stiff and worthless. They would not lift the screen. Also, I tried every type of tape on the screen to help the suction cups stick without success. Heavy duty suction cups were for my bathroom also failed. However, I had an old GoPro mount with some preapplied double sided 3M VSB tape and stuck that on the screen near the bottom. Magic! This method had the added bonus of being able to use a GoPro attachment as a handle to lift the screen, and propped up the screen like a kickstand in step 12.
Very cool! Thanks
Antonio -
My screen was pretty stuck… would not budge. Heated, super glued the suction cup, tried gorilla tape. Ended up doing the GoPro mount with 3M VSB tape method mentioned. Worked great. That 3M tape is the bomb.
If you have flat feeler gauges (for adjusting engine valve tappet clearance, ignition points … old school) the .003 thick goes right in. Work your way up until you can get the pick or supplied pry tool in.
where can I buy 3M VSB plis!!
3M VHB tape is at auto stores and other big box stores, or online.
nicO -
I used the tweezers that came with the replacement screen and jammed one of them into the glass and that eventually worked. Heating with a blow dryer is also important. The suction cup was helpful in loosening the adhesive for sure, but just not enough to get the display to come out.
-
-
-
Posiziona strisce sovrapposte di nastro trasparente da pacchi sullo schermo dell'iPhone finché non l'hai coperto tutto.
-
Se non riesci a far aderire la ventosa nei prossimi passi, applica del nastro adesivo resistente (come del nastro americano telato) come una maniglia e alza lo schermo con quello.
-
-
-
Tira la manopola blu indietro per sbloccare i bracci dell'Anti-Clamp.
-
Fai scorrere i bracci oltre il bordo sinistro o destro del tuo iPhone.
-
Posiziona le ventose vicino al bordo inferiore dell'iPhone, una di fronte e una sul retro.
-
Premi le ventose insieme per farle aderire sull'area desiderata.
-
-
-
Scalda un iOpener e infilalo tra i bracci dell'Anti-Clamp.
-
Piega l'iOpener in modo che si appoggi sul bordo inferiore dell'iPhone.
-
Aspetta un minuto per dare all'adesivo la possibilità di scollarsi e creare un'apertura.
-
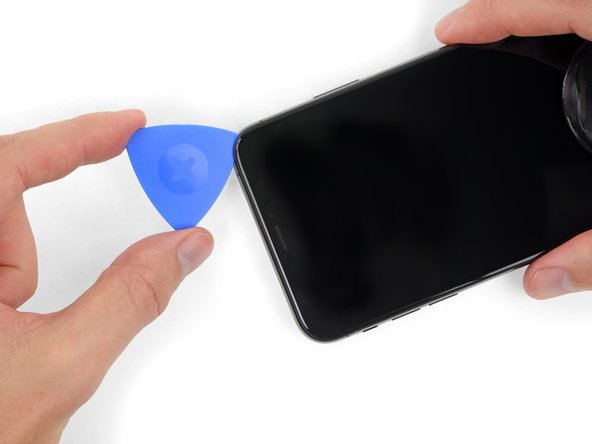
Inserisci un plettro di apertura sotto lo schermo e la scocca di plastica, non solo sotto lo schermo.
-
Salta i prossimi tre passaggi.
-
-
-
Usa un asciugacapelli oppure prepara un iOpener e applicalo per circa un minuto al bordo inferiore dell'iPhone per ammorbidire l'adesivo sottostante.
besteht da die Gefahr das sich das Displayglas vom lcd löst?
Besteht da die Gefahr das sich der Kleber vom Displayglas löst?
-
-
-
Tira la ventosa applicando una trazione forte e costante fino a creare una piccola fessura tra il pannello frontale e il case posteriore.
-
Inserisci un plettro di apertura nella fessura sotto lo schermo e la scocca di plastica, non solo sotto lo schermo.
-
-
-
-
Inserisci nuovamente il tuo attrezzo nell'angolo inferiore destro dell'iPhone e fallo scorrere lungo il lato destro del telefono per separare l'adesivo.
-
-
-
Rimuovi le quattro viti tri-wing Y000 che tengono in posizione la staffa del connettore della scheda logica, delle seguenti lunghezze:
-
Due viti da 1,1 mm
-
Una vite da 1,5 mm
-
Una vite da 3,7 mm
-
-
-
Usa la punta di uno spudger o un'unghia pulita per staccare il connettore della batteria sollevandolo dal suo zoccolo sulla scheda logica.
-
Piega lievemente il connettore per distanziarlo dalla scheda logica ed evitare che questo possa fare contatto con lo zoccolo e quindi alimentare il telefono nel corso della tua riparazione.
-
-
-
Rimuovi le tre viti tri-wing Y000 che bloccano la staffa del connettore del display:
-
Due viti da 1,5 mm
-
Una vite da 1,1 mm
I am replacing the screen for the 2nd time - the first repair was done by someone else, and the first 2 screws are 1.5mm and the last screw is 1.1mm… If I put the screw back in am I risking Long Screw Damage?
Thanks for all your comments! I'll amend this step.
Hi, I just changed the screen on my XS Max and for this bracket I used 2 x 1.1 mm and 1 x 1.5 mm.
Starting from left to right:
- left 1.1 mm (I tried with 1.5 mm like in the above picture but I felt that it didn't wanted to go deeper so I didn't forced and I tried it in the middle and it fit perfectly)
- middle 1.5 mm
- right 1.1 mm
For the two brackets I had 7 screws, I aligned them on the desk by length and I had 2 x 1.5 mm, 4 x 1.1 mm and 1 x 3.7 mm.
Good luck and I hope it will help someone!
-
-
-
Solleva delicatamente il cavo finché non si stacca.
-
-
-
Rimuovi le tre viti tri-wing Y000 che bloccano il gruppo altoparlante/sensore:
-
Una vite da 1,4 mm
-
Due viti da 1,5 mm
Ciao @max94949 Quale lunghezza stai cercando? Il passo menziona che si tratta di una vite Y000 da 1,4 mm e di due vite Y000 da 1,5 mm.
-
-
-
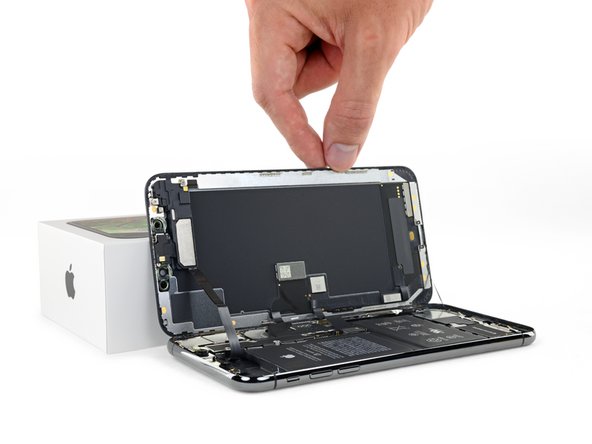
Usando uno spudger, fai leva delicatamente sotto il bordo superiore del gruppo altoparlante e rovescialo verso il basso allontanandolo dal bordo superiore del display.
If you are using a refurbished display, check for dirt in the earpiece speaker cutout.
If you have poor quality or low sound after changing the display, use a cotton bud and isopropyl alcohol to clean the earpiece cutout.
-
-
-
Usa un asciugacapelli o una pistola termica oppure prepara un iOpener e applicalo sulla parte superiore del display dal lato frontale per 1-2 minuti per ammorbidire l'adesivo che blocca i sensori.
-
-
-
Infila con cautela il bordo del tuo plettro di apertura sotto il microfono, passando sotto al cavo flex.
-
Torci delicatamente il plettro per staccare il microfono, stando attento a non forzare o danneggiare il cavo flex.
-
Se necessario, usa la punta dello spudger per portare a termine la separazione del microfono dal suo vano nel pannello anteriore.
-
-
-
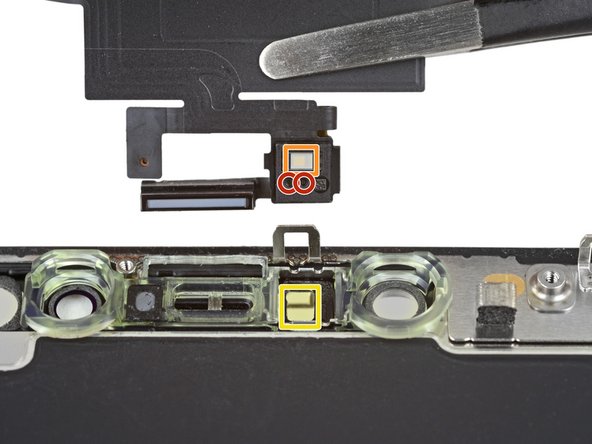
Usa delle pinzette per smuovere il sensore luce ambiente e sollevarlo dal suo recesso nel display.
This was the most difficult part for me so i erred on the side of caution. I reheated the display in the oven at 85 degrees celsius. Like in the third picture in the next step, i got a razor into the slot below, to get the diffuser a little loose before wiggling the sensor out. I didn't understand the wiggling until i simply rocked it like a boat would side to side like to the top of the display to the bottom on the display, and voila, all came out easy and in one piece with the diffuser still attached.
-
-
-
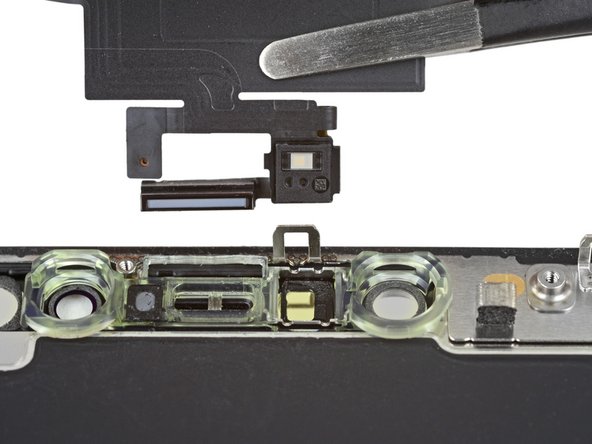
Se hai avuto successo nella rimozione del sensore luce ambiente, come illustrato nella prima foto, continua con il prossimo passo qui sotto.
-
Se la striscia diffusiva bianca si è staccata e rimane attaccata al display, come mostrato nella seconda foto, devi staccarla facendo leva con delicatezza lungo il bordo superiore utilizzando una lama sottile o uno strumento di apertura. L'operazione è un po' più facile se prima di iniziare riscaldi di nuovo la parte.
I have accidentally damaged flood illuminator will it affect the face id also or if I just replace the Earpiece Speaker and Sensor Assembly it will get fixed.
-
-
-
Rimuovi il gruppo altoparlante e il gruppo dei sensori frontali.
-
Sensore di prossimità
-
Illuminatore flood
-
Il modulo deve essere posizionato in modo tale che questi componenti non siano coperti in alcun modo da adesivo.
Do you have to remove the earpiece speaker and front sensor assembly. If you are taking a screen from another Xs max with it already attached?
The front sensor assembly is part of Face ID, so you must transfer the original assembly to the replacement screen in order to maintain Face ID functionality.
No, you just take the whole unit. Warm it up and remove the glued sensors like described. Handle it carefully, the speaker cable is quite thin. If damaged, you might loose your face-ID functionality.
Does the screen need a reprogamation onto the new screen?
if the pentalope screws are rusted and the driver can’t fit in it to remove them is there any other way to remove them to replace screen?
-


Confronta la tua parte di ricambio con quella originale: potrebbe essere necessario il trasferimento di alcuni componenti o la rimozione di protezioni adesive dalla parte nuova prima di installarla.
Per rimontare il dispositivo, segui queste istruzioni in ordine inverso.
Porta i tuoi rifiuti elettronici a un riciclatore certificato R2 o e-Stewards.
La riparazione non è andata secondo i piani? Vai sulla nostra comunità Risposte per trovare aiuto nella risoluzione dei problemi.
Annulla: non ho completato questa guida.
Altre 175 persone hanno completato questa guida.
Un ringraziamento speciale a questi traduttori:
100%


Questi traduttori ci stanno aiutando ad aggiustare il mondo! Vuoi partecipare?
Inizia a tradurre ›


37 Commenti
Nice guide. I could be wrong but for the first time in a while, changing a display on an Apple phone looks like it’s not anymore difficult than previous models.
John K
the-screen-savers.com
If you remove the screen but then apply the same screen back on the phone, will True Tone still be disabled?
@onslivion Nope! It'll continue to work fine, so long as you didn’t damage anything.
Hi i broke the Flex cable of the Part.
what i can do now.
is their some Parts for sale?
I just switched the screens from 2 phones and both are unresponsive, if put them back to its original logic board the work again, any idea why they dont work? both are original.
Why is True Tone disabled afterwards? Even with an Original Screen how is that possible?
That's normal. There's a chip in the screen that has info that is specific to the original logic board so unless you have a special machine to read/write to that chip, truetone will not work.
This was perfect. It definitely helped me replace the screen on a friend IPhone XS Max!
Every authoritative source (such as Apple Support, Wikipedia) that I read about the iPhone XS Max display states that it has an OLED display - not an AMOLED display, and not an LCD display (such as on the XR model). Yet the parts associated with this guide are LCD (website quirk?) and the written text for XS Max mention AMOLED. Isn’t this important to get right when replacing? The model I have is A1921.
Hi Mark,
The iPhone XS Max uses an AMOLED display. Active Matrix OLED (AMOLED) is a subcategory of the general OLED tech—AMOLED displays contain circuitry which allows them to switch each OLED pixel on or off. Compared to Passive Matrix OLED, AMOLED displays have a higher refresh rate and are more energy efficient . However AMOLED displays are complex, difficult to source, and very expensive to replace (think $200-400 for the part!) Hardware manufacturers sought to resolve this problem by producing LCD replacement screens. These screens are made to be completely compatible with the iPhone XS Max, but are significantly cheaper to replace. They do look slightly different compared to the original screen. Check this link out for a more in-depth review of the differences.
Where is the INSTALL GUIDE this is just removal? And don’t tell me it’s the reverse. I have a small gasket that’s not mentioned in this and it doesn’t explain how to remove the main old gasket or install the new gasket
Where is the installation guide? This is just a removal guide. Don’t tell me that it’s the opposite of removal to install because I have a small gasket that is not mentioned in the YouTube video or on this site in my package
I would like to echo this comment. It is extremely disappointing to see a guide this comprehensive and detailed stop short of reassembly. Especially because some parts need to be transferred from the original display to the replacement one.
Completed the Repair with the more Expensive alternative - the OLED display.
The guide is very comprehensive and covered all the points including looking out for bits left behind!
- I noticed a tiny piece of conductive foam on the old display which i moved to the new one.
The OLED display is top quality, but a little darker due to losing the “True Tone” no doubt.
The Adhesive kit is very good, but separating the two films was a little difficult and messed up the alignment slightly, however I managed to recover!
One more addition I had to make after undertaking this repair.
I had noted that after swapping the display the earpiece was very quiet. I thought that I had missed a gasket, misaligned the earpiece speaker or not plugged in the leads correctly.
Nope. Much simpler than that. CLEAN THE EAR PIECE CUTOUT! *Eeeewwww* After putting up with this for about 4 weeks, I happened to get out the Cotton Buds. A quick wipe revealed someone elses EAR GUNK was clogging up the ear piece cutout !
Disgusted, I got out the Isopropyl and cleaned it (carefully) about 10 times, the audio is now crystal clear.
@ifixit - Please ensure your “Refurbished displays” have a clean earhole. It was pretty gross that it was clogged to the point that I could not HEAR!
Great guide, completely worked for me!
This guide worked perfectly for my iPhone Max XS screen replacement. This is only my second “project” from iFixit (the first was a replacement display screen for my Canon 6D) and both times, miraculously, everything worked. I’m really not sure if it is my skills or the details in the guides (it’s definitely the latter and a tiny bit of the former). The replacement parts are reasonably priced and the toolkits are VERY GOOD in quality.
For this iPhone screen fix, I used a previously purchased toolkit and “borrowed” suction handles (yes, definitely makes a difference and better than the tape alternative—I tried both) from a bathroom rack.
It took me about 3 hours to get this done. I rushed on step one and stripped the first pentalobe screw. Luckily, one stripped pentalobe screw is still OK. I managed to pull it apart by wiggling the screen around (without too much force). I used a hair dryer to heat the frame/adhesive.
Follow the instructions closely and don’t lose the tiny screws. A magnetic screwdriver helped.
I have accidentally damaged flood illuminator will it affect the face id also or if I just replace the Earpiece Speaker and Sensor Assembly it will get fixed.
Step 1: Remove pentalobe screws…is very careful to NOT STRIP THE SCREW…tools provided/metal is not hard enough and is unable to take out the screw in Step 1 and am now currently going out to buy better pentalobe screw driver. THANKS. Why don’t you just provide better tools and increase the cost……………………………………………
for me at least once you get use to repairing this it can take around 30 min too an hour but i also repair all devices even phones for living so i do have experience with repairing these
Changing just the glass screen on my iphone xs max and the black part behind the screen is cracked what do I do ?
Executed this repair almost flawlessly. The FaceID flex cable is very fragile and glued down very well. I advise you be careful when removing is as not much pressure at all can cause it to break (Speaking from experience). Other than that the guide was very easy to follow.
This was an incredible guide! With the video, it was the perfect guide and I managed to complete the fix in less than 2 hours.
Can water damaged iphone be restored by replacing screen?
Hey Team iFixit, vielen dank für diese ausführliche Anleitung. Einfach richtig lesen dann macht man auch keine Fehler haha
Last month I ordered and received a new screen/digitizer for my iPhone XS max. Installation was easy and the phone was back on-line in half ah hour. Not for long unfortunately. A week after the replacement, the digitizer became irresponsive. I had to let the battery die and subsequently reboot my phone.
It fixed the problem for one day. Then the digitizer froze up again. I decided I was going to open the phone to check the ribbon cables for faulty connection. Alas, when opening the iPhone,one of the cables between the screen and the main board tore.
I resorted to re-installing my old cracked screen that now has been working flawlessly for one week.
Is there a fix for the broken ribbon cable, or can I return the screen for credit or repair?
Hey, I'm thinking on fixing up my Iphone Xsmax screen will the Face Id still function after replacement
Hello oguntayo tosin, as mentioned in the introduction, for Face ID to work you have to transfer the earpiece speaker + sensor assembly as they are paired to your individual iPhone.
I cant put the display on the iPhone and I dont know why.It just doesn't fit right and rises about 2mm higher than it should.What can I do?
Hello Robin, did you already go through the recommended troubleshooting steps? It sounds like it could be a bracket or elements of the earpiece speaker and front sensor assembly that are not seated correctly or that there is some issue with the clips holding the display. You could also try checking whether your replacement part deviates from the original screen as discussed here. Hope this helps!
If purchasing the OLED option from here, would I be able to use a programmer to enable back True Tone?
There's a couple extra chips near the bottom of the original screen that aren't on the replacement. Are they surplus to requirement?
after re assembly the screen is loose I attempted to open it and re sitting but still loose!!! why???
PLEASE HELP! I have an IPhone XS Max with a cracked screen. It has loads of irreplaceable information on it. I can’t afford to buy a screen right now but I have a brand new screen for a IPhone 6 Plus, I don’t want to install it onto the XS but I was wondering if it could be hooked up long enough to type the passcode and trust a computer so I can download the phone’s contents? Pretty much I just need to know if the cables for the display are compatible.
This is the only thing I could think of that might possibly work and not cost me a bunch of money. I was recently attacked, robbed and assaulted. The IPhone XS Max was recording during the assault but couldn’t back up because I didn’t have any Icloud storage available. If anyone has any other suggestions please help me out. P.s. I have went to the police and they couldn’t care less, I live in a small town and my abuser is a prominent member of the community so I am on my own.