Questa guida ha delle modifiche più recenti. Passa all'ultima versione non verificata.
Introduzione
Se lo schermo del tuo iPhone 11 è rotto, non risponde al tocco o non riproduce immagini quando il telefono è acceso, usa questa guida per rimettere in funzione il tuo iPhone installando un nuovo schermo, ovvero il gruppo display.
***Se la faccia posteriore del tuo nuovo schermo comprende già una
lamina metallica di schermatura dell'LCD, segui questa guida più breve.*** Mentre, se questa piastra è assente, continua a leggere: questa guida ti mostra come sostituire lo schermo mantenendo la tua vecchia piastra di schermatura dell'LCD.
Il gruppo combinato altoparlante voce + sensori frontali collegato alla retro dello schermo è accoppiato in fabbrica al tuo esemplare di iPhone, quindi devi seguire le istruzioni sottostanti per poter trasferire il gruppo stesso dal vecchio display al nuovo. Il gruppo contiene l'illuminatore flood, che è parte integrante della funzionalità di sicurezza biometrica Face ID. Se viene danneggiato o sostituito, il Face ID smetterà di funzionare, quindi poni molta attenzione a non danneggiare alcun componente del gruppo nel corso di questa procedura. In caso di danni, soltanto tecnici "autorizzati" Apple potranno ripristinare la funzionalità Face ID.
Nota: la funzionalità True Tone viene disabilitata dopo la sostituzione dello schermo, perfino se è stato utilizzato uno schermo Apple originale.
Cosa ti serve
Panoramica Video
-
-
Spegni il tuo iPhone prima di cominciare a smontarlo.
-
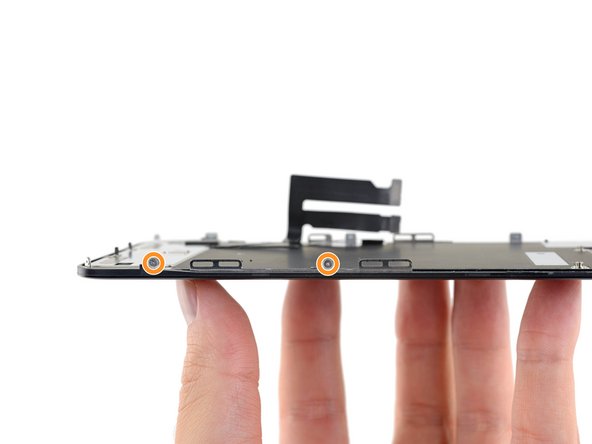
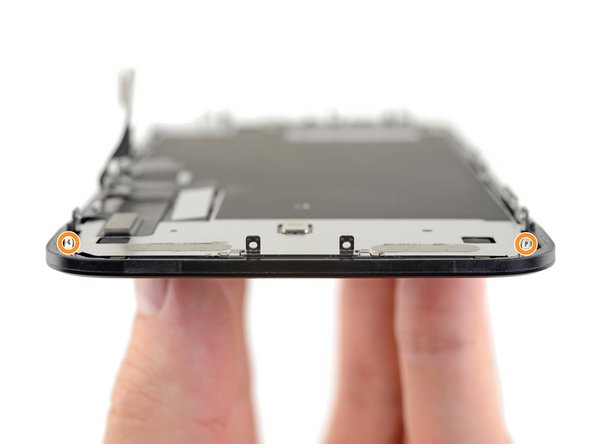
Rimuovi le due viti pentalobe da 6,7 mm nella parte inferiore del tuo iPhone.
-
-
-
Se il tuo iPhone ha lo schermo in pezzi, applicando del nastro adesivo sulla superficie eviterai ulteriori rotture e la possibilità di farti male nel corso della riparazione.
-
Disponi strisce sovrapposte di nastro da pacchi sul display dell'iPhone fino a ricoprire tutta la superficie.
-
Se la rottura del vetro rende difficile far aderire una ventosa come indicato nei prossimi passi, prova a ripiegare un pezzo di nastro adesivo molto tenace (come il nastro americano) attorno a una maniglia e usalo al posto della ventosa per sollevare il display.
-
-
-
Appoggia strisce sovrapposte di nastro adesivo trasparente sullo schermo dell'iPhone fino a coprire l'intera superficie.
-
Se non riesci a far aderire la ventosa nei prossimi passaggi, piega un pezzo di nastro resistente (come il nastro adesivo americano) come una maniglia e solleva lo schermo con quello.
-
-
-
Tira indietro la maniglia blu per sbloccare i bracci dell'Anti-Clamp.
-
Fai scorrere i bracci sul bordo sinistro o destro del tuo iPhone.
-
Posiziona le ventose vicino al bordo inferiore dell'iPhone, una in davanti e una dietro.
-
Premi le ventose insieme per applicare l'aspirazione all'area desiderata.
-
-
-
Tira in avanti la maniglia blu per bloccare i bracci.
-
Ruota la maniglia in senso orario di 360 gradi o fino a quando le ventose iniziano ad allungarsi.
-
Assicurati che le ventose rimangano allineate l'una con l'altra. Se iniziano a scivolare fuori allineamento, allenta leggermente le ventose e riallinea i bracci.
-
-
-
Scalda un iOpener e fallo passare attraverso i bracci dell'Anti-Clamp.
-
Piega l'iOpener in modo che poggi sul bordo inferiore dell'iPhone.
-
Attendi un minuto per dare all'adesivo la possibilità di staccarsi e presentare uno spazio di apertura.
-
Inserisci un plettro di apertura nella fessura sotto lo schermo e la cornice di plastica, non lo schermo stesso.
-
Salta i tre passaggi successivi.
-
-
-
Usa un asciugacapelli, una pistola termica oppure prepara un iOpener e applicalo per circa un minuto al bordo inferiore dell'iPhone.
-
-
-
Tira la ventosa con una pressione decisa e costante per creare un leggero spazio tra il pannello anteriore e il case posteriore.
-
Inserisci un plettro di apertura nella fessura sotto lo schermo e la cornice di plastica, non lo schermo stesso.
This turned out to be the most difficult part for me. My old ifixit suction cup didn't suck hard enough to generate enough force to pry the display from the case. I ended up applying heat at least a dozen times, and I had to pull up on the suction cup forcefully over and over and over while repositioning it several times. I finally had success inserting my pick into the tiny gap after 30 or so rapid tugs on the suction cup.
I have the same question
-
-
-
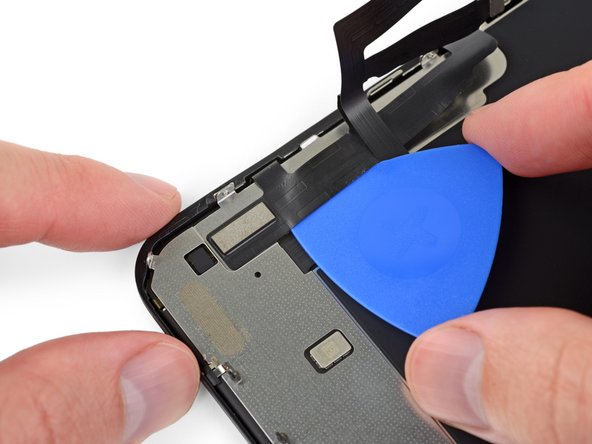
Fai scorrere il plettro di apertura attorno all'angolo in basso a sinistra e lungo il bordo sinistro dell'iPhone, tagliando l'adesivo che tiene in posizione il display.
-
-
-
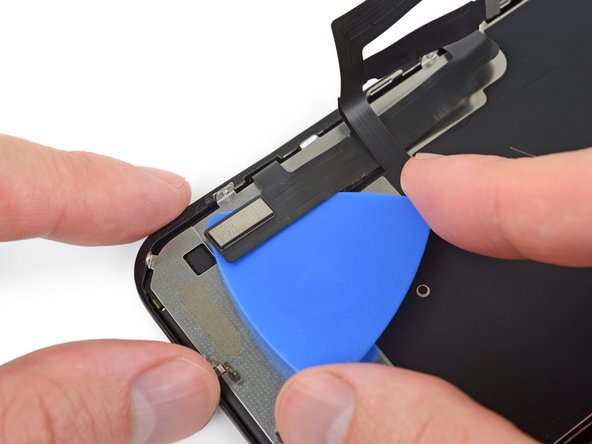
Reinserisci il plettro sul bordo inferiore dell'iPhone e fallo scorrere lungo il lato destro per continuare a separare l'adesivo.
Instructions are confusing as the last step says not to insert at certain points, while this says to slide all the way up the right side - is it that sliding is ok but inserting isn't (whatever that might mean) or just not more than 3mm?
Just slide slightly and the display will rise without problems on all iPhone models, sometimes if I have long nails I even insert a fingernail and lift the display.
Tonynox -
-
-
-
Tira la linguetta sulla ventosa per staccarla dal pannello frontale.
-
-
-
Apri l'iPhone sollevando il display dal lato sinistro, come la copertina posteriore di un libro.
-
Appoggia il display contro qualcosa di robusto.
-
-
-
-
Per accedere alle viti nel passo successivo, gira lo schermo sollevandolo delicatamente dal suo bordo inferiore.
-
-
-
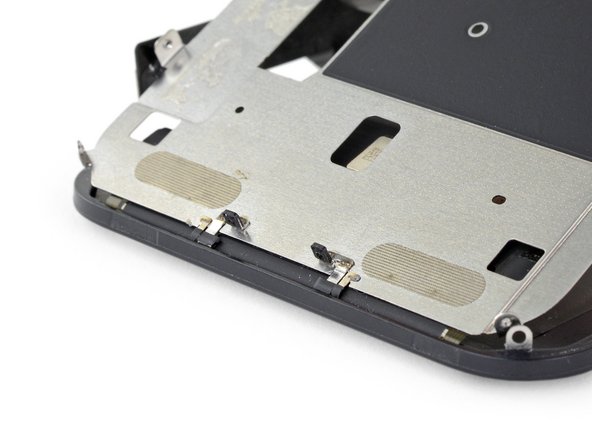
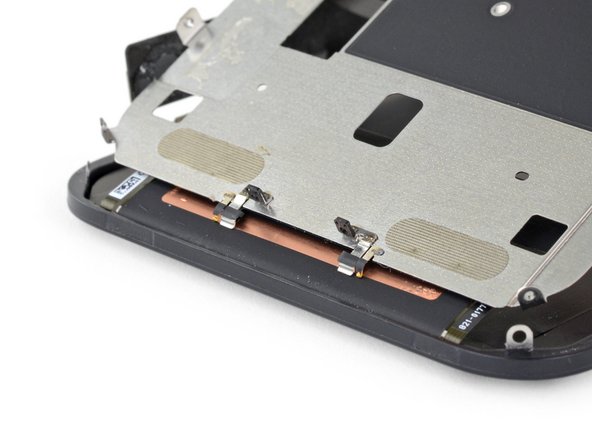
Usa un cacciavite Y000 per rimuovere le tre viti, lunghe 1,1 mm, che fissano la staffa sopra il connettore della batteria.
During reassembly, I had to connect my phone to the charger before it would power up.
Die Schrauben sind wahnsinnig kurz, tatsächlich winzig klein. Nach dem Herausdrehen könnte es im ersten Moment so aussehen, als habe man die Schrauben ausgebohrt anstatt herauszudrehen, sie sind jedoch sehr schnell gelöst und liegen dann entweder im Gehäuse oder sind neben dem Gehäuse herausgefallen. In jedem Fall sollten sie nie auf den Boden fallen, da sie dann kaum mehr auffindbar wären.
-
-
-
Usa la punta di uno spudger o un'unghia pulita per staccare il connettore della batteria sollevandolo dal suo zoccolo sulla scheda logica.
-
Piega lievemente il connettore per distanziarlo dalla scheda logica ed evitare che questo possa fare contatto con lo zoccolo.
-
-
-
Usa un cacciavite Y000 per rimuovere le cinque viti da 1,1 mm che fissano la staffa della cover della scheda logica.
Die Schrauben sind wahnsinnig kurz, tatsächlich winzig klein. Nach dem Herausdrehen könnte es im ersten Moment so aussehen, als habe man die Schrauben ausgebohrt anstatt herauszudrehen, sie sind jedoch sehr schnell gelöst und liegen dann entweder im Gehäuse oder sind neben dem Gehäuse herausgefallen. In jedem Fall sollten sie nie auf den Boden fallen, da sie dann kaum mehr auffindbar wären.
-
-
-
Usa uno spudger o un'unghia per staccare il connettore del cavo del pannello LCD.
-
Scollega il connettore del digitizer disposto accanto.
Be mindful when reconnecting LCD panel connector and digitizer connector. It’s looks very similar. These 2 ribbon connectors a slightly different.
Pay attention.
내 아이폰이 디스플레이 분리 단계를 거친 후, 전원이 들어오지 않습니다. 층전기를 꽂아도 배터리에 미세한 전기 반응이 느껴지지 않고, 탭틱 엔진도 작동하지 않게 되었습니다. cpu 온도는 여전히 뜨껍습니다. 내 마더보드가 디스플레이 분리 후 갑자기 고장난건가요?
Hast Du das Problem gelöst?
커넥터 핀을 빼거나 다시 넣기 위해 구부러졌을 수 있습니다. 핀이 구부러진 경우 돋보기 등으로 살펴보고, 그렇다면 적절한 매장에 가져가세요.
Hampter -
-
-
-
Usa la punta di uno spudger o un'unghia per scollegare il connettore del gruppo sensori del pannello frontale.
-
-
-
Rimuovi il gruppo schermo.
After this step its probably a good idea to test the new screen (you dont have to plug in the front camera assembly)
Not a technician, so correct me if I'm wrong: I think that it's at this step of reassembly (before you reattach the screen) that you apply waterproof glue, if you have it.
-
-
-
Rimuovi le quattro viti che fissano il gruppo altoparlante/sensori:
-
Tre viti a croce da 1,6 mm
-
Una vite tri-wing Y000 da 1,3 mm
Correct me if I am wrong but you no longer need to do this as of IOS 15.2 as apple doesnt disable Face ID on 3rd party repairs
-
-
-
Usa la punta di uno spudger per far leva con delicatezza sul bordo superiore dell'altoparlante.
-
Ribalta il gruppo altoparlante, in direzione opposta al bordo superiore dello schermo.
-
-
-
Usa un asciugacapelli, una pistola termica oppure prepara un iOpener e applicalo sulla parte frontale e superiore del display per 1-2 minuti in modo da ammorbidire l'adesivo che fissa i sensori.
-
-
-
Fai scorrere con cautela il bordo del tuo plettro di apertura al di sotto del cavo flessibile sotto il microfono.
-
Torci delicatamente il plettro per separare il microfono, stando attento a non forzare o danneggiare il cavo flessibile.
-
Se necessario, usa la punta di uno spudger per finire di separare il microfono dal suo incavo nel pannello frontale.
This step was a little bit confusing. I thought that the entire ribbon assm should be removed once the speaker was detached. The entire assm doesn’t actually come off until Step 30.
Be careful in the next few steps, as you can easily damage some parts. Make sure that you operate gently, and that you don't pull, twist or apply too much pressure on the components.
-
-
-
Usa delle pinzette per far scorrere la piccola staffa verso l'alto allontanandola dal sensore luce ambiente.
As you remove it, familiarise with its position. It will be hard to put it back into place. If you pay close attention to how it comes out, it will be easier to put it back
-
-
-
Usa delle pinzette per far oscillare il sensore luce ambiente e quindi per sollevarlo dal suo incavo nello schermo.
-
-
-
Rimuovi il gruppo altoparlante voce e sensori frontali.
-
Sensore di prossimità
-
Illuminatore flood
-
Il modulo deve essere posizionato in modo che questi componenti siano liberi da qualunque adesivo.
-
-
-
Usa un cacciavite Y000 per rimuovere le viti da 1,1 mm che tengono ferma la schermatura dell'LCD:
-
Tre viti sul lato più vicino ai cavi del display
-
Altre 2 viti sul lato opposto
L’appui sur les vis est réellement important, au risque de foirer celles-ci. N’hésitez donc pas à appuyer, en faisant contre-poids du côté opposé bien évidemment.
This is the bit that was difficult. The tri'point screwdriver y0000 barely fits this tricky size. It could have been the cheap screwdriver that came with the screen replacement kit. Stripped 2 screws, drilled out with an appropriate size drill bit ' frame still intact. I had more success using a size 0.7mm flathead screwdriver.
-
-
-
Applica un po' di calore usando iOpener (o un asciugacapelli o una pistola termica) sul retro dello schermo, in modo da ammorbidire l'adesivo che tiene attaccati i cavi del display alla piastra di schermatura dell'LCD.
-
-
-
Inserisci il plettro tra i cavi del display e la schermatura dell'LCD.
-
Fallo scorrere verso il bordo inferiore del display in modo da separare i cavi.
-
Fermati quando raggiungi la fine del primo cavo.
-
-
-
Inserisci di nuovo il plettro, questa volta in mezzo ai due cavi.
-
Fai scorrere il plettro fino in fondo al bordo inferiore dello schermo per staccare i cavi l'uno dall'altro.
-
-
-
Rimuovi l'intero cavo del digitizer dalla piastra di schermatura e spostalo sul lato, piegandolo.
IPhone XS copy phone ka folder
-
-
-
Inserisci il plettro sotto il bordo superiore della piastra ed esegui una torsione per staccarla dal display.
-
-
-
Angola maggiormente la schermatura dell'LCD, fino a vedere il resto del cavo dello schermo attaccato al retro.
-
Fai passare lo spudger tra la schermatura e il cavo del display e separa completamente questi due elementi.
-
-
-
Mentre sollevi la piastra LCD, tieni d'occhio i dentini di metallo sulla parte bassa.
hello whaty if one of the golden contact pins ( i guess it is) to be exact right one has freyed up a bit and looks messy. could it cause harm or it is not very important?
On reassembly leave the adhesive cover on the digitizer cable so that it doesn’t get caught on the LCD shield while working the other cable in place and positioning the shield on the frame. When you are ready to stick the digitizer cable to the shield remove the protective plastic.
-
-
-
Ora restano solo la piastra di schermatura dell'LCD e il digitizer.
-


Confronta il pezzo sostituito con quello originale, potresti dover trasferire componenti rimasti sulla vecchia parte o rimuovere adesivi sul retro del componente nuovo prima di installarlo.
Per riassemblare il tuo dispositivo, segui i passi descritti in ordine inverso.
Porta i tuoi rifiuti elettronici a un riciclatore certificato R2 o e-Stewards.
La riparazione non è andata secondo i piani? Visita la nostra vasta libreria per la risoluzione problemi iPhone, o in particolare la nostra pagina iPhone 11 non si accende. Prova delle soluzioni di base ai problemi, oppure rivolgiti alla nostra comunità Risposte iPhone 11 per trovare aiuto nella risoluzione dei problemi.
Annulla: non ho completato questa guida.
Altre 173 persone hanno completato questa guida.
Un ringraziamento speciale a questi traduttori:
100%


Questi traduttori ci stanno aiutando ad aggiustare il mondo! Vuoi partecipare?
Inizia a tradurre ›


23 Commenti
I am a repair technician from California, and I use your company’s tools and I gotta say that I love them. Very sleek, and the powerful magnetic bits help me get the job done. I did 5 repairs yesterday and each one finished was a good feeling of satisfaction. In the future, if you guys decide to make some sort of in-depth manual for the newer iPhones, that would be great because diagrams are not only a great way for me to sharpen my own skills, but will help make training new techs a breeze.
Cheers all the way from Fresno!
Hi, I replaced the display independently, not in the Apple service, to my disappointment I found a message in the device that warned me that the part is not original, consequently the FaceID was disabled. Can you tell me about ear? Thank you
Getting a message saying not genuine is known issue. there is no workaround yet. as far as face ID not working, you need to check for tear on the flex as you probably damaged it during transfer. If it’s broken, there is no way to fix.
The Important Display Message can be removed, check here: https://www.youtube.com/watch?v=bLo0_p7O...
Ricky LV -
Great repair guide. My only issues:
1. There are no instructions for removing the metal panel from the back of the old screen (nor how to reinstall it).
2. There are no instructions for removing the old, black adhesive from around the edge of the old case (nor the much needed instructions for reinstalling the new adhesive without damaging it or compromising the purpose of replacing this adhesive). This info is also missing from the adhesive replacement page for the iPhone 11.
I was able to patiently work my way through both of these issues and complete the repair on an iPhone 11. Covering these issues as additional steps of the repair guide would be very helpful for future iFixers.
Anyone have the phone randomly reboot after screen replacement? All aspects work on the phone after replacement. It just randomly goes black and then restarts
Maybe just a bad battery connection or a stained/bent connector
I am a repair tech at a repair shop we do more but thats what we are called and i love you’re tools, they are just perfect for everything and all i can say really is, be super careful with the screen and the prox flex, they can be eaisly ripped and really ruin you’re day because to restore the face id with a new prox requires micro sodering but other then that just be careful
I find the OEM screen looks more yellowish, is it me only?
OEM screens tend to have the colors a little bit off, could also be caused by disabled true tone.
Overall a very useful repair guide, there´s just one issue I came across:
Different display manufactors.
Been looking around, due to some issues and so far I´ve seen some different manufactors for the iPhone 11 (and the XR):
Toshiba (the print on the display starts with C11 or F7C, as seen on the last picture)
LG (DTP or C3F)
Sharp (DKH)
someone else stumbled across this?
Apple doesnt offer new displays, however afaik the original apple product manufacturer foxconn refurbishes original screens. Or you could just get a refurbished screen from somewhere else…
For iphone 11, on the flex if there is a square code QRC is DTP and a rectangle is C11
Didier -
Awesome guide, thank you very much! By the way, after the replacement the true tone function will most likely be disabled, which can as far as i know only be fixed by copying the firmware from the old screen over to the new one with a programmer (for example Qianli iCopy Plus). Also, the phone will notify you that the screen is not genuine after every restart and it will always show a notification in the settings. The only way to get around that is to swap the chip on the display cable with a hot air station and solder paste (not worth the hustle in my opinion, i dont mind the one notification in settings). https://www.youtube.com/watch?v=agq2HPK-...
Cheers!
Hi, since replacing my screen my ear speaker has been very muffed/static. Is there any way I can fix this? Thanks
I’d suggest checking the mesh under the earpiece for dirt and stuff that could be blocking the sound and maybe trying to refit it, maybe it’s not properly seated. Could also be fixed by just reseating the earpiece flex…
completed the guide. thx. my iphone claimed the screen is not original. anyway, seems to work correct
Hello I was wondering if anyone could help me. I recently replaced the screen of an iphone 11. The phone was good for the first couple of days but now the customer is having some issues. His display is something randomly scrolling up, mainly while watching videos and sometimes the screens just starts to act crazy and press random things. I’ve been doing some research and I found that something i could do is reset the phone to factory settings. However i’m unsure if this is like a software or a hardware issue. Any advice is helpful, thanks!
From my experience this sound like a ghost touch issue. Usually caused by a loose/broken/dirty connection or an overly tight screw somewhere. It's unlikely, but if you installed a screen protector afterwards, it may have a fingerprint or dirt between the protector and the phone screen. Same thing happened when we did my sisters phone at our store, a connection was loose and a screw was a little bit tight. Maybe a more experienced tech could offer more in-depth insight.
Teejay R -
Hello, I followed the guide and repairs. My phone will not come on. Unless sitting on the charger and then I only get the Apple logo for a few seconds and it does this repeatedly. Any guess on where I went wrong? Thanks
Hi all, Im still trying to get a better understanding of the different types of "screen repair" that can be done.
From what I understand, it is possible to perform a replacement of ONLY the "front glass/screen" with 3rd party, non-OEM screens that you can purcahse online) OR you can replace BOTH the screen and digitizer.
ALot of 3rd party sellers sell a "screen replacement" but I am not sure exactly what I need to look for.
My front screen is cracked but the damage that is visible is purely physical (II don't see /experience any altered pixels, flashing colors etc, just dealing with a iphone with a cracked front screen). BUT in addition to the physical damage, the right side of my iphone 11 (specifically a small area that covers the "&" sign and letter "i" on my keyboard are non-responsive.
Now, is the item Im commenting on going to fix my touch issue? If not, which Ifixit replacement part(s) will resolve this? if at all.
thanks
The ribbon cables used on this screen are incredibly weak, when compared to the apple ones. Did this whole thing and had the phone fully working. Made sure the cables were in the right spot and started pressing the screen in just for the display cable to split in half from a couple pounds of pressure. Absolutely livid. Waste of money and time. You can really tear these cables apart with the tiniest fold.
the right screws wouldn’t come off
Yusef San Inocencio - Replica
ok one came of but my right wont come of either!!!!
Aisa Jawara -
Hello guys, I still haven't found away to power off the iphone without using the screen. Cheers!
danielaguirre93 - Replica
You can try this.
Quickly Press and release the volume up button.
then Quickly Press and release the volume down button.
then press and hold the power button and wait until it turns off.
worked for me :D
Benóný Egilson - Replica
Where does one get replacement seals? Is this the same as the display assembly adhesive?
Brian Baker - Replica
not of the screwdrivers i have seem to be able to turn the screws
Aisa Jawara - Replica