
Nintendo DSi Microphone Replacement

Introduzione
Vai al passo 1Use this guide to replace the microphone in your Nintendo DSi
Cosa ti serve
Ricambi

Strumenti


Mostra di più…
-
-
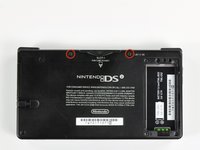
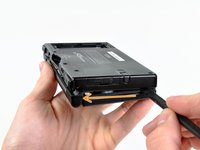
Unscrew the two Phillips screws securing the battery cover to the lower case.
-
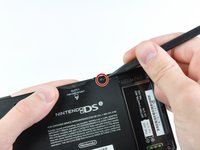
Grasp the battery cover and lift it out of the lower case.
-
-
-
Using a spudger tool (or your fingernail), lift up the battery from the top.
-
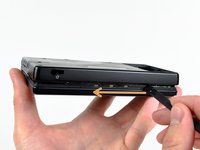
Grasp the battery and remove it from the DSi.
-
-
-
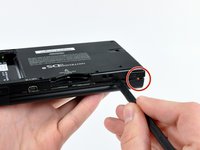
Two screws are hidden underneath two rubber feet highlighted in red.
-
Use the tip of a spudger to pry the rubber feet out of the lower case.
One of the feet did break on me, tweezers came in handy for picking it out
I unfolded and sharpened a paperclip. You can use that to stab and hook the rubber without tearing it, as the rubber is thick enough to reseal when reinserted.
-
-
-
Remove the following screws securing the lower case to the body of the DSi:
-
Six 5.2 mm Phillips #00 screws.
-
One 2.7 mm Phillips #00 screw.
Impossible d'enlever les vises… trop serré! comment faire?
i can't get the screw by the gamecard slot out, PH#00 is too small and PH#0 is too big
same problem here. maybe try a JIS?
-
-
-
Insert the spudger in between the lower casing and lower panel near the top right corner of the DSi.
-
Carefully run the spudger along the edge of the outer casing, creating an opening between the body and the casing.
-
Continue running the spudger around the body of the DSi until the majority of the lower case has been separated.
-
-
-
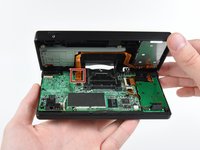
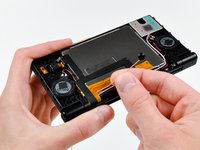
Carefully lift the lower casing from its bottom edge.
-
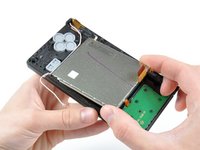
Pry the volume and SD board cable up from its socket on the motherboard using a spudger.
-
Once the cable is completely removed, then you may take off the entire outer casing.
Any help removing the ribbon cable, I have absolutely no clue how to remove this.
-
-
-
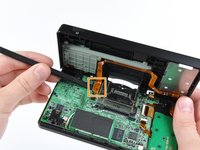
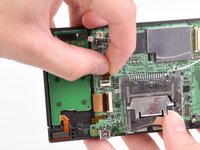
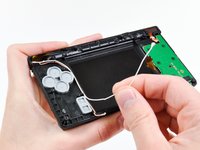
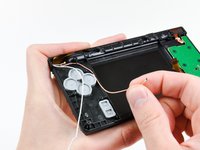
Pull the Wi-Fi board away from the motherboard by its edge closest to the headphone jack.
-
-
-
-
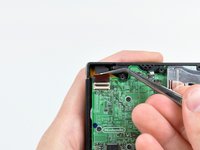
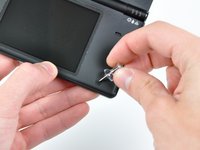
Use the tip of a spudger to pry the power board connector out of its socket on the motherboard.
do not pry up! pull to one side so you don't disconnect the clip from the motherboard!
Actually Lisa, you are incorrect. If you pull to one side you WILL end up pulling the connector off the motherboard. It is designed so that you ARE MEANT TO pry it upwards out of the connector. All you need to do is use the point or corner of the flat edge of a spudger (or a small flat-headed screwdriver), push it ever so slightly under the middle of the small white plug where there is a small recess in the connector for just this purpose. Prying the plug up in this fashion you should clear the connector with the spudger by prying it up through the recess rather than catching the connector and pulling it off the board.
If the socket comes off the motherboard along with the connector, what’s the best way to fix it?
it has to be soldered back on, so if you can't do it yourself, find someone who can (maybe a local repair shop).
I already pull it off from board new i have to learn how to weld it back
-
-
Attrezzo utilizzato in questo passaggio:Tweezers$4.99
-
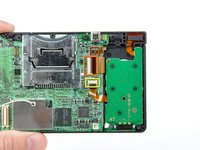
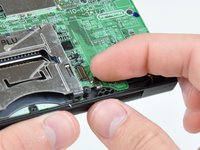
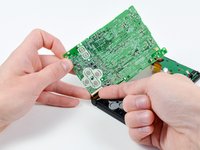
Use your fingernail or the edge of a plastic opening tool to flip up the retaining flap on the following three ZIF sockets:
-
Lower touchscreen cable
-
Lower LCD cable
-
Power board cable
-
After flipping up the locking tabs on all three sockets, use your fingers or a pair of tweezers to gently pull the cables straight out of their sockets.
I accidentally broke the retaining flap off of the lower touchscreen’s socket. Is it possible to reattach it?
Mine broke off too. At first I thought it would just pop back in, but when I looked at it under magnification, I can see that a tiny piece of plastic actually snapped off the flap. I think we're farked. Looks like the only way to fix would be to solder on a new cable connector.
-
-
-
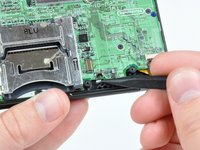
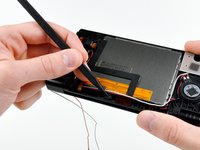
Use your fingernail or the edge of a plastic opening tool to carefully flip up the touchscreen ribbon cable retaining flap.
-
Use the tip of a spudger to pull the touchscreen ribbon cable straight out of its socket.
When I was putting mine back together, the flap popped off and when I tried to put it on with a tweezers, it snapped. Any suggestions other than scrap it or use it without the touchscreen? Pictures at https://sites.google.com/site/memesbyluc...
This little flap is a pain in the butt to get back in! If there is any way to bypass the removal of this, my advise is to do it!
Adding on: The cable actually ended up breaking as the tweezers I used to put it back in scraped part of the gold ribbon off. Be extremely careful!!!
-
-
-
Use your fingernail or the edge of a plastic opening tool to carefully flip up the dual camera ribbon cable retaining flap.
-
Use the tip of a spudger to pull the dual camera ribbon cable straight out of its socket.
-
-
-
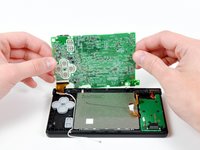
Slightly lift the motherboard upwards to reveal the upper LCD ribbon cable above the ABXY buttons .
-
Use your fingernail or the edge of a plastic opening tool to carefully flip up the upper LCD ribbon cable retaining flap.
-
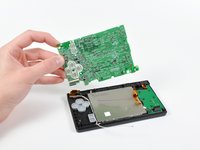
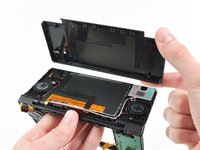
Remove the motherboard from the DSi.
I actually chose to leave this ribbon cable connected, and had no issues completing the rest of the steps around this. Just be careful not to pull the cable!
-
-
-
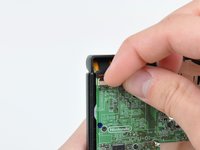
Use the tip of a spudger to pry the metal backing of the lower LCD up from the DSi's framework.
-
Lift the lower LCD assembly out of the DSi.
-
-
-
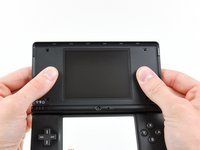
Use a pushpin to remove the four plastic screw covers (highlighted in red) on the front bezel.
-


To reassemble your device, follow these instructions in reverse order.
To reassemble your device, follow these instructions in reverse order.
Annulla: non ho completato questa guida.
Un'altra persona ha completato questa guida.

3Commenti sulla guida
Love the guide! If your mic still doesn’t work look into the headphone/mic jack and see if the two pins are pulled down inside. If they are stuck up then the mic will default to the jack mic input even if there’s nothing in the socket. I pulled mine down with the Ifixit tweezers and this fixed my mic problems.
Hey this worked for me thanks! I wonder how you found out lol
You just saved us soooo much aggravation! Thank you very much!
Big Iggy -