
Mac mini Mid 2011 IR Sensor Replacement

Introduzione
Vai al passo 1Use this guide to replace your mini's IR sensor/sleep LED assembly. Replacing this component requires removal of the logic board and most other components in your mini.
Cosa ti serve


-
-
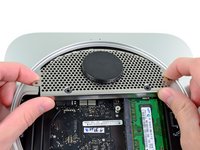
Place your thumbs in the depressions cut into the bottom cover.
-
Rotate the bottom cover counter-clockwise until the white dot painted on the bottom cover is aligned with the ring inscribed on the outer case.
-
-
-
Remove the two 11.3 mm T6 Torx screws securing the fan to the logic board near the antenna plate.
-
-
-
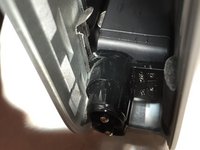
Lift the fan out of the mini for enough clearance to access its connector.
-
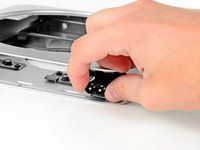
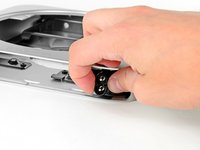
Grab all the wires at once and gently pull straight up to disconnect the fan from the logic board.
-
Remove the fan.
You actually don't need to disconnect the fan. You can just let it hang on the side while working. I accidentally killed my connector trying to pry it loose. It's being held together now by some tape, after spending hours trying to reconnect it and figuring out pin outs.
Did it just as Nick suggested, hang the assembly to the side.
Agreed. It is much better to leave the fan connected. The only thing you actually need to disconnect is the hard drive.
ablack3 -
Absolutely. just dangle it.
110% agreed: you don’t have to remove the fan. Those wires are delicate, as is the connector. Just move it off to the side. Do the same for the antenna plate. The fewer connectors you touch, the fewer things you break!
These instructions are used as a prerequisite for many other repairs where the fan simply has to be removed in order to continue. (For example, fan replacement.) I would not recommend leaving the fan dangling from the board during a repair, as that’s a hazard all by itself. If you insist on leaving the fan connected, secure it to the chassis with some masking tape to make it a little less dangerous.
The fan has some slack cable on it. Once you have unscrewed the fan, you should see that the connecting cable is wrapped around two hooks. CAREFULLY move the cable around the hooks to free it. You can then move the fan to one side out of the way while you access the hard drive bay. On reassembly, thread the cable back around the hooks before screwing it back in.
Be careful to LIFT UP on the fan connector cable. Using a spudger tool helps here. I mistakenly thought that the connector would slide off the logic board and tried to remove the connector this way. I ended up lifting the connector off of the logic board, thus ruining my logic board and requiring a $350 logic board replacement at the genius bar. The second time I did a HD/SSD replacement, everything worked fine.
Yeah, I did the same thing by following someone elses "shortcut". Now I am going to shell out 289 for quad core i5 board, and a new fan BTW. . . . . . Oh well never a dull moment :) and it gets an upgrade as well!
That's probably the must tricky part of the replacement. I did the same thing, i just pull on my cables and the connector stays on the board. Tried many times to switch cables into but any order i try is not the good one.
The avoid this, now, when i want to pull out my fan, i just use a plate screwdriver and lift up the connector. That's work perfectly.
I screwed it too... Not reading carefully enough, I accidentally removed the whole socket from the board. This happened with the IR connector too. When re-assembling the parts, the socket wouldn't stick to the board, now I know why. I don't want to buy a new logic board, because I can't afford one, so I'm trying to find someone to solder it. Seems hard to find someone able to repair logic boards these days. Hope I'll be successful, otherwise this is an expensive upgrade to my mac...
Don't remove it with your fingers, use a tool for that. And underneath the wires!
Followed all the instructions, everything went well, but now my mini fan won't turn off. It starts as soon as I boot up. I've tried every fan control software out there, and nothing works; the fan just constantly runs. I was very careful when I disconnected/reconnected the fan cable, and it looks fine. What else can I do?
The problem is most likely a disconnected or damaged temperature sensor, I had this problem when reassembling a 2007 Mac mini. It can't read the temperature, so assumes the worst and sets the fan to maximum.
For heavens sake please DON'T remove the fan. It's really really hard to reconnect it properly. And besides that you don't have to remove the Logic Board for just changing the HDD.
It’s very easy to reconnect if you know how. Position the connector over the socket as shown in the photo, and press it down. As long as it’s not upside-down or anything, you’re done in 5 seconds.
Does anyone know how to solve the full RPM fan issue? My computer guy couldn't solve with fan control software
I removed the fan and everything worked fine, but it’s good to know that it’s a “push-down“ connector, took me some time to relize that, all I needed to do was to press down the connector over the pins, see the picture for more details.
The direction you “ gently pull” to remove the connector is all important. You have to pull upwards, vertically away from the board. If you pull more downwards parallel to the board, you may end up wrecking the connector by pulling the wires out of it as I did. Fortunately the socket was okay so it was just a case of buying a $10 replacement fan (complete with new connector).
DAGNABBIT! Broke it! Now I have a fan blowing on the open case while it’s operating. What can I use as a shield for dust but still allow for airflow?
OMG, please change this instruction to NOT remove the fan. What a nightmare trying to reseat it.
You need to position it over the socket as shown and press straight down. If it takes you more than 5-10 seconds, something’s wrong.
really wish i would have seen these comments before I ripped out the fan from the logic board.
I missed the word UP and instead pulled the wires straight out, which ended up with me holding the wires but leaving the plug behind in the socket. I just ordered a replacement fan from ebay, since ifixit is out of the one in the correct amperage for this unit.
I then edited the guide to capitalize and bold the word “UP” and hopefully that saves somebody else a bit of hassle.
Any step with a lot of comments is one people have trouble with. It might be useful if ifixit were to make it more obvious we should read the comments, at least for those that have a lot of them. It would save a lot of people a lot of hassle.
Just for emphasis on this point, I did exactly that - I ripped the fan connector right off of a perfectly good logic board. I used a plastic pry tool and was attempting to follow OWC video for replacing the drive. So beware! Trust me, it is not that hard to rip this thing off the board.
DO NOT REMOVE THE FAN.
Put it to one side.
Here’s a video showing how this is done: https://youtu.be/KlR-RWtqzis
-
-
-
Remove the single 3.5 mm T6 Torx screw securing the cowling to the heat sink.
-
-
-
Remove the following screws securing the antenna plate to the mini:
-
Two 6.6 mm T8 Torx screws
-
Two 5.0 mm T8 Torx or 2.0 mm Hex screws (either screwdriver will work)
-
When putting back together:
-
-
-
Use the flat end of a spudger to pry the hard drive connector up from its socket on the logic board.
-
-
Attrezzo utilizzato in questo passaggio:Mac mini Logic Board Removal Tool$4.99
-
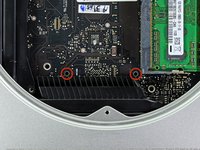
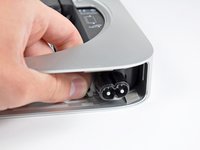
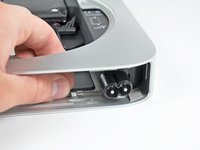
Insert the Mac mini Logic Board Removal Tool into the two holes highlighted in red. Be sure it makes contact with the top side of outer case below the logic board before proceeding.
-
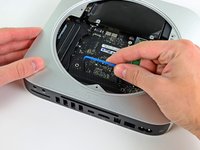
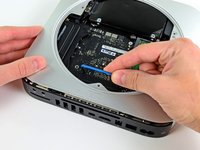
Carefully pull the tool toward the I/O board. The logic board and I/O board assembly should slightly slide out of the outer case.
-
Remove the Mac mini Logic Board Removal tool.
-
-
-
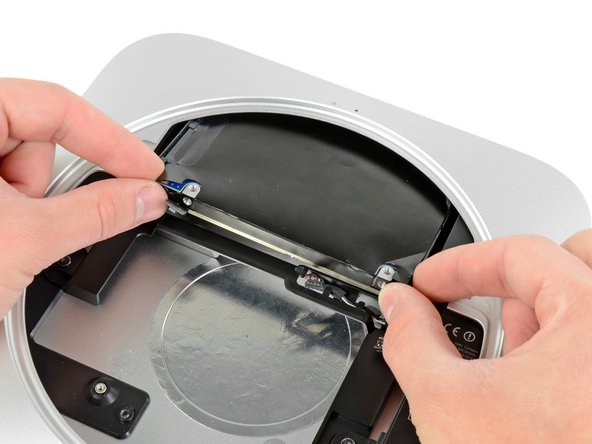
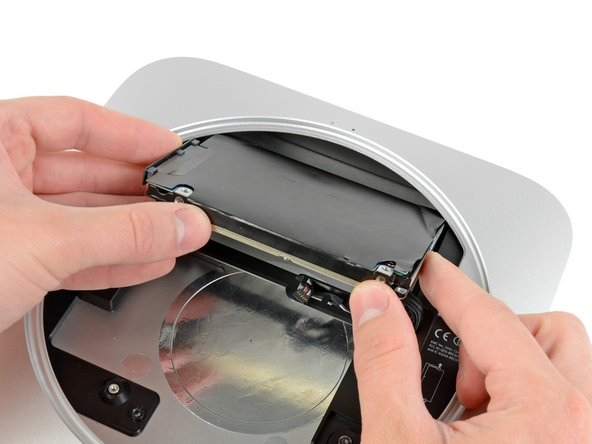
Pull the hard drive away from the front edge of the mini and remove it from the outer case.
-
-
-
Remove the 7.9 mm T6 Torx screw securing the power supply and hard drive tray to the outer case.
-
-
-
Remove the 7.9 mm T6 Torx screw securing the hard drive tray to the outer case.
-
-
-
Carefully de-route the IR sensor cables from the channel in the hard drive tray.
-


To reassemble your device, follow these instructions in reverse order.
To reassemble your device, follow these instructions in reverse order.
Annulla: non ho completato questa guida.
Altre 10 persone hanno completato questa guida.
Preparati per le riparazioni future
Acquista tutti


3Commenti sulla guida
Does anyone know the part number of the IR sensor and where you can order it?
Is there a way to get a stronger LED light? I did a mod to the Mini and put in a translucent logo with a retro sticker and I wanted it to shine through like it would on a MacBook but the LED is too weak, I'd need a stronger LED.