
Installazione Disco Rigido nel Mac mini, versione metà 2010

Introduzione
Vai al passo 1Usa questa guida per sostituire completamente il disco rigido. Per completare il lavoro, è necessario utilizzare il mastice per incollare i vecchi sensori termici al nuovo disco rigido.
Cosa ti serve
Kit di riparazione
Questi kit contengono tutti i ricambi e gli strumenti necessari per completare questa guida.


Ricambi


Strumenti


Mostra di più…
-
-
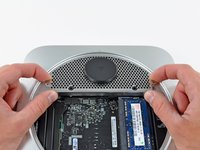
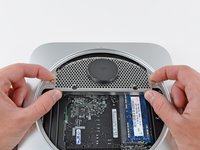
Posizionare i pollici negli incavi tagliati nel coperchio inferiore.
-
Ruotare il coperchio inferiore in senso antiorario finché il puntino bianco dipinto su di esso non è allineato con il cerchio in rilievo sul case esterno.
-
-
-
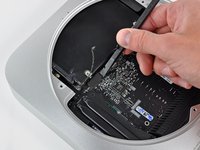
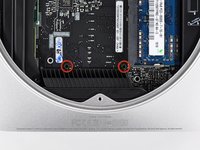
Rimuovere le due viti Torx T6 da 11,3 mm che fissano la ventola alla scheda logica, in prossimità della piastra dell'antenna.
-
-
-
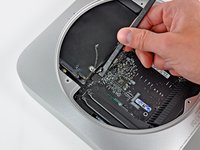
Rimuovere la vite T6 da 3,5 mm che fissa la mascherina al dissipatore.
-
-
-
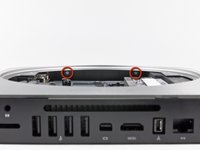
Rimuovere le viti seguenti, che fissano la piastra dell'antenna al Mac mini:
-
Due viti Torx T8 da 6,6 mm
-
Due viti Torx T8 da 5 mm o viti esagonali da 2 mm (vanno bene entrambi i cacciaviti)
-
-
-
-
Rimuovere le tre viti seguenti:
-
Una vite Torx T8 da 5 mm o vite esagonale da 2 mm (vanno bene entrambi i cacciaviti)
-
Una vite Torx T6 da 16,2 mm
-
Un distanziatore Torx T6 da 26 mm
-
-
-
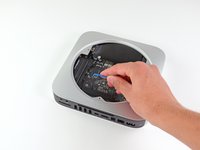
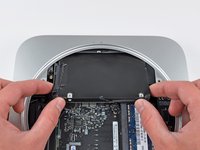
Inserire un attrezzo per la rimozione della scheda logica per Mac mini nei due fori evidenziati in rosso. Verificare che avvenga il contatto con il case esterno sotto la scheda logica prima di procedere con l'operazione.
-
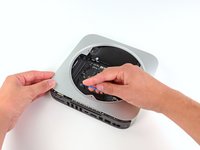
Tirare con attenzione l'attrezzo verso la scheda I/O. La scheda logica e il gruppo della scheda I/O dovrebbero scorrere leggermente fuori dal case esterno.
-
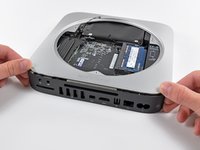
Interrompere l'operazione quando la scheda I/O è visibilmente separata dal case esterno. Rimuovere l'attrezzo per la rimozione della scheda logica per Mac mini.
-
-
-
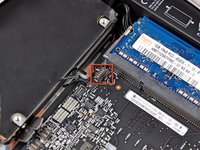
Rimuovere la striscia di nastro che copre il connettore del disco rigido.
-


Per riassemblare il dispositivo, segui queste istruzioni in ordine inverso.
Per riassemblare il dispositivo, segui queste istruzioni in ordine inverso.
Annulla: non ho completato questa guida.
Altre 425 persone hanno completato questa guida.
Un ringraziamento speciale a questi traduttori:
100%


Questi traduttori ci stanno aiutando ad aggiustare il mondo! Vuoi partecipare?
Inizia a tradurre ›

38 Commenti
These instructions and a little common sense can also be used to replace the lower hard drive in the server version of the Mac Mini. Luckily that was the drive that had failed in my case. Replacing the upper drive looks like a tougher proposition.
Fantastic guide, thank you very much Mr. Bookholt!
As with the above commenter, I accidentally mistook the fan's standoff for a screw and removed it while removing the fan. Also the top right fan screw's standoff came out along with it. I edited the guide with a note on this.
While replacing the antenna, it wasn't immediately clear why the screws weren't lining up, until I realized that two of the screws were in the (otherwise free-floating but for the back grommets) hard drive, I also added a note on that.
STEP 15: If you don't have the time to purchase the Mac Mini Logic Board Removal Tool, the round stock on a large binder clip is PERFECT for the job. It requires a little bending and cutting but it worked perfectly!!
And as jon jon stated, it works like a lever - not a pull. You can feel it kind of click in to the lever points below.
Bravo to ifixit.com for the easy to follow instruction!!
Hey, what about the 2nd harddrive? how does that come out?
This was a superb guide. Thank you very, very much.
Ok, just did here. 1 tera HD working fine. Thanks iFixit, for repacking my tools because the Brazilian mail lost them. So, for those who want to do the same, just have in mind that not ALL things happen just like the how-to. I have to figure out What to do with the logic board removal tool... And, no, I did not fuss with those initial thermal stuff, because they are impossible to unplug. I only fuss with the HD thermal.