Salta al contenuto principale

Canon PowerShot A4000 IS Flash Replacement

Cosa ti serve

  1. Canon PowerShot A4000 IS Flash Replacement, Removing the Screws Anchoring the Front Cover: passo 1, immagine 1 di 3 Canon PowerShot A4000 IS Flash Replacement, Removing the Screws Anchoring the Front Cover: passo 1, immagine 2 di 3 Canon PowerShot A4000 IS Flash Replacement, Removing the Screws Anchoring the Front Cover: passo 1, immagine 3 di 3
    • Remove the battery and data card. Refer to the Battery Removal and Memory Card Removal guides.

    • Use a Philips head screwdriver (PH000) to remove the screws circled in the picture. Screw Sizes: 4 millimeters.

  2. Canon PowerShot A4000 IS Flash Replacement: passo 2, immagine 1 di 2 Canon PowerShot A4000 IS Flash Replacement: passo 2, immagine 2 di 2
    • Use the spudger tool to gently lever the front cover off.

  3. Canon PowerShot A4000 IS Flash Replacement, Removing the Flash: passo 3, immagine 1 di 3 Canon PowerShot A4000 IS Flash Replacement, Removing the Flash: passo 3, immagine 2 di 3 Canon PowerShot A4000 IS Flash Replacement, Removing the Flash: passo 3, immagine 3 di 3
    • The flash is not held very securely in the camera so be careful. Make sure someone is holding on to it so it does not fall out.

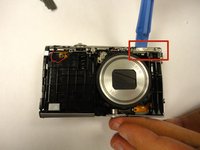
    • Your flash should come out very easily if you use your spudger to lever it out carefully.

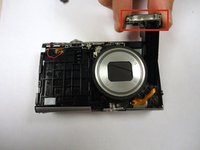
    • Once the bulb piece of the flash is clear of the camera body, simply use your fingers to lift the flash clear of the camera.

Conclusione

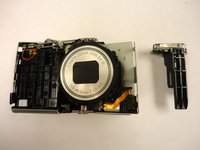
To reassemble your device, follow these instructions in reverse order.

Team

Clemson, Team 1-3, Benson Fall 2014 Membro di Clemson, Team 1-3, Benson Fall 2014

CLEM-BENSON-F14S1G3

3 Membri

17 Guide realizzate

Un commento

Hello! thank you for this flash replacement guide. I would like to know: can the flash be repaired or is it only replaceable? Thank you!

Jeiler AV - Replica

Aggiungi Commento

Visualizza Statistiche:

Ultime 24 Ore: 0

Ultimi 7 Giorni: 3

Ultimi 30 Giorni: 28

Tutti i Tempi: 1,538