Questa traduzione potrebbe non riflettere gli aggiornamenti più recenti dalla guida originale. Aiuta ad aggiornare la traduzione o visualizza la guida d'origine.
Introduzione
Questa guida di riparazione è stata redatta dallo staff di iFixit ma non è stata approvata da Google. Leggi di più sulle nostre guide qui.
Segui questa guida per rimuovere o sostituire lo schermo rotto o danneggiato di un Google Pixel 4a.
Per la tua sicurezza, scarica la batteria al di sotto del 25% prima di smontare il tuo telefono. Questo riduce il rischio di pericolosi eventi termici se la batteria viene danneggiata accidentalmente durante la riparazione.
Cosa ti serve
-
-
Nota le due giunzioni sul bordo del telefono:
-
Giunzione dello schermo: questa giunzione separa lo schermo dal resto del telefono. Non fare leva su questa giunzione.
-
Giunzione della cornice: qui un frame di plastica progettato per proteggere lo schermo si congiunge con la cornice. Viene tenuto fermo da dei ganci in plastica. La sezione su cui far leva è questa.
-
-
-
Posiziona un iOpener riscaldato sul lato destro del display, per un minuto, in modo da ammorbidire l’adesivo.
-
-
-
Osserva i punti di ingresso ottimali prima di procedere.
-
-
-
Posiziona una ventosa il più possibile vicino al bordo destro dello schermo.
-
Solleva la ventosa, applicando una forza costante finché non si forma una fessura tra la cornice e il telaio intermedio.
-
-
-
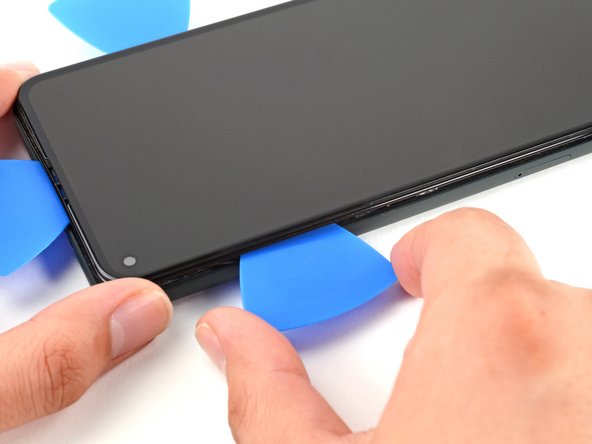
Inserisci la punta di un plettro all’interno della giunzione della cornice a circa 4-5 cm dal bordo inferiore del telefono.
-
-
-
-
Usa un paio di pinzette per rimuovere la staffa del connettore dello schermo.
-
-
-
Usa la punta di uno spudger per sollevare e scollegare il cavo a nastro dello schermo.
-
-
-
Rimuovi lo schermo dal telefono.
-
Se hai sostituito lo schermo, controlla il foro della fotocamera frontale dello schermo e rimuovi eventuali pellicole protettive che lo coprono.
-
Se stai usando un foglio di adesivo pretagliato, segui questa guida per applicarlo correttamente.
-
Se stai usando il nastro adesivo Tesa per riattaccare lo schermo, segui questa guida.
-
Durante la procedura di avvio dopo il rimontaggio, lo schermo attraverserà una fase di calibratura. Non toccare lo schermo durante questa fase, in quanto potrebbe causare una calibrazione errata del touch e generare problemi.
-


Per rimontare il tuo dispositivo, segui le istruzioni in ordine inverso.
Porta i tuoi rifiuti elettronici a un riciclatore certificato R2 o e-Stewards.
La riparazione non è andata come previsto? Prova delle soluzioni di base ai problemi, oppure rivolgiti alla nostra comunità Risposte per trovare aiuto.
Confronta la tua parte di ricambio con quella originale: potrebbe essere necessario il trasferimento di alcuni componenti o la rimozione di protezioni adesive dalla nuova parte prima di installarla.
Annulla: non ho completato questa guida.
Altre 74 persone hanno completato questa guida.
Un ringraziamento speciale a questi traduttori:
96%


Questi traduttori ci stanno aiutando ad aggiustare il mondo! Vuoi partecipare?
Inizia a tradurre ›

40 Commenti
Thank you, this was useful for removing the screen from my device without damaging it further! With the invisible fasteners, a guide like this is invaluable for knowing where the latches are and how to get to them.
As a guide for replacing a screen, there are a few other things worth mentioning:
• Is it necessary to remove the old gasket ("adhesive film")?
• How do you apply the new display adhesive, the one that comes on a blue card? Do you need to do that before re-attaching the new screen cable? Why are there cut-outs in the blue card that mostly match the positions of contacts on my device, but not entirely? Do I remove it before closing the device?
• In addition to a couple pieces of tape, the replacement screen also comes with a small piece of film protecting the camera area. Do pull it out by the small red tab before re-assembly.
• Any other tips for reattaching that press-fit board-to-board connector? Should I really expect it to click into place? It took me many tries to get that aligned and secured!
1. Depends on what you mean by "Necessary," but it is recommended
2. In Step 15, there is a guide linked for custom-cut adhesive; follow that one.
Yes, before you reconnect cable.
I don't know what the cutouts are for, but you will remove the blue card anyway after applying the adhesive to the frame. The important part to line up is the adhesive to the frame; the blue card doesn't matter beyond that.
And yes, you will remove it before closing the device.
3. Didn't see that. I hope my device's camera works. I'll check that now.
4. Reconnecting this was the most tedious part for me. I used the gold colored corners on the board to line up the connector(you can see these in the picture for step 15. Also, I used my finger and not the spudger for pressing down when reattaching (and I don't have small hands); this helps you feel the slight click when it's in place.
Also, you can use the suction cup as a sort of kickstand so you have enough ribbon cable to work with (because there's not a lot of it.)
Lol No -
Literally went step by step by this guide and repaired my own Google pixel 5A phone. If you purchase the entire repair kit for the Google Pixel 5A you have essential every tool you'll need. I will recommend ordering screens for this phone here from this website.
Good guide but agree with keturn that it would be great to have more tips and reminders for replacing the screen.
I mostly figured it out, heres how I did it:
- I removed the old adhesive, and tried to scrape and clear it all.
- next I attached the new adhesive before connecting the screen cable since I figured it would be hard when its attached. I did try to make sure to press all along the adhesive with tweezers to set it. I left the next set of backing on to minimize the time the adhesive is exposed (avoid dust or me touching it)
- then I attached the connector. This was a little difficult, but also not very experienced with this.
- then I removed the adhesive backing and closed it up right after. I used rubber bands (3 across and 1 down the middle) to clamp the screen and put some books on it as much as I could over the next day.