
iPod Touch 2nd Generation Power/Volume Controls Replacement

Introduzione
Vai al passo 1Replace the power/volume controls to awaken an unresponsive Touch.
Cosa ti serve


-
-
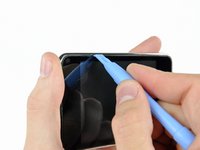
The picture at left (front panel already removed) shows the locations of the metal clips (shown in red) that snap on to the plastic frame. In the next few steps, try to pry the front panel up from the gaps between these clips.
-
-
-
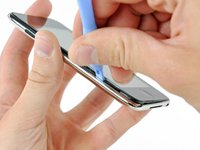
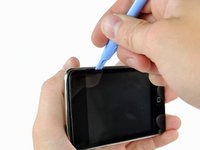
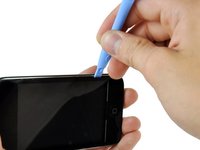
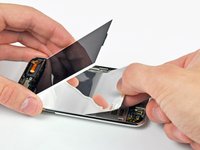
Gently insert a plastic opening tool, near the volume control buttons, between the plastic surround of the screen and the metal case.
-
Rotate the tool away from the Touch to pry up on the glass panel.
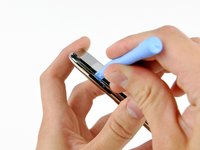
If you are planning on reusing the front bezel / seal around the glass screen, be careful not to rip it up too much when loosening the screen.
If you bought a new front panel there is a rubber seal around it so dont worry about ripping it up to open your iPod
Citazione da mikeseptak:
If you bought a new front panel there is a rubber seal around it so dont worry about ripping it up to open your iPod
sometimes if you buy a new front it doesn't come with the front bezel, so make sure it does before you rip the old one up. otherwise you can get a new front bezel from ebay.
Cracked the glass dropping on tile floor. I used a metal guitar pick to remove the glass/digitizer/bezel/"o" ring assembly, noting the clips in the first picture, I worked my way around and between the clips - starting at the volume control - first to loosen the glass/digitizer, then to go deeper and vertically lift the bezel and free the bezel from the clips. As others say - if you purchase from this site DO NOT worry about the bezel OR the "o" ring around the bezel - just get the entire thang out and the new one slips/snaps into place with ease - entire process took about 10min for removal and 3 for replacement - and I HAVE A NEW WORKING iPod TOUCH!! Jerry -Houston, TX - 281-687-2755 for questions...
And the service and shipping are excellent - and now I'm gonna buy a new MacBook keyboard from this company and fix my daughters stuck "z" key - I love IFIXIT - would recommend to ALL - products and instructions are EXCELLENT - yes ebay *may* be cheaper but you get what you pay for... HIGHLY RECOMMEND IFIXIT...
Citazione da jgreengold:
Cracked the glass dropping on tile floor. I used a metal guitar pick to remove the glass/digitizer/bezel/"o" ring assembly, noting the clips in the first picture, I worked my way around and between the clips - starting at the volume control - first to loosen the glass/digitizer, then to go deeper and vertically lift the bezel and free the bezel from the clips. As others say - if you purchase from this site DO NOT worry about the bezel OR the "o" ring around the bezel - just get the entire thang out and the new one slips/snaps into place with ease - entire process took about 10min for removal and 3 for replacement - and I HAVE A NEW WORKING iPod TOUCH!! Jerry -Houston, TX - 281-687-2755 for questions...
I am not familiar with a Metal Guitar pick, The plastic ones break very easily. (Even my Fender one) Did your metal pick damage the metal frame of your iPod? Were you able to remove the touch screen, o-ring, and plastic bezel without further damage to the parts?
When I attempted to use a metal screwdriver I damaged the LCD.
Citazione da barlowdo:
I am not familiar with a Metal Guitar pick, The plastic ones break very easily. (Even my Fender one) Did your metal pick damage the metal frame of your iPod? Were you able to remove the touch screen, o-ring, and plastic bezel without further damage to the parts? When I attempted to use a metal screwdriver I damaged the LCD.
Not too hard to find - either at music store a sometimes as a jewelry
"charm"... Mine is the latter - very thin, very stiff. It did not damage
the frame of the iPod at all. However - after replacing the new part I noted
a plastic protector sheet on the *underside* of the new screen - upon
removing the new top glass panel using the same guitar pick a second time, I
too damaged the LCD - I also damaged the bezel and O ring. The O ring is
very difficult to get off in a reusable condition. The bezel can come off
clean with patience - which I apparently have little of and hence purchased
a second glass top assembly to go along with the new LCD. I think the key
here is patience and very slow going - I also purchased an iPod opening tool
as another key learning is that while the guitar pick does work - it tends
to get inserted too deep damaging the bezel (separating it from the glass or
breaking it) or damaging internal parts. But the opening tool can sometimes
be not firm enough. I imagine with practice one can remove the entire
assembly in completely reusable condition - the trick it seems is to
understand that the bezel has vertical sides that must be lifted vertically
after being unclipped from the case - and that the glass has a tendency to
separate from the bezel...
I tried a flathead screwdriver and cracked the front panel.I learned that prying with a flathead screwdriver will damage it.
Citazione da jgreengold:
Not too hard to find - either at music store a sometimes as a jewelry
"charm"... Mine is the latter - very thin, very stiff. It did not damage
the frame of the iPod at all. However - after replacing the new part I noted
a plastic protector sheet on the *underside* of the new screen - upon
removing the new top glass panel using the same guitar pick a second time, I
too damaged the LCD - I also damaged the bezel and O ring. The O ring is
very difficult to get off in a reusable condition. The bezel can come off
clean with patience - which I apparently have little of and hence purchased
a second glass top assembly to go along with the new LCD. I think the key
here is patience and very slow going - I also purchased an iPod opening tool
as another key learning is that while the guitar pick does work - it tends
to get inserted too deep damaging the bezel (separating it from the glass or
breaking it) or damaging internal parts. But the opening tool can sometimes
be not firm enough. I imagine with practice one can remove the entire
assembly in completely reusable condition - the trick it seems is to
understand that the bezel has vertical sides that must be lifted vertically
after being unclipped from the case - and that the glass has a tendency to
separate from the bezel...
Last night I recalled I use to own a metal pic it was a thumb pic for slide guitar. Anyway I decided to use my metal tools I bought from this site which are more rounded edges than the flat bladed screw driver that comes with kits. I made more progress with the metal tools and got what I think is all sides mostly up accept for the home button side which is really fighting me. I can easily tell where a clip is by sliding the tool alongside until I bump up against the side of a clip but I find it very difficult to push straight down to catch the top of the clip which it would seem would push away from the bezel. I am just not sure why this is difficult to do. I have a broken 2nd gen which I use as reference and it looks like the clip would easily push away. At any rate I am in the same predicament as you. I got the 2nd gen together only to find the home button sticks and wifi range is not what it use to be. So I am attempting to take the iPod apart a 2nd time to fix these issues without breaking the touch screen and lcd and so am taking my time. I just don't want to have to replace these brand new parts and have more money in this 8 gig 2nd gen than if I had just bought a brand new one.
Citazione da jgreengold:
And the service and shipping are excellent - and now I'm gonna buy a new MacBook keyboard from this company and fix my daughters stuck "z" key - I love IFIXIT - would recommend to ALL - products and instructions are EXCELLENT - yes ebay *may* be cheaper but you get what you pay for... HIGHLY RECOMMEND IFIXIT...
Hi jgreengold, Can you help me to check if your iPod touch is like mine on this picture?: http://i44.tinypic.com/2a8ga6p.jpg
My iPod touch bottom glass is a bit raised over the chrome bezel at the right part. Please check it and many thanks for your reply!!
best I can see my touch glass is level with the frame - whether this picture is pre or post glass replacement, you need to gently, slowly, firmly, press down to try to seat the glass better in the frame/clip. I've see cases where after removint a glass top, the removal of the bexel is not perfect and it may leavel some of the black plastic bexel in the clip which makes it impossible to then copmpletely seat the new top glass/bezel.
isn't this instruction misleading? :
"Gently insert an iPod opening tool between the glass front panel and its plastic surround near the headphone jack."
i agree with mgardner: "Be sure to pry between the outer case and the rubber gasket and not between the gasket and the glass"
I changed the text to reflect this. It's currently the "unverified" version.
no way -
-
-
-
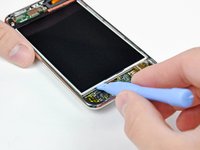
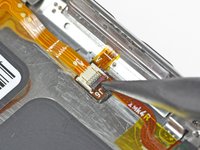
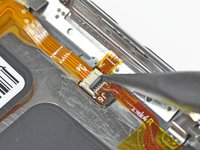
Insert a small iPod opening tool with the edge angled up toward the underside of the display between the white plastic backlight and the metal shield beneath it.
-
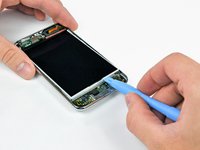
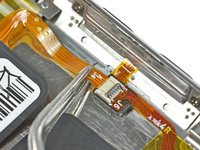
Pry up along the lower edge of the display enough to grab it with your fingers.
-
-
-
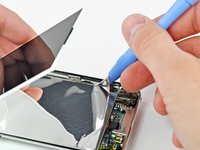
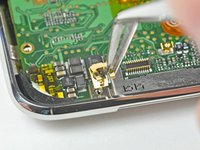
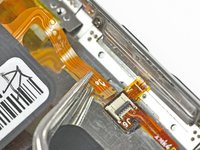
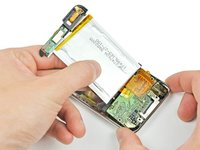
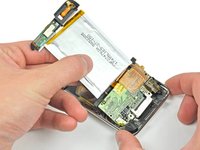
Use the flat end of a spudger to pry the battery off the adhesive securing it to the metal display tray.
-
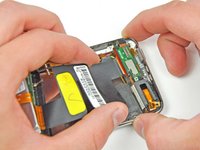
Remove the metal display tray and set it aside.
-
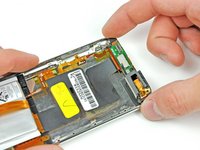
Lay the battery flat in the rear panel.
-
-
-
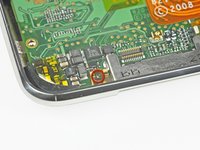
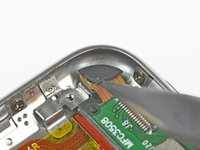
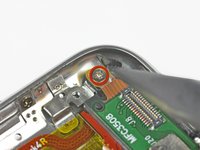
Remove the two Phillips screws securing the power/volume controls to the rear panel.
-


To reassemble your device, follow these instructions in reverse order.
To reassemble your device, follow these instructions in reverse order.
Annulla: non ho completato questa guida.
Altre 38 persone hanno completato questa guida.
Preparati per le riparazioni future
Acquista tutti


2Commenti sulla guida
what pins are for the on/off button on the logic board?
OMG this look super hard but my power button is broken