Questa traduzione potrebbe non riflettere gli aggiornamenti più recenti dalla guida originale. Aiuta ad aggiornare la traduzione o visualizza la guida d'origine.
Introduzione
Segui questa guida per sostituire il tasto Home su un iPad Pro 12.9".
Il tasto Home originale è accoppiato esclusivamente con la sua scheda logica in fabbrica. Se sostituisci il tasto Home, il Touch ID non funzionerà.
Il tasto Home si attacca allo schermo con una guarnizione adesiva. Ti servirà dell'adesivo liquido per incollare il tasto Home allo schermo.
Parti di questa guida sono state scattate con un modello Wi-Fi e quindi gli interni potrebbero apparire leggermente diversi dal modello LTE. La procedura è la stessa per entrambi i modelli, tranne dove viene specificato.
Cosa ti serve
-
-
Spegni completamente il tuo iPad prima di iniziare
-
Stendi strisce di nastro da pacchi trasparente sovrapposte sullo schermo dell'iPad finché non è coperta tutta la superficie.
-
Fai del tuo meglio per seguire il resto della guida come descritta, ma, una volta che il vetro è rotto, è molto probabile che si continuerà a rompere mentre lavori e potresti avere bisogno di usare uno strumento per fare leva per rimuovere i pezzi di vetro.
-
-
-
Mentre tagli l'adesivo, considera quanto segue:
-
La parte superiore ha una zona ampia di adesivo spesso. Dovrai tagliare a una profondità di 1,2 cm per separare l'adesivo.
-
Non tagliare a più di 2 mm di profondità sui bordi dell'iPad o rischierai di danneggiare il pannello dello schermo.
-
Anche il bordo inferiore ha delle zone con l'adesivo più spesso, ma ci sono dei delicati cavi flessibili in entrambi gli angoli. Non tagliare più in profondità di 6 mm intorno agli angoli inferiori.
I have an A1652 iPad pro 12.9” that was originally my wife’s. The battery doesn’t hold a charge very long in use so I read through this guide and ordered the kit and battery. This iPad has a gold colored case that appears to wrap over the edges of the screen. As a result I could not find any place to slice through the adhesive. Model number brought up on the “about” screen is ML3P2LL/A and serial is DLXR3M7LGMW5. Is this possibly a transition model? Any ideas?
Hello! Based on the model number, it looks like you have the 1st generation cellular version of the iPad Pro 12.9". This guide should work for you. The tolerances on the iPad are very tight—you're looking for the seam between the black bezel and the gold case. You'll need a lot of heat in order to loosen the bezel.
-
-
-
Scalda un iOpener e appoggialo sul lato sinistro dell'iPad per ammorbidire l'adesivo che tiene fermo lo schermo.
-
Aspetta circa due minuti perché l'adesivo si ammorbidisca prima di procedere al passo successivo. Il bordo dovrebbe essere leggermente troppo caldo per essere toccato.
Oven works fine: preheat to ~225 then turn off, protect back with towel and warm for 10-15 minutes. Basically the same as a car interior in summer, this skips about a dozen steps. Used mini plastic pry tools and a few picks/cards, no need for suction or iopener: yet another reason microwaves should be relegated to diners to destroy perfectly good food. Two issues from my surgery: damaged small section of screen border by carding too far inside the device while effortlessly slicing through adhesive, and one of the smart connector pins was revived from bent pin purgatory. Apple’s planned obsolescence genius truly shines through the multipin snap connectors. I detached the screen cable before disabling battery, YMMV; remainder of procedure was done to spec with disabled battery on reinstall. Screw monster only ate about 2, even after breaking an elbow sweat with 70% iso the residual adhesive should outlast the ios nerf that will bring this ipad to the grave. Much easier than first impression with oven.
-
-
-
Attacca una ventosa al bordo sinistro dello schermo dell'iPad, sopra la porta Smart Connector.
-
-
-
Appoggia un iOpener caldo lungo l'angolo in basso a sinistra dell'iPad, dal plettro di apertura al tasto Home.
-
Dopo aver lasciato ammorbidire l'adesivo, inserisci un plettro di apertura o uno spudger halberd nella fessura vicino alla porta Smart Connector.
-
Usa un plettro di apertura o uno spudger halberd per tagliare l'adesivo lungo la parte inferiore del lato sinistro dell'iPad. Se diventa difficile tagliare, scalda di nuovo il bordo e riprova.
Well, this is the scariest part so hold my beer. I tried something similar to the “iOpener” which is a gel filled heat/cold pack I could microwave. That was good to start warming, but I was too impatient to get the first pick under, so I got out my heat gun. Mine is a 1200 watt model and I used it on low, the tip about 3 fingers away from the glass, sweeping it over 8” sections about 10 times taking about 3 seconds per pass. It worked ok and I now have 10 picks pried under all edges. Took about 35 minutes to this point. Only difficulty here is bracing the iPad while sliding the picks under the glass - need to be careful to not knock out the picks you already have inserted.
One note I might offer is that it’s not entirely clear from your pics which is the top/bottom/left/right side because it’s hard to see the button on the screen in your pics. Another is to mark your 2mm pick depth with whiteout or something similar.
-
-
-
Appoggia un iOpener caldo lungo l'angolo in alto a sinistra dell'iPad, partendo dal plettro fino alla fotocamera interna. Aspetta un minuto per lasciar ammorbidire l'adesivo.
-
Usa un plettro di apertura per tagliare l'adesivo lungo la parte superiore del lato sinistro dell'iPad. Se tagliare diventa difficile, scalda di nuovo il bordo e riprova.
-
-
-
Scalda di nuovo il tuo iOpener e appoggialo sul lato superiore del dispositivo. Aspetta un paio di minuti per lasciare ammorbidire l'adesivo.
-
Usa un plettro di apertura per tagliare l'adesivo lungo il lato superiore dell'iPad, fermandoti prima di arrivare alla fotocamera interna.
-
Se diventa difficile tagliare, scalda di nuovo il bordo e riprova.
-
-
-
Scalda di nuovo il tuo iOpener e appoggialo sul bordo superiore del dispositivo. Aspetta un paio di minuti perché l'adesivo si ammorbidisca.
-
Inserisci un plettro di apertura o la lama di uno spudger halberd appena dopo la fotocamera interna.
-
Usa il plettro di apertura per tagliare l'adesivo nell'angolo in alto a destra.
-
Se diventa difficile tagliare, scalda di nuovo il bordo e riprova.
-
-
-
-
Ammorbidisci l'adesivo scaldando il bordo destro dell'iPad con un iOpener.
-
Usa un plettro o uno spudger halberd per tagliare lungo il bordo destro dell'iPad, finché non raggiungi l'angolo in basso a destra.
-
Lascia un plettro di apertura inserito nel mezzo del bordo destro per evitare che l'adesivo si reincolli.
-
-
-
Usa un iOpener per scaldare il bordo inferiore dell'iPad.
-
Inserisci per 6 mm un plettro di apertura o la lama di uno spudger halberd nell'angolo in basso a destra dell'iPad.
-
Fai scorrere il plettro lungo il bordo inferiore dell'iPad, fermandoti circa 13 mm prima di raggiungere il tasto Home.
-
-
-
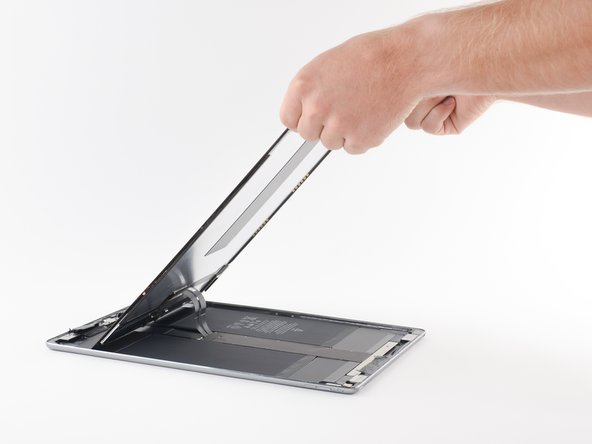
Solleva il bordo superiore dello schermo e fai scorrere tutto lo schermo verso la fotocamera interna per accedere ai componenti interni dell'iPad.
-
Usa del nastro adesivo per fissare il bordo inferiore dello schermo alla cornice per evitare che il vetro scivoli.
For me, disaster struck at this step. I was being careful but somehow lifted the wrong end and snapped the ribbon cable.
😟😟😟 Be careful It would have been helpful to label the screen's top and bottom edges with a marker and tape at the beginning of the repair process. For that matter, label right and left edges as well. Then change all dialog to reference top, bottom, left, or right. I think it would make it easier to follow the instructions
-
-
-
Attacca una striscia lunga di nastro adesivo al bordo superiore dello schermo. Piega il nastro adesivo oltre il bordo e assicurati che sia fissato saldamente.
-
Attacca l'altra estremità della striscia al bordo inferiore della cornice dell'iPad per tenere fermo lo schermo inclinato. Assicurati che il nastro sia attaccato saldamente alla cornice.
Just make sure you use plenty of tape on the backside of the screen and on the underside of the iPad and the tape won't slip.
-
-
-
Usa un cacciavite a croce Phillips per rimuovere le nove viti che fissano la schermatura EMI della scheda logica:
-
Otto viti da 1,2 mm
-
Una vite da 2,4 mm
-
-
-
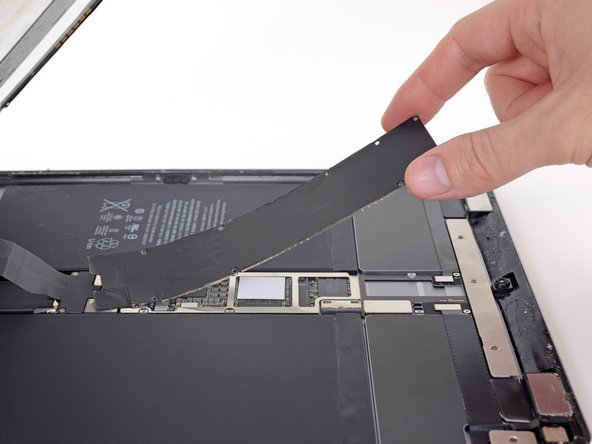
Solleva la schermatura EMI della scheda logica dal bordo più vicino alla parte superiore dell'iPad.
-
Solleva e rimuovi la schermatura EMI dalla scheda logica.
-
Rimuovi la schermatura EMI della scheda logica.
In the iPad 4G version, this is where the cellular radio sits. You might see some different chips underneath the EM shield, and a little adhesive gasket. When I pulled my EM shield off I tried not to disturb that adhesive, and put it back when I was done.
-
-
-
Crea un blocco per la batteria usando una carta da gioco e falla scorrere sotto la scheda logica per scollegare la batteria.
-
Lascia lì il blocco per evitare che i contatti del connettore facciano contatto finché non hai completato le riparazioni.
-
-
-
Usa un cacciavite a croce Phillips per rimuovere le tre viti che fissano la staffa del cavo dello schermo:
-
Due viti da 2,4 mm
-
Una vite da 1,2 mm
-
Rimuovi la staffa del cavo dello schermo.
-
-
-
Usa la parta piatta di uno spudger per fare leva e scollegare i cavi dello schermo e del digitizer dalle loro prese sulla scheda logica.
Would it help to draw a sharpie line between the two parts of the connector, so these can be alingned when refitting?
-
-
-
Rimuovi lo schermo.
-
Se il tuo schermo non includeva l'adesivo già applicato, usa la nostra guida per l'applicazione dell'adesivo dello schermo per installare delle nuove strisce adesive pretagliate quando riassembli l'iPad.
Phew! One hour 45, took my time, maybe cut that in half if I did it again and pray I don’t have to. Working sideways, the little screws were usually caught by the battery on the bottom edge. Need a shorter Phillips than in the iFixit kit. And looks like I don’t need the pre-cut adhesives I bought as they were on the replacement screen - hopefully I can get a refund.
Good time for a coffee break before cleaning off the old adhesive. Quite a relief to get the screen off & thanks much to you guys for getting me this far.
Es wäre sehr schön, wenn hier noch jemand beschreiben könnte, wie man "unfallfrei" die Klebereste vom Display rundherum entfernt. Ich habe das in meinem Falle ganz vorsichtig mit Isopropanol (hochrein) getan. Die Klebereste gingen damit gut ab - trotzdem ist das eine sehr aufwendige Arbeit, bis man alles sauber hat. Zudem kann man noch so vorsichtig sein, durch die angebrachte Displayunit auf der Rückseite der Displayscheibe und die dadurch entstehende Kapillarwirkung zieht sich immer Isopropanol zwischen Display und Displayunit, was danach zu hellen Flecken führt. Ich hoffe, die verschwinden wieder, wenn das Iso abgetrocknet / ausgetrocknet ist.
Vielleicht hat jemand eine gute Idee, wie man diese Klebereste entfernt, ohne dass das Beschriebene passiert.
Markus,
I just wouldn't use any isopropyl alcohol to remove the residue. We're going to immediately apply more adhesive right after we remove the old adhesive, so if there's a little bit of sticky residue remaining, that's not a problem for us. I would just scrape as best as I could with a spudger, make sure there's no adhesive on the internals, and call it a day.
-
-
-
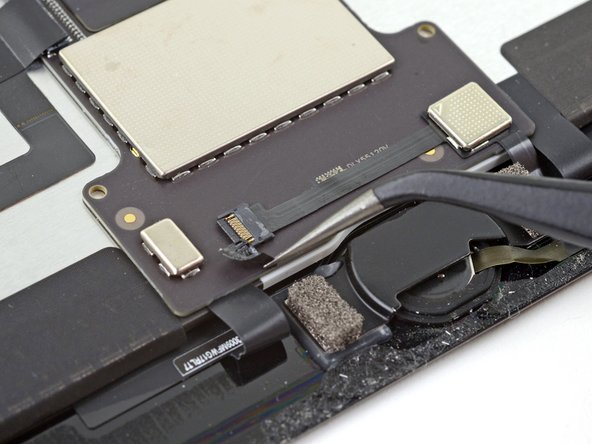
Usa delle pinzette per rimuovere il nastro adesivo che copre il connettore ZIF sopra il tasto Home.
-
-
-
Usa un iOpener, pistola termica o un asciugacapelli per ammorbidire l'adesivo sotto al cavo prima di sollevarlo.
-
In alternativa, applica qualche goccia di alcool isopropilico al cavo e aspetta un minuto per lasciar ammorbidire l'adesivo.
I used a heat gun on low air, set to 150°C, and very very gentle pressure with the tweezers, and it came out very easily and neatly.
-
-
-
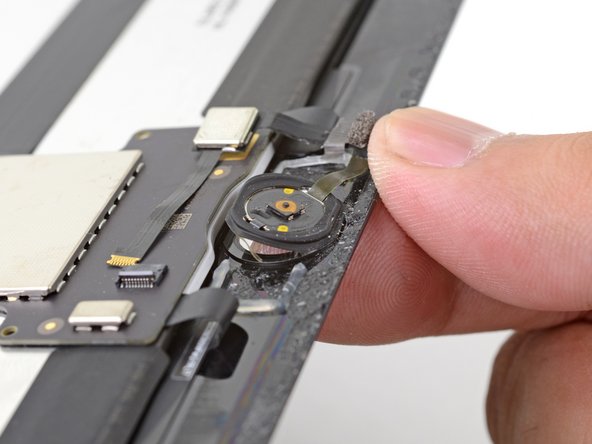
Applica qualche goccia di alcool isopropilico alla base della staffa del tasto Home.
-
In alternativa, puoi usare un iOpener scaldato per ammorbidire l'adesivo.
-
-
-
Rimuovi la copertura del tasto Home.
-
Gratta via quanto più adesivo vecchio puoi, quindi puliscilo con dell'acetone o dell'alcol isopropilico ad alta concentrazione (maggiore del 90%).
-
Fissa la copertura con colla a caldo, supercolla (cianoacrilica) o nastro biadesivo molto resistente. Assicurati che la copertura sia allineata correttamente prima di lasciar far presa all'adesivo, o il tasto Home non funzionerà quando premuto.
Would be really nice if the adhesive strip kit for the screen included the adhesive bits needed to secure the existing home button to the new screen (or a new home button to an existing screen).
One more thing about the bracket: you really need a strong adhesive when you put it back, so that pushing the button doesn’t dislodge it. If it doesn’t hold the button firmly, you can push the button out of its socket during normal use. Getting the bracket in and aligning it without accidentally sticking it in the wrong place or (much worse) sticking it to the fragile ribbon cable takes some very careful work.
This is an excellent guide, but I’d like to see maybe the first two steps of reassembly, showing how to do this correctly.
When replacing the bracket, a very slight difference in the replacement part caused the bracket to make the home button click all the time. The little white washer between the home button and the back of the glass was about 0.3 mm thicker than the original, and i had already superglued those parts together.
Fortunately, the playing card included in the kit is about 0.3 mm thick. I cut 2 small rectangles and superglued them to the feet of the bracket, so it would stand away from the home button. Then superglued the bracket on, and now it clicks perfectly. Hopefully I don't have any issues with the playing card delaminating as the home button wears, because I definitely don't know if i could get this ipad apart again (the first time was easier because the screen was already shattered).
-
-
-
Spingi delicatamente il tasto Home dalla faccia frontale dello schermo verso l'interno con la punta di un dito.
-


Confronta la tua parte di ricambio con quella originale: potrebbe essere necessario il trasferimento di alcuni componenti o la rimozione di protezioni adesive dalla nuova parte prima di installarla.
Per rimontare il dispositivo, segui le istruzioni in ordine inverso.
Porta i tuoi rifiuti elettronici a un riciclatore certificato R2 o e-Stewards.
La riparazione non è andata come previsto? Prova a rivolgerti alla nostra comunità Risposte per trovare aiuto.
Annulla: non ho completato questa guida.
Altre 27 persone hanno completato questa guida.
Un ringraziamento speciale a questi traduttori:
94%


Questi traduttori ci stanno aiutando ad aggiustare il mondo! Vuoi partecipare?
Inizia a tradurre ›

7 Commenti
Yes. If you take the iPad apart most of the adhesive on the screen won’t be usable again. You can use either the specific kit for your ipad Pro that iFixIt sells, or get a roll of “red” tape (probably between 2-5mm size) and cut out pieces for all four side of the screen. You will probably also need tape or glue (such hot glue or something like B-7000) for the home button, and the metal bracket that holds the home button, since the old adhesive tends to not work a 2nd time.
Some LCD Assemblies come with Adhesive pre-applied, simply peel and seal. :)
Otherwise, plan on running some double-sided 3M tape before commencing new LCD Assembly Installation.
TIP: B7000 Adhesive in the bottom left and right corners will help keep it in place moving forward.
Replaced LCD and reattached home button, everything works, but the home button is lose and trying to fall inside, like it's missing something that is suppose to be between the home button and the cover that sets over it under the glass. The cover is stuck to the glass, but there's enough of a gap that the home button wants to fall inside?
I have the same issue, haven’t solved it yet but here is what I’ve found so far:
The home button appears to have several pieces not just one, including: 1. black gasket, 2. white or space-grey ring (paper or plastic?) around the metal part, 3. The actual glass circle button with fingerprint feature, and 4. electronics layer behind it.
When I took the button off, and re-adhered the button, the glue or tape between No. 2 and 3. above started to separate. Not sure how to put these back together since so small.
The guide plus a few videos made this a painless experience. my only problems are the home button no longer recognizes finger prints and iPad no longer auto shuts off when lid is closed. Not a great result for the price.
Successfully completed this one but I must have damaged the home button cable during removal, I was very careful but it does say the cable is very sensitive, as it will not enable touch ID. Oh well, my iPad Pro works again, yay!