
Sostituzione midframe Nexus 5X

Introduzione
Vai al passo 1Usa questa guida per rimuovere e sostituire il midframe (telaio intermedio) di un Nexus 5X.
Cosa ti serve


-
-
Inserisci uno strumento di estrazione SIM nel foro del vassoio della scheda, sul bordo sinistro del telefono.
-
Premi per espellere il vassoio della scheda SIM.
-
Rimuovi il vassoio della scheda SIM.
-
-
-
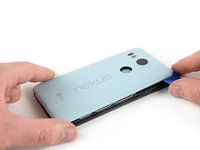
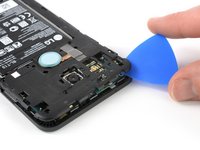
Infila un plettro di apertura nell'apertura della fessura del vassoio della scheda SIM; torcila per staccare la prima clip di plastica che tiene fissato il pannello posteriore.
-
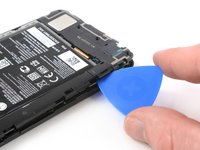
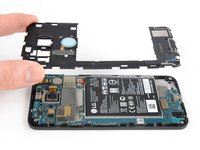
Fai scorrere il plettro di apertura lungo il bordo superiore del telefono per staccare le clip di plastica che bloccano il pannello posteriore.
Here’s a photo of the location of the 18 tabs that hold the back cover in place
Twisting sideways didn’t do it for me, but sliding along the edge did. However, at first I didn’t realize that the pick was between the motherboard and midframe, rather than between midframe and back cover like it was supposed to. This led to breaking off a spring-loaded connector on the motherboard, connecting to an antenna (I guess) in the back cover. So far I haven’t noticed any reception issues, but I can’t say for sure.
In essence: be careful to get the pick towards the back cover, and not “straight in” under the midframe.
-
-
-
-
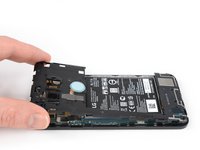
Rimuovi le dieci viti a croce Phillips da 3,6 mm che fissano il midframe.
-
-
-
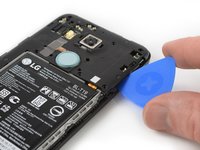
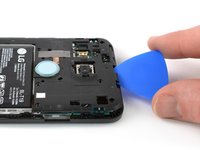
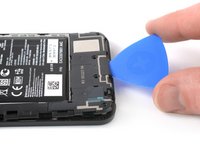
Inserisci un plettro di apertura nella fessura del vassoio della scheda SIM e torcilo per liberare le clip di plastica.
The photo seems to show that the person is opening from the top, which is the opposite of your advice. So, just want to be clear.
yes, open from bottom first... the pic above shows the finished product after reaching top of phone. I found it best to actually start close to the right of the usbC connector. Pushing inbetween the 2 tabs and up will release the shell.. then work clockwise.
Chris, your advice to start to the right of the usbC connector was excellent, thank you!
I found that my middle panel was already broken at the narrowest part just to the left of the 2-D scan code on the battery, perhaps from some ham-fisted previous repair. This seems of little consequence, there do not seem to be any electrical connections running through this part.
After a long amount of prying, I discoved that, if used gently, a jimmy can really help get the plastic off
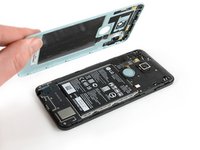
I could not remove the cover with the opening tool but had success with the opening picks (the triangle parts). Just slide them under the cover and gently bend and twist the pick to release the cover from the locks. By the way: it’s perfectly normal for the bottom cover part to come loose from the top cover part. It’s designed that way (they interlock).
Here’s a photo of the location of the 20 tabs that hold the middle assembly in place, and the pry angle needed.
This is the scariest part but it is the same process of taking a bike tire off the rim: lift up one part of the cover then put a wedge under the lifted section to hold it up then continue around the frame lifting it up and holding it up with the blue picks. You’ll find that after you life the bottom you can wriggle free the rest by hand.
The 10 screws came out quickly using the IFIXIT.com magnetic screwdriver.
-


Per rimontare il dispositivo, segui queste istruzioni in ordine inverso. Se il tuo pannello intermedio è danneggiato o rotto, mettine uno nuovo.
Porta i tuoi rifiuti elettronici a un riciclatore certificato R2 o e-Stewards.
La riparazione non è andata secondo i piani? Vai sulla nostra comunità Risposte Nexus 5X per trovare aiuto nella risoluzione dei problemi.
Annulla: non ho completato questa guida.
Altre 7 persone hanno completato questa guida.
Un ringraziamento speciale a questi traduttori:
100%

albertob ci sta aiutando ad aggiustare il mondo! Vuoi partecipare?
Inizia a tradurre ›


2Commenti sulla guida
Has anyone else run into the different screws holding the midframe? I opened my son's phone today to swap out the battery and found the screws to be tri-wing. Imagine my confusion. I've been into to my wife's Nexus 5x before, and it has phillips-head screws. Weird.