
Sostituzione gruppo altoparlante Samsung Galaxy S7

Introduzione
Vai al passo 1Segui questa guida per sostituire il gruppo altoparlante del tuo Samsung Galaxy S7.


-
-
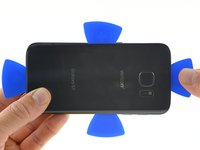
Applica un iOpener riscaldato su uno dei bordi lunghi del telefono per circa due minuti.
-
-
-
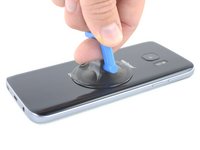
Quando il pannello posteriore è caldo al tatto, applicaci una ventosa, il più vicino possibile al bordo riscaldato ma evitando la parte incurvata.
-
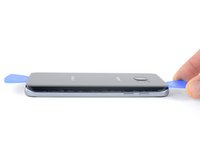
Solleva tirando con la ventosa e inserisci un plettro di apertura sotto il vetro posteriore.
Because of the metal lip around the phone the picks were to thick to get under the glass. Couldn’t get the glue loose enough with the iOpener or the glass lifted high enough with the suction cup despite using a lot of heat and stength on the suction. Ended up having to use a thin piece of metal to get the first separaration. After that the picks are ok to use.
This step is certainly giving me trouble. I don’t have enough hands to be able to both form the space and to insert the pick. In order to even form the space, I need to use the double-sided plastic scraper-thing.
Turns out that three hands was the answer. I had my dad insert the pick while I pried open a gap, and it was smooth sailing from there.
How do you pull on the suction cup? I.e. what's the right technique to pull up the suction cup? Just pulling up is going to lift the entire phone, unless I had some kind of double sided suction cup up keep the phone stuck to the table.
Thank you
I'm going to try it Jerry rig everythings technique. https://m.youtube.com/watch?v=kHzmFPoZbC... unfortunately every iFixit video seems to use the clamp which seems like an oversight for a tutorial. But it is not fair for me to be too annoyed since they have really good repair kits and the repair guides are nice.
A X -
-
-
-
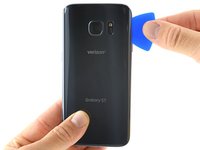
Quando il plettro è saldamente inserito sotto il vetro, riscalda e applica di nuovo l'iOpener per ammorbidire l'adesivo.
Use a heat gun or hair dryer to soften the adhesive to remove the back cover. The Iopener that you heat up with the microwave takes a very long to accomplish the same task.
Keep the heat gun in motion at all times and check the surface temperature of the phone with your hand every few seconds to ensure it does not overheat the plastic and glass and electronics. Use several blue guitar picks to brake the seal of the cover once you have softened the adhesive and popped the seal initially with the suction cups.
-
-
-
-
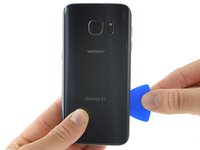
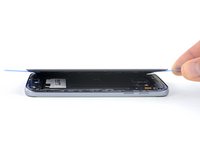
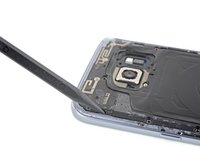
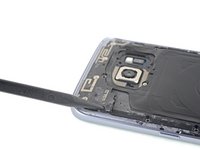
Ripeti la procedura precedente di riscaldamento e di taglio per gli altri tre bordi del telefono.
-
Lascia un plettro in ogni bordo del telefono mentre procedi con il successivo per evitare che l'adesivo aderisca di nuovo.
At about this stage, as I was working on the fourth side, the layer of black paint on the inside of the glass started to separate from the glass, near the edge. I may have overheated the phone (I used a heat gun). Most of the paint layer ended up left behind, attached to the body of the phone, as the glass came away - along with the lens covers of the camera and flash. I removed and discarded as much of the paint as I could using tweezers, a spudger, and cautious heating with the heat gun. I hope the back glass will work OK without it; a clear back cover will be a distinctive design feature! If not I’ll have to get a new one. (Note, some battery repair kits from other suppliers such as Amazon include a replacement back glass, which would help with this issue).
Hi Michael,
The glass back would definitely work without the black paint. In fact, there are tutorials online that instruct exactly how to do that in order to have a cool transparent glass back look!
antibodies when they come across antigens:
-
-
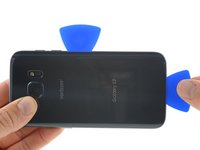
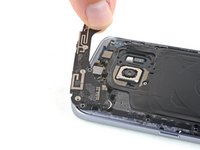
Do not hold the glass as shown. I did that, and the glass cracked when I tried to pull the adhesive because the adhesive was on tight. Always keep the glass down on a flat surface so that you don’t apply any bending forces to it.
I'm sorry to hear that! That's a good suggestion—I'll modify the photo slightly to deter people from holding the glass in the air.
-
-
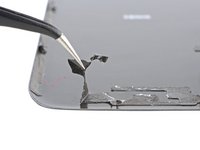
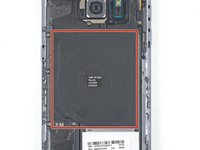
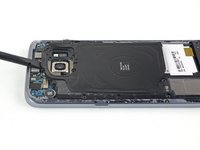
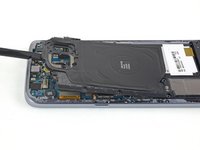
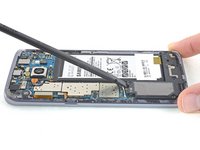
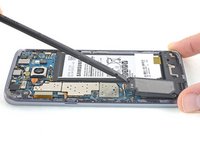
Usa l'estremità piatta di uno spudger per sollevare la bobina di ricarica wireless fuori dal telefono.
The picture for Step 10 shows that no attempt was made to remove the residual adhesive from the phone side. I don’t think it is sufficient to only remove the old adhesive from the case back. For my disassembly, 50% stayed on the case back and 50% on the phone
I diligently removed all the adhesive on the phone side. Tedious but necessary.
As a final clean up step, when I rubbed a cotton swab dipped in alcohol near the flash and finger sensor, the black covering for the recharging coil dissolved before my eyes. There needs to be a warning in the instructions to avoid any alcohol or other solvent contacting the inductive charger coil. So far, it doesn’t appear this will interfere with the connector integrity at that dissolved spot,
Unfortunately I can’t post the picture here.
Hi William,
Thank you so much for your comment and tips! I’ll add your info into this guide.
-


Per rimontare il tuo dispositivo, segui queste istruzioni in ordine inverso.
Per rimontare il tuo dispositivo, segui queste istruzioni in ordine inverso.
Annulla: non ho completato questa guida.
Altre 3 persone hanno completato questa guida.
Un ringraziamento speciale a questi traduttori:
100%


Questi traduttori ci stanno aiutando ad aggiustare il mondo! Vuoi partecipare?
Inizia a tradurre ›

I used a heat gun and heated it a little too much. The color of the rear glass is just a sticker on a clear cover. Due to this I tore the sticker off. Now the back cover is see through, which isn’t a bad thing but the repair was for a customer.
Kevin Bishop - Replica
When using the iOpener, you may need more than 30 seconds, especially in compact or low wattage microwaves. Take this slowly, though, and be extremely careful, as it is easy to overheat your iOpener. Remember, you can always heat it up a tad more, but you cannot undo overheating it.
Jacob Pratt - Replica
I used an adjustable heat gun and set it to 400 degrees (F). That was enough to seperate the glass without having to worry about exposure times of the heat. The front of the phone was just fine. Just be ready to use a bunch of picks to slide in between because they will be needed this way.
Ryan Schumerth - Replica
I went from the bottom center up, using one ifixit tools, one suction cup and one pick.
Pick just popped in with some minor pressure.
Laid heat pack along base of phone 2 mins first and worked up slowly, rotating picks as I went. Had to heat iopener over several 30 second bursts
Lauren Burt - Replica
This is useless because the phone does not recognize the new battery and will behave like on the old one
Search for “battery count xda"
Albert Einstein - Replica
That is an interesting discovery! Thanks for pointing it out—I’ll have to look into it.
Even if this is true, replacing the battery should still give restore a significant amount of life, since the max voltage affects a minor amount of the battery’s capacity. If you charge a worn battery and a new battery to the same lower max voltage, the worn battery’s voltage will dip more under use and will be depleted faster.
Arthur Shi -
Thanks for the guide! It helped me replace a friend's battery with no problems!
Darren Crook - Replica
I will never replace a screen again, and don’t recommend it. Not for phones nowadays. Once upon a time everything was screwed together, and you might even get the same quality or better screen when buying from eBay. And having the phone repaired was nearly the cost of the phone. Now, it’s the reverse. Removing the glued back and screen and cleaning off all the glue for a clean re-seal is an ordeal that takes multiple hours, AND, often the screen you buy on eBay is NOT OLED, but an LCD, and a blurry one at that. And the local phone repair store will replace the screen with an OLED, reliably, same day turn around, for not much more than the cost of an actual OLED screen, because they have the parts in bulk, and the tools and experience to do it quickly. Never again!
domarius - Replica
have you ever had one that just wont open at all? i can not get mine to open to replace the battery i have heated with a heat gun and attached suction cup and it will not lift at all
Carla James - Replica
Hi Carla,
I've definitely had that experience before. The adhesive is very strong, and the curved back makes getting the initial seam very difficult. I'd suggest focusing on one small area on the edge. Apply steady force when you pull, and repeat a few times to loosen the adhesive. Eventually it will give and present a small gap.
Arthur Shi -
I can confirm my issue was that I was allowing too much time between applications of the iOpener. The heat must build up for a while because the device does not have much heat capacity, thus expelling the heat quickly.
Aidan Saar - Replica