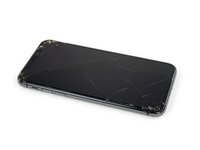
Introduzione
La scheda logica, nota anche come scheda madre, contiene la CPU e la maggior parte dei chip del circuito integrato che controllano il funzionamento del telefono. Le schede logiche di iPhone X sono notoriamente difficili da riparare, in quanto sono costituite da due schede impilate l'una sull'altra e saldate insieme per formare un'unica unità. La riparazione di qualsiasi componente inserito tra le due schede richiede lo smontaggio, un passaggio aggiuntivo e difficile nella riparazione della scheda che è già abbastanza difficile e richiede esperienza di microsaldatura.
Questa guida ti mostrerà come sostituire la scheda logica.
Tuttavia, per mantenere in funzione la funzione Face ID, è necessario sostituire anche l'assieme auricolare/sensore di prossimità e l'assieme fotocamera frontale, entrambi da accoppiare alla scheda logica.
Se la perdita di Face ID è accettabile, puoi utilizzare questa guida per sostituire la scheda logica da sola.
Cosa ti serve
-
-
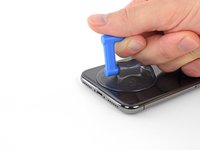
Inserisci uno strumento di espulsione della scheda SIM o una graffetta nel piccolo foro nel vassoio della scheda SIM, situato vicino al pulsante laterale sul bordo dell'iPhone.
-
Premi con decisione per espellere il vassoio.
-
-
-
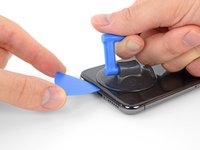
Rimuovi il vassoio della scheda SIM dall'iPhone.
-
-
-
Spegni il tuo iPhone prima di iniziare a smontarlo.
-
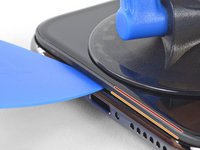
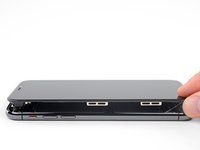
Rimuovi le due viti Pentalobe lunghe 6,9 mm sul lato inferiore dell'iPhone.
same situation here
Same issue with the stripping. The tip of the iFixit P2 head in my $70 kit just ground off on the first screw and that was that. Not much you can do.
yes correct the same happened to me, the screws were perfect shaped never been open and as soon as i used the P2 it stripped the screws, seems like the P2 is slightly smaller but Dremel kit with a very small drill bits and precise knife tool is the way to go.
This step in automatically followed through, without any thought. Why remove these screws? Can anybody explain? The Screen is detachable all the same, with them well screwed in…
These screws attach to a plate that’s part of the screen half of the phone. If you succeed in detaching the screen without removing those, it would seem reasonable that you will have damaged that plate or its ability to keep the two halves together.
Dan Long -
@Dan Long is right
Uri -
Clean out the pentalobe screw heads first so the tool goes all the way in. A small sewing needle works well to loosen any build up and then press some putty/chewing gum into the screw head and pull away quickly for a final clean out.
Never opened my phone ever, when I went to look at the first step.. I noticed one of my screws was stripped. I thought it was impossible, but I removed the non stripped one, then once I got to the stripped one.. I learned my assumptions were correct. I bought this one straight from the apple site years ago ahaha Any tips to remove the stripped screw?
William Olstad's tip about cleaning the screws with a needle and a bit of poster putty worked well for me. There was a lot of crud in there! The opening is shallow, so it's easy to see how the screwdriver wouldn't catch with even a bit of grit in the way, No problem getting the pentalobe screws out with the ifixit screwdriver.
If all else fails, very carefully cut a slot across the head of the screw with a Dremel tool using a diamond bit that dentist will gladly give you - I ask my dentist for used bits; and chuck them in a drill bit chuck designed for Dremel. The slot allows you to use a tiny, straight blade screwdriver. You can reuse the screw or replace it with a new pentalobe screw.
-
-
-
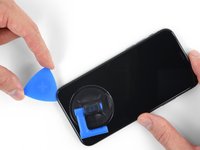
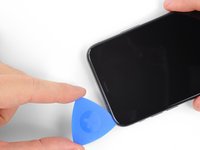
Misura 3 mm dalla punta del plettro e segna questa distanza con un pennarello indelebile.
Got to step 2 and realized the fix kit doesn't include an opening pick! Looks like a guitar pick, and I have those lying around. Is that expected? Looks like the pick is used in many steps below. There's a little blue crowbar that isn't mentioned in the instructions. Perhaps that replaces the opening pick?
Hi! I can't see which guide you were using when writing this comment. Can you reply here with which guide and fix kit you used?
I see you posted this in Meta. I hope it's resolved soon! In the meantime, a guitar pick may work well enough for your repair.
what fix kit?
My fix kit didn't include an opening pick either
My AliExpress refurbished screen came with a pick that has a coin-like circle that pops out, so no modification was necessary
It's not an Ifixit KIT if it doesn't include everything. You'll need to order the opening pic separately. Or head to Walmart like myself and look for guitar pics. Hopefully, this will work just as well.
No pick in mine as well. It’s really not clear that you have to order this separately when ordering an IPhone SE 202/2022 screen repair kit. Is this the case?
Frustrated, I ordered a compact package where everything was encapsulated. Useless suction tools could not separate the screen. If it is unable to decouple the screen, then why sucking suction tools you have provided.
For my kit the triangle pick was stuck inside the box with the screen not with the other tools maybe it's also there for you
Y’all are getting far, FAR too detailed with some of this stuff…. Measuring and marking the pick that you won’t actually use to open the device?!? lol that’s kinda funny. Just heat it up, grab a spudger, and the back just pops right off! The iFixit tech need to stick to the KISS method more often, you know KEEP IT SIMPLE STUPID!!! Like l, for reals, I’ve been doing this stuff for YEARS and using iFixit guides regularly and this is just ridiculous at this point!
Will the phone still work if the sensor assembly on the back of the screen is damaged?
-
-
-
Attacca diverse strisce di nastro adesivo da pacchi trasparente sopra lo schermo finché non è completamente coperto.
-
Se nei prossimi passi non riesci a far aderire la ventosa, piega un pezzo di nastro adesivo resistente (come del nastro americano) a forma di maniglia e usa quello per sollevare lo schermo.
-
-
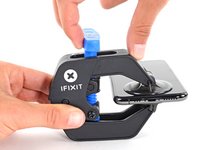
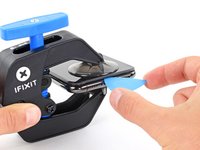
Attrezzo utilizzato in questo passaggio:Clampy - Anti-Clamp$24.95
-
Tira indietro la maniglia blu per sbloccare i bracci dell'Anti-Clamp.
-
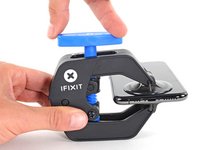
Fai scorrere i bracci oltre al bordo destro o sinistro dell'iPhone.
-
Posiziona le ventose vicino al bordo inferiore dell'iPhone: una sulla parte anteriore e una sulla parte posteriore.
-
Premi le ventose nell'area di interesse.
-
-
-
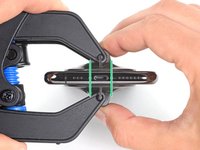
Spingi la maniglia blu lontano dalla cerniera per attivare la modalità di apertura.
-
Piega l'iOpener in modo che sia appoggiato sopra il lato inferiore dell'iPhone.
-
Attendi un minuto per dare tempo all'adesivo di staccarsi e creare un'apertura.
-
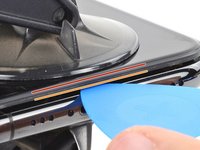
Inserisci un plettro sotto lo schermo e la scocca di plastica, non solo sotto lo schermo.
-
Salta i prossimi tre passi.
DO NOT separate the glass from the plastic bumper or rim around it. These instructions don't clarify that the pick has to be inserted between the plastic rim and the metal body. It is likely that the glass will lift slightly off the plastic surround before the plastic will lift out of the metal body. I had success sliding a card or pick back and forth along the bottom edge of the plastic rim while pulling on the suction cup. Eventually there was a space large enough for the pick to go under the plastic rim.
Thanks for pointing this out! I'll revise this step to clarify this point.
-
-
-
Utilizza un asciugacapelli, una pistola termica oppure prepara un iOpener e applicalo sul bordo inferiore dell'iPhone per circa un minuto al fine di ammorbidire l'adesivo sottostante.
General tip regarding heating necessary to remove adhesive:
consider using a heated tip of a small screwdriver or metal spudger (not the one made of plastic, provided in kit), rather than to heat the device itself.
You then need to be careful about the temp of the tool which if hot enough can melt plastic components or harm them. Keeping the heat source (heat gun) far enough away from the object that you’ll eventually melt the glue but would be much harder to melt components. I try to keep 4” or 5” gap between the source & object
Thanks for the info. Could a air convector do the job
If you have a 3d printer, heat the bed to 80c and put the phone screen side down on it for 30 secs
thaks for this advise, I was looking for this as I dont have a heat gun haha, nice hack
-
-
-
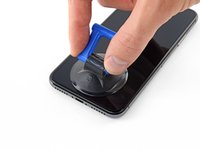
Se usi una sola ventosa, applicala sul bordo inferiore del telefono evitando la parte curva del vetro.
If you were using some form of screen protector, it may come off first as soon as you pull on the suction cup. Do not be alarmed. That is normal behavior.
3m VSB double stick tape will stick to the screen when the suction cups fail (see my comment on step 1)
-
-
-
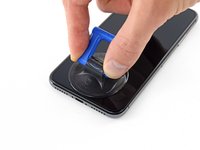
Tira la ventosa applicando una tensione forte e costante fino a creare una piccola fessura tra lo schermo e il resto dell'iPhone.
-
Inserisci un plettro nella fessura sotto la scocca di plastica, non sotto lo schermo.
In addition to safety goggles, I would recommend you also wear good gloves to avoid getting cut with the glass as you try to pry it open.
The top about applying more heat and gently rocking the screen up and down to weaken the adhesive did the trick for me. Thank you!
There needs to be more clarity on where to shove the opening pick into. There is actually two openings that the pry tool can be forced into: one below the black plastic bezel, and one above the black plastic bezel. When I heated my screen with a warming pad and pulled up the suction cup, it actually pried apart above the black plastic bezel which removed the touch screen from the display panel. With this being the first newer iPhone I'd opened since the 3GS, I didn't realize that I was opening the wrong opening as the directions only mentioned one opening and did not warn of this. I was pretty disappointed in the lack of mentioning this, as I was taking my time and following it to the tee. As a result, it destroyed my original iPhone screen.
DO NOT separate the glass from the plastic bumper or rim around it. As someone else noted, these instructions don't clarify that the pick has to be inserted between the plastic rim and the metal body of the phone. When pulling upwards with the suction cup, it is likely that the glass will lift slightly off the plastic surround before the plastic will lift out of the metal body. I had success sliding a card or pick back and forth along the bottom edge of the plastic rim while pulling on the suction cup. Eventually there was a space large enough for the pick to go under the plastic rim.
Thank you for pointing this out! I've updated the step to reflect this.
The suction cup doesn't work at all... The minimum force I apply to lift it up, it comes off completely. This is very frustrating!!!
-
-
Wouldn’t it be better to put this part BEFORE the step where you have to pry open the phone?
-
-
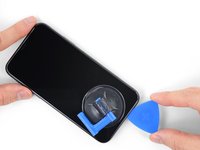
Inserisci nuovamente il tuo attrezzo nell'angolo inferiore destro dell'iPhone e fallo scorrere lungo il lato destro del telefono per separare l'adesivo.
If you have flat feeler gauges (for adjusting engine valve tappet clearance, ignition points … old school) the .003” thick gauge goes right in. Work your way up in thickness until you can get the pic or supplied pry tool in. Don’t insert metal feeler gauge in too far, just enough to hold crack open. I didn’t need to use the suction cup. I used a hot/cold gel pack heated in microwave to heat edges to soften glue a bit. Made sure it wasn’t so hot I couldn’t stand it on my skin.
-
-
-
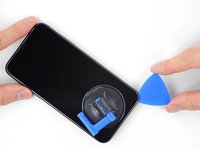
Fai scorrere il plettro sotto il bordo superiore del display, mentre muovi o scuoti delicatamente il display verso il basso, in direzione della porta Lightning.
-
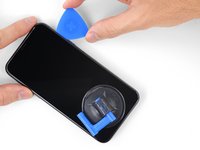
Fai scorrere il plettro nell'angolo opposto e taglia tutto l'adesivo rimanente.
-
-
-
Apri l'iPhone sollevando il display dal lato sinistro, come per sollevare la copertina posteriore di un libro.
-
Come indicato nell'immagine, accertati che il telaio venga via assieme allo schermo e non resti incastrato nel dispositivo.
-
Appoggia il display contro qualche tipo di supporto per mantenerlo aperto mentre lavori sul telefono.
My phone came apart in a different way and looks not right the little box at the top of the display as actually bolted to the top of the frame body I think something went really wrong when I opened it.
It opens like a book but be careful not to open it all the way — only as far as shown in the photo. Otherwise it will strain the thin cable that connects the sensor module and then no more FaceID for you (or, as it turns out me). This could have been made more explicit in the instructions.
It opens like a book but be careful not to open it all the way … the small stainless steel tabs that hold the screen around the metal frame, that are on the bend place (right side of the phone)… are tend to bend, you can straighten them back to 90 deg. but the plastic base that they are on? very fragile- watch out not to break the plastic bezel … it may come apart of the glass.
Advice for re-assembly: Before closing up the phone with the seal, check if phone is powering up again and speaker, mic and sensors are still working. If done this check even before installing the board connector bracket in Step 13.
-
-
Attrezzo utilizzato in questo passaggio:Magnetic Project Mat$19.95
-
Rimuovi cinque viti viti tri-wing Y000 che tengono in posizione la staffa del connettore della scheda logica, delle seguenti lunghezze:
-
Tre viti da 1,1 mm
-
Una vite da 3,1 mm
-
Una vite da 3,7 mm
One thing I found helpful for replacing the screws was to use only the 000screwdriver tip, without the handle. This way, the tip isn’t magnetized and the screw doesn’t tend to ‘roll’ off the screwdriver tip (the screw has almost no mass, so the head (largest surface) is pulled around to the side of the screwdriver tip when magnetized).
Rich May 23, 2020
My 3.1mm screw had a stripped head, could not remove it. (Factory defect, this iPhone was never opened)
So I had to give up removing the display assembly, and jumped directly to battery replacement, Step 20.
That was tricky as I had to keep the display at 90º with a risk of breaking display connectors, but hopefully the replacement went well.
I would not recommend to do this but to follow the guide, but, in case someone encounters a similar issue, that could help!
Be careful on reassembly. Keep the screen supported and not moving. I had difficulty getting the screws in and ended up ruining the screen connectivity at the back of the screen where the ribbon cables go in near the center. I was trying to hand hold the screen and it ended up moving around too much.
To keep track of the screws, I copy the photos showing their places, then arrange these photos on document in Pages, print it. Next I apply two sided sticky tape (the roll-on type). So all screws have their corresponding places …
-
-
-
Rimuovi la staffa.
I tested it, then proceeded to close up the device without the bracket. Do I need to reopen and install? All connections are good?
The bracket helps those many connectors underneath maintain good contact. Probably in the short term nothing bad will happen, but I’d hang onto the bracket and reinstall it when convenient.
Agree with Jeff
cgtyoder -
for me, the replacement battery was completely dead, small panic when the power-on button was pressed, but quickly realised that this was the situation, and now watching the phone take a power cycle.
Before clicking the screen assembly back, I tried to test the iPhone by pushing the start button, but nothing happened. After taking off the bracket, reseating the plugs I tried again - nothing happened! Then I plugged in the charging cable connected with the iMac, and it started immediately. So if the phone does not start using the startup button, it might just be a glitch when reconnecting the battery.
-
-
-
Usa la punta di uno spudger o un'unghia pulita per staccare il connettore della batteria sollevandolo dal suo zoccolo sulla scheda logica.
-
Piega lievemente il connettore per distanziarlo dalla scheda logica ed evitare che questo possa fare contatto con lo zoccolo e quindi alimentare il telefono nel corso della tua riparazione.
cosa può succedere se non si disconnette la scheda logica'?
note: be careful not to crush or puncture your battery at this step!! I gave mine a minor dent, which I hope wont be a problem.. but something to keep in mind for fxlks in the future!
Thanks, already did it)
-
-
-
Usa la punta di uno spudger o un'unghia per staccare il connettore del cavo del pannello OLED.
Snap ‘em in like little Legos.
-
-
-
-
Usa la punta di uno spudger per staccare il connettore del touch pad dal suo zoccolo.
This was probably the hardest part other than trying to get the screen off with the crappy suction cups. I re-installed the bracket only the find out that the touch screen would not respond to touch. Had to remove the five screws, remove the bracket and reseat the recessed screen connector. Reseating the bracket took another 10+ minutes. I carefully used the angled forceps to grab the cable and align the connector being careful not to damage the cable.
Once you have the connector seated, I would reconnect the battery, power on the phone, and check the touch screen response before re-installing the bracket (step 13).
Yeah, this was probably the trickiest part of the reassembly. The power connector cable kept getting in the way so I moved it carefully but fully out of the way. Then it was a matter of fiddling around with it a bit and being careful not to force it on.
I was positive that I had messed something up, I had powered up the phone to test three different times and everything seemed find except there was no touch at all. On my fourth attempt, I carefully examined everything for dust and debris (blowing gently), and I did notice that a corner of the connector (more like part of the ribbon) was bent slightly, and I straightened it. I don't know if it was the ribbon or some tiny debris, but after reseating a fourth time, it worked.
Very important part of the tutorial. Be careful and patience! In my case the screen and camera didn't respond after assemble, so I tried again to reconnect the connector like tutorial said and it worked well. Now my iPhone feel like a new one 💪🏼
-
-
-
Solleva delicatamente il cavo finché non si stacca.
It is part of the face id part so yes. This is the ear piece too so if the ribbon tears there is a chance the ear piece will stop working as well.
Be super careful handling this ribbon particularly. I did a battery install and, when I was done, I had a phone with a new battery and no Face ID. That’s a $300 Apple repair, and no 3rd party shop will touch it. I believe the ribbon lays vertically (i.e., perpendicular to the “floor” of the phone, against the side edge of the battery. During the re-install, I must have forced the ribbon into position after seating the connector, causing fatal flexing of the ribbon. (Don’t know this for sure, but I see another comment saying that this cable is part of Face ID.) Anyway, bottom line: BE CAREFUL REMOVING AND REINSTALLING THIS RIBBON!
My flex cable was more than lightly adhered in place. I needed to use a guitar pic or similar to help encourage adhesive to separate. I wouldn’t pull too hard like shown in pictures unless you had just the right grip on the ribbon cable so as to avoid damaging flex cable. See note above (5/31/20)
Bizarre — it turns out my whole front panel sensor assembly came entire off of the front screen and is stuck to the logic board.
I also found the glue quite recluctant to release so I applied a second or two of heat using the wife's hair dryer which softened it and the cable lifted much easier then. Be careful not to apply too much heat though which could then impact other internal components.
Cho ít cồn 90° vào để mềm keo dễ tháo
my iphone x doesn't have a front panel sensor? in fact, it looks completely different than the picture???
@kennethmcleod, most likely you've separated the screen frame from the screen itself. We see this most commonly when people neglect to remove the pentalobe screws next to the charging port. Usually the cure is to take out those screws, then repeat the screen removal process on the frame that's still attached to the phone.
You don't need to disconnect the front sensor to change the screen. Just leave it connected and remove from the screen side.
I have damaged the front panel sensor assembly flex cable. Does it carry multiple channels of info or is it just one solid piece that can be soldered back together? If not, will the phone still work except Face ID?
-
-
-
Rimuovi il gruppo display.
I tried this and broke the cable can it still repair
CAUTION:
Removing the Taptic Engine or Speaker in next step is optional and the guide continues as this was per se needed.
Unnecessary work and also If you remove the speaker you lose the adhesive gasket and this is not included in the scope of delivery of the "Battery replacement" offering.
So do not remove and avoid losing waterproofing.
Just to confirm the face id is not affected when replacing the earpiece assembly? Am I correct
Sorry for the late response, but you are NOT correct. Replacing the earpiece speaker assembly will result in the loss of Face ID functionality. That's the whole assembly, including the speaker, dot projector and flood illuminator. If you unsolder the speaker from the assembly, that can be replaced by itself without losing Face ID, but any other part will cause it to quit working.
-
-
-
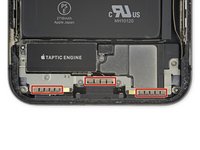
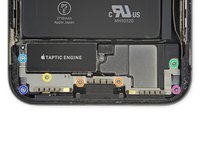
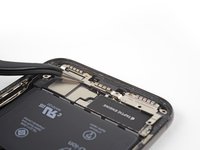
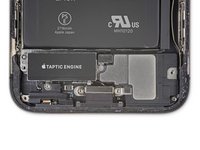
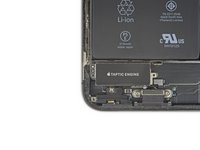
Rimuovi le sette viti che fissano la staffa sopra il Taptic Engine e l'altoparlante:
-
Due viti Y000 da 1,9 mm
-
Una vite Y000 da 1,2 mm
-
Una vite Y000 da 1,6 mm
-
Una vite Phillips da 2,4 mm
-
Una vite Phillips da 1,7 mm
-
Una vite Phillips da 1,5 mm
For battery replacement:
It is not necessary to remove Taptic Engine and speaker to replace a battery. Go straight to the step #33
Additional video: https://youtu.be/2GfBOlJEW10
I wish I seen this before I did all that! Thank you for that information. Next time I do something like this. I'm gonna pay more attention to the comments.
Removing the Taptic Engine and speaker greatly improves your chances of getting the battery adhesive strips out intact. If those break, you’ll have a much tougher time.
Boy, I tried to skip removing these items but was unable to get the glue strips out with them in place, not much to grab and tabs were kind of stuck to a seam in the battery, and hard to tell the difference between the seam and the strip tabs. For me I had to remove these items to get this done.
I stopped removing things after getting the display side off. There were 3 screws stripped on the speaker cover which wouldn't come out so I punted. Just pried the battery out with a smudger tool and some patience, starting at the top and working towards the bottom. New battery is in and working fine.
Thanks for not removing the following steps. this made me break the connector for the bottom speakers >:(
The screws color and quantities in list don’t match the schematic ! I wish i had a magnetic screw mat before starting, because not only i removed the Taptic Engine and speaker unnecessarily, but i also lost a screw ?
Does anyone know the purpose of this bracket "with grounding pads"? What would be the possible side effects if it was damaged or not connected properly during reassembly?
Hello, in my case the grounding pads are damaged. I've had problems since EMC. When I try to charge wirelessly, the iphone starts wild button presses (Gosting).
Does anyone know, where I can get new grounding pads (with or without bracket)?Sure would like to know WHY the warning "Be careful not to touch the three rows of grounding pads..." What would or could happen if I did touch them??
Removing the battery strips is a major PITA, just skip this step and everything onwards, remove the one strip on the top part of the battery (according to step 33) and for the bottom part of the battery, pry it off with a plastic spudger.
Yes, this is not the elegant solution, but the quickest and easiest one. This method is better, as you don't want to keep the old battery anyway, so why bother. (You must not puncture the battery though! But as long as you're only working with a plastic tool and are careful, nothing can happen from my experience.)
Remove the adhesive from the top part of the battery, squirt some ipa into the bottom part and it will come off easily, then skip to 38.
-
-
-
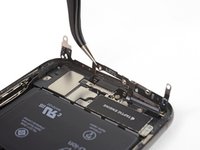
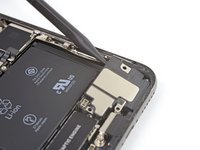
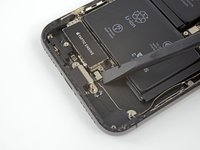
Solleva la staffa dal bordo accanto alla batteria. Non provare a rimuoverla interamente perché è sempre connessa tramite un piccolo cavo flessibile.
Does anyone know, where I can get new grounding pads (with or without bracket)?
-
-
-
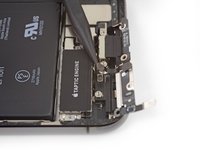
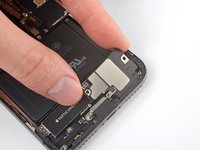
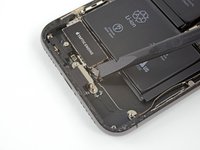
Rimuovi la vite Y000 da 2,1 mm che fissa la staffa del connettore dell'altoparlante.
L'unique vis non?
Effectivement ;-) Merci pour les bons yeux et la remarque !
-
-
-
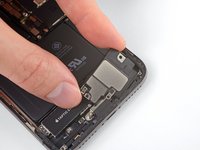
Usa la punta di uno spudger per sollevare e staccare il connettore dell'altoparlante.
As mentioned in a comment by timblake2112 (see step 29), this step is not necessary and can be skipped skipped. I would advise you to do so, as removing your speaker is guaranteed to ruin your gasket and rubber seal. This will result in loss of water resistancy of your iPhone and could potentially harm the sound quality of your speaker.
Try removing the Taptic Engine without removing the speaker. It might still be possible removing the battery adhesive strips and your speaker will stay in its original condition.
-
-
-
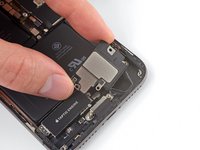
Afferra l'altoparlante dai lati e muovilo da un lato all'altro per staccarlo dall'adesivo che lo fissa al bordo inferiore dell'iPhone.
-
Allontana l'altoparlante dal bordo inferiore dell'iPhone finché non si stacca dalla guarnizione adesiva.
As mentioned in a comment by timblake2112 (see step 29), this step is not necessary and can be skipped skipped. I would advise you to do so, as removing your speaker is guaranteed to ruin your gasket and rubber seal. This will result in loss of water resistancy of your iPhone and could potentially harm the sound quality of your speaker.
Try removing the Taptic Engine without removing the speaker. It might still be possible removing the battery adhesive strips and your speaker will stay in its original condition.
-
-
-
Rimuovi l'altoparlante.
You don’t need to remove the speaker and ruin its gasket. You can wiggle and slide the taptic engine out without removing the speaker. I’ve done this twice on rear shell replacement jobs.
Maybe I'm a bit daft, but where's the instruction just how to line up the speaker gasket when replacing? I only have one so I'd like to avoid wrecking it. And I completely cleaned off the old one in order to do a good job of things. Why no simple instruction from part supply link?
-
-
-
Usa delle pinzette per tirare via la vecchia guarnizione tra la cornice e l'altoparlante e rimuoverla completamente.
-
Per pulire i residui dell'adesivo della guarnizione dalla cornice e dall'altoparlante, usa un panno in microfibra con dell'alcool isopropilico.
-
Assicurati che la guarnizione, da inserirsi nel fondo dell'altoparlante, sia correttamente allineata prima di installarla; il foro ampio sulla guarnizione dovrebbe stare attorno alla griglia dell'altoparlante.
-
Rimuovi il rivestimento trasparente più grande dalla guarnizione e usa una pinzetta per posizionare con cura la guarnizione sul fondo dell'altoparlante.
-
Usa le dita o uno spudger per spingere con decisione la guarnizione in posizione, per bloccarla e farla aderire all'adesivo.
-
Rimuovi il rivestimento residuo della guarnizione e inserisci l'altoparlante in posizione, assicurandoti che il suo connettore non gli si incastri sotto.
-
-
-
Ogni pezzo di adesivo ha una linguetta di estrazione nera alla sua estremità, facilmente staccabile dalla superficie della batteria alla quale aderisce.
-
-
-
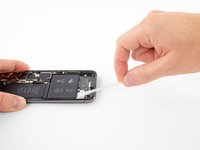
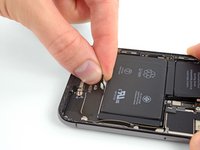
Stacca la prima linguetta adesiva dalla parte inferiore della batteria.
hole breaks instantly on pulling. adhesive tab does not release from side of battery
just pry it off, why bother
-
-
-
Per contribuire al successo dell'impresa:
-
Non premere sulla batteria. Afferra saldamente l'iPhone dai suoi lati.
-
Tieni le strisce piatte e senza creare pieghe quando tiri.
-
Tira molto lentamente per dare alla striscia il tempo di allungarsi e staccarsi. Ci vogliono tra 15 e 30 secondi di tempo per allungare e ritirare ogni striscia.
-
Tira con un angolo ridotto affinché la striscia non interferisca con il bordo inferiore della batteria.
-
Se una striscia si rompe sotto la batteria e non può essere recuperata, continua con le altre strisce e segui poi i passi aggiuntivi sotto.
-
-
Attrezzo utilizzato in questo passaggio:Tweezers$4.99
-
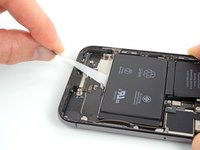
Afferra una delle linguette adesive esterne della batteria e tirala lentamente, allontanandola dalla batteria, verso la parte inferiore dell'iPhone.
-
Tira lentamente ma esercitando una forza costante, finché la striscia non esce dal suo alloggiamento tra la batteria e il case posteriore.
-
-
-
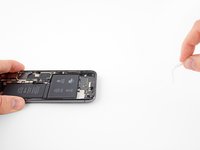
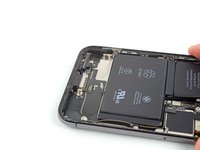
Scolla e stacca la linguette d'estrazione dell'ultima striscia adesiva dal bordo superiore della cella più in alto.
surtout ne pas passer avec la spatule par le bas, vous risqueriez d arracher la nappe du volume et du nfc,
-
-
-
Se una delle strisce adesive si è rotta e la batteria resta attaccata al case posteriore, prepara un iOpener o utilizza un asciugacapelli per riscaldare il case posteriore direttamente dietro la batteria.
-
Capovolgi l'iPhone e fai passare un filo molto robusto (come filo interdentale o una sottile corda da chitarra) sotto la batteria.
-
Avvolgi le estremità della corda con un panno (o indossa dei guanti) per proteggere le tue dita.
-
Tira il filo da un lato all'altro muovendolo come una sega per tutta la lunghezza della batteria per separare l'adesivo. Può richiedere un certo tempo perché l'adesivo si deforma lentamente, ma con pazienza si staccherà. Non deformare o danneggiare la batteria.
-
-
-
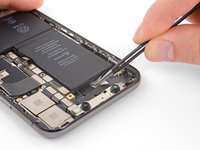
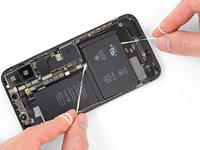
Afferra la batteria dall'angolo inferiore e rimuovila dall'iPhone.
-
Fai aderire la batteria, scollegala e continua a rimontare il tuo dispositivo.
When reinstalling the battery, the Taptic Engine does serve as a useful way to orient the battery, but it should also be noted that if you push right up against that as you install the battery (as I did) and don’t pay any attention to power connector (shown in step 14), there is a risk that the connector from the battery will not line exactly with the connector port on the board. Mine was only off a mm so I had to get a little creative to try to get it to stretch to reach and connect to the port on the board. Just keep that in mind as you place the battery (with adhesive) down.
-
-
-
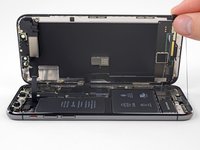
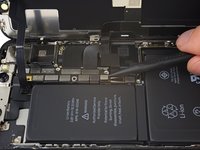
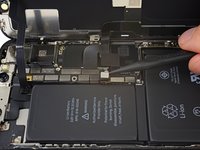
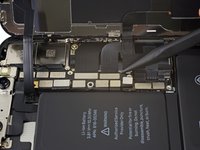
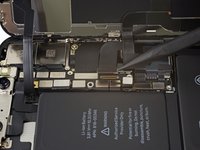
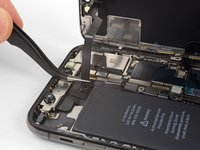
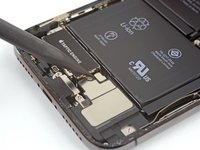
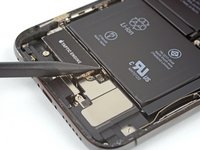
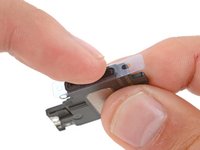
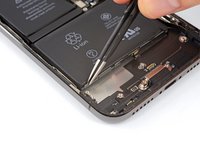
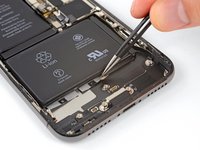
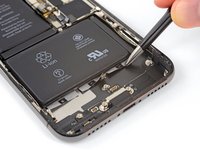
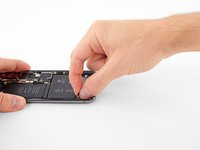
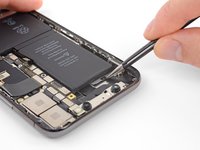
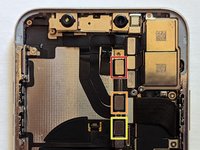
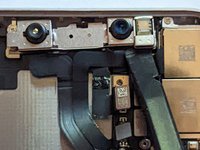
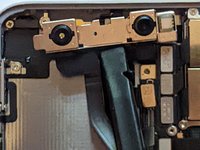
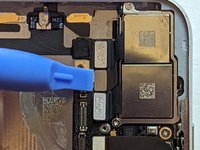
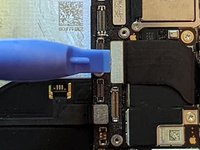
Usando l'estremità piatta di uno spudger, scollega i tre cavi del gruppo fotocamera anteriore:
-
Il proiettore di punti.
-
La fotocamera frontale.
-
La telecamera a infrarossi.
This thing is highly prone to damage. Treat it with baby hands! Mine stopped working after changing my buttons and I was super careful
-
-
-
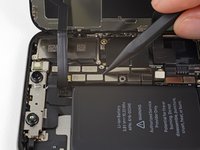
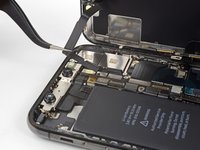
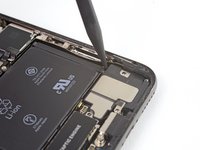
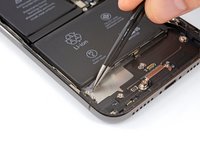
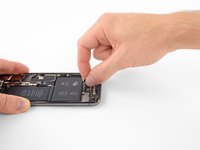
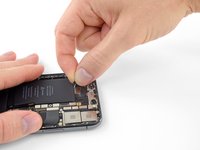
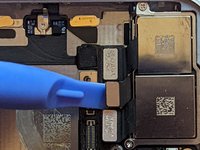
Scollegare i seguenti connettori del cavo.
-
Il connettore dell'antenna Wi-Fi.
-
Il connettore della fotocamera grandangolare.
-
Il connettore del pulsante di accensione/flash/microfono.
-
Il connettore della fotocamera del teleobiettivo.
-
Il connettore Dock Flex.
-
Il connettore pulsante / ricarica wireless.
-
Il connettore dell'antenna cellulare.
-
-
-
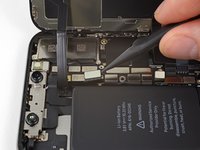
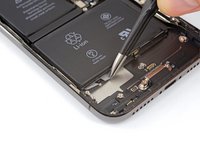
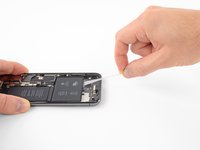
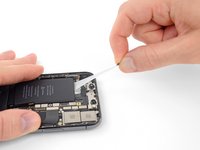
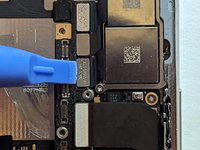
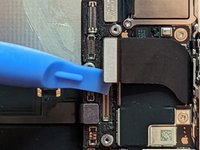
Scollegare il connettore del cavo della fotocamera grandangolare.
-
-
-
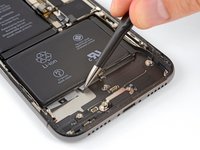
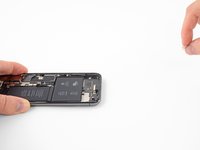
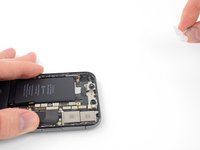
Scollegare il connettore del cavo del pulsante di accensione/flash/microfono.
-
-
-
Scollegare il connettore del cavo della fotocamera del teleobiettivo.
-
-
-
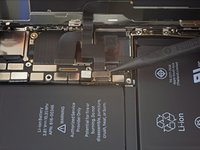
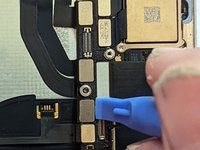
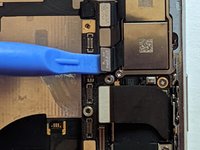
Scollegare il connettore del cavo Dock Flex.
-
Piega il cavo di 90 gradi verso l'alto per lasciare spazio per rimuovere la scheda logica.
-
-
-
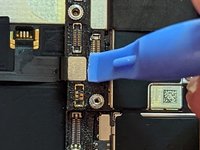
Scollegare il connettore del cavo pulsante/ricarica wireless.
-
-
-
Scollegare il connettore del cavo dell'antenna cellulare.
-
Piegare il cavo in modo che non sia di intralcio.
-
-
-
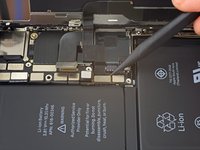
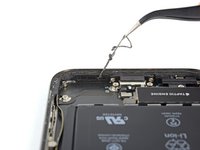
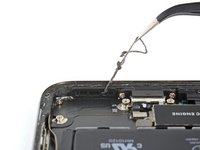
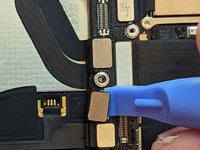
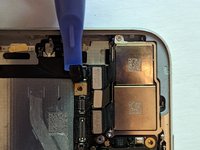
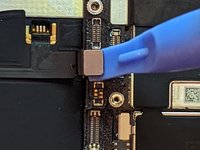
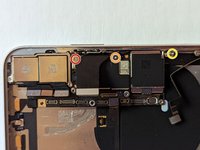
Rimuovere le due viti di montaggio Phillips.
-
Una vite Phillips da 2,7 mm.
-
Una vite Phillips da 2,1 mm.
-
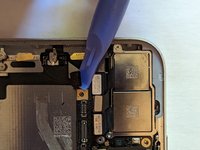
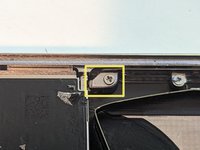
Rimuovere la vite di messa a terra Phillips da 2,0 mm.
-
Rimuovere la linguetta di messa a terra.
-
-
-
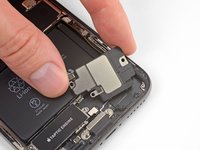
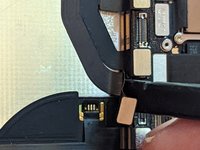
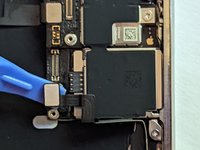
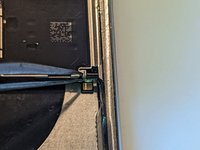
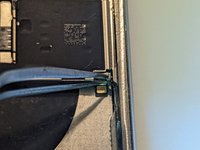
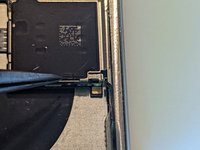
Quando la scheda SIM viene espulsa, un perno scivola fuori dal telaio e spinge sulla leva di espulsione nel supporto della scheda SIM. Il perno deve essere reinserito nel telaio in modo da non bloccare la rimozione della scheda logica.
-
-
Attrezzo utilizzato in questo passaggio:Tweezers$4.99
-
Usa un paio di pinzette a punta fine per far scorrere la leva di espulsione della scheda SIM verso il lato della custodia.
-
La leva di espulsione dovrebbe apparire così quando hai finito. Il pin non bloccherà più la rimozione della scheda logica.
-
-
-
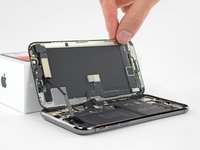
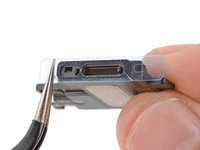
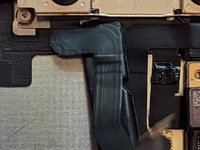
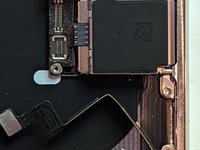
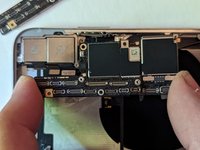
L'assieme della scheda logica è montato su due montanti che passano attraverso la scheda inferiore e sono fissati alla scheda superiore. Per rimuoverlo, devi sollevarlo in modo uniforme verso l'alto per eliminare i distanziatori.
-


Per rimontare il dispositivo, segui queste istruzioni in ordine inverso.
Per rimontare il dispositivo, segui queste istruzioni in ordine inverso.
Annulla: non ho completato questa guida.
Altre 14 persone hanno completato questa guida.
Un ringraziamento speciale a questi traduttori:
100%

Questi traduttori ci stanno aiutando ad aggiustare il mondo! Vuoi partecipare?
Inizia a tradurre ›

Team

15 Commenti
Existe compatibilidad entre la tarjeta lógica del iPhone X y el iPhone XS ??
Es decir, puedo sustituir la del X por la del XS ?
Hi Omar,
In general the answer to that is pretty much always no. Each phone is designed with a customized motherboard made specifically for that phone, along with all of the components inside it. Unfortunately for us, that means there is virtually no possibility of interchange between different models and that holds true for the iPhone X and XS. Each model tends to change the type of parts that are plugged into it, the position of those connections and even the type of connector. Those changes also result in different shapes and mounting points of the logic boards, meaning they won't even physically fit into a different housing.
Hello Jerry,
Thanks for this tutorial, however are there apple brand motherboards for iphone x available on the market? There are numerous items on numerous websites, how can I be sure it's reliable and works properly etc.?
Hi Ray,
Although it's entirely possible for companies (Chinese ones in particular) to reverse engineer iPhone motherboards and components and make a decent copy, the catch is that Apple controls the firmware that goes on them and there are parts of the software that cannot be duplicated. As a result no one but Apple can make a fully functioning iPhone X motherboard, especially not one that is paired to the Face ID components.
However, there is a large market for phones that have been scrapped and scavenged for parts, so there are a lot of places that sell those. Most of the sellers ensure that the motherboards they sell do not have iCloud or SIM locks in place, but you'll want to verify that the seller states that explicitly. And if you want Face ID to work, you have to buy the paired components that go with the motherboard; specifically the front camera assembly and the earpiece speaker assembly on the display.
(Continued...)
(...Continued)
Since all the motherboards on the market are used, obviously you can't be 100% sure that every function is going to work correctly, but the reputable sellers will have tested the boards they sell to weed out the ones with issues. The ones sold on AliExpress, for example are generally tested and should have a guarantee of functionality. There are also reputable online stores that sell the parts as well; go through some of the answers forums to get an idea of which companies get recommendations.
eBay can be a good source to save money, but it's definitely a buyer beware situation, depending on the seller. You'll want to verify the IMEI number on an IMEI checking website to make sure the Find My iPhone function is turned off, that it's not iCloud locked and that it's not SIM locked. In general, the boards are pretty reliable so in most cases if it powers up at all, it will usually work.
So it's like buying anything used; you want to find a reputable seller who will guarantee their product.
Hallo,
Danke für die tolle Anleitung. Wenn ich zwei gleiche Phone X habe, kann ich dann grundsätzlich die Boards tauschen mit der FaceID oder muss ich da noch etwas beachten. Z.B. gleiches Herstellungsjahr usw. oder ist das egal ? Ich habe ein Iphone X mit Baujahr 2017 und eines mit Baujahr 2019. Gruß Harald
Hi Leo,
Yes, you can swap any of the iPhone X parts no matter what year it's made; but only iPhone X, not XS or XR. The other main thing is the screen; if you want True Tone to function you have to either take the screen along with the logic board, or else copy the screen data from the old screen to the new using something like the Qian Li iCopy programmer.
I noticed a previous comment you mentioned if you replace the logic board then features like Face ID would no longer work. If I were to swap a logic board from a different phone to back up the data and then put the original logic board that came with the phone back in would the face ID work again?
Yes, as far as the original board would know, all you did was take it out and put it back in, so it would see everything as it was before. The other logic board you backed up wouldn't leave behind anything that would interfere with the original board's operation.
So yes, you should be able to do that backup without causing problems for the original phone.
@allifmia It all depends on what is wrong with your speaker. If it's an audio chip or motherboard connector problem, then yes, I suppose replacing the logic board would probably fix the issue. However, if the problem is in the speaker itself or the connection between it and the motherboard, then swapping out the motherboard would still leave the same issue in place.
You really need to be sure of the diagnosis about where the fault lies before you go that far. And remember, you are going to have multiple issues just from changing the motherboard, such as Face ID and True Tone no longer working, as well as a genuine parts warning and the loss of battery health information, so changing the motherboard should definitely not be your first choice for fixing a speaker problem.
E' possibile aumentare la memoria? E se si dove si puo' acquistare? Grazie
Generally the memory on an iPhone is not considered upgradable. The parts are soldered onto the motherboard in a BGA package, meaning it takes very specialized equipment and expertise to replace, and even then the success rate is far below 100%. When you take into account the cost of that kind of repair, it is quite likely that you would spend less buying a full Face ID set, including the motherboard, front camera assembly and earpiece speaker assembly that already has the amount of memory you want.
In genere la memoria di un iPhone non è considerata aggiornabile. Le parti sono saldate sulla scheda madre in un package BGA, il che significa che servono attrezzature e competenze molto specializzate per sostituirle, e anche in questo caso il tasso di successo è ben al di sotto del 100%. Quando si considera il costo di quel tipo di riparazione, è molto probabile che spenderesti meno acquistando un set completo Face ID, che include la scheda madre, il gruppo della fotocamera frontale e il gruppo dell'altoparlante auricolare, che ha già la quantità di memoria desiderata.
Hey! I have an issue with my mainboard and it seems very pricy to get a new one. I cant spend a lot on repairing it. Is there any way to retrieve the data if they aren't stored in the icloud memory?