Introduzione
Segui questa guida per rimuovere tutti i componenti dal case posteriore del tuo iPhone 7. Questa guida mostra come togliere lo sfiato dell'altoparlante, i cavi e i coperchi dei pulsanti, così potrai sostituire un case ammaccato o deformato.
Cosa ti serve
-
-
Spegni il tuo iPhone prima di cominciare a smontarlo.
-
Rimuovi le due viti pentalobe da 3,4 mm nella parte inferiore del tuo iPhone.
-
-
-
Usa un asciugacapelli o prepara un iOpener e applica calore per circa un minuto per ammorbidire l'adesivo sottostante.
¿Cuántos segundos son los recomendados?
Sesenta segundos
Absolutely. Just don’t overdo it—the adhesive usually softens up pretty easily. If you are experienced with a heat gun, you’ll have no problem. (If you are inexperienced, it’s easy to cook the display or cause other damage.)
If i use this process, will iphone 7 still be sealed, water/ splash resist after that?
Opening the iPhone's display will compromise its waterproof seals. Have replacement seals ready before you proceed past this step, or take care to avoid liquid exposure if you reassemble your iPhone without replacing the seals.
Can I use a cpb heating pad to soften the adhesive ? If yes how much time and temperature ?
Will doing this compromise the screen protector (Zagg) that I have on my phone?
Hairdryer worked for me but I needed to use a razor to pry it open at the bottom then used the spudger
Is there a reason why you wouldn’t put the iopener over the entire length of the phone, instead of just the bottom corner?
The motherboard is extremely sensitive to heat.
Hello can the head damage the id touch bottom?
After heating opening it stoped working.
Qrizmasex @ gmail . Com
It definitely can. That happened to me.
I just threw a hand towel in hot water, and then stuck it into a plastic bag. Dryers work fine, too.
Thanks for this, the other instructions make it seem SOOOOO simple to open up the case with the suction cup! It actually is hellish. The instruction here about the pre-heating and the required patience really helped!
For those of you who don’t have an iOpener or a girlfriend, I used a ziplock bag with some instant mashed potato inside. It worked perfectly first time and you can fold the bag around the ID button in order to prevent damage to it.
You also get to celebrate by eating the mash afterwards, HUZZAH!
🤣 You made my day Adrian, thank you!
Jicey -
I found this to be completely useless. It didn’t help at all. I had to use a heat gun instead. Waste of money.
I use a rice pack in the microwave. White dry rice in a sock sown or tied, then microwave (1 minute +/-). The dry rice heats and retains heat for a long time. My kids loved them in in bed during cold winter nights.
I have changed now Iphone 5 Battery, IPhone 7 front camera & another iPhone 7 rear camera. The instructions along with the comments are really important. Be patient & read them several times. By using your heated gel pack 3-4 times for 2 mins or so on the bottom end near the touch button you will be able to pry with your razor & then you can use your spudger. Thanks for this great guide.
I would DEFINITELY recommend to NOT use direct heat (hair drier, etc.) on the phone. I used a hair drier to help heat the phone and ended up damaging the home button (would not work after the replacement and I did not touch or take apart the home button). Note that a damaged home button cannot be replaced so I will end up using the alternative “screen” home button going forward with my phone. Instead I would recommend preheating something else (example - metal / coins / ceramic / beads / glass stones / cookware / etc..) to a warm-to hot (but not burning hot) touch and place the heated items on the IPHONE (or visa versa) to heat and soften the adhesive.
I placed the iOpener heat bag over the bottom of the phone, disregarding the home button. Now it doesn’t work. All subsequent procedures went well as I was very careful. I should have read all the posts! Protect the home button from direct heat. Fortunately, now using the Assistive Touch feature is better than buying a new phone or replacing the home button.
It’s better to choose an iPhone back case to cover and protect your phone from bumps and scratches. Choosing premium cases is the best option for long-term safety. If you need ***iPhone 7 phone cases*** then you can check them out!
-
-
-
Applica una ventosa alla metà inferiore del gruppo display, appena sopra il pulsante home.
A wide, single strip of packing tape, well placed, will solve this for you. :)
Last comment works well. Thank you !
Using packing tape for a cracked screen should be included in the description in Step 3.
Cracked screen is most probably the reason you are replacing it.
I agree that using packing tape for a cracked screen should be included in this steps description. I don’t have wide but turned mine horizontal and that worked great.
Bekomme die Oberschale einfach nicht runter! Trotz mehrmaligem erwärmen durch den iOpener und seitlichen bewegen! Weiß nicht mehr weiter!
Wouldn’t that screw up the Touch ID?
The suction cup that is. supplied with the essentials kit doesn’t work that well.
Agreed, the iFixit suction cup was useless. I borrowed one from the sponge holder in my kitchen sink. It lacked a grip so I held it with needle-nose pliers, resting them on a bit of wood to keep pressure off the phone.
ephraim -
I am not getting this open at all! Why an I provided with tools that can't help me ??♀️
I couldn’t get the bottom to lift first, but the left side did, so I started there and worked my way around the horn.
-
-
-
Tira la ventosa fino a creare una piccola fessura tra il gruppo display e il case posteriore.
-
Inserisci l'estremità piatta di uno spudger nella fessura.
This was SO hard for me to do with the spudger. I couldn’t get a gap to insert it because my phone was so cracked (even though I used tape on the front) to get a solid seal with the suction cup. I ended up taking a VERY thin knife and inserting it straight down to make the initial break that allowed me to insert the spudger.
I’ve given up using a plastic spudger to try to open any of these phones. I use a metal one with a flat base and a very sharp end…close to a razor. As long as I’m careful, it won’t slip and scratch the base. It’s much easier than using these plastic spudgers.
mcr4u2 -
I confirm that the plastic spudger it’s not the best tool for this operation. I suggest to use a larger metal tool like a “Jimmy” or “iSesamo open tool” (I used the first one)
Cristef -
Im trying to get the screen off right now and my phone is not cracked and its still a pain
Using a blow dryer was extremely helpful and using the suction cup towards one of the lower edges was also helpful
This is not working for me. How long does the heat need to be applied? Still trying right now…. =/
Apply hair dryer for at least 1 minute. I inserted the tip end of a thin mini screwdriver and with some force, pryed it open and inserted my plastic spudger to continue the separation process. It worked, just be patient.
Please wear protective glasses! My iPhone glass was severely cracked, when separating the glass a corner area of broken glass exploded in my face. Apply transparent tape over the broken glass to contain the shards.
I second Jessica’s January 8 comment. I just finished a battery replacement on my iPhone 7 and this step was the most nerve-wracking part. I ended up using a sharper (but not razor-sharp) metal object to get this done with confidence (tried the spudger and guitar pick but not thin enough). The tool I used was the exact duplicate of what iFixIt calls “iSesamo Opening Tool” in their tool selection. I did the heat up with a hair dryer (after attempts with an iOpener hot pad) and the secret (as Jessica also noted) was to not use the angle of attack shown in the pictures, but to push it in more vertically along the bottom edge while pulling up on the suction cup. From there you can easily lever the tool to the lower angle-of-attack (as shown in the picture). I actually used the metal tool for most of the perimeter as well, just don’t go deep (you don’t need to). Notes: my display was intact, and I was able to pull up fairly hard with a glass screen protector still on it.
This is frustrating. I heated the lower edge with a hair dryer for 1 min on high about 3-4 times. In between each heat cycle, I rocked the suction cup back and forth. I was eventually able to create significant space for the provided tool. This takes a lot of patience. Once the space was created, it was very easy to remove the screen.
use a fingernail, then the blue tool, then the spudger
The iOpener worked just fine for me. Had to keep it on for a few minutes. I also was able to get the suction cup seal right close to the edge, over top of the home button for added leverage. Used the blue tool and transitioned to the spudger. Slow, steady pressure…and patience. ;)
Unable to open an iPhone 7 display assembly. Used gell pack at 150 degrees F. The phone wouldn’t budge when I used the iFixit suction cut. Part of the problem is that the cup doesn’t adhere for long before it looses suction. I suspect it would work better on unbroken glass, but that doesn’t help me now. After spending a lot of time at this, I changed heating methods to a hot air heater. I raised the temp of the bottom end of the phone to, ultimately, 175 degrees, and used a variety of tools to try to pry the glass apart enough to get a spudger (or anything) in, but it didn’t even lift enough for a double-edged razor blade to get in. I’ve been trying this for hours now, and about to give up and throw a lot more money at this to have a service perform the work. I figured that 175 was as high as I should need to go to soften the adhesive without damaging the electronics. Should I have gone higher? I see no mention of measured temps in any instructions or comments.
Have you tried applying tape to the broken screen? This will help a lot with keeping the suction cup on it.
It doesn’t need to get very hot; pulling up on the display is mainly what does the trick. Make sure the two pentalobe screws have been removed and then try the tricks in this step. If all else fails, superglue the suction cup to your display and let it cure, and then pull. Keep in mind you only need a tiny gap to insert a plastic pick and start cutting the adhesive. Good luck!
The trick I found, was to add packing tape right across the bottom over the home button then use hairdryer on the end, then suction cup on the very bottom and it lifted enough to get a gap. No one mentioned how it would be impossible to handle the phone after the hairdryer ;)
Didn’t have an iOpener and 60 seconds on a hairdryer wasn’t doing it for me. Still wouldn’t budge. I had to take a very sharp razor along the seam at the bottom between the speakers. It took about 20 passes for it to separate enough to get the spudger in. Make sure you keep the razor at a 90-45˚ angle and that it goes no more than 1-2mm into the phone. The bottom of the phone is metal, but the casing for the screen is plastic. So if you cut lower than a 45˚ (flat with the phone) you risk cutting into the casing. Apply light pressure when making the passes. I would just do the razor on the flat part on the bottom.
I used a hair drier while lifting up at the same time until I could get the too inside. The seal is pretty finicky. Just take your time and you should be fine. Work the hair drier and the tool all the way around before lifting the screen up and off. There will likely be sealant stuck between the screen and phone. You can just break it with the tool.
This step was impossible for me despite using a blow dryer and having no cracks on the screen. I finally took it to a local repair place and had them do battery replacements for two iPhone 7’s. The girl let me watch her do it. She used a razor blade (just until she had a small opening that she could hold open with her fingernail) and confirmed that she too would have difficulty opening it with a plastic tool and suction cup. The plastic tool was great for prying the rest of it open once a crack was there, but she said she would never try to use that as the tool to initially open it. The tools provided for initially prying open the screen are inadequate.
Hopeless - no chance to get the screen off without any damage. No matter what tools, heat etc.
When the right heat is reached, the easiest way is to use a metal iFlex to create the initial gap, then insert the Jimmy or iSesamo next to it so the gap gets bigger, at this point you can get in with the flat edge of a plastic spudger and slowly slide it in the borders to cut the adhesive. You will still need to force a bit the upper end to separate the screen by pulling it down while keeping up the screen, and twist to the right. I hope this is clear enough. Never apply too much strength too quickly anyway.
I used the short blade of my swiss knife to make an initial opening. Using the sharp edge, inserting about 1 mm straight down and twisting down into a 45° angle. Then I was able to insert the spudger.
This is a difficult step. Fortunately, I had another suction cup from an earlier repair available, so I applied one to each side of the phone. After warming with a hair dryer, I was able to pull the two suction cups far enough away that another person could easily insert the spudger.
The third hand was essential.
I found this tactic to be the best solution for us. I used two suction cups, one on each side of the phone, and another set of hands to get a pry tool under the display. We still had to take our time prior while heating the adhesive, but were able to pry the display fairly easily using the two suction cup method.
Lucas -
It was a really excruciating process of heating, lifting with the suction cup, trying to slide in the spudger/pick, and repeating the process for 20 times or so. But in the end, my patience paid off!
I used a hair dryer, then used a safety razor blade parallel to the bottom edge to push straight down (from the glass side, towards the back) while lifting with the suction cup. I wiggled the blade (top to bottom) while pressing down gently, until I saw a gap that would accept the spudger. It did not take much force on the blade or much wiggling, just patience.
I would skip right to using a single edge razor blade and a hair dryer to create the gap needed for the spudger.
Think plunging the toilet - it did not work for me for a long time. the suction cup would not stay held on a long pull. I found that tiny push-pull repeated motions, reseating the suction cup with each push slowly overcame the adhesive, and contributed heat :). I had it after about 50-70 cycles
seconding this comment from Ted ~~~ “the secret (as Jessica also noted) was to not use the angle of attack shown in the pictures, but to push it in more vertically along the bottom edge while pulling up on the suction cup. From there you can easily lever the tool to the lower angle-of-attack (as shown in the picture).”
I echo what everyone is saying here, the spudger just isn’t good enough for this and neither is a pick. The razor is the best way to go. I tried using a very sharp penknife blade and managed to damage my LCD (somehow!) and the bezel so I ended up having to buy a new screen display as well as a new battery. Think twice before doing this. Be prepared to shell out for a new screen just in case it goes wrong. You’ll also need the heat gun (the iopener was useless). If you do need to buy a new screen, make your life easier and get one with the speaker, forward-facing camera, home button, etc., already attached (you can then replace the home button) or you’ll end up having to transfer all these from your old display.
I finally got the screen up but shattered it in the process. I was replacing it anyway but if the screen is not what you’re replacing, take EXTEME caution. The suction cup and spudger were not working for me to get it started. Thanks to the comments, I used a razor blade and a heating pad and went back and forth, back and forth, between heat and pressure from the blade. Once you get a gap, the spudger works great and the screen comes up easy.
More feedback on this “guide”:
“Pull up on the suction cup.” What does this mean? If I just pull up on the suction cup (with a real one that actually sticks) it just lifts the phone off the table. You need a description of what you are pulling against. Do I try to hold the frame of the phone? Do I try to stick something in the lightning port to pull against? Do I try and get something against the edge of the rounded metal on the edge of the phone (this usually just slips off). What am I pulling against???
I found a combination of iOpener, suction cup and razor blade, all applied at the same time, worked for me and I didn't need to use a hairdryer.
Dumbly, I thought that with the Spudger I'd had to hold the phone from the charging hole while pulling the screen. .. In the end I inserted the two ends of the tweezers(bends the tweezers and may damage it) in the screwdriver holes and pushed the screen out upwards so that I could insert the sharp side of a knife.
This was my first iPhone battery replacement and I can say this was the hardest part.
Be wise, go for a hair dryer and heat up the phone bottom (long enough). iOpener did not work at all for me. Heat up, use the suction cup and push the opening pick under the frame as soon as you see movement along the frame.
Then use the spudger to wander around the whole frame (leaving the pick where it is). Done!
One little corner at a time. Don't try to do the whole bottom at once. I heated with a hair dryer. Applied the suction cup to one side and worked the corner till it started to give. Took a minute or two. Use a magnifying glass to help see when it's starting to come loose. It's not hard to do.
-
-
-
Fai scorrere lo spudger verso sinistra lungo il lato inferiore dell'iPhone.
-
Ruota lo spudger per allargare la fessura tra il display e il case posteriore.
Didn’t have an iOpener and 60 seconds on a hairdryer wasn’t doing it for me. Still wouldn’t budge. I had to take a very sharp razor along the seam at the bottom between the speakers. It took about 20 passes for it to separate enough to get the spudger in. Make sure you keep the razor at a 90-45˚ angle and that it goes no more than 1-2mm into the phone. The bottom of the phone is metal, but the casing for the screen is plastic. So if you cut lower than a 45˚ (flat with the phone) you risk cutting into the casing. Apply light pressure when making the passes. I would just do the razor on the flat part on the bottom.
I used a hairdryer and a razor
The photos are a con. You cannot get a spudger in unless you can lift the screen. You cannot lift the screen because of the adhesive. Using a anything metal will damage the paintwork or the glass edge.
I agree, these guides are half imaginary idealism it seems. A thin metal edge pushed vertically down just a fraction of a mm will cause the adhesive to weaken better than any amount of heat, but affects the final appearance sadly.
-
-
-
Fai scorrere lo spudger lungo il lato sinistro dell'iPhone, iniziando dalla parte inferiore e spostandoti verso i pulsanti del controllo volume e l'interruttore della modalità silenziosa.
Be VERY careful on this next step going up the right side of the phone. There is a ribbon cable 1/3 of the way up from the bottom that is very close to the edge. Do NOT use the blue triangle!!!! Just lightly rotate the spudger to get separation on the edge.
-
-
-
Inserisci l'estremità piatta di uno spudger nell'angolo inferiore destro del dispositivo.
-
Ruota lo spudger per allargare la fessura tra il gruppo display e il case posteriore.
-
Fai scorrere l'estremità piatta dello spudger sul lato destro del telefono per rompere l'adesivo che tiene in posizione il display.
-
-
-
Tira verso l'alto la ventosa per sollevare il display e aprire l'iPhone.
do not pull up pull sideways it will brake
Made this mistake
Somehow my phone turned itself back on during the opening. Scared me a little, like a patient coming out of anesthesia during the operation. I was able to turn it back off. Gotta be more careful where you grab this thing.
-
-
-
Solleva la piccola appendice della ventosa per rimuovere lo strumento dal pannello anteriore.
-
-
-
Fai scorrere uno strumento di apertura lungo il lato superiore dell'iPhone, tra il case posteriore e il pannello anteriore, per rompere la parte restante dell'adesivo che tiene in posizione lo schermo.
The plastic clips mentioned are on the top of the screen being replaced… so not sure why it matters not to break them. Trick here was to pull the screen downwards to open a gap at the top and then insert as shown and raise to break the seal.
This is relevant for other guides than the display replacement guide.
jvalaamo -
-
-
-
Tira lievemente in orizzontale il gruppo display per allontanarlo dalla parte superiore del telefono per scollegare le clip che tengono bloccato lo schermo al case posteriore.
-
Apri l'iPhone sollevando il display dal lato destro, come se fosse la copertina posteriore di un libro.
same dude im such a freak lol omg haha
Are there replacements ribbons?
Has anyone else noticed very small squares of rubber with a circle cut through it (I think they fall off into the phone when dismantling)?
I just replaced my screen and worked out that these are actually a wee pocket that slips over the pentalobe screw holes on the replacement screen. I’m not sure if it’s an additional water resisting mechanism or if it’s to add additional traction for the screws
Thanks, I was wondering where those were from!
Albert -
Same, I only had one fall out and I had no idea if important, and didn’t re-add - because I wasn’t sure where it fell from - but it was definitely from the home screen button….watch it be important. -__-
I just broke cable connecting camera and earpiece speaker to logic board. Be careful with it.
This section is missing a critical step - to lay some Post-It notes or something below the right half of the phone when you swing it open, so the ribbon cables don’t get sliced by the sharp edge of the phone case. I broke the Home Button ribbon cable because there was no strain relief when I laid it open.
I also broke the home button cable and now I have to use assistive touch.
Keep the suction cup on the display to keep it propped up while you disconnect the ribbon cables.
I broke the short ribbon cable that attaches underneath the lower connector bracket. Be SURE when you lift the display, you do it from left to right. I thought I had the phone oriented correctly in my hand, but I was mistaken.
no mention of what you do once u open the book. are the ribbons long enough to lie flat or do we have to keep screen raised while removing screws,, like when we hold screen up 45 degrees while removing 5 screw plat when at top of phone. I only realised how fragile the ribbons are and how important it is to use suction cup to rest screen on an angle so ribbons don't stretch or cut on frame.
thanks for the above comments and probably the most important section. I just hope I closed t before I fdid any damage. its lke the fragility of iPhone 3’s all over again.
I just broke one of the cables… yeah, it is not nice… I’m lucky in the sense the screen is still working, but the button is not.
Trying a cheap screen on Ebay (that contains the cable) do 20$, after that, it’s a new cellphone…
Attention ! J’ai cassé la nappe de la caméra avant !
-
-
-
Rimuovi le seguenti viti con testa tri-wing Y000 dalla staffa inferiore del connettore:
-
Tre viti da 1,2 mm
-
Una vite da 2,4 mm
These screws just spin for me. They don't back out, but the heads aren't stripped either. I've tried applying backpressure to help lift the screws, but no luck
What driver do I need to remove these screws i’m stuck
i cant use, the Y000 it isnt working.
What if I stripped a screw what do I do??
Yep, only the 2.4mm came out, other 3 won’t budge, and worried I’ve stripped the heads. Anyone got any ideas?
It’s the screwdriver bit that is the problem. I had the same issue with 2 Y000 bits not grabbing the screw properly. I fixed it by using a small 3 sided file to slightly grind the groves in the Y000 bit just a bit deeper. Then the bit worked like a charm on these screws.
Use Y000 on all 4. U have to be very sensitive on the 1.2mm screws. Put the bit in the screw, put the left pointing finger on top of the screwdriver and turn the driver carefully to the right until you feel a “bump”, thats the trick :-), then you are able to screw the screw out.
For me the key here was a LOT of downward pressure to ensure the Y000 bit caught in the screw. Not sure i can describe how much exactly, but is was significant. Otherwise the bit would not catch.
What do I do if I Stripped one of them?
Can’t get them removed what to do ?
Managed to get the central one out. The upper one won't move, the lower one I've popped out with some force. This allows you to rotate the cover enough to unplug the various bits. Not ideal, but works. I've tried applying a lot of pressure, using the tighten/ loosen method, but the heads have just got mashed… no wonder Samsung are now No1, sigh…
You need to be careful when just rotating the cover as you can accidentally slice through the two black antennas! You only need to nip them…As you can tell I have done this in the past :/
Filing down the bit worked for me. The tip about putting an index finger on the end of the screwdriver handles and then turning gently until it clicks into place was very helpful! Using these 2 tips I didn't need much downward pressure. Screws are out in a few turns.
Mine came out easily. I placed the screws in the area where the bit goes in my kit so I can keep track.
I use a 28 day pill box and keep every screw separate and reburn to exact slot because they all vary in length, width and can really damage u phone if too long and nt secure if to small. use a magnetised screwdriver, or make the cheap freebees magnetic for a short period by rubbing it up an a magnet. lol
Absolutely ridiculous had to go get a different one just stupid
Was able to get the outer bracket screws out using fine needle nose pliers 90 degrees straight down for the outer ones by pressing down a little and using medium gripping force. Had to take these out first before i could use tweezers on the middle one, for which I had to use tweezers to hold the screw, then rotating the bracket (not the screw) counter clockwise a few mm many times over to slowly unscrew it 1/32th of a turn at a time, repeat. (this loosened middle screw). Think ‘rotating bracket 3minutes/degrees counterclockwise at a time while holding screw in place.) You are gonna need really small/fine pliers and tweezers for this because the heads are countersunk into the bracket.
To help tell if the screw is turning, put a small dot from a marker on the head of the screws. This helped me to know I wasn't just stripping the head.
try heating the iPhone with a hairdryer or a bag of rice or about 60 degrees in an oven for 3 minutes . It has worked for me. If the screws don’t come out while hot the will come out as the iPhone cools.
-
-
-
Rimuovi la staffa inferiore del connettore.
my battery cable connector was stuck to the bottom of this metal bracket plate so be careful when you lift it off
This may have been intentionally done by Apple to make sure the battery gets disconnected before any other connector is disconnected. So always make sure to disconnect the battery before disconnecting and reconnecting the connectors for the display.
So…I forgot to put this bracket back on when reassembling. Now I’ve adhered the display to the case and don’t have another adhesive strip…so I’m wondering: what purpose does this bracket serve? The phone is powering on and seems to work okay.
Am I going to run into trouble with this bracket missing?
Well, that didn’t last long. The phone shuts down without warning. So I guess that plate is important…
I also forgot to put the battery shield in, and adhered the display. I’m tempted to leave it like that. However, your negative experience is a good data point telling me to not be cheap.
Ordered a new adhesive , under $2 shipped from eBay.
Thanks, Josh Martin! Mine was stuck too, so I lifted carefully.
-
-
-
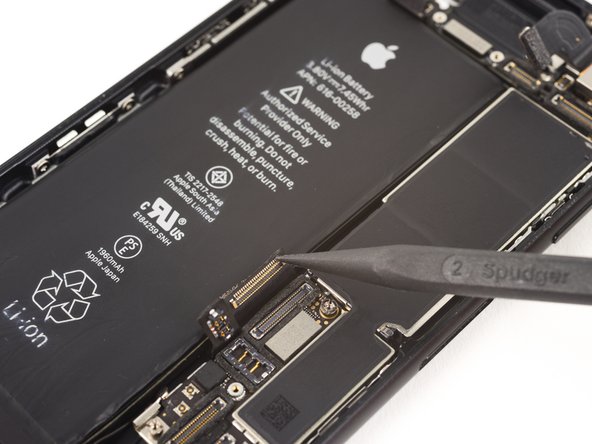
Usa l'estremità a punta di uno spudger per sollevare il connettore della batteria dal suo zoccolino sulla scheda logica.
Was kann passieren wenn man diesses Kabel vergessen hat zu entfernen `?
Reconnecting the battery poorly can cause the iPhone to appear to be properly powered and functional, but then suffer a reboot loop.
I had difficulty after a screen replacement, and the Console app on my Mac showed that the ‘thermalmonitord’ process was throwing lots of errors from not getting any sensor readings from the battery. It would never charge past 1% and just kept rebooting.
The contacts on this conector looked fine so even though I had reseated this connector several times already, I reconnected it very firmly using my thumb and a spudger to really press all the corners and middle and really gave it a good massage and then finally it showed the normal dead battery screen and started properly charging and eventually booted back up to normal functionality.
It seems the battery has to be able to transmit data to the phone to say it’s not overheating or iOS will not allow any current into the battery to recharge it, and the kernel will panic from the null readings and just reboot over and over again.
In my case, the battery connector was attached to the bracket. We just left it connected bracket when we pryed it up.
Reconnecting the battery connector was a bit difficult in my case. The cable that comes out of the battery was a tiny bit too long, or that I placed the battery a bit too high (i.e., too close to the top of the phone). It took me several frustrating minutes of fiddling with the connector for it to sit right into the socket. I was not sure if that was connected correctly but, alas, the phone came back to life when it was turned back on.
VERY IMPORTANT NOTE: Please READ the reply here by jason.
It is very easy to knock off or nudge the little pins near the battery socket, see https://guide-images.cdn.ifixit.com/igi/... and https://guide-images.cdn.ifixit.com/igi/....
Those pins are the data lines to extract battery info: temperature, charge, etc. If you accidentally nudge/knock off them the phone could appear to work normally, even for a few days. But then you will start getting wrong battery reads and then after that it may suffer a reboot loop. If you enter settings > privacy > analytics & improvements and you scroll down you will find panic errors from thermalmonitord that there are missing sensors (TG0B or TGXXX) and you will have to micro solder them. DO NOT NUDGE THEM and double check the socket connector when reconnecting the battery.
after installing new ifixit battery kit, note the foam on the new battery is thicker than old apple one, managed to remove the old foam and swap to new battery connector, sheild plate now level
-
-
-
In questo passo, accertati che la batteria sia scollegata quando disconnetti o riconnetti i cavi.
-
Usa l'estremità piatta di uno spudger o un'unghia per staccare i due connettori inferiori del display sollevandoli verso l'alto dai loro zoccolini sulla scheda logica.
To be honest you don’t really need to disconnect the display cables in step 15 or 16 to get the battery out. Just keep the suction cup on the screen to keep it propped up and to give the cables some slack. The only reason to take these cables off is that it’s a pain to apply the replacement display adhesive with those cables in the way. If you’re not re-waterproofing your phone just leave these attached.
MAKE SURE you hold the top screen when dislodging the cable connections. I let the screen lie flat down and ended up tearing one of the cable connections, now my touch ID does not work at all! I’m going to have to order a whole new screen.
Don’t miss that SECOND CONNECTOR like I did. It will break very easily if not disconnected :(
I replaced the screen and have ended up with a blank screen. Touch control seem to work (touch button works and I can shut down the phone by pressing power button for some seconds and then swipe left to right in the upper part of the screen). But the screen is blank. I’ve tried to disconnect and connect the two connectors in step 16 but with the same result (blank screen). What do I need to do?
Thanks for advice!
this point is the most important in the whole manual.
Please pay attention not to strain the flex cables or they will end up breaking
I should have been more careful - the second cable tore off.
My own fault after having done this replacement about four times previously without any issues, I clearly got cocky and didn’t pay enough attention.
Be VERY CAREFUL and remember to unplug those cables. Don’t skip steps.
I’ve now had to order a replacement screen.
If you replace the screen and there is no display apply io propyl alcohol 99.9 & purse to both connectors on the screen and on the iPhone with a clean toothbrush and let them dry for 45 minutes and then fit the screen and reassemble the iPhone..
It works for me . when I get a new screen I do t5his before fitting it.
I tried to save time by not removing the screen during battery replacement as some comment here, HOWEVER, I ended up having to use a little force to remove the battery and in the process broke the second, lower smaller cable, resulting in loss of home button function and needing to get a new screen. Next time I will follow these steps and completely remove the screen during a battery replacement
I removed the screen and cable still got ripped during reassembling :(
Viktoria -
There is a critical fact missing from the steps here, for reassembly: That bottom (underlying) cable is longer than it should be. Loads of people are reporting that the Home button is dead after this repair, but the cables aren't torn. I'm pretty sure this is why. Here is a picture of the problem.
When reassembling the phone, you must poke this cable back into the body of the phone while you bring the halves together, or you will crush, crimp, and destroy the cable.
I’m only reading your very useful comment now, after the exact thing happened to me and my cable got ripped during reassembling phone. Would you be able helping me naming this part, so I can look for a new one? Thank you very much!
Viktoria -
thanks gavin. ifixit should have included this piece of info.
-
-
-
Rimuovi le due viti Phillips da 1,3 mm che fissano la staffa sopra il connettore del gruppo sensore del pannello frontale.
Has anyone had trouble getting these two screws off? I’ve been working on these for about 10 minutes and the LEFT screw wont spin. It seems like the little PH000 screwdriver bit won’t even grip it. (The one of the right comes off, no problem)
It looks like I’ll have to pick this project up again with a screwdriver that will actually take off this piece.
If you’re having trouble removing these screws;
the screw on the right goes into a standoff screw that is screwed into the frame.The left one goes into the logicboard.
If your phone is used most likely it has been repaired in the past and the person that repaired it put the screws in way too tight.
If your phone is brand new And you know 100% it is then the problem is your screwdriver.Stop before you strip it completely and buy a better screwdriver (EBAY).
If you already stripped the screw head take the phone to a shop before you break it.
there are ways to get them out but truthfully it’s extremely dangerous and sometimes your better off quitting while you are ahead.
I used a #1 flat head tip to loosen.
I couldn’t get the two screws out either—used the correct screw tip and everything. Stripped the screw. Will now attempt to just keep the cable attached…..
Use the PH000 and apply a little more force before spinning, should come right out!
^To anyone having trouble, this is the correct answer. Put the phone on a firm surface, align your driver carefully, press down hard, and twist. As long as your driver is approximately the right size, it’ll come out.
the two screw i have are stripped and i have n way of getting either screws off whats my next bet
The PH000 bit is to large. I can’t get the screws out either which really sucks…now I have to put everything back together, find another bit that will work and try this again another day. Not impressed with IFIXIT’s attention to detail so far :-(
Using iFixit’s driver kit, I prefer a PH00 for this, which is larger than the PH000. If you think the PH000 is too big, something is wrong.
I think part of the issue with the iFixit PH000 is that it is slightly too pointy. The PH00 fits better because the splines engage the slots of the screw before the point bottoms out. The PH000 tip bottoms out in the screw’s center point and the splines don’t engage as well. I have other PH000 tips that are more blunt nose and they work better than the iFixit bit.
PH000 screwdriver didn’t work for any of these screws, or the barometric vent, or the taptic engine. It was too big. I had to use a different screwdriver from another kit I had.
the cable tore. is that it i need a new phone?
You don’t need a new phone, but your selfie camera and phone speaker will not work. You can get replacements for that about $10.
Reconnecting this cable and coverplate took a good 20 minutes. O_O
I also had issues to loosen up the screws, in two parts the right side up and the left side down, i think the PH000 is to pointy or something or its too hard for the srews of the iphone, i cannot take it off and know im regreting i bought i order all the way from Paraguay in south america and know so angry it doesnt work
I skipped this step. Just be really careful not to pull on the screen.
The guide says they changed these to the Y000 “at some point in the t middle of the product’s lifecycle”…
That can’t be true, I have a *day one*, preordered iPhone 7, and mine had, unmistakably, Y000 screws!
and also, I’m just faithfully following the guide here, but can anyone clarify *why* is is necessary to entirely remove the display AND the Taptic Engine at all? The battery seems accessible just fine… oh well
PS- I’m doing this on an older backup iPhone 7. My iPhone 12 Pro just went berserk and stopped working completely a little over a year after I got it day one of its release… since the iPhone X I’ve only had easily breakable, overly sensitive phones. I’ve had every numbered iPhone except for the 8 (I got the X released at the same date) and the 11, and man, are these newer iPhones post X fragile!
-
-
-
Stacca il connettore del gruppo sensore del pannello frontale dal suo zoccolino sulla scheda logica.
Das ist sehr mutig, das Kabel dort so zu strapazieren.
Mich würde das Display daneben stellen und mit irgendetwas stützen, dass es nicht umkippen kann um Beschädigungen an dem Kabel zu vermeiden. Das reißt sehr schnell ein.
Is this the connector for the earpiece, as well? I did the screen replacement and everything worked, except now I can’t use my earpiece… I’m afraid I didn’t fully connect this particular portion.
@victorbui714 Correct, this is also the connector for the earpiece speaker. Check the flex cable carefully and make sure it wasn’t pinched or torn. Make sure the connector socket is clean (give it a blast with some compressed air if needed) and try reseating it. If that doesn’t help, you may want to remove the earpiece speaker and inspect the four springs on the back, and check that they’re intact and making good contact with the four circular pads on the flex cable. Give the pads a wipe with some IPA and try not to leave any skin oils on them. If none of that works, try replacing the entire flex cable/sensor assembly. Good luck!
This is the only connector that is quite easily possible to put back in the wrong way. If you do so, the phone will just get into a continuous loop where it shows the boot screen, goes blank and then shows the boot screen again and again. If this happens, do not despair-just put it back in the right way.
After putting together, I had a continuous loop boot up (as noted above). I saw articles where this (front panel sensor connection) was the reason. I disconnected this connection and the boot up loop stopped. I tried reconnecting several times but had the same problem (boot up loop). However, it turns out that I needed to apply extra pressure when installing until a heard a (faint) second click when pressing down. Note - before I was using the spudger to press the connection together, which didn’t do the job. I ended up using my finger to press harder to get it to click in. Solved that issue.
The ribbon cable on this step is torn. Is this something that can be replaced? Is this only to the earpiece?
The ribbon cable on this step is torn. Is this something that can be replaced? Is this only to the earpiece?
-
-
-
Rimuovi il gruppo display.
When removing the screen, be aware of the two tiny square black rubber grommets on the Penelope screw brackets that secure the screen. They can fall off very easily and be lost without even knowing it (it happened to me, but was lucky enough to find them).
Sorry, I’m so unclear about when to replace the Adhesive tape. Should I put the iPhone 7 Display Assembly Adhesive at this step, or after I’ve replaced the battery?
@victorbui714 Battery first, then adhesive during reassembly, as it says in the instructions. ;)
This is the 3rd screen iv put in my phone and everyone them bust at the top by the camera every time iv bought one of these screen idk if it’s the manufactures fault or what?
@trentb28922 Ouch! That’s not normal. Is your phone’s frame bent? Are you having to use a lot of force when you install the display?
If the instructions are followed step by step, then adding the adhesive comes before changing the battery.
If I had to do it all over again, I'd skip adding the adhesive, because you have to disconnect the battery, plus the two lower display connecters and the front panel sensor assembly connector. It was a nightmare trying to marry the components back together without disturbing the wire prongs, and I don't even want to talk about reinserting the tiny screws that kept twirling around on the tip of the screwdriver as well. It wasn't worth the time or aggravation!!
If you decide to skip this step, just avoid using your iPhone near water.
-
-
-
Rimuovi le due viti Phillips da 1,9 mm che fissano lo sfiato barometrico al case posteriore.
I didn't see the necessity, so I didn't remove the Barometric Vent since I decided I wasn't going to uplug the Taptic Engine, although I did remove screws for the Taptic Engine, but I didn't unplug it. I believe the point of removing the Taptic Engine is to gain access and space to pull the adhesive strips off the battery. If you attempt and are able to remove the adhesive off the battery, then I believe it's NOT necessary to remove the Barometric Vent nor the Taptic Engine.
-
-
-
Usa l'estremità piatta di uno spudger per disconnettere il connettore del Taptic Engine dal suo zoccolo sulla scheda logica.
-
-
-
Rimuovi le tre viti a croce Phillips da 1,6 mm che fissano il Taptic Engine al case posteriore.
My screws are stripped here. Please help, I don’t know what to do!
Hey Salva and Kyle, sorry to hear about all these stripped screws! For help with removing them, check out our guide.
I had my 7 battery replaced by an Apple Authorized dealer. Around 2 weeks after the taptic engine started to make a !&&* of a noise when it was activated (sounded as if it was loose)… then 1 month after that… it stopped working completely. fast forward 8-9 months later, the battery they had replaced just wasn’t holding its charge anymore (phone was spending more time plugged in charging and depleting very quickly = full charge lasted about 1-2 hours). Having bought the ifixit battery and have gotten as far as this step, I could see that all three of the 1.6mm screws were just floating around in the compartment and the taptic engine was just being held on via it’s ribbon lead. WTF?! Screws aren’t stripped and I managed to fix it in again. Why would these screws be floating around like this??
another person checking in here to assure you that, if you find a stripped screw (or more) at this step, you’re not crazy. I have one as well! I’m in dis-effing-belief. This phone has NEVER been serviced by anyone, and was allegedly brand new when purchased.
To the person suggesting a dremel tool to remedy this…. *blink**Blink*. Are you kidding me right now? *slap*. Vibrating the !&&* out of all those sensitive parts - not to mention what one slip could end in your phone being effectively sawed in half.
-
-
-
Svita la vite Phillips che fissa l'antenna diversity del Wi-Fi al case posteriore:
-
Una vite da 3,2 mm
-
-
-
Usa la punta di uno spudger per sollevare i connettori dei due cavi dell'antenna dai loro zoccoli sulla scheda madre.
Hey may i ask…what is the use of both of the antenna cables?i just opened my iphone 7 plus and i found both of the cables are broken.if both of the cables are broken,what does it effect on my iphone?
Speaker and antenna?
I'm missing the black thing from my antenna and I have no signal, could this be the reason why? Is the black thing insulation?
I am having the worst time imaginable trying to reconnect the antenna cable coming from the lightening connector assembly to the logic board. It’s barely long enough and will not snap into place. There’s a minature gold pin sticking up from a circular gold ring on the logic board and I must have spent an hour on this one step. The antenna end has the female end. Everything else went well. The antenna connector from the old lightening assembly will connect relatively quickly. I’m beginning to think the new antenna connector female end might be defective. I’m ready to cut the black antenna wire and try to solder in a longer piece using the old connector assembly. Any ideas? HELP !!!
These can be tricky to reconnect. I found the best way is to hold the connector with tweezers and use the point of a spudger on top of the connector in the other hand. Slowly moving the connector with the tweezers while applying gentle pressure with the spudger, you will eventually feel the connector and its seat line up and you can snap into place. Don’t force it, when it is lined up it is easy so you have to patiently work on aligning it.
please say which antenna is which, impossible to know now
Tip that helped me: remove the standoff screw next to the clip before derouting (or, upon reassembly, rerouting) the cables. This gives you a lot more space to work with! (Note: I only did this on reassembly, so I don’t know if there are any gotchas on disassembly.)
-
-
-
Usando ancora le pinzette, rimuovi i cavi dell'antenna dalla clip sull'altoparlante.
This was an oddly challenging step, lifting the speaker slightly from the top end allowed me to slide the tips of one side of the tweezers in between the cable and the speaker, prying it out rather than grabbing and pulling which feels dangerous.
They break very easily
One cable seems to stay attached to the speaker. Don’t try to pry it off the speaker! This is shown in the video but not in these photos.
-
-
-
Rimuovi l'altoparlante.
Reassembly tip: after aligning the speaker with the bottom edge, instead of lowering the speaker into place, keep the speaker raised slightly and push the cables back into the clip (which were removed in step 28) with the flat end of a spudger. In doing so, though, make sure that the cable from the lightning connector piece remains above the flat metal piece protruding out the left side of the speaker.
-
-
-
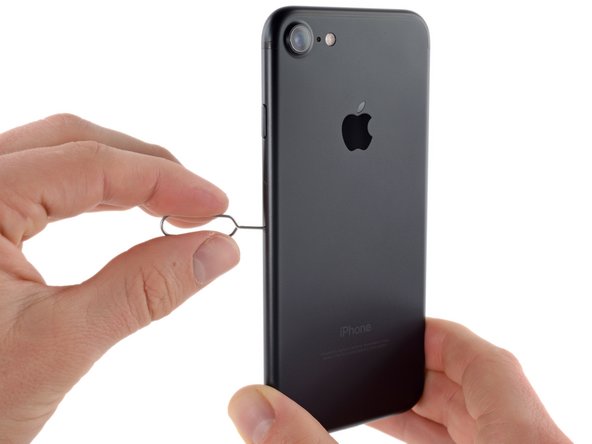
Inserisci uno strumento per l'estrazione della scheda SIM o una graffetta nel piccolo foro nel vassoio della scheda SIM.
-
Premi per estrarre il vassoio.
-
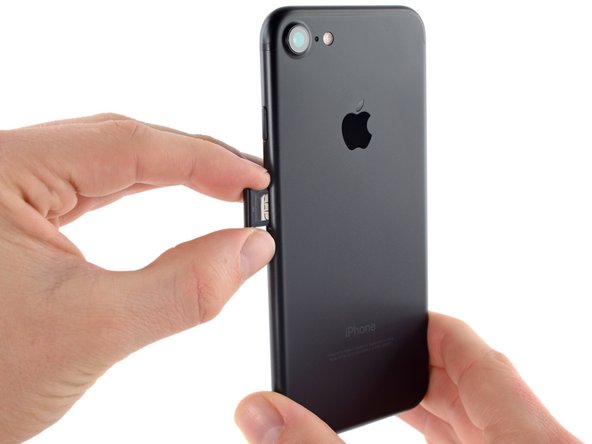
Rimuovi il vassoio della scheda SIM dall'iPhone.
Received a sim card tray from IFIXIT for my iphone 7. I can’t seem to get it to close flush no matter how hard I try. Any suggestions?
Why would it require a significant amount of force? Is it because the iPhone 7 is water resistant? When I removed my tray it was like it was stuck in goop inside the phone and the tray had a glue like sticky substance on it? It did not ‘click’ back in smoothly like my other iPhones, I had to push it against the ‘goop’. Is this normal for iPhone 7??
I used the tip of the super pointy tweezers, and it worked well.
-
-
-
Usa l'estremità piatta di uno spudger per staccare il connettore della fotocamera posteriore.
-
-
-
Rimuovi le seguenti viti Phillips che fissano la staffa della fotocamera posteriore al case posteriore:
-
Una vite da 1,3 mm
-
Una vite da 2,5 mm
-
-
-
Usa l'estremità a punta di uno spudger per far leva e staccare il connettore del cavo del bus dell'antenna, appena a sinistra del modulo della fotocamera posteriore.
There is one Step missing before removing the flash light cable: Remove Camera cable, right?
I broke this and can’t find it on amazon. Is it part of the volume control flash connector? If not, can you send me a link on where to find this connector,…and possible instructions on how to replace?
-
-
-
-
Rimuovi le due viti tri-wing da 1,2 mm che bloccano la staffa del cavo superiore.
these are too tight cant get rid off them from y000
Had to push down to get the Y000 in place
-
-
-
Usa l'estremità piatta di uno spudger per staccare il connettore del cavo superiore.
-
-
-
Rimuovi le quattro viti a croce Phillips di fissaggio dell'antenna Wi-Fi:
-
Tre viti da 1,2 mm
-
Una vite da 1,7 mm
I lost one of these 1.2 mm screws. Will that affect the signal reception?
How do you open the 1.7mm screw? LOL
Yes : 4 screws and not 3 !!
-
-
-
Rimuovi le seguenti viti Phillips:
-
Una vite da 1,3 mm
-
Una vite da 2,2 mm
-
-
-
Rimuovi il distanziale a vite da 2,2 mm dalla staffa di terra.
-
In caso di emergenza, può bastare un piccolo cacciavite a taglio, ma è necessaria un'estrema cautela per evitare che scivolando possa danneggiare i componenti circostanti.
What bit is this? The link doesn’t use the same name.
I hate getting the deep into a repair to find there’s a tool missing. This bit should be part of the toolkit!
Its in the toolkit now. Looks like a Philips head but up close the end is squared off with a point in the middle.
I received two boxes - one box contained the repair part, the other was the tool kit. I only opened the tool kit before disassembling the phone. The standoff screwdriver bit was not in there. Neither was the guitar pick. I used a real guitar pick and a small standard screwdriver from my toolbox. When I was ready to reassemble, I opened the repair part box and guess what was in there - the standoff screwdriver bit and guitar pick. So, I guess if you just order the part it will come with (at least) those two tools. The tool kit contains tweezers, suction cup, three screwdriver bits (tri-point, pentalobe, and phillips) and screwdriver handle, a long black spudger with a flat end and a pointy end, and a smaller, thicker spudger with a wide, flat ends.
The flat end of the spudger works a treat too.
Thank you, bronyar. Since there is a box labeled “Repair Tools”, I never would have looked in the parts box for tools. I was able to use the standoff tool to takie the phone apart, not just to put it back together.
-
-
-
Usa delle pinzette per piegare delicatamente la staffa di messa a terra della scheda logica in modo che non dia fastidio.
I accidentally broke the grounding bracket, is it very important to get a new one to replace? as I can't seem to find them for sale anywhere
I also broke it. Did your phone work after?
Did you find a replacement?
Did your phone work ?
Emin -
I broke mine while doing this step. A bit confusing. You’re just supposed to bend it out the way, not pull on it entirely. Will the phone still work without this?
I just didnt bend this one.. Ill tell you how it went
-
-
-
Disconnetti il connettore del cavo inferiore con la punta di uno spudger.
This is ‘hinged’ on the battery side.
-
-
-
Svita le viti seguenti:
-
Una vite Phillips da 1,4 mm
-
Tre distanziali a vite da 2,2 mm
-
In caso di necessità, può bastare un piccolo cacciavite a lama piatta, ma è necessaria un'estrema cautela per evitare che scivolando possa danneggiare i componenti circostanti.
The lowest standoff screw is different than others, so be careful when reinstaling them
-
-
-
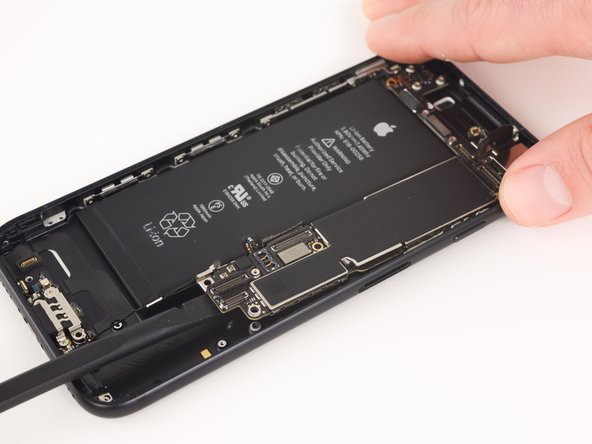
Usa l'estremità piatta di uno spudger per sollevare la scheda madre dalla parte del connettore della batteria.
Assurez-vous à cette étape (au moment du remontage) que le connecteur de l'antenne (que vous voyez à l’étape 35) est bien par dessus votre carte mère et qu’l n’est pas passé dessous !!!
-
-
-
Afferra la scheda madre dall'estremità del connettore della batteria, sollevala verso l'alto e rimuovila dal case posteriore.
Remember to remove the SIM card eject plunger (see step 47) or you may loose it seeing as there is no longer anything to stop it dropping out.
Reassembly note:
Peel up a couple centimeters of the lightening port and plug it in to the logic board *before* seating the logic board. Doing this, you can perfectly line up the connector and hold it to the board as you jimmy everything in to place. This makes the hardest part of the job a no-brainer.
-
-
-
Rimuovi la vite Phillips da 2,9 mm dal connettore Lightning.
Haven’t had any issues with any of the screws so far. Nothing stuck or even threatening to strip. Could it be that people are using the wrong driver bit and getting into trouble that way? You regularly have to swap between tri and normal 4 blade Phillips heads, best to double check each time.
-
-
-
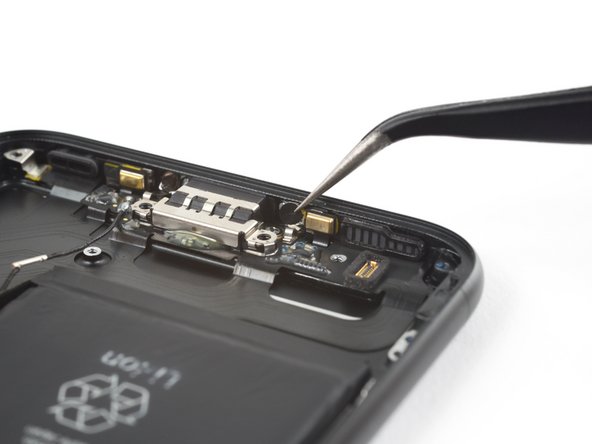
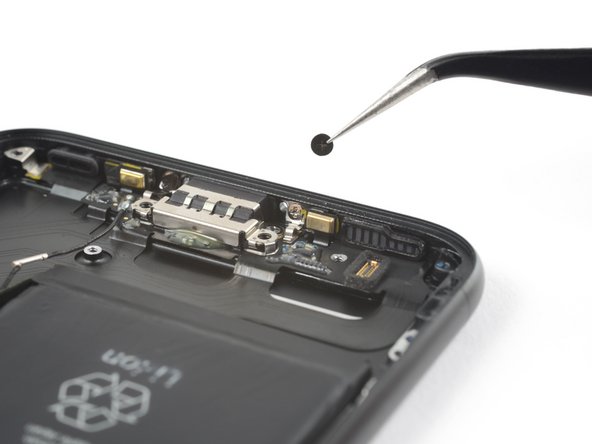
Togli il contatto a molla dal connettore Lightning.
Not sure but dont forget to place it
Scary thought - did you manage to find one?
-
-
-
Rimuovi i due sticker che coprono le viti che fissano il connettore Lightning alla parte bassa del case posteriore.
This step makes the whole guide invaluable! Those sneaky devils hide the screws perfectly!
I just ripped one.Never did a regular 7 thee only iPhone I’ve never done.Im pissd.Not sure if I should just pull another from a good phone or hook it up and see if it still works it looks like there grounding screws smh it’s only because for 2 years I had a used 7 housing I always bump into when going through my parts and whoever had that before me also ripped it but in both spots.So when the charge port wouldn’t come up I broke it smh
-
-
-
Rimuovi le due viti Phillips da 1,2 mm dal case posteriore.
What are these connectors 4? I noticed a tiny chip next to the one on the right if you're looking at the phone face-to-face and on the backside of the charging port is some heavy circuitry for the left side... If the one on the right is broken what can a person expect their phone to do differently? Is this connector on the right hand side of the charging port attributed to anything specifically? Will my phone operate as normal without this?
It should be noted that these two 1.3 mm Phillips screws are different from the other 1.3 mm Philips screws removed in steps 16, 25, 33, and 41. All those screws are identical, but these two have a slightly wider shank so they won’t fit in the others’ bores.
I'm not able to remove these screws with the screwdriver Phillips that was used throughout the rest of this repair. How do I remove them safely?
-
-
-
Usa la punta di uno spudger per staccare i due microfoni dal bordo inferiore del case posteriore.
When reassembling, the right microphone (the one on the left in the above picture) has a metal back that has two alignment tabs. One is on the bottom left, and if you just try to push the microphone down into position it will be held up by the tab. The tab is black plastic and not real apparent unless you have some decent light on it.
Everything popped out when I disassembled mine. I was able to get the spacers apart after the lightning connector was out. My kit came with new ones, but I just used the old ones. As the above comment states, there are alignment tabs on each one that are hard to see. Be sure to use the adhesive strips that come in the kit.
May I suggest not bothering to separate the microphone , and thus avoid dmage, ..juts release the rectangular foam as a complete assembly, its just stuck to the bottom of the case each side. less risky than trying to prize off the micro phones.
issues so far
Ive had one small glitch so far …one the anntenas, the one nearest the battery, came off its base. Im hoping to just reconnect to base to make a contact and secure after with a spot of glue each side…
This step was surprisingly hard - the plastic guitar pick was a bit finer and made it easier. Perhaps some heating helped as well?
I agree with Andrew - just taken the foam bits out and either replace with the new ones that come with the kit or swap over. My tip would be don’t reinsert them until you’ve got the lightning connector in place when reversing steps, as they get caught otherwise.
-
-
-
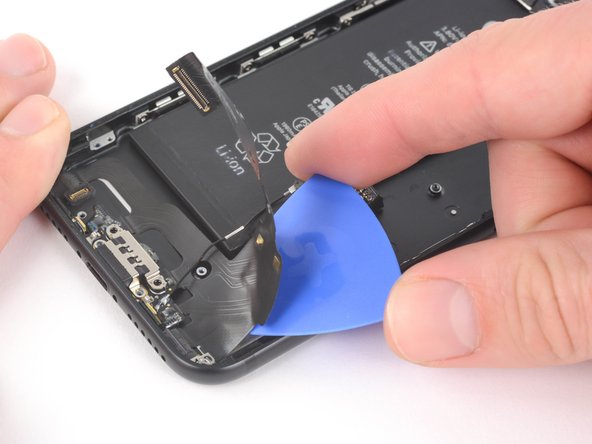
Utilizza un asciugacapelli o riscalda il tuo iOpener per scaldare la parte inferiore del telefono.
-
Aspetta circa un minuto finché l'adesivo sia caldo per procedere al passo successivo.
-
-
-
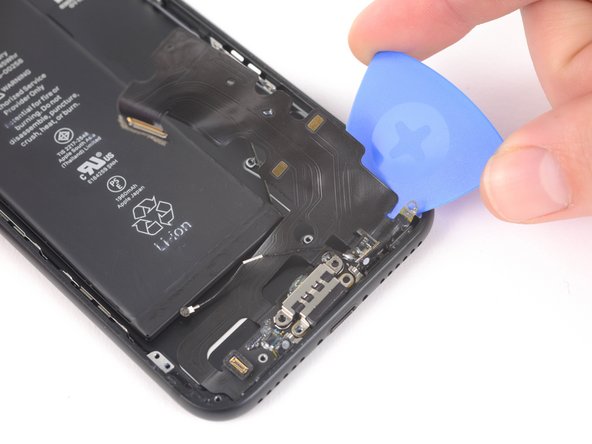
Continua a far scorrere il plettro sotto il gruppo connettore Lightning.
-
Fermati dopo aver oltrepassato la batteria.
-
-
-
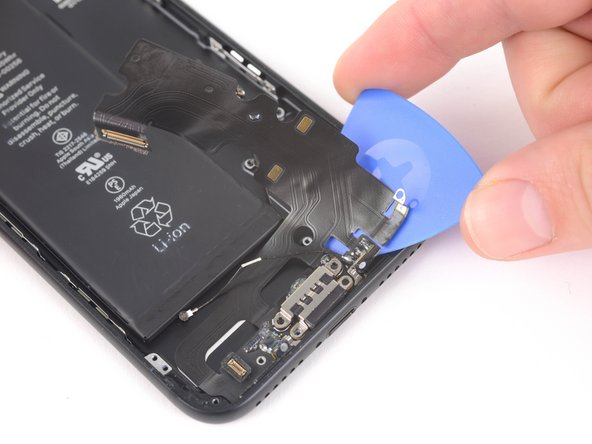
Fai scorrere un plettro sotto il connettore Lightning per continuare a staccare il gruppo dal case posteriore.
-
Fallo scorrere finché il gruppo connettore Lightning non aderisca più al case posteriore.
-
-
-
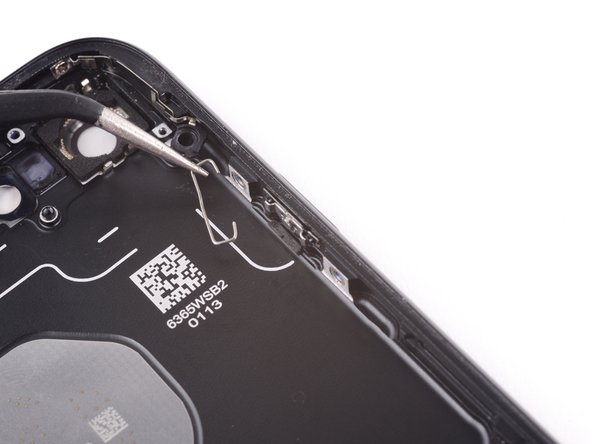
Rimuovi il gruppo connettore Lightning.
-
Utilizza un attrezzo di plastica per staccare ogni adesivo residuo dal case posteriore.
-
Assicurati di posizionare il gruppo connettore Lightning in modo che i due punti bianchi sul case posteriore dell'iPhone compaiano attraverso i due fori tondi del cavo flessibile del connettore Lightning. In caso contrario il cavo sarà disallineato e non sarà possibile riconnetterlo al suo zoccolo sulla scheda madre.
I'd go so far as to say line the holes up first before you secure the rest of that part. There is no room for error here!
Totally agree, it is absolutely paramount that it has to be perfect, as my three attempts at re-assembly can attest to!
-
-
It would be nice to have tips for the best way to actually apply the adheasives on the lightning assembly to beat maintain proper positioning. Otherwise, great guide!
So.. my new lightning assembly had a yellow piece of plastic over the right microphone. Wasn’t sure if it was blocking the opening, so I removed it. Found a small hole in the plastic. Anyone else get one like that?
doubt it will affect it’s function, and since the old one was bad…. can’t be worse than it was before.
i’ll double back once it’s back together.
Plastic liners—yellow or otherwise—should definitely be peeled off and discarded before installing any new parts. You done good. ;)
The gasket is a pain. I’m not even convinced I did it right. The guide stops here and lets you figure out the installation on your own. You can screw yourself if the new connector isn’t placed just right as the connector won’t align. Use the old adhesive areas as guides. I had to take my new part out and install it a second time to get the cable connected. I imagine the usual error is it is too high. The connector ribbon should bend down toward the case just above the connector. Seriously, millimeters count here.
It would be good to have some additional steps explaining how to install the Speaker and Microphone Mesh Set that comes with the kit. I did appreciate that it was included but it took some fiddling around (and almost ruining the seals) before I figured out where the parts needed to go and still I ended up with 2 tiny black gaskets, that looked similar to the microphone gakets, that I couldn’t place and ended up not using. If they were important, I’ll find out soon I guess :D.
all this is great and all, but how do I reinstall all the stuff I took out of the phone. Am I seposed to scroll backward step for step from 64 to 1?
Amazing guide thanks so much! It would be great to show how to reattach the new lightning connector including the mesh bits etc as this is very hard to work backwards through particularly as it looks a bit different to the original
E muito demorado, mas pelo guia da para fazer direitinho.
Waste of two days, the new lightning connector was not recognized by the phone - it did not charge, but the speakers and mic worked fine. I then took it apart again and made sure everything was installed correctly.
Only now, the touch screen no longer works.
So I am back where I was was with a brick.
Awesome guide - my iphone 7 is like new again. BUT reassembly is definitely not simply disassembly in reverse. I found it very necessary to first connect the new lightning connector assembly to the logic board (Step 49) and then place and attach the logic board (Step 50) with the new assembly underneath before sticking the lightning connector assembly into place. If you first adhere the lightning connector assembly, there is zero chance that the logic board connector will be in the right place for connection to the logic board, which is screwed into place and has no freedom of movement. Also reassembly is twice as hard and takes much longer than disassembly.
Followed this great tutorial today to replace the lightning connector (my microphone was greyed and disabled) and installed a new battery as well. Fantastic guide and everything installed and fit well. However, there are 2 issues:
1. Microphone is still disabled so can;t talk to anyone. Bluetooth works fine for calls though. So maybe that replacement was a waste of sorts.
2. Now I get the error that my Touch ID is not activated and greyed out. Can't use the Home button. Is this something Apple/iOS does if you install a 3rd party battery and lightning connector?
-
-
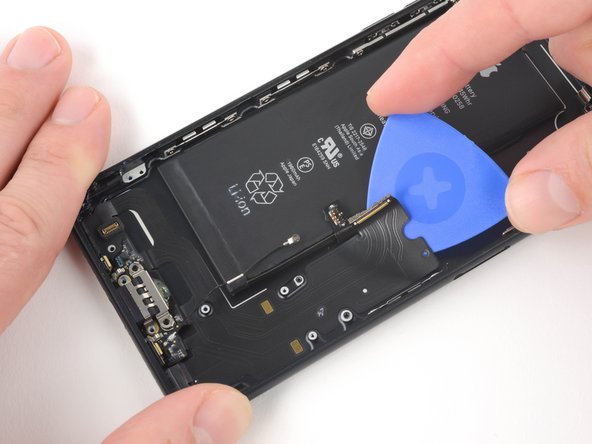
Usa delle pinzette con punte smussate per staccare una delle strisce adesive dal bordo inferiore della batteria.
-
-
-
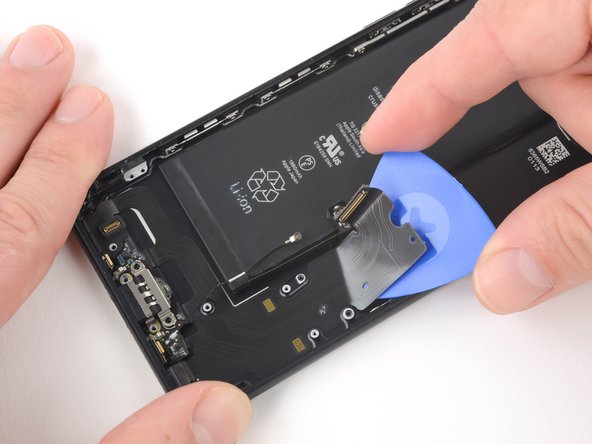
Tira lentamente una striscia adesiva della batteria verso il lato inferiore dell'iPhone.
-
Tira senza pause, mantenendo una tensione costante sulla striscia finché questa viene fuori da sotto la batteria e il case posteriore. Per risultati ottimali, tira la striscia a un angolo inferiore a 60°.
-
-
-
Ripeti il passo precedente per la seconda striscia.
-
Se hai rimosso con successo tutte le strisce adesive, salta il prossimo passo.
-
Altrimenti, se una delle strisce adesive si è rotta sotto la batteria e non può essere recuperata, continua con il prossimo passo.
The adhesive strips come out easily enough with a constant even slow pull. however once pulled out they are pretty useless. should say you will need these again.
Where can I get new adhesive strips, or can I just use a bit of thin double sided tape instead to re-secure the battery? Just a small bit or it will make any future battery replacement difficult!
-
-
-
Prepara un iOpener e applicalo sul retro del case posteriore, direttamente sopra la batteria. In alternativa puoi applicare calore usando una pistola termica o un asciugacapelli.
-
Dopo circa un minuto, rimuovi l'iOpener, gira il telefono e usa una scheda di plastica per rompere l'adesivo che può essere rimasto sotto la batteria.
-
-
-
Rimuovi le seguenti viti Phillips:
-
Due viti da 1,9 mm che fissano il pulsante di accensione
-
Tre viti da 2,3 mm che fissano i pulsanti del volume.
-
-
-
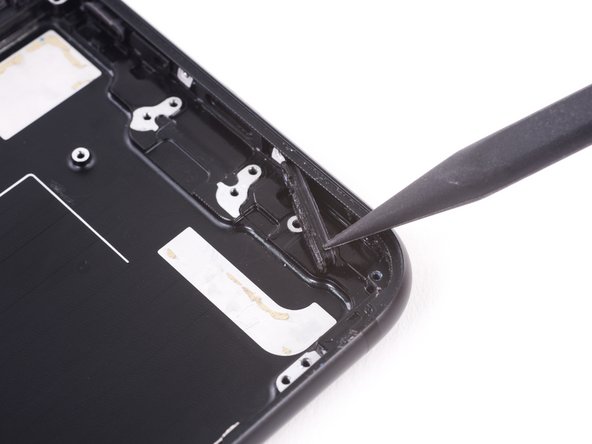
Spingi la clip verso la parte inferiore del telefono e sollevala per staccarla dalla staffa.
-
-
-
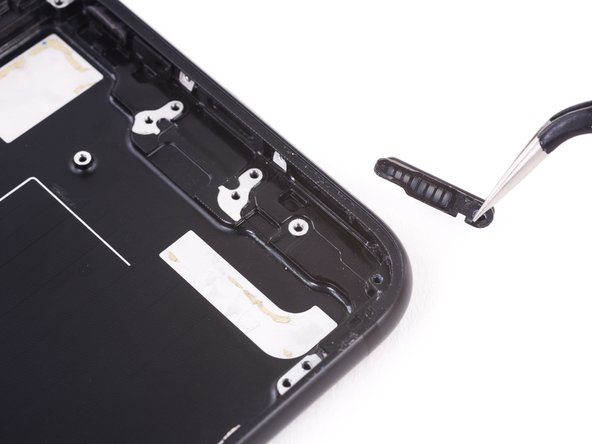
Stacca l'estremità inferiore della staffa del pulsante accensione dal piccolo piolino che la tiene in posizione.
I was having great difficulty on this step with this step with spudgers, flat head screwdrivers, etc. After much struggle I tried hooking the curved end of a Halberd Spudger, and it worked immediately with little effort.
TL;DR - Hook a Halberd Spudger under the bottom right edge and gently pry.
-
-
-
Spingi la clip del pulsante del volume verso la parte inferiore del telefono per liberarla dalla staffa.
Use the small flat end of a screw driver to push up the rt hand side of the bracket once youve removed the wire clip and also use to push up and pre release the lefthand side of the bracket. easier than pliers as it needs a bit of force and its safer as you dont want to break the plastic pins!
-
-
-
Spingi la clip del pulsante del volume verso la parte inferiore del telefono per liberarla dalla staffa.
-
Tira la clip verso la parte superiore del telefono per rimuoverla.
To re install the clips, it is easier to use very small needle nose pliers than needle point tweezers. As, the clips tend to roll in the tweezers.
-
-
-
Fai scorrere la punta piatta di uno spudger sotto il bordo inferiore della staffa del pulsante del volume.
-
Disponi lo spudger in modo che possa spostarsi lungo il case posteriore senza entrare in contatto con il piolino sporgente del pulsante del volume.
-
Ruota lo spudger per far saltare via la staffa dal piolino del pulsante del volume.
-
-
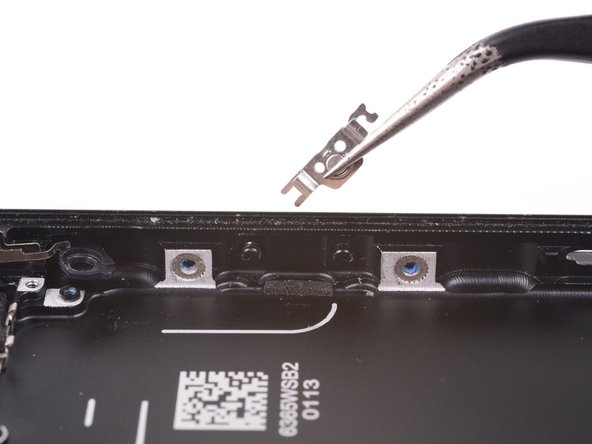
-
Usa l'estremità a punta di uno spudger per spingere ciascuna delle cover dei pulsanti del volume fuori dal case posteriore.
-
Rimuovi le cover dei pulsanti del volume.
Niergends findet man ne info wie der stummtasten hebel ersetzt wird. Baue von schwarz auf rot um aber hier muss ich passen. Ich kann das ding welches man mit dem finger umschwitscht nicht austauschen…
-
-
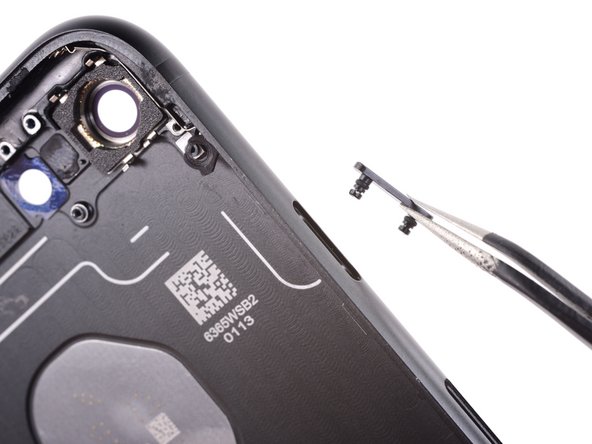
-
Usa la punta di uno spudger per spingere lo sfiato sinistro di gomma dell'altoparlante fuori dal case posteriore.
-
-
-
Rimane solo il case posteriore.
What is the position of screen holding brackets?
-


Per rimontare il tuo dispositivo, segui queste istruzioni in ordine inverso.
Per rimontare il tuo dispositivo, segui queste istruzioni in ordine inverso.
Annulla: non ho completato questa guida.
Altre 71 persone hanno completato questa guida.
Un ringraziamento speciale a questi traduttori:
100%


Questi traduttori ci stanno aiutando ad aggiustare il mondo! Vuoi partecipare?
Inizia a tradurre ›

10 Commenti
Great Guide!
There are some components that may need to be transferred to your new case, which are not in this guide:
1 speaker screens
2 screen mounting catches
3 put the SIM card tray ejector pin back in BEFORE the logic board. I inserted it before mounting the logic board, otherwise the pin may fall out.
Hello everyone!
Has anyone had problems with reception, especially the 4G network, after replacing the body with a non-original one?
thank you and sorry for my terrible english!
Merci tres bon tutoriel tout c’est bien passé
HIW much cost to changing it
How much cost it. Back panel iPhone 7
Couple minor components missed such as speaker/mic mesh and LCD mounting catches but overall great guide!
Can anyone confirm 7/7P's pentalobe screws have a ring of seal near the screw head?
Cooper Chase - Replica
Confirmed, the screws have a black ring seal around the head.
rcheing - Replica
Can’t get the display front
Bernadette Pfeifer - Replica
From personal experience, I highly recommend before doing this procedure or any other, that you do a backup of your phone (preferably local) in case your procedure goes south.
ballina5ny - Replica
I purchased the repair tools with the replacement battery from iFixit. The tools include a screw driver and three heads none were labeled 3.4 mm. I think the one that fit the pentalobe screws was labeled Y000. The guide should identify the screw driver head supplied by the kit not 3.4mm.
Mark Lieberman - Replica
in the iphone 7 replacement battery kit from iFixit, the screwdriver that fits the 3.4 mm pentalobe screws is labeled P2 (and not Y000)
Jan-Tijn Oppermann -
3.4 mm is the height of the screw and is not related to the screw driver code.
Ahmad Vaziri -
the screwdriver PH000 does not work i wasted two screws and now they dont have the 4 cross mark they are now a circle, i buyed it all from Paraguay and it doesnt work, had to assembly back the parts because i got stuck like i mention with some screws, well im just going to send to a professional to install, thanks
Martin Frutos, Nuñez - Replica
The bottom screws are Pentalobe, not Phillips.
Bram Driesen -
Before starting, I would recommend backing up your Iphone’s data just in case.
Jon Moylan - Replica
If you managed to make it to this section, just send the phone into apple for 50 + 6 dollars shipping. The ribbon cables on the screen are designed to break. I can literally twist on the rest of the cable and it won’t fall apart but there is a diagonal section where it snaps. This is the fault of apple and the fault of ifixit for misrepresenting the fragility of the cables.
Ryan Huebert - Replica
Had to reheat it a few times for a minute each with a hairdryer to get the seal to break after pulling and rocking the suction
Cynthia Lamb - Replica
I’m technically challenged. Is there a premier national service who can professionally install a replacement battery got my 7 +?
Richard - Replica
Do the screws come out in total?
YVES THEUGELS - Replica
They may come out or may not. If you loosen as much as you can and they don't come out you should still be able to pry open the bottom. Once you get the screen off you can then push the screws out from the inside.
Anthony Falabella -
Is it the P2 you should use for the bottom??
YVES THEUGELS - Replica
I heated the bottom of the phone with a hairdryer and then used a syringe to put a couple of drops of acetone directly into the bottom two screw holes. I GENTLY pulled on the screen with the suction cup and used the pry tool to GENTLY separate the screen. The sealant is applied around the entire display so be very careful pulling it off so you don’t break the fragile display cables.
Anthony Scaminaci - Replica
At first it was very difficult to open, per instructions. I used a heat/ice pack and nuked it for 1 minute. The pry tool wasn’t working so I carefully used my pocket knife to wedge the cover open. The rest of the procedure went well until I cracked the glass while trying to get the top right corner to pop off. Other than that mistake, all went well. Tip: before setting the new battery, attach the battery connector first and leave enough room for the taptic engine, or better yet, place the taptic engine before adhering the replacement battery. This way you’ll have a small gap between the two, whereas mine barely fit. Good job on hosting the video, Gwendyl.
Klaus Preiss - Replica
I love the fact that the screw bit and shaft are magnetic! I almost lost a screw and found it attached to the magnet.
I used a heat/ice pack and nuked it for 1 minute. At first the display cover was very difficult to open with the pry tool, per instructions. The pry tool wasn’t working so I carefully used the blade of my pocket knife to wedge the cover open. The rest of the procedure went well until I cracked the glass while trying to get the top right corner to pop off. Other than that mistake, all went well. Tip: before setting the new battery, attach the battery connector first and leave enough room for the taptic engine, or better yet, see the taptic engine in place before adhering the replacement battery. This way you’ll have a small gap between the two, whereas mine barely fit because I placed it almost too low.
Good job on hosting the video, Gwendyl.
Klaus Preiss - Replica
I replaced the lightning connector assembly and reassembled. The old one did not 'click' into the cable and had corrosion inside, it needed the cable to be placed in a specific way to charge. The new part - does not recognize that a charger is plugged in at all.
I backtracked the assembly - took it apart, put it back again - and find that every thing on the part works - the mic, speakers, taptic engine.
The original problem with the cable still persists. Any ideas?
H K - Replica