Introduzione
Segui questa guida per sostituire la batteria del tuo controller Sony DualSense.
Se la batteria è gonfia, prendi precauzioni appropriate.
Nota: questa guida riguarda gli attuali controller DualSense con ID FCC che terminano con A. Guarda sul retro del controller per verificare il tuo modello. Se il tuo termina con 1, è uno dei primi modelli e saranno presenti differenze interne. Segui queste guide per la versione precedente.
Cosa ti serve
-
-
Inserisci un plettro di apertura sotto al frontalino nell'angolo in basso a destra del controller per liberare i ganci che lo tengono attaccato alla custodia.
-
-
-
Fai scivolare il plettro di apertura lungo il bordo in basso a destra del frontalino per liberare i ganci che lo tengono attaccato alla custodia.
-
-
-
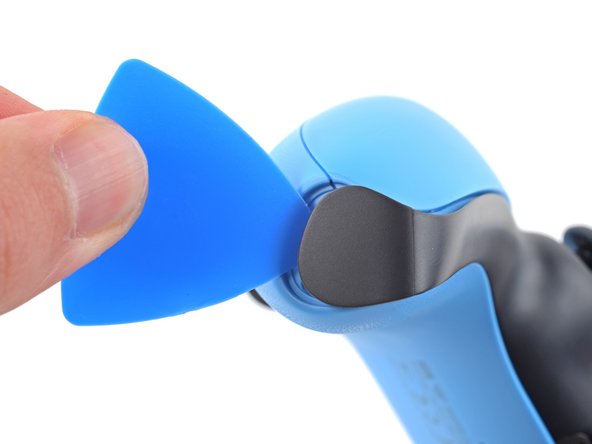
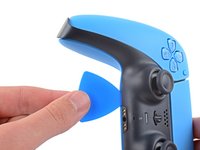
Inserisci un plettro di apertura sotto al frontalino nell'angolo in basso a sinistra del controller per liberare i ganci che lo tengono attaccato alla custodia.
-
-
-
Fai scivolare il plettro di apertura lungo il bordo in basso a sinistra del frontalino per liberare i ganci che lo tengono attaccato alla custodia.
-
-
-
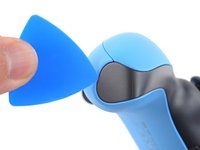
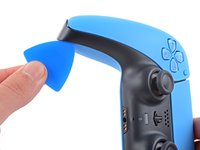
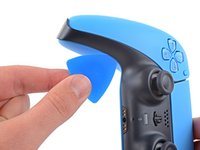
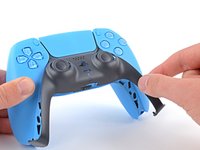
Usa le dita per sollevare il bordo inferiore del frontalino per liberare i ganci restanti.
-
Solleva il frontalino oltre i joystick per rimuoverlo.
-
-
-
-
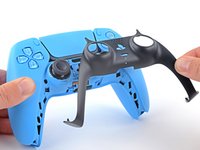
Inserisci l'estremità piatta dello spudger nello spazio sopra il pulsante L1.
-
Fai leva sullo spudger verso l'alto per rimuovere il pulsante L1.
-
-
-
Inserisci l'estremità piatta dello spudger nello spazio sopra il pulsante R1.
-
Fai leva sullo spudger verso l'alto per rimuovere il pulsante R1.
-
-
-
Utilizza un cacciavite a croce Phillips per rimuovere le due viti da 6,5 mm che fissano gli angoli inferiori del case inferiore.
-
-
-
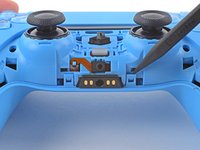
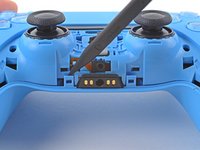
Usa il bordo appuntito di uno spudger per sganciare le due clip su entrambi i lati del jack delle cuffie.
-
-
-
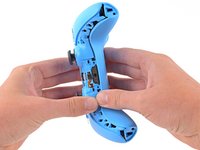
Usa le mani per estrarre con cautela il case posteriore dal controller.
You can´t just grab both ends and expect it to open flawlessly, first you gotta travel the spudger around the seam at the outer edges of the controller, there are multiples clips in that area, there a couple really hard to get out at the outer edges of the R1 and L1 buttons, for those you need to insert the spudger bending outwards the bottom piece of the controller (a fairly amount, like 1.5mm) and while bending outwards use the same inserted spudger to lever them apart carefully, the plastic will bend quite a bit so be very careful with the motion of the spudger.
Yet again, that was my personal experience opening it up, try first as the guide says, if you feel the upper and bottom pieces glued around the R1 and L1, then try this.I had the same experience, the best way to reach these for me was to place the spunger from L1 R1 side whilst using a spunger to press outwards from the side like in Carlos's comment. Thank you Carlos I was struggling with this!
This did not work for me. Finally I just pulled the two parts apart at the bottom side, carefully twisting and manipulating until the parts clicked loose at the top side
This is the biggest hassle in the whole process. It seems that all controllers now come with those extra clips that other people mentioned here. I, however, didn't have the same success with their steps of running a spudger on the sides to undo the clip. Looking around, I found this Youtube video showing that you can undo the clips simply by twisting up from the bottom. Do it carefully because it pops off easily using this method - when I did, I used some force and the back just flew from my table.
I found it easier like that and was able to continue the process.
+1 to this. None of the suggestions worked well enough for me, but this video clip got this step done for me nearly instantly. note the position of the tech's fingers and thumbs - I copied that exactly and had no issue.
Nathan K -
-
-
-
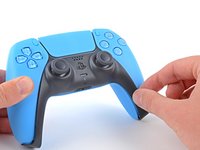
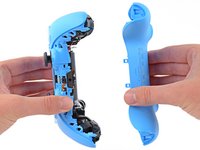
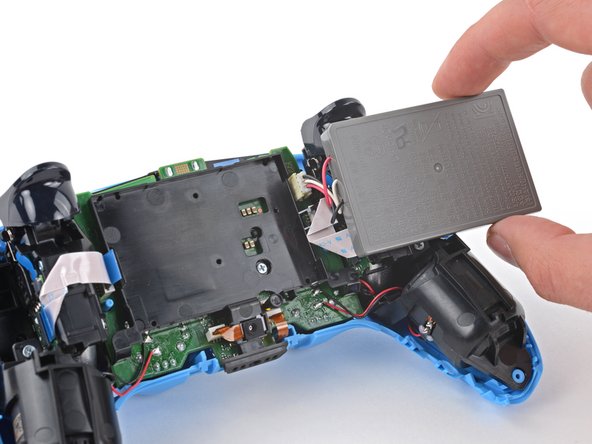
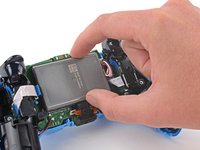
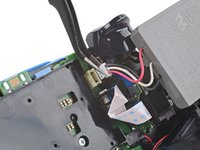
Solleva la batteria dal supporto e riposizionala a destra per un migliore accesso al connettore della batteria.
-
-
Attrezzo utilizzato in questo passaggio:Tweezers$4.99
-
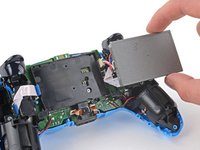
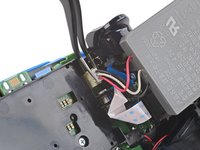
Usa un paio di pinzette o le dita per scollegare la batteria dalla scheda madre.
-


Per rimontare il dispositivo, segui queste istruzioni in ordine inverso.
Porta i tuoi rifiuti elettronici a un riciclatore certificato R2 o e-Stewards.
La riparazione non è andata come previsto? Prova alcune risoluzioni dei problemi di base o chiedi aiuto alla nostra comunità Risposte.
Per rimontare il dispositivo, segui queste istruzioni in ordine inverso.
Porta i tuoi rifiuti elettronici a un riciclatore certificato R2 o e-Stewards.
La riparazione non è andata come previsto? Prova alcune risoluzioni dei problemi di base o chiedi aiuto alla nostra comunità Risposte.
Annulla: non ho completato questa guida.
Altre 3 persone hanno completato questa guida.
Un ringraziamento speciale a questi traduttori:
100%


Questi traduttori ci stanno aiutando ad aggiustare il mondo! Vuoi partecipare?
Inizia a tradurre ›

Un commento
The guide was very helpful for most everything. I did have trouble prying off the back plate, what wasn’t clear was that clips near the L1 & R1 need to be pried ~ 1.5 mm with a spudger in the direction of the face buttons and not the back plate.