Introduzione
Segui questa guida per rimuovere con sicurezza la batteria incollata del tuo MacBook Pro con l'aiuto di un kit iFixit dotato di liquido antiadesivo. Il solvente è studiato per ammorbidire la colla che tiene ferma la batteria, permettendoti di toglierla con maggiore facilità.
L'antiadesivo iFixit è infiammabile. Esegui questa procedura in un'area ben ventilata, non fumare e non lavorare vicino a una fiamma libera.
Per minimizzare il rischio di danneggiamenti, accendi il tuo MacBook e consenti alla batteria di scaricarsi completamente prima di iniziare questa procedura. Una batteria al litio-ioni carica può creare un incendio pericoloso e incontrollabile se viene forata accidentalmente. Se la tua batteria sembra gonfia o ingrossata, prendi adeguate precauzioni.
Nota: il solvente usato per sciogliere l'adesivo della batteria può danneggiare alcuni tipi di plastica. Segui con cura le istruzioni e stai molto attento quando applichi l'antiadesivo.
Cosa ti serve
-
-
Accendi il tuo Mac e apri Terminal.
-
Copia e incolla il seguente comando (oppure digitalo esattamente) in Terminal:
-
sudo nvram AutoBoot=%00
-
Premi [return]. Se richiesta, inserisci la tua password di amministratore e premi di nuovo [return]. Nota: il tuo tasto return può essere etichettato anche come ⏎ o "enter."
-
sudo nvram AutoBoot=%03
-
-
-
Richiudi il display e ribalta il laptop mettendolo a faccia in giù.
-
Usa un cacciavite pentalobe P5 per rimuovere le sei viti che fissano la cover inferiore, delle seguenti lunghezze:
-
Quattro viti da 4,7 mm
-
Due viti da 6,6 mm
So this need to replace each and every screw in its exact former position explains exactly the excruciating difficulty I am having in getting the set of four shorter screws screws back in after everything else having gone successfully. Wanna scream at the top of my lungs. Maybe this point needed to be made in all ALL CAPS and BOLD for me. So can I still just start over trying each screw in each hole or have I messed up the threads in trying to screw in screws mismatched to their holes?
The front screws are at a slight angle, pay attention when putting them back!
I did not have the magnetic project mat, but instead I stuck loops of blue painter's tape on the table, wrote the step number on them in sharpie, and stuck the screws/covers for the corresponding step on them.
-
-
-
Posiziona e quindi premi una ventosa vicino al bordo anteriore della cover inferiore, tra i fori delle viti.
-
Tira la ventosa giusto quanto basta per aprire una piccola fessura sotto la cover inferiore.
-
-
-
Tira la cover inferiore con decisione verso la parte anteriore del MacBook (allontanandola dal lato con le cerniere) per separare l'ultima delle clip che trattiene il case.
-
Tira prima da un angolo e poi dall'altro.
I found it easier to insert a screwdriver through the hole (not too far down), and use that to pull sideways, as it was hard to get a strong grip with my fingers.
If you have a black stick, or a nylon probe tool, you can insert it at the back at the point closest to the screw holes, and use that to push the lower case forward. I’ve seen this help me quite a few times, and it makes it quite easier.
I like adrianbrown's suggestion. Spot on!
Its difficult if the side catches arent released properly, check them again if it seems too much.
I snapped one of the spring loaded logic board grounding pins. Take your time. Leverage from the back in order to push it out versus pulling on it.
Take the opening pick and stick the edge down behind the hinge all the way to one side, so it is perpendicular to the case, and give it a twist. That end should pop free. Do the same on the other side and there you go.
This step requires a lot of force to slide the back cover away. Make sure you get a good grip of the mac body and of the back panel.
I literally cut myself with the bottom case, when it finally got freed from the upper case. I have opened a lot of macs, phones, and other items in my life, this was a first. Some light duty cloth gloves next time.
I didn’t understand some suggestions above. Tried Indawg Wetrust but didn’t really get it. Now looking back, it means use the pick just on the tiny lip of the cover, close to the hinge. Not on the antenna, but just on th slip of metal I believe. If that can help others.
-
-
-
Rimuovi la cover inferiore.
-
Disponilo in posizione e allinea le clip a scorrimento vicino alla cerniera del display. Premi verso il basso e fai scorrere la cover verso la cerniera. Lo scorrimento si dovrebbe arrestare non appena le clip si agganciano.
-
Quando le clip a scorrimento sono perfettamente agganciate e la cover sembra correttamente allineata, premi con decisione la cover stessa per agganciare le quattro clip nascoste. Dovresti sentire lo scatto quando le clip si bloccano.
I am doing a battery replacement for a client on this model. The battery has swollen more than I have ever seen before on a Mac! Roughly a ½” higher, once cover removed. Cover was so tight that one screw stripped and had to drill out one screw after trying everything else! Fortunately, I’m an exmechanic/machinist and I own a full size drill press! None of the screw extraction tools sold by ifixit worked or were applicable until I finally got the cover off. Then the small screw pliers from Japan were easier to use than anything else I own. My tools are mostly for larger nuts, bolts and screw extraction. Possibly a mini hammer driver screwdriver would work if one could be made small enough for tiny screws! Ross
-
-
-
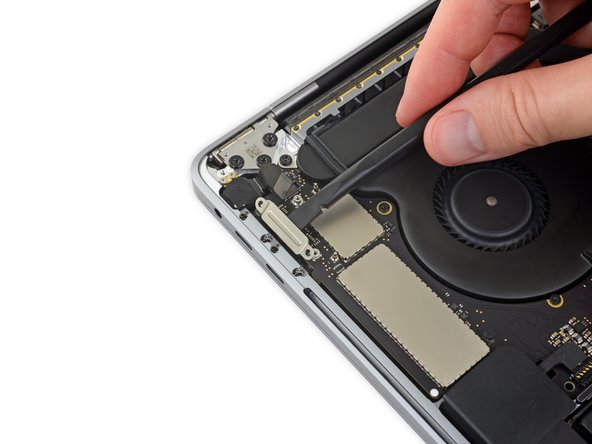
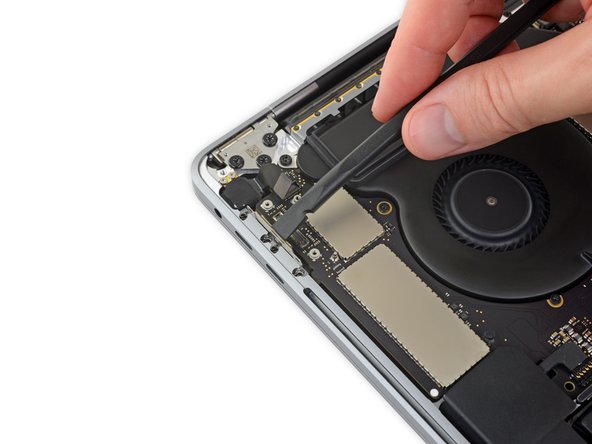
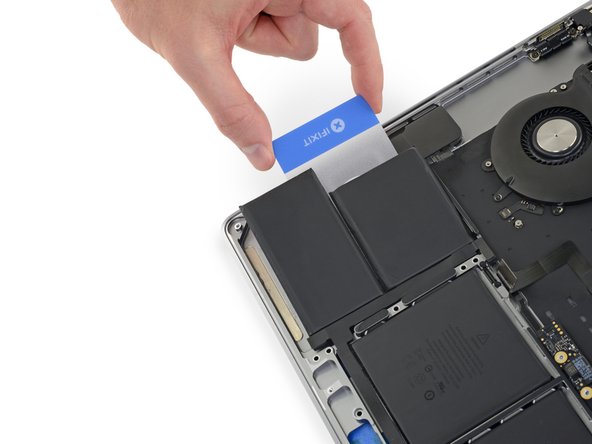
Solleva e rimuovi la grande cover rettangolare della scheda della batteria, sul bordo della scheda logica dalla parte più vicina alla batteria.
-
Se la cover non si stacca facilmente, applica una modesta quantità di calore con un iOpener, un asciugacapelli o una pistola termica per ammorbidire l'adesivo sottostante e prova di nuovo.
What is the though behind this step? I have replace my trackpad before, and I did not do this step. At the time, there was no guide. As a result, I’m wondering how this changes/or if it is necessary for the repair process.
It’s necessary in order to disconnect the battery. Always disconnect the battery before making repairs.
I found my one of my fan making some noise, when open the bottom of my Mac I see this piece floating over the fan. Trying to put it back where it goes but don’t seem to stick anymore and move around. Does this piece is really necessary or I can simply remove it or order a new one from you?
It should be pretty easy to reattach. Put a dab of rubber cement or a bit of double-sided tape on top of each of the screws underneath the cover, press the cover down, and close up your MacBook. It should stay put. Don’t use superglue or anything else that will harden over the screw heads and make it impossible to fit a driver in there later.
Do you know if this piece is necessary. I lost mine.
My Macbook doesn’t appear to even have this piece.
This cover is not attached to anything critical underneath, so do not be afraid that you can break anything like pulling anything from the mainboard. Just pull it out. To reattach, I removed the old double side adhesive tape and replaced with fresh one.
-
-
-
Stacca il nastro adesivo che copre il connettore del cavo dati della scheda della batteria.
The replacement battery did not come with the “tape” in this cable so it was very difficult to reinsert the cable into the zif socket. Now I can’t get the replacement battery to charge.
I have the same issue, My battery is not charging. Did you figure out how to get your battery to charge?
In my case, the original replacement was faulty. iFixIt sent an RMA without hesitation, and I am happy to report that the new one works fine. But also recheck this step and steps 13/14.
J D -
Note that the tape covering that comes on the OEM battery is not included in the battery sent from iFixIt. I removed it from the old and attached it to the new, but it does not “re-stick” very well, so it’s rather difficult to re-insert. Be careful, the ribbon is fragile.
I broke the locking flap! Also, my original tape lost its stickiness as well. I cut out a small piece of electrical tape to keep the cable snug in place. Also will work to keep it secure since I broke the locking flap.
I was able to reinsert the cable easily a number of times with the nice Ifixit angled tweezers as the ziff connectors tiny latch came off! I ended up using a bit of Pliobond 25, contact cement to mke sure the data cable doesn’t move. A future repair will just pull off or at most need an xacato blade knife to slit the rubbery cement. Ross
REALLY important. You need to really pull this back in snug for things to work when you reassemble.
I didn’t seem to have any tape covering it, I just proceeded to the next step
My battery board connecter is broken. Let me know where can I get these cables.?
I recommend to just lift a little the right end (end of the cable side), then keep the socket in place with a spudger while removing this adhesive tape, to avoid any accident like ripping off your socket. With a little care, it is safe and easy to remove completely.
-
-
-
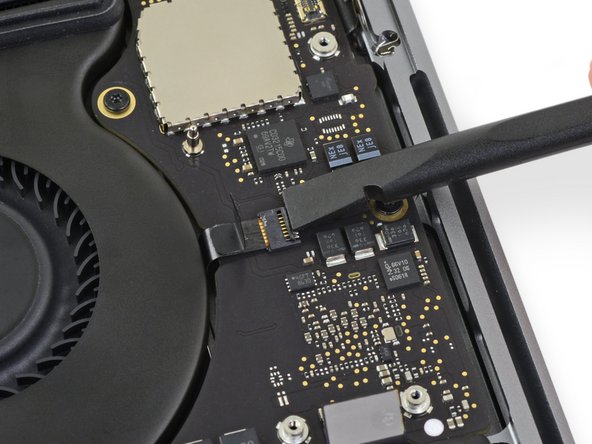
Usa uno spudger per alzare delicatamente la linguetta di bloccaggio del connettore ZIF del cavo dati della scheda della batteria.
Mein Sicherungsbügel ist abgebrochen, oder zumindest nicht mehr auf dem ZIF-Stecker. Ist dieser Sicherungsbügel sehr wichtig, oder kann ich das Kabel dennoch zurück stecken?
Hallo Fabio, wahrscheinlich wird das Kabel ohne den Bügel nicht mehr halten. Das Zurückstecken geht, aber es bleibt nur sehr fragil drin.
My zif connector was already open. It apparently never got closed during manufacture. Being so tiny this made it difficult to see why there was nothing to pry up with the spudger. Once I put my finger on top of it I realized the flap was already verticle.
I had no issue here but I recommend to use a second spudger to keep the rest of the socket in place while GENTLY lifting the lock. It should lift without effort.
When putting it back, be careful, there might be a little piece of transparent adhesive foil on top of the socket, gently lift it up on the side of the cable. The cable should slide in easily, but do not force it. About 0.5mm of the cable contacts will be VISIBLE on the left side, when the cable is fully it, do not force it more than that.
コネクタのプラスチックが割れたのですが、代替品を教えてもらえませんか?
-
-
-
Scollega il cavo dati della scheda della batteria facendolo scorrere fuori dal suo zoccolo.
-
Tira rimanendo parallelo alla scheda logica, in direzione del cavo.
If this breaks, what’s the risk to the computer?
I tried powering mine on after my zif connector socket broke. It made bad electrical noises. I had water damage at one point and cleaned the unit very well but never replaced the battery. Through excesive, a hot and bad battery, or water damaged weakening the area mine came right off with the tape when i peeled it up. Im working on finding the part and will attempt to solder it back. Of course i still need a battery which ours was swollen. After water damage it worked great for over a year though.
Mine broke and now the Macbook will not power on, this was after a battery replacement, the Macbook powered up afterwards, but after transporting it, it would not power up. I removed the back cover and noticed the battery board cover was missing and the zif gate for the battery data connector was half off.
Same here, I broke the cable which was soldered on the mainboard. I tried to hold it on place with a tape, but I couldn‘t charge my macbook though. Then I tried to solder it and I also failed. I wish I had read the comments before :/
I couldn‘t find the fpc 6 pin connector with 0,5 mm grid. However I managed to connect the flex cable directly on the mother board with 0,3 mm isolation filament! It was tough but I‘m so happy that it works again :)
Would you be able to give a little instruction on how you were able to make this work? I’m super curious and need a solution to the same issue.
Tim -
Surprised by the tolerance of this little connector to my mistake of not flipping up the not very noticeable clamping element on side opposite to where the contact tip is inserted. The contact tip pulled right out without having done that. Saw in a video I should have done that before pulling the contact tip out. Remembered when reinstalling it.
The cable is stuck on the board underneath with adhesive, so it is best to first work it a little from left under (as the picture is oriented) in order to break the adhesive, and then pull it sideways. At all times, I kept the socket safe with a spudger to avoid ripping it off the board. The cable will come out with a little effort. Remember, it is the socket you need to take care of, not the cable (the cable will be thrown away with the old battery).
I had issues in reassembly - the lever for the ZIF socket was missing. I think it came off with the tape. I found the lever, but it was way too small for me to reattach (I couldn't hold it well enough with the tweezers and wasn't sure where the hinge pins went).
The computer did not recognize the battery or recognized it with errors (if I got the cable just right) without the lever.
My solution was to cut a tiny bit of electrical tape and put it on the back of the ribbon cable to make it thicker. This gave it enough traction to stay in the socket and pushed the ribbon onto the contacts.
-
-
-
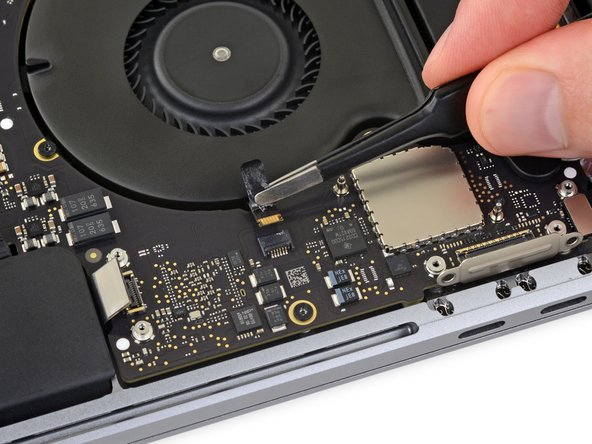
Usa un cacciavite Torx T5 per rimuovere la vite a testa piana che fissa il connettore di alimentazione della batteria.
-
-
-
Usa uno spudger per sollevare delicatamente il connettore dell'alimentazione della batteria, scollegando la batteria stessa.
wondering if i didn’t heed this warning close enough. mac not powering on. only black screen with battery and lightning bolt beneath it. What happens if this connector makes contact?
im in the exact same boat right now.
Was everything okay in your case?
Same here until I realized that I never reconnected the tiny power button/Touch ID connector in step 31! It’s underneath the headphone cable jack from step 30. Mine was hiding under the board and I carefully fished it out with a tweezers.
ajm0824 -
I have the same issue. Followed Instructions to theT. Battery is connected properly as it fully charged however, it will not power on. If i disconnect the battery and connect the power adaptor, it powers on. How did you resolve your issue?
Ian Duff -
Hi, did you manage to fix this? Ive got the same issue sadly.
Same problem, any solution?
Lifting up to about 75 degrees is more that enough and safe, and I did also use some electrical tape to block the contact. When this goes back, there is no socket in place, it is just the screw that keeps it there.
-
-
-
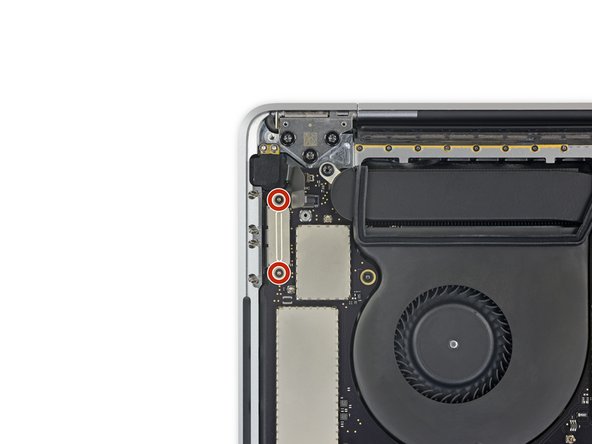
Usa un cacciavite Torx T3 per rimuovere le due viti da 1,9 mm che fissano la piccola cover di supporto del cavo del trackpad.
-
Rimuovi la cover.
T3 doesn’t seem to fit, somehow on my a1707 the driver doesn’t grip and it just slips on the screw.
What am I doing wrong?
I don’t have a T2 to try, what can I do?
I managed to get a holt of a T2, but still no luck: there are a bunch of screws that seem to be T2 but everything I stick inside them just spins around and doesn’t grip :(
T4 worked perfectly
Indeed, a T4 worked for me, also.
-
-
-
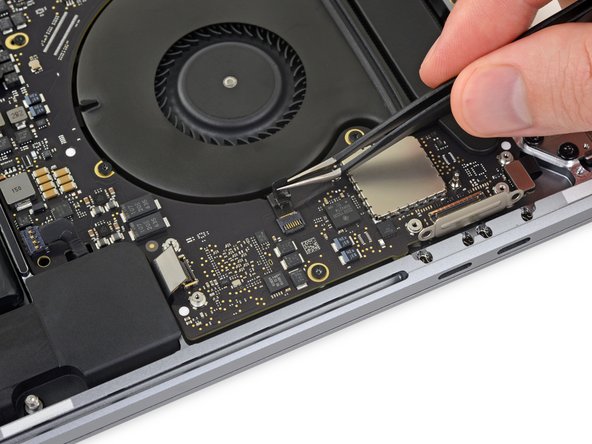
Usa uno spudger per scollegare il cavo del trackpad sollevando il suo connettore dalla scheda logica.
I managed to pry the metal bit with screw holes off first. Whoops.
Make sure the spudger goes under the entire plastic connector, not just the surface metal place, as you risk damaging it like the comment above.
If you get to this point and realize that the connector isn't lining up quite as perfectly as you hoped, don't panic. Open up the lid enough to get a couple fingers under the trackpad to support it. Use your T5 to loosen all of the trackpad screws JUST A COUPLE TURNS not all the way. It will flex around a little bit in the housing and give you some slack if you need it. Then just tighten it all back up again.
-
-
-
Applica una modesta quantità di calore al cavo a nastro del trackpad per ammorbidire l'adesivo che lo tiene fissato alla batteria.
-
Puoi usare un iOpener, un asciugacapelli o una pistola termica, ma in ogni caso stai attento a non surriscaldare la batteria. Il cavo deve essere caldo, ma non al punto da non poterlo toccare.
I used a hairdrier. Barely needed to hold it there for 20 seconds before I could peel it off.
Just warming it gently made it easy to peel off. Work with care starting from the free end, lift a little, move your grip, etc. Do not lift it all at once, there is a risk of breaking it. It is safe to then move it at 180 degrees angle, completely on the other side.
All my battery packs were swollen. The trackpad ribbon cable was barely adhered to this battery pack. No heating necessary.
I didn't need to heat the ribbon, I carefully peeled it back without putting to much pressure on it. I can however, if the adhesive is stronger than on my computer, to warm it up slightly.
-
-
-
Stacca con cautela dalla batteria il cavo del trackpad e spingilo dove non dia fastidio.
thin ifixit pick opener sliding gently/slowly underneath ribbon cable towards the front edge of mbp did the trick for me. no need for heat.
In my case the sticky part of the track pad ribbon remained on the battery. So after replacement the trackpad ribbon does not have a sticker to stay on the battery.
Did it work all right without the adhesive there?
That happened to me too! I thought that was what was supposed to happen, until I read your comment. I managed to peel it off the battery, but before I could catch it it rolled up into a tight ball. I got about half of it unrolled and onto the ribbon.
rileybk -
Since this step you can skip the part with removing the trackpad and logic board and just remove 7 screws (step 47, except green and blue) holding the logic board so you can lift it for a few millimetres just to take off the battery. You can find a YouTube videos where a guy is replacing the battery very easily. So waste of time and a lot of places to screw up you MacBook doing it this way.
This comment and that YouTube video saved me a lot of time - thanks!
Note that there are 8 logic board screws to remove excluding green and blue (now on step 46) and battery board screws are on step 50; the rest of these steps are irrelevant, making this a very easy replacement.
Max Z -
My logic board has 9 screws. Each fan has 3 plus the other three in the blowup. Total waste of time and effort to remove the logic board when it can be tilted up to remove the battery. As stated, no need to remove the trackpad either.
F#%K Apple for making this a difficult job when the batteries were just screwed in before. Absolutely no need for such difficult glue and hiding cables apart from sheer bastardry!
Jack -
-
-
-
Usa un cacciavite Torx T5 per rimuovere le 13 viti che fissano il gruppo del trackpad:
-
Nove viti da 5,8 mm
-
Quattro viti da 4,9 mm
Using a piece of cellophane tape can help hold the trackpad in place with with proper clearance all around.
-
-
-
Fai ruotare lievemente il display per aprirlo, ma lascia capovolto il MacBook. Il gruppo trackpad dovrebbe separarsi e rimanere di piatto sul display.
-
Sfila delicatamente il cavo a nastro del trackpad attraverso la sua feritoia nello chassis.
WARNING - READ THE NEXT STEP NOW OR YOU WILL LOSE THE WASHERS. Please update this with BIG RED LETTERS in the step to indicate what is about to happen, or you’ll skip forward and the washers will fly everywhere. I’m really upset right now.
Merci beaucoup vous venez de me sauver
-
-
-
Mentre rimuovi il gruppo del trackpad, stai molto attento a non perdere le nove piccole rondelle metalliche sopra gli alloggiamenti delle viti. Non ci vuole davvero molto a farle volare via e a perderle.
-
Rimuovi il gruppo del trackpad.
They are not kidding about the jumping washers.
Pro Tip: put your magnetic mat under the trackpad as you slide it out to catch the tiny washers. Alternatively, a magnetic tool bowl, or a terry cloth towel so the lighter guys can’t get far if they fall.
Mine are made of aluminum or stainless or something that magnets don't attract. Flypaper, maybe? :-D
dgatwood -
Can I change the battery with out removing the trackpad and logic board?
yes
I did it, you just have you remove enough screws on the board to bend it upwards in order to pull the battery frame that’s it…
my mac is working fine
a m -
yep lost a washer in the process
One of the washer remained stuck on the body, luckily I observed it on the working table when I cleaned the dust from the trackpad casing area. Be VERY careful to not loose these tiny metal pieces!
Without the washers the clicking and moving mouse around doenst work well. very important
Ok, I have all but 1 round washer. I found the rest. Not knowing a source (not even in my extensive parts collection) I will reassemble with the middle one without a washer. If anyone knows of a parts source (other than buying a trackpad assembly) please post here, Thanks.
When you put the trackpad to the side, write a note and put it on top so you don’t forget about the washers when you come to reassemble it.
I used a clean paint brush to dust off the back of the trackpad and internals. One of the round washers flew out of the assembly and got lost. The washers are super easy to lift off the posts. BE VERY GENTLE WITH THE TRACKPAD REMOVAL AND HANDLING!
This needs to be moved WAY up higher. You are 100% guaranteed to lose one by the time you start the previous step, because the trackpad will fall the microsecond you start to open the case. Really, you shouldn't remove the last screw until you're holding the trackpad from underneath.
Also, the battery replacement kit should really come with at least one extra washer, because I can pretty much guarantee nobody will ever do this without losing one. It is darn near impossible to deal with something that lightweight. Even putting the trackpad down on the counter is enough to lose one, much less having it drop out of the bottom while you're cracking open the laptop.
I found it, and it wasn't in a place you might expect. There's a bit of metal trim on the back of the trackpad itself, and the washer was underneath that. I actually had to dump all the washers out onto the bottom case, and suddenly it peeked out from under the metal rim. Worse, these things are aluminum (or maybe metallized mylar), so you can't pick them up with magnets....
It might be a good idea to put some masking tape on the trackpad to hold it in place so that it doesn't drop out when you open the lid. Then very carefully press it down from the underside with a spudger after you have opened the lid fully and have your hand under it to catch the trackpad so that it doesn't suddenly drop.
dgatwood -
Pro tip: During reassembly, put the plastic backing from the battery down on top of your display, put the trackpad upside-down on top of that, and slowly close the top case down onto it, working the cable through the slot. Then, when it is almost fully closed, use the plastic backing to maneuver the trackpad into position so that the pins line up.
Be careful when you remove this touchpad! I followed every step from the instructions provided here and also checked some video tutorials on YouTube from time to time. Everything went well after swapping the battery, at least that's what I thought. When I started the computer, unfortunately, my keyboard and touchpad didn't work, and the fans were very loud. I used an external keyboard and mouse, searched online for the problem, and tried some solutions such as PRAM reset, but nothing worked. Anyway, I opened the computer again and found that the end of the cable attached to the touchpad was loose. After putting it back in place, everything worked flawlessly.
I had the same problem as Mercan. The touchpad and keyboard would not work. The cable on the back of the touchpad had a partial open on the connector. The only thing I can add is the connector on the back of the trackpad has a lever that must be raised, the the cable inserted and closed. (Just like the data cable on the system board) BIg shout out to Mercan. Thanks.
Dwight
-
-
-
Usando un cacciavite Torx T3, rimuovi le due viti da 1,9 mm che fissano la staffa di copertura del connettore della tastiera.
-
Rimuovi la staffa.
I’m just curious - why did the entire logic board have to come out in order the replace the battery? It seems like after the trackpad you could skip to battery removal. Is it to protect the board? Thanks!
Yeah this is where I stopped and said, wait, you have to remove the entire logic board?
So I looked around for more tutorials and indeed, it is not at all necessary. You just need to remove a few of the board's screws, enough to lift the board up and slide the battery cables out. That is all. This tutorial is way way overcooked.
Here you go:
I am also wondering if it is necessary to remove the logic board. I’m just looking to remove a leaking battery from my macbook pro and safely discard of it while I get a replacement as it is releasing some chemical smell which I assume must NOT be good for one’s health.
As far as I can tell there is a part of the battery that is below the logic board. It’s the thin black stripes next to the battery pcb on either side. You can see it after the logic board is removed on step 50.
Absolutely correct. No way to skip the steps.
Please, elaborate.
Because the one small cable to the right is the battery data cable, it's been disconnected in step 10 and then presumably comes out with the battery (there's no indication it is glued nor instructions to unglue it by heating it and it doesn't look like it is UNDER the logic board) and the only cable that is UNDER the logic board is the keyboard cable, whose connector gets disconnected in next step but needs not being further removed.
I can't imagine all these risky actions (both when disassembling and reassembling are actually needed!
Actually, a T4 Torx driver works perfectly.
T3 stripped mine, should have used T4. Screw Extracting Pliers to the rescue.
Hands up everyone that’s never buying an apple product again?
Hah yep never again.
I can confirm that the logic board removal is mandatory, because two battery connection cords are under the logic board and cannot be removed otherwise. Even if that would be possible by cutting them, it is not possible to install the new battery anyway.
Thanks for your hands-on feedback Cristian.
Would you please elaborate? Which "two battery connection cords?" What I see in step 50 are the keyboard cable (which needs not removing) and the battery board cable, whose connector has already been disconnected (step 10) and comes out with the battery, because new battery shows the cable (and the board).
the cables CAN be slid out with slight upward pressure on the loosened logic board. There is no need to remove it entirely.
Marc -
I'm about to try this again. My MB Pro late 2016 has had three battery replacements so far.
The first one went fine but found the battery cable receptacle had poor solder joints on it and was repaired by Luis's shop in NYC - bit thank you to those guys. They did the last battery swap too as I was too busy to try it myself.
Now my battery shows full but has zero capacity so going to replace it once again.
I've never removed the logic board to do the replacement of the battery! I simply loosen the retaining screws on the logic board and very carefully slide the cable past the interference and Voila it's out and in. Of course, be very careful doing this so you don't warp the board much.
I'll post the post battery stuff here once I do this for the 4th time.
-
-
-
-
Usa uno spudger per scollegare la tastiera sollevando il suo connettore dalla scheda logica.
Again, make sure you pry from underneath, not only the metal plate. Goes off easily and then it also gets back easily when putting it back.
Don't do what I did :( When I reinstalled the logic board and bolted down everything, I realized I didn't pull keyboard cable connector through and was stuck underneath the board. Rather than taking the time to disconnect all the cables and unbolt everything to carefully pull the cable back through, I unbolted only left side and attempted to pull cable through using tweezers. I tore the cable which is very fragile. This ultimately disabled my keyboard. Hopefully, people will read this and will not happen to anyone. If it does, the cable can easily be purchase from Amazon for $6. The cable that worked for me is part #821-00612-04.
-
-
-
Usa un cacciavite Torx T3 per rimuovere le due viti da 3,5 mm che fissano la cover disposta sopra il cavo flessibile della scheda dello schermo.
-
Rimuovi la cover del cavo flessibile della scheda display.
-
-
-
Usa un cacciavite Torx T3 per rimuovere le due viti da 1,7 mm che fissano la staffa del connettore del cavo della scheda dello schermo.
-
Rimuovi la staffa del connettore del cavo della scheda del display.
This appears to be a T4 not a T3
They are definitely T3 ;) But not all driver kits are created equal. If your T4 works better for you, go with that.
I concur the the T3 didn’t work, T4 worked great.
't4'나사에 전해 맞습니다.
The bracket of the display board connector in my case is glued. So wasnt able to remove it.
I also found a T3 to be too small and T4 too large. I skipped this step and was able to complete the installation by using this connector (still secured by the screws I couldn’t take out) as a hinge to carefully lift the logic board up when needed. I ended up not requiring any of the adhesive remover liquid to remove the battery; just heat from a hairdryer and elbow grease to slide the cards under each cell. Laptop working perfectly again now with this new battery.
I used my T3 on my 2017 but I had to press a bit harder to get these to unscrew.
-
-
-
Fai leva con lo spudger per sollevare e disconnettere il cavo flessibile della scheda dello schermo.
When putting it back, I did not notice any “click”, but it was definitely secured in place. Just do not overpress it expecting the “click”. It fits back easily.
-
-
-
Usa un cacciavite Torx T3 per rimuovere le due viti da 2,4 mm che bloccano la piastrina di copertura dei connettori del Touch ID e del jack cuffie.
-
Rimuovi la piastrina.
Again, a T4 worked here, not T3.
't4'나사에 전해 맞습니다.
T3 worked for me. MBP 2016.
I only had the bottom screw of this pair to remove. The other is missing,
The top screw of the cover bracket screws into a larger bottom screw. You need to keep that bottom one separate from the others as it is the only one that has a hole for the top screw.
Thank you Bob Donovan! I got already confused
-
-
-
Scollega il cavo del jack cuffie sollevando il suo connettore dalla scheda logica.
Be very careful with this connector, pry from the bottom of the body, not from the side of the fan, as there is the next connector under it. Just be gentle and patient. Lifting it up to about 100 degrees is safe.
I ripped it. Game over. Is it?
-
-
-
Scollega il pulsante di accensione e il sensore Touch ID sollevando il relativo connettore dalla scheda logica.
Pry this from the fan side (right side of the body) and be VERY careful, the cable is extremely thin. Lift it up gently under the previous cable. When putting it back, just work gently, it will snap easily into place if positioned correctly. Do not force it back.
On the reassembly this was a crucial part I have forgotten.
Without this, and NVRAM autoboot disabled my MBP wouldn’t start up and only show me the battery state.
-
-
-
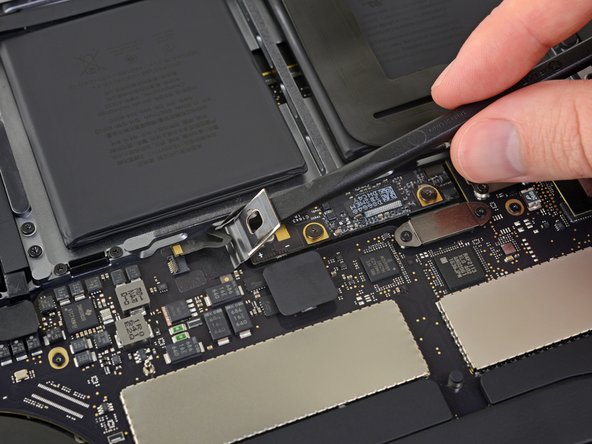
Usa un cacciavite Torx T3 per rimuovere la vite da 1,3 mm che fissa la staffa che copre il connettore del digitizer Touch Bar.
Screw was stipped. I had to cut a flathead slot in the head with a Dremel cutting disk. It then came out OK.
My screw here was or became stripped just like Nicks. However, I didn't use a dremel or anything else to make a cut. I left the screw in and when the board was removed and started the adhesive removal, I layed the board over and supported it. This worked fine but keep a look out so that the ribbon isn't stretched. Assembled back without issues
-
-
-
Con delle pinzette, fai scorrere la staffa verso il bordo laterale del MacBook Pro finché non è libera dalla linguetta dotata di fessura sulla scheda logica.
-
Rimuovi la staffa.
When replacing the bracket make sure to loop it through the metal flange so it stays secure.
Lift it gently on the left, 10 degrees, then slide it to the right so that it is freed from the metal strip holding it from under the logic board. It will be obvious how to put it back once you have it out, it has a small cut on the right that has to go first in the metal strip from under the board, then let the left side down.
-
-
-
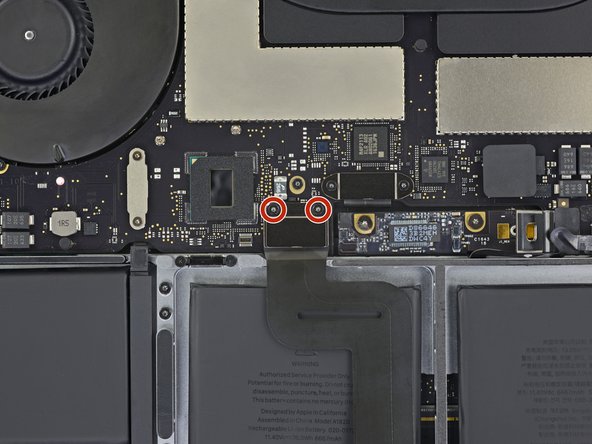
Usa un cacciavite Torx T3 per rimuovere le due viti da 1,9 mm che fissano la staffa del connettore del cavo del display del Touch Bar.
-
Rimuovi la staffa.
Completely stripped the screws on this one - T3 seemed too small, but T4 was too big.. Any way to get replacement screws for this step?
T4 worked better for me than the T3. I would suggest trying both lightly as the T3 might strip the screw for you. be careful here… T3 almost stripped the screw.
T3 from the ifixit kit works fine for me
I used my T3 on my 2017 but I had to press a bit harder to get these to unscrew.
It is a very tight T3 - I stripped the head on one of these screws so be very careful here. (T4 wouldn't fit) I think this screw was welded in!
-
-
-
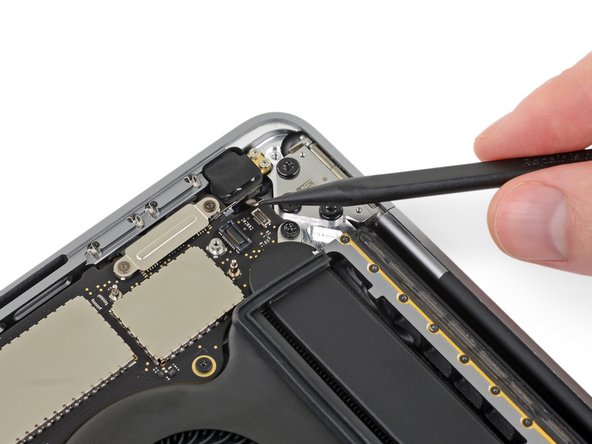
Scollega il cavo del display del Touch Bar facendo leva per sollevare il suo connettore dalla scheda logica.
-
-
-
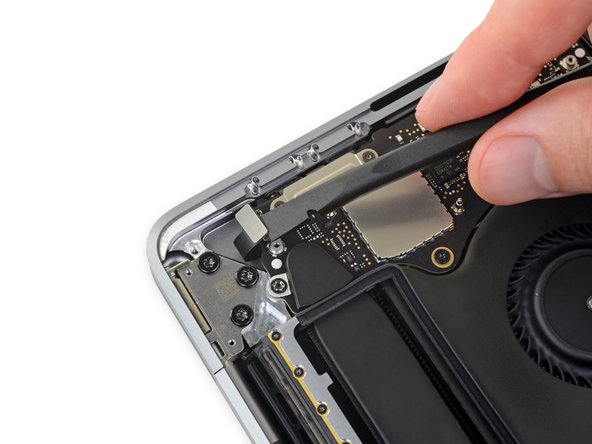
Usa un cacciavite Torx T3 per rimuovere le quattro viti da 1,3 mm che bloccano le cover del cavo flessibile Thunderbolt:
-
Due viti a sinistra
-
Altre due viti a destra
Amazingly, the top right screw here was not a T3 at all but a T4.
Top screw head seems to be stripped. Tried various other sizes to no avail.
Top screw stripped for me. Stuck here. Can’t progress.
Noticed the screws of left bracket of the thunderbolt connector didnt tighten into place (after it goes in and tightens it freely rotates). The right one did. Although both are scecured and working.
When reassembling you need to push down snug to make sure the thunderbolt ports work.
-
-
-
Disconnetti il cavo flessibile Thunderbolt di sinistra sollevandolo dalla scheda logica.
-
Fai leva dal lato interno, quello più vicino alla ventola.
-
Spingi delicatamente il connettore del cavo flessibile sul lato, in modo che non possa interferire quando la scheda logica sarà rimossa.
Pry on the middle of the connector, not the sides, as it is pretty long. Be careful to position it correctly when putting it back and do not force it back.
-
-
-
Ripeti l'operazione per staccare il connettore del cavo flessibile Thunderbolt sul lato opposto.
-
Piega delicatamente sul lato il connettore del cavo flessibile in modo che ci sia spazio per estrarre la scheda logica senza che questa si impigli.
-
-
-
Scollega i due connettori degli altoparlanti infilando l'estremità piatta di uno spudger sotto ciascun cavo, in corrispondenza del suo connettore.
-
Torci l'attrezzo oppure usalo per far leva per disconnettere entrambi gli altoparlanti.
DO NOT TWIST
The connectors are very delicate, you must use the spudger as a lever to lift the cable.
May be the worst part of the whole procedure
Both of the connector cables were secured with adhesive for me. Had to take my time and work gently to loosen.
Which ended up screwing me when reinstalling. The adhesive made it really tough to slide connector in. I ended up breaking the socket connection to board. No more left speaker!!! Argh!
I broke off the left speaker connector. I wonder if I can solder it back on. Anyone know??
When putting these back, these seem to just be pushed down from above, rather than slotting in from the back
Add me to the Broken Connector club ?. No right speaker for me. Have to think how I can soldier some pins on to fix the connector, or just leave it alone so I don’t make it worse. I should have read thru the instructions and all the comments. Oh well. Shoulda wouldas
By far the most delicate step. I suggest SLOWLY peeling away the adhesive until gone, then CAREFULLY pull the cable away from the connector.
The connector is NOT secured well, and you WILL break it off if you don’t proceed with extreme patience in this step. The cable pulls toward the sky. I held the connector down while I gently lifted the cable.
Very easy to snap back into place if you didn’t muck up the connector while removing it. Just finger press directly from the top and they snap right into place.
I used tweezers to carefully hold the sides of the connector as I slowly worked the cable out. Work under the adhesive by rocking the spudger forward and backward (not twisting). As you work toward the connector, gently pull the spudger out every so often and slide back under the cable till you eventually reach the connector. If you do it this way, have steady hands and patience! A magnifying glass helps too.
I heated a little bit the area and then used a spludger to keep the entire socket + connector in place, then SLOWLY and GENTLY introduced a spludger from the top under the cable to break the adhesive. Once the cable was free from the adhesive (3-5 degrees lift, not more!), then I used a spludger to keep the socket in place (it is a U shape with the bottom near the battery cell, I introduced another spludger under the cable from the opposite direction (from UP of the body if the battery is DOWN) and then pried UP the connector. It does not slide, it just pops out of the socket. Putting it back is very easy, just press it gently down and it will get in the socket with a small click sound.
Same on the other connector.
DO NOT rush the part where the cable is freed from the adhesive, that makes the operation much safer and simpler!
I used Dental floss threaded under and around the speaker cable to cut through the adhesive (really easy) and then one spudger on the circuit board and another to lift the connector out of the socket. Took me a while to workout what to do and the comments above really helped.
Mint flavor or just regular?
Tim -
The floss method worked perfectly! I threaded the floss under a metal trail close to the battery to guide the floss.
Mint flavored.
I use a blow dryer to heat it up and a thin string/floss to cut the glue. It worked well.
Anybody have a solution on how to resolder this connector now that mine no longer works?
-
-
-
Stacca l'eventuale nastro adesivo di copertura dello zoccolo del connettore del cavo del microfono.
-
-
-
Disconnetti il microfono tirando il suo cavo in direzione della ventola finché non è libero dal suo alloggiamento.
-
Se possibile, tira sul nastro attaccato al cavo invece che sul cavo stesso, riducendo così il rischio di danneggiamento.
Be VERY careful fishing that circuit/cable back into the socket. I was using regular tweezers that have a sharp edge. It scratched the circuit under the black plastic sleeve (which is thin). That cable kills your internal mic (which Ifixit does sell a replacement for).
-
-
-
Stacca tutti tre i cavi di antenna sollevandoli uno alla volta dal proprio zoccolo.
-
Fai scorrere le pinzette oppure l'estremità piatta dello spudger sotto ciascun cavo finché questo non è vicino allo zoccolo e quindi torci l'attrezzo oppure fai leva per scollegare il cavo stesso.
That is the hardest part. Can’t get one of the three plugs back into position.
Stefan is right. Mine proved impossible and I think I smashed (yes, smashed) the “sockets” they are supposed to “snap” back into (they didn’t for me). For now, they are taped down (and wifi works well), but looking into soldering these if it won’t ruin the connection.
Takes quite a bit of realigntment repositioning to place these back.
These are VERY tricky to reconnect. ADVICE: Push down on these at and angle and then snap them in and slowly rotate them to get them to stick. It took me FOREVER to figure this out.
I had no problem getting these on. The trick is to come from just above the connector and pull back on the cable a little bit at the same time. A fully stretched cable will overshoot the connector so that’s why I pulled it back. I used the black spudger to snap it in place. Everything seems fine. There definitely is a slight snap.
I always worked from the cable towards the connector to pry it up, and then when putting it back, it can seem tricky, but I used to push the connector back a little (towards the cable side) before trying to gently press it down. This seems to align it better to the socket. DO NOT force it, but it needs a little force to hear the “click” if it connects properly.
Correct positioning before pressing down is the key here and it can get very frustrating, so be patient. A microscope /optical zoom would help.
Also, I advise to start with the longest cable, the one you disconnect first, as it is easier to maneuvre, to get a feeling of how the connector is positioned correctly. The move to the shorter cables.
After a frustrating 20 minutes, I tried with the longest one as suggested. Made a re-affirming click. The other two were a wresting match and just eased into place when it happened.
This was the hardest part of the entire process for me. I'd say I probably spent an hour on these. Have patience.
Jay -
I think it would help if there was a close-up photo directly above the connectors so you can see how much of the solder on the board is visible. That would help with the positioning of the plug.
-
-
-
Rimuovi le dieci viti che fissano il gruppo della scheda logica:
-
Due viti Torx T3 da 2,8 mm
-
Cinque viti Torx T5 da 2,9 mm
-
Una vite Torx T5 da 3,7 mm
-
Una vite Torx T8 da 3,9 mm
-
Una vite Torx T8 da 3,8 mm
I needed a T9 for the green 3.9 mm “T8” Torx screw
My 3.9mm upper left screw (green) is T8 Torx, while the upper right 3.8mm (blue) screw is a T9 Torx. Note that both are not included in the kit sold by iFixit for this repair @jeffsu
EDIT: actually the T8 is included in the kit description but was not inside the one I got
I had 4 bits in my driver set that I got. One was the T8 that others seemed to have been missing. Maybe they realized this and added to the new kits.
No T8 in my kit. Now I have a half disassembled macbook pro I can’t finish. Sweet.
On my A1707, the Green and Blue are T10 (although T8 and T9 do ‘fit’ but with slack).
Don’t confuse the 3.9 torx8 (green) with the 3.8 torx8 (blue): the green one has a tapped hole for one of the two torx3 of step 29.
Reinstalling Note: I learned the hardway - Count (12 by my method) the number of connectors:
5 on the right edge.
4 on the left edge (I count 2 at the very top left, on under the other).
2 on the bottom edge near the center (NOTE: if you change a keyboard you will need the keyboard ribbon connector from the old case/keyboard).
1 cluster for antenna (3 wires & 1 ground screw)It's actually 15 connectors, as somebody else pointed out further down:
5 on the right edge (touchbar digitizer, thunderbolt, mic, touchbar, speaker)
4 on the left edge (power, touch id, thunderbolt, speaker)
4 on the bottom (trackpad, keyboard, batter power, battery data)
2 on the top (display, antenna bundle)
-
-
-
Stacca (ma non rimuovere) dall'adesivo che le tiene sopra le ventole le due strisce antivibrazione in gomma.
-
Se necessario, applica una modesta quantità di calore con un iOpener, un asciugacapelli o una pistola termica per ammorbidire l'adesivo e staccare più facilmente le strisce.
Only needs to be lifted from the fan, not from the heat pipe, and gently. If the rubber “end connector” comes out from underneath the heap pipe, do not worry, it can be easily positioned back in place when the logic board is out! Do not spend time trying to push it back now.
-
-
-
Sollevandola a partire dal lato sinistro, rimuovi la scheda logica.
This connection is VERY easy to forget when you reassemble. If you go to startup your computer and you see the battery icon but the computer will not start with the power button, this is the connection you missed when reassembly. Drove me nuts until I figured that one out!
Absolutely DO NOT lift the board by the cables as the picture might lead you to think!
Also, when lifting up the board, if you feel any resistence, make sure that:
- all the screws were removed!!
- move cables and connectors gently away in the area where you are lifting, they can easily catch the logic board and it feels immediately resisting the lift
After lifting the left side to be able to keep it between your fingers, work toward the middle and then the right, moving the connectors and cables away to free the board for lifting.
-
-
-
Verifica l'allineamento delle strisce antivibrazione in gomma e riposizionale se necessario.
-
Infila il gruppo del cavo di antenna attraverso la fessura tra la scheda logica e il dissipatore di calore, facendo in modo che si allinei correttamente mentre cali dall'alto la scheda logica per rimetterla nella sua posizione.
-
Verifica che non restino cavi intrappolati sotto la scheda mentre la riposizioni. Controlla con attenzione tutti i punti evidenziati.
Start from the right, position it down in place and make sure the cables are not under the board, then get the antenna cables from beneath with tweezers, then work to the left, paying attention to get the cables away so the board can go down in place.
-
-
-
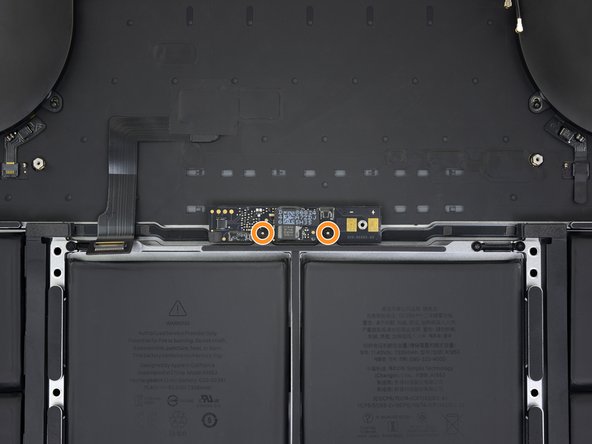
Rimuovi le due viti che bloccano la scheda della batteria:
-
Modelli 2016-2017: usa un cacciavite Torx T5 per rimuovere le due viti da 3,5 mm.
-
Modelli 2018-2019: usa un cacciavite pentalobe P2 per rimuovere le viti da 3,2 mm.
On my mid 2018 15.3” i9 MBP the battery board screws were PL1
I second this. If your repair is time-sensitive, consider making sure you have a PL1 driver in advance. Seeing that IFixit doesn’t seem to sell them, I bought a german-made Wiha driver, hoping the quality would be high. You never want these things to strip!
On my mid 2018 15.3 i9 MBP the keyboard cable is farther to the left (as shown at Step 23)! When reinstalling, make sure it is under the battery cable and its connector sticking up between the battery cable and the aluminum battery frame.
So if I’ve understood correctly, almost all the above could have been skipped if apple just made these two screws accessible? Wow, just wow
The screws are accessible, but the ribbon is under the board...
Chi Wang -
Dear Chi Wang, which cables do we remove once the logic board has been lifted? In step 49 and further I can only see the keyboard cable (which needs not getting removed) and the battery board cable doesn't look like it is under the board...
P2 bit end broke unscrewing the second of these screws… Now I have a piece of the bit stuck in the screw head and a MacBook completely disassembled…
Same just happened to me a, but I could get the screw out with a small pair of pliers, and then remove the broken tip from it with some banging on the desk. Took me 5 min, but I wasn’t sure that it will work, so I was a bit nervous 😬
Eike R -
I bought the battery + "kit" pack here and it doesn't include p2 screws. wow.... it seems like you own people don't even know what tools is needed for this? wow... just wow...
I used P0.8 for my Mac 2018
I used P0.8 on my MacBook 2018
There is no P2 in the kit 😞
Pas de P2 dans le kit pour les 2 dernières vis, c’est inadmissible !!! Mon mac est en pièces et je ne peux pas finir !!! J’ai pourtant bien acheté le bon kit complet…
Bonjour @guillaumegerald, je suis désolée d'apprendre cela. Veuillez contacter notre service client au support@ifixit.com (pour la boutique américaine) ou au eustore@ifixit.com (pour la boutique européenne et française) en indiquant ce qui s'est passé et votre numéro de commande. Ce sera un plaisir de vous aider !
C'est possible qu'il y a un malentendu ? Je crois qu'on a seulement besoin du P2 pour les modèles 2018/2019 et il est inclut dans le kit pour ces modèles là : MacBook Pro 15" Retina (Mid 2018-2019) Battery. Par contre, il n'est pas inclut dans le kit pour les modèles plus vieux car pour ceux-ci, un Torx T5 suffirait ?
-
-
-
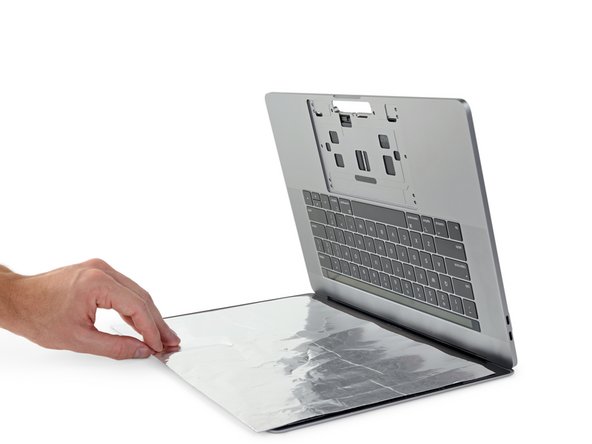
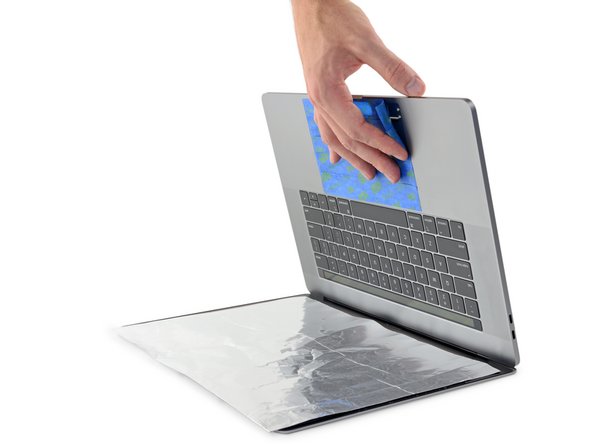
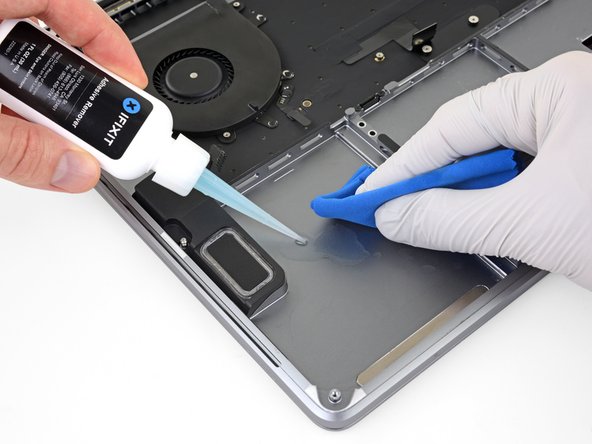
Per proteggere lo schermo, disponi un pezzo di foglio di alluminio tra lo schermo e la tastiera e lascialo lì mentre continui a lavorare.
-
Inoltre, puoi anche aggiungere del nastro di carta per sigillare per quanto possibile l'area sotto il trackpad. In alternativa puoi disporre un panno assorbente direttamente sotto la zona del trackpad per assorbire un eventuale eccesso di antiadesivo.
I didn’t have any solution and was hesitant to simply use an Isopropyl Alcohol solution of any concentration let along subject my electronics to liquid and aluminum foil, so I simply took a card (something between a metrocard and credit card… i used a rewards card) and brute forced the adhesive while dry (making sure to direct the bulk of the force laterally and not down into the screen below and mostly wiggle back and forth instead of straight on). About 10 minutes later with a sore hand it worked just fine and avoided steps 52-62. (You may want to try the string method detailed in step 62 if stubborn and after started with card.
The alu foil and the paint tape make it much safer, use them!
Also removing battery with adhesive remover is quite dangerous (I don't like the idea of liquids around my MacBook insides) so you can do it slowly a carefully with just some plastic cards (like in step 57) putting below the batteries (I used my old credit cards to do this).
-
-
-
Ora che il tuo MacBook Pro è preparato l'intervento, è ora che ti prepari tu stesso.
-
Quando maneggi e applichi l'antiadesivo, indossa occhiali protettivi (sono inclusi nel kit).
-
Non portare lenti a contatto senza occhiali protettivi.
-
Nel kit sono compresi anche i guanti protettivi. Se temi l'irritazione della pelle, comincia a indossarli già ora.
-
-
-
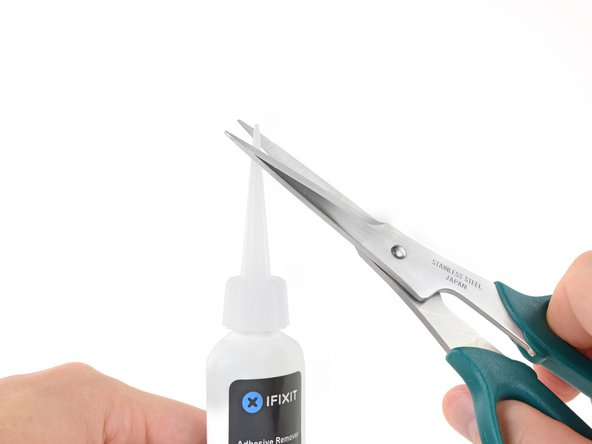
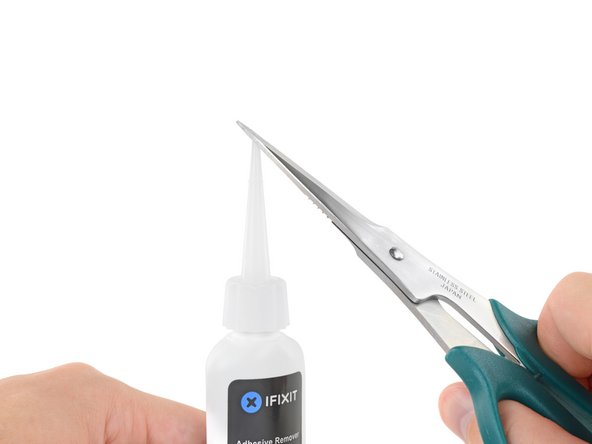
Tira via dalla tua bottiglia di antiadesivo il tappo di gomma nera.
-
Usa delle forbici per tagliare la punta ancora sigillata dell'applicatore.
The latest Adhesive Remover arrives already with a tiny hole at the tip and the bottle cap and tip is now black instead of clear.
-
-
-
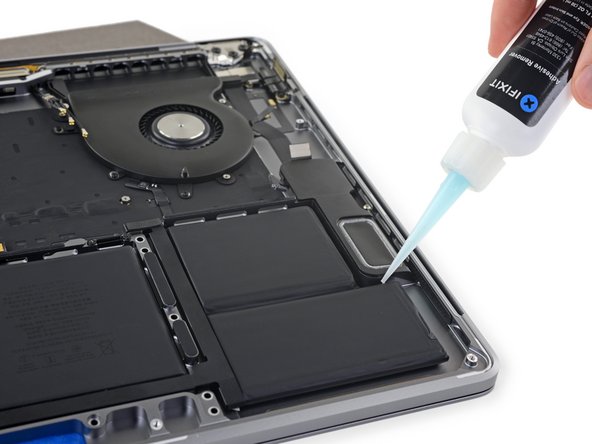
Applica poche gocce di antiadesivo sotto le due celle di destra della batteria, iniziando dal bordo più vicino alla ventola.
The bottle may (will!) squirt liquid. I used a bit of absorbant paper around the tip while turning the bottle upside down and putting the tip where it needs to go. Be especially careful not to drip liquid onto the speakers.
For this type of work I always have a roll of thick toilet paper nearby: its leaves are smaller than those of kitchen paper.
-
-
-
Aggiungi qualche altra goccia di antiadesivo tra le due celle di destra della batteria, in modo che possa scorrere sotto la cella inferiore.
-
Prima di procedere con il passo successivo, lascia passare un paio di minuti per consentire al solvente di penetrare ed indebolire la colla della batteria.
-
-
-
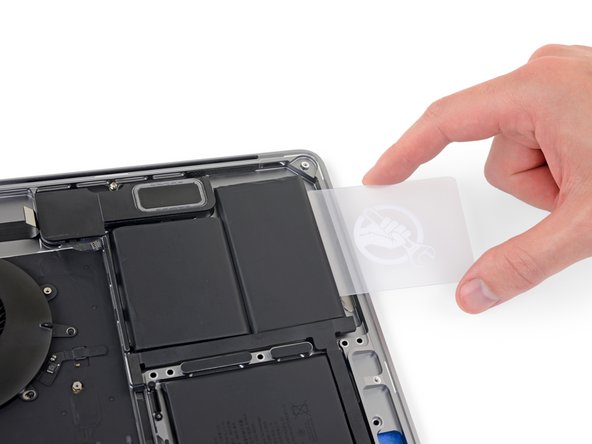
Dopo un paio di minuti, inserisci l'angolo di una scheda di plastica sotto la batteria, iniziando dal bordo inferiore della cella in basso a destra.
-
Muovi la scheda da un lato all'altro e falla scorrere interamente sotto entrambe le celle della batteria.
-
Solleva le celle per staccare completamente la colla, ma non cercare di rimuoverle già ora dal MacBook.
-
Lascia temporaneamente la scheda di plastica sotto le celle per impedire che l'adesivo possa incollarsi nuovamente mentre procedi con il passo successivo.
I had a great deal of difficulty loosening the batteries. The solvent seemed to have little effect on the adhesive strips. Despite efforts, I deformed the batteries trying to get them free.
Took me three applications of adhesive remover. Think it really is about wiggling though.
It took me about 10 minutes or so to remove all battery modules. I used the adhesive remover as per the guide and also used the card with the corner doing most of the penetration instead of the blunt end. I also would gently wiggle the battery up and down while I applied more adhesive remover to allow it a better chance of getting underneath. BTW, my adhesive strips ran left to right and not back to front on the outer batteries, so I would think it would be more ideal to put the adhesive remover down the left and right sides of the outer batteries. The inner batteries (under trackpad) adhesive strips ran front to back. Keep this in mind when using the remover to loosen them up.
Once one of the packs is loose, stick a leaf of toilet paper under it, so that it cannot stick to the body again, while you are working on the other packs.
See my comment in Step 63. Might save you time and trouble. Putty knife to remove batteries, then hot dryer to get black strips off followed by de-solv-it (or the Ifix-it remover) to get off the adhesive junk.
I wanted to comment on what worked for me.
I did put some of the remover on like they showed.
I used the credit card plastic tool to kind of get underneath it.
Then I used plastic putty knife and slowly and carefully pried the batteries off. I take no responsibility here for you, but it worked for me. Also I used 99% isopropoyl to clean the adhesive off.
Also so you are probably reading this because it is hard, put the trackpad back like the other person said before you put the batteries in. I did that and it probably saved me time.
Also as you reassemble, make you go look at every connector and there are a bunch and make sure those leads are all coming up through the logic board. I don't want to tell you I thought I was done 2x when I found a small cable at the end I missed. If you do end up in that case, you can remove some of the screws, and use the curved tweezers to kind of snake the cable up top. I know you aren't there yet, but as someone ahead of you, you'll remember this tip.
The trick here was the use of a putty knife. As someone mentioned, the adhesive strips on mine also ran the direction of the width of the computer, not from the screen side down. Thus, putting the adhesive remover where the directions said only worked on the uppermost adhesive strip. The adhesive remover did nothing to help the process...
If you're very careful not to deform the packs, you can (ON THE SIDE PACKS ONLY) use the spudger to help gently push through stubborn adhesive. DO NOT use it on the middle packs though, because there are little squarish holes in the body that you could push the spudger through and end up gouging the hell out of your display. And then you'll be back here tomorrow praying there's a tut for that :)
-
-
-
Applica alcune gocce di antiadesivo lungo i bordi superiori delle due celle centrali della batteria.
-
Stai attento al solvente che cola e, se necessario, applica dell'altro antiadesivo lungo i bordi laterali.
-
-
-
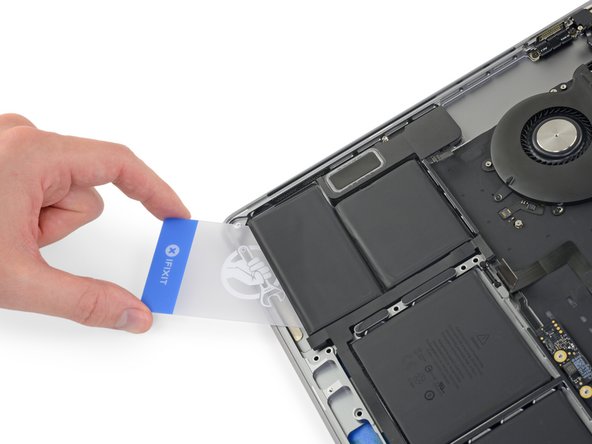
Dopo un paio di minuti, recupera la tua prima scheda di plastica e inserisci un angolo di essa sotto il bordo superiore di una delle celle centrali della batteria.
-
Muovi la scheda da un lato all'altro e infilala sotto la cella della batteria finché non si stacca tutto l'adesivo.
Once you get the card edge under a cell, you can apply a couple of drops on top of the card and it will flow down to the working edge of the card. This will make moving the card back and forth a lot easier.
I'd consider looking at step 62 first.
-
-
-
Se hai delle difficoltà a infilare la scheda sotto una qualunque delle celle, prova a far passare un pezzo di filo interdentale o di cavo elettrico sotto la cella della batteria e tiralo da un lato all'altro in modo alternato per staccare la colla.
Wouldnt the wire damage the underside of the cells?
Yes, but you should never re-use a glued-down battery after removing it like this. These batteries are not designed to be re-used, and can pose a fire risk even when removed carefully.
I used dental floss + pastic card for the middle part. Avoided using the adhesive remover for the middle ones.
I didn’t have to resort to this method, but if I did I would think some fishing line would be a good option. Put some candle wax on it if it starts to bind. I use this method to remove car dash phone holders that are siliconed down to the dash.
I used this method, (while waiting for the iFixIt glue dissolver kit: was over a weekend; so too late). Works well with a strong, doubled (with slight, about 1 turn per cm, twist) 25SWG (0.5mm, 0.02inch) copper wire, wrapped around spare small screwdriver handles. Ensure that the angle of the wire is _very_ _flat_ while ‘sawing’ slowly; take your time, quite a lot of force is required to sheer through the spongy pads in places. I started with the 2 larger central cells to refine the technique.
-
-
-
Solleva e rimuovi la batteria.
-
I pezzi più grandi di adesivo li puoi rimuovere usando delle pinzette o le dita, protette da guanti.
-
Raschia ogni altro pezzo di colla con uno strumento di plastica e pulisci le aree sottostanti con antiadesivo o alcol isopropilico. Sfrega in una sola direzione (non avanti e indietro) finché la scocca non sarà pulita e quindi pronta per accogliere la nuova batteria.
Mine was very difficult to remove and clean. I spent forever trying to clean up the residue. However, I tried 70% isopropyl on two bays and the iFixit adhesive remover in the other two, and covered with food plastic wrap. Went to lunch and when I got back I used razor blade scraper (like used to remove stickers from glass), and it was pretty easily cleaned. Both chemicals worked just as well. Just soak and let the chemicals do the work.
I found the best way to do this was to put the hairdrier on the adhesive for a few seconds, then it just peeled off in one go. Wasted a lot of time trying to scratch them off before this.
SECOND THIS ADVICE!! Use a hairdryer it will save you a lot of time and the old adhesive will come off much, much cleaner
Yes, hairdryer and use the plastic card to push/scrape one end so you can grab it with your fingers, then peel off the adhesive strip.
Used a putty knife and removed the batteries, then hair dryer and removed the remaining black strips. Used De-Solv-it (my usual computer anti-glue) to get the gooey glue off. Went well and clean. New batteries in and reassembled.
By far the easiest way to remove the adhesive strips for me was to use tweezers. After removing the battery I had mostly large swaths of adhesive. first I used the tweezers, open, then laid it on an angle so the edge laid flat against the surface. Then scraped up side of the adhesive. I wedged up sufficient adhesive so that i could grab it angled (lengthwise not with the point) , Then i slowly pulled up the adhesive without a tear nearly every time, almost satisfying.
-
-
-
Se la tua batteria è dotata di adesivo preinstallato nella parte inferiore, rovesciala e stacca con attenzione la protezione per esporre l'adesivo. In caso contrario, per bloccare in posizione la batteria applica un sottile nastro biadesivo come il Tesa 61395.
-
Posiziona con cura la batteria e disponila in posizione.
-
Premi e tieni premuta con fermezza ogni cella per 5-10 secondi per fissarla bene al case inferiore.
In this photo, the holes that are shown in Step 51, where it states, “2018-2019 models: Use a P2 Pentalobe driver to remove both 3.2 mm screws,” are in a different position, so that re-securing the battery board doesn’t seem possible.
Step 51 shows the correct procedure for two different models; this step shows only one model, because the procedure here works for both. Order the correct replacement battery for your model, and you’ll have no problem.
I strongly recommend re-installing the touchpad BEFORE installing the battery. Doing that and feeding the ribbon cable through the correct slot will ensure that you don’t block the path of the cable. I did not do this and had to cut some of the framing plastic away to give me just a bit more slack to be able to reconnect the cable.
After you have the touchpad back in, do a “dry” fit of the battery to make sure you see how the battery should go in so you don’t affect the ribbon cable. Then you can peel off the adhesive protection strips to secure the battery.
After reading this comment I went straight back to steps 19/20 and reversed them before installing the battery… will update if something is notable!
The version i got had the individual adhesives stuck to what look like tempered plastic that covered the whole battery. Removing the main plastic took off all adhesives at the same time. Its usefull to have another set of hands at this stage.
I had the same problem as others with the adhesive sticking harder to the plastic cover than to the batteries themselves. Another set of hands here would indeed be useful. This was actually the hardest step of the entire process as you cannot reposition the batteries once you set them down. Luckily it seems there is at least a little wiggle room in there. Make sure the power connection lines up with its screw holes as the number one priority.
I took off the top side full cover of plastic before sticking which meant all the individual cells were flopping about - leave it on until after sticking it down (as per the next step!).
Unsticking the packs is messy and dangerous since they may tear if too much force is applied, especially if swollen.
But do they need to be glued in?
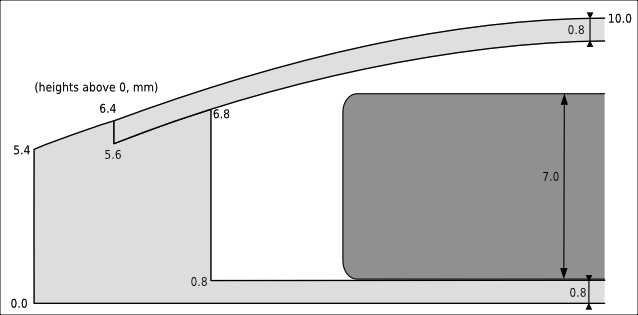
The batteries should not move: in time that would damage the connections. Measuring carefully, the space between the unibody and its lower case is 8.2mm. The thinnest packs are 7.0mm: there is some room.
Instead of taking the protective sheets off the glue patches, I put bits of double-sided tape on top. The batteries are now easier to remove, but they cannot slide around.
However, after turning the machine upside up, they are in fact “hanging” from the “ceiling”! My office tape solution works, but the thinner packs might in time unstick and fall down.
It may be advisable to use the strong glue anyway, or else put some thermally conductive silicone sponge between them and the lower case.
The batteries are under the palms of your hands: they don’t get warm, leaving the protective sheets on should not have any effect. The unibody case there is 0.8mm thick.
Position the battery first with the back covers on it, to feel how it would fit in place (the battery logic board position is a good reference, and the relative distance to the two speakers). Only when you get a good feeling of the position, remove the adhesive covers and put it in place. SLOWLY, there are not many chances to pull it up again if you do it wrong!!
I pressed on the batteries for 5-10 seconds but they did not stay stuck after a few days.
The bettery didnt feet well and there are some part wich are a little bit left up uppon the unibody but there were no solution since the size didn t feet it is a problem ?
Looks like I have the new version too Tesa 61395 not needed?
-
-
-
Dopo che la tua batteria è stata correttamente posizionata e installata, stacca e butta via la protezione in plastica trasparente sulla faccia superiore.
-
Calibra la nuova batteria: caricala al 100% e poi tienila in carica almeno altre 2 ore. Quindi stacca l'alimentazione e usa il laptop normalmente per farlo scaricare. All'avviso di batteria in esaurimento, salva il tuo lavoro e tieni acceso il MacBook finché non si iberna perché è scarico. Aspetta almeno altre 5 ore, poi carica ininterrottamente al 100%.
In order to not remove everything, I reduce the procedure in following only steps 1 to 18 (until trackpad cable is pushed away).
Then I removed the “low “ screws of step 46 in order to losen the fixation of “bottom” of the motherboard, as there is no room to remove the battery board and its ribbons).
Then I removed the two screws of the step 50 (battery board). To take off the glued battery, I used twine or thread (e.g. as shown here: https://www.youtube.com/watch?v=fupkPz55...) but not acetone nor diluant.
Then I lifted very carefully the bottom of the motherboard both to push away the battery board and its ribbons and to reinsert the new battery board and ribbons.
Then I proceed backward to remount (step 50, step 46 then step 18 to 1).
Note: my “old” battery was so inflated that the two screws of the lower case near the trackpad were difficult to remove (sometimes, this leads to a malfunctioning…
Thank to Jeff for this overall procedure which helps me a lot.
Did they change the step numbers? You mention step 46 and 50, but now it looks like these are steps 47 and 51.
strells -
Hi Strells, in the english or french version, it seems that it is always step 50 (two screws for battery) and 46 (“lower” screws for motherboard).
jompo -
As Jompo Discovered, I also concur: LB removal not necessary. “removed the “low “ screws of step 46 in order to losen the fixation of “bottom” of the motherboard, as there is no room to remove the battery board and its ribbons)”
Be careful, I removed all screws from LB & disconnected speakers as well. .
Thanks @jompo! Great tip... no, awesome tip! Worked like a charm for me, and saved a ton of work/mess. I've never done the solvent method on any of the batteries I've replaced with the help of iFixIt's excellent guides; I use a plastic card with a 'sharpened' edge to work the batteries loose. Way, way easier than having to take all the innards out (and risk breaking something) and using the solvent.
Another tip: the best tool for removing the remaining double-sided adhesive tape is a #11 Xacto blade; it's basically a super sharp tiny 'paint scraper' shape, and removes the tape remnants beautifully.
Also, quick note to the great folks behind iFixIt: I finally wised up and am buying all my batteries from you now. I learned my lesson about buying cheap knock-offs on Amazon that had to be replaced again in a year. No more; from now on, you get all my business!
Huge thanks all around!
jiclark -
Thanks a lot jompo! Your approach worked like a charm and saved a lot of time (and me potentially breaking something :D). The bit of lifting the motherboard up to take out the battery ribbon was a bit of a fiddle but in the end was worth it. The twine and thread approach definitely is less risker as we can avoid liquid damage from the use of the adhesive remover.
wow, this was awesome. thanks whoever wrote it. very well described.
I did the same a @jumbo . So, I’d be happy to rewrite this into a much shorter and less hazard format as @jumbo suggests which works perfectly and has many fewer steps and less risk of injury to the trackpad, motherboard and connected components. I did this in about an hour on my MacBook Pro late 2016.
Did you ever rewrite this @marcemarc ? I have to do this ASAP and would love to cut out as many steps as possible.
roopesh -
I didn’t rewrite it but basically stopped at step 19, and could get the batteries out without solvents or crazy efforts. Heat, slow working with a good spudger and they pop out.
One thing really important was I found my battery data connector on the motherboard had a loose connection. I had tried three different batteries and it wat the data cable connect on the motherboard. So, that was touch to figure out but it did solve the problem. Bottom line, be careful when disconnecting or manipulating the battery data cable latch.
Marc -
Plastic liner is not releasing from the battery cells. If I hold the foam pad in place the plastic sheet rips the foam.
Newer batteries have foam protection that needs to be removed. The blue tape between the foam and the battery peels off from the battery. https://i.imgur.com/NDwhyVO.jpg
Missing one critical helpful notation and photo on the reassembly part - a checklist of all the cables and connectors that need to be checked to make sure they are not caught under the motherboard. I missed the keyboard cable and it cost me half an hour. I checked off all the ones I could remember to make sure they were clear, but just missed that one. A photo with circles and a checklist would be a big help to make sure everything is clear. Otherwise, everything was very well done.
That’s in Step 49. Easy to miss, but it’s there! I feel your pain though, I’ve made that same mistake.
I think that was the same cable I missed… at the bottom by the battery connector. I mentioned it to ifixit to add a checklist as well…. Who is responsible for editing this guide? Do you know?
robert -
That happened to me, as well. I agree that the list is implied in the instructions (working in reverse during re-assembly), but I also missed the two small cables on the upper left (headphone and touch-id cables). I had almost everything re-assembled by the time I realized my mistake and had to pull everything back apart again to fix the issue. I think that was just me being eager to finish, thinking the hard part was done. (But kudos to the authors for these instructions - my laptop battery is now working great, and everything is functional!!!)
dot1000 -
OK well, followed the instructions to the word, & pleased to say my problem has now been resolved. So very many thanks for the fix kit & cracking easy to follow instructions. The MacBookPro lives to fight another day.
in knapp 3h habe ich den Akku gewechselt gehabt, passt auf die Unterlegscheiben vom Trackpad auf… die gehen schnell verloren und das Tastaturkabel vergisst man auch mal ganz schnell. Der Guide ist eine super Hilfe gewesen und ohne den hätte ich sicher das MBP noch nicht mal aufbekommen.
that’s what I thought :D But as others mentioned it can be reduced to a nice amount of steps. but anyway: I think producers should make their products waaaay easier to restore those parts like accumulator, ram, HD or even processor cores.. long live the good old desktop pc with motherboards as big and heavy as macbook airs from nowadays ;)
Great instructions I finally got my mac book back alive! I am noticing that the battery settings do not show that it is charging even though it is plugged in…tried resetting the SMC still nothing indicating it is charging…I have no idea if it is calibrating correctly. Has been plugged in for about 2 hours but only indicates a 30% charge
This guide worked very well for me. Triple-checked all the connectors when reassembling. I was able to get everything inside the machine cleaned up very well including the fans and the fan ports. Very well done!
Got through and it worked perfectly! Then I realized the up arrow key was no longer working :(
Ended up sending it to Apple for a free keyboard replacement since it’s the notorious butterfly keyboard problem.
Hopefully it will come back with the same battery and they won’t mind I replaced it.
Very good guide, I didn’t remove the whole mother board tho (A1707) but this is not my first time replacing a battery of macbook.
I used alcohol 96% to get the glue off the battery and a old card.
The way to do it if you don’t want to take apart the whole laptop is to follow this guide to step 23 and unscrew the mother board screws then start to take out the battery and slide the cable while holding up the motherboard.
I FixIt 😎
Ho acquistato il kit completo per il mio mbp 15" touchbar 2018.
Ho seguito la guida fino al punto 18, poi il 46 Ed il 50.
Non ho usato il solvente adesivo per staccare la vecchia batteria ma mi sono aiutato con la scheda in plastica e con un filo di rame sottile che facevo passare sotto le batterie, una alla volta. Mi sono anche aiutato con un phon per far ammorbidire il nastro adesivo originale sotto le batterie.
L’unica accortezza sta nello stare attenti quando si toglie e poi si inserisce la scheda della batteria sotto la scheda madre. Io ci son riuscito senza problemi.
Ora il mbp è in carica: sto seguendo i consigli di ifixit per la calibrazione della batteria.
Comunque una guida perfetta, in ogni minimo dettaglio. Se avete pazienza, dimestichezza, seguitela ed avrete una batteria nuova in circa 1,5h di lavoro.
Uh oh I did this and now the machine won’t turn on. When I open the lid it shows the battery level for a second then it disappears. No amount of key presses seems to work. Any ideas here? I assume I messed up the keyboard or some other connection?
Ah I fixed it. Double check step 31, that was my issue. The connector for the power button is right below another one.
Same. Thanks .
For sure we need every step so its clear. One misstep and its game over. Shouldnt there be a note or step to work backwards after battery is installed?
-


Per rimontare il dispositivo, segui queste istruzioni in ordine inverso.
Porta i tuoi rifiuti elettronici a un riciclatore certificato R2 o e-Stewards.
La riparazione non è andata secondo i piani? Vai sulla nostra comunità Risposte per trovare aiuto nella risoluzione dei problemi.
Per rimontare il dispositivo, segui queste istruzioni in ordine inverso.
Porta i tuoi rifiuti elettronici a un riciclatore certificato R2 o e-Stewards.
La riparazione non è andata secondo i piani? Vai sulla nostra comunità Risposte per trovare aiuto nella risoluzione dei problemi.
Annulla: non ho completato questa guida.
Altre 132 persone hanno completato questa guida.
Un ringraziamento speciale a questi traduttori:
100%

albertob ci sta aiutando ad aggiustare il mondo! Vuoi partecipare?
Inizia a tradurre ›


61 Commenti
it’s an unbelievably undesired design that glues everything together. And the design arrangement for the screen was just… annoying.
Holy &&^&^$^ $@$*, good thing you dont have to delaminate the screen just to replace the battery. Wtf.
Why removing the logic board. I don’t understand it seems useless. Just detach the battery cables and the battery.
There is a video on youtube that shows this (think its turkish, and they only disconnect the battery and start removing it from there with a plastic spatuala). I think its more to do with the fact that this guide doesnt want accidental spillage of adhesive remover onto the logic board. Also to avoid and damage to the board when cleaning the remenants.
@sciack: well - the point here is that one uses some liquid to soften the glue from the batteries in place - what if that liquid gets onto the mainboard?! And if this where you who spilled it onto the mainboard, and if this guide wouldn’t contain the removement of the logic board, I bet you would be the first wining, crying etc….
Skill level: Novice, first time doing this kind of project on macbook pro 2017. The 65 step process seems daunting (for a novice). But, once you get started and stick to the plan its not difficult. All the credit goes to the Ifixit and author of this manual. In first round, I skipped from 24 to step 50 thinking I had cleared the battery, only to find the top section buried under the board. But, thanks to the clear instructions I was able to salvage the project and the macbook/battery works great. Maybe put in warning at step 24. Also placing new battery in exact location is tricky. Suggestion, remove sticky pad covers one at a time once in location. Suggestion: use the organizer (with the box grid) and put labels with step #, that way once replacement is complete, putting macbook back is easy. Thanks
Really good instructions and kit. As RS20 says, ORDER THE ORGANIZER! Also, to be explicit, you must perform all steps. Ribbon cables to the flanking batteries are under the mainboard and so it needs to be removed. Adhesive on mine was very strong, and I ended up repeatedly putting the adhesive remover on the edge of the removal card and then sliding it under each battery.
I’ve followed the instructions but my battery will not charge. I’ve taken it all the way down to dead at this point and can no longer turn the laptop on. When I did get it on, the left fan was running continuously. I don’t believe I’ve damaged anything in the process but it’s certainly possible. I’ve tried resetting PRAM and SMC a multitude of times, it just doesn’t seem to recognize the power cord being plugged in. I’ve tested the power cord with other computers and have confirmed this cable working.
Any idea why it would turn on (ie it’s running on the new batter) but then not charge?
I am having the same Fan issue, the left fan just runs and runs, any idea how to fix it?
anyone have a issue of left Fan running at 6488 RPM’s after this. If the system is on the left Fan is running full speed now.
I am having the same issue, Left fan running at full after the install. Do you ever get a solution to this? I have reset the SMC but that has not fixed it.
I had the same issue, took it for service and was told the fan failed, I suspect there is a step somewhere where it gets easily damaged but I do not for the life of me know where it would be
Having same issue, did you have any luck?
I have the same problem, looks like a mosfet might have broken off. I found this video that explains what might have happen: https://youtu.be/MgPighrnTA0?si=XTn_SjRy....
I haven't yet checked to see if my mosfet has broken off, it just takes to long to disassemble everything. But I'm pretty sure I have the same issue.
Absolutely incredible guide. Very satisfying to finish this successfully.
I used an egg carton for a screw organizer and, at 49 yo proud to say didn’t use any magnifying/corrective eye wear! Smallest screws I’ve ever seen.
Only a few minor issues - upper right screw in Step 29 refused to go back in (I think it’ll survive), REMEMBER there’s 2 ribbon cables in steps 31/34 - I installed the logic board forgetting about the lower cable….LUCKILY was able to fish it out from underneath after realizing it during reassembly. Also forgot to pull the trackpad ribbon all the way though and put a neat sharp crease in it on reassembly. Just massaged it back flat and works fine.
Thanks to the author/iFixit very much for this!!
Amazing guide. Glad i decided to let Apple do it for $199! Not confident enough to have done this on my own. Repair came back today. Letter inside says they replaced 661-07954 SVC ENCL TC W/BAT ANSI GRAY MB under keyboard program and 605-02685 Logic Board 2.8GHZ 16GB RP555 256GB FCC w/sympton being failed sensor test. Does anyone understand this. Symptom was enlarged battery because i only had 110 cycles since unit always plugged in due to external monitor use. Computer always ran fine.
Think I have the same issue as you with a swollen battery, how long was your repair time via Apple in total? How was it only $200, it appears to be closer to $350 based on their site repair pricing. Thanks for any potential info.
Eric -
I Echo Jompos strategy about not having to remove the LB. I would add that in order to loosen the “Fixation” of the LB, I removed all the screws attaching the board to the lower case. I also disconnected L & R speaker cables from LB. Used spudgers wedged on either side of LB to carefully raise LB enough to carefully slide battery flat cable out from under LB. Insertion of new battery flat cable under edge of LB was done with care and good lighting. Battery extracted with a silicon, rubber cake icing spreader. No liquids or floss used here.
Well, I went through the whole process. I’m experienced at working inside machines, although it’s been a while. Now… the Mac says it has no battery available. I opened it back up and the ZIF socket for the battery data cable is missing its lever. I tried carefully and fully re-seating the connector since only the lever is missing, but no joy. Looks like I have a very expensive and under powered desktop system now. :-(
Expensive failure. Torx heads stripped out, lost washers, can’t reseat the cover screws. Do not attempt this, imho.
Well I followed the instructions to the letter, Very well written & clearly explained. Pleased to report that all went well & my problem has been resolved. The MacBook Pro lives on to fight another day. Many thanks to the team at iFixit.
Battery replacement seemed to go as expected. While plugged in to the wall charger, mac boots fine, and behaves normally - Except, there is no battery detected. System Report (Apple Menu > About This Mac > System Report >Hardware > Power : Battery Installed: NO . Seems the new replacement battery is faulty. I did double check the battery data cable connection is as seen in STEP 12. Any other ideas?
Did you make sure to lift the flap protecting the contacts of the data cable for the battery?
Apple has definitely made improvements in the 2017 models as far as removing and re-installing the mother boards. I was not looking forward to that part given what a pain it was in earlier macbook pro’s but this time that went very easily! There are still an awful lot of connectors but if you keep them in order with their screws where the cat won’t walk across your desk and scatter them then this felt much easier than previous versions. I know that earlier models had you remove the mother board just so you didn’t get acetone on the speakers but it seems that on the 2017 model that some of the battery cabling actually goes under the lip of the motherboard and so you really can’t safely get it out without doing this where on older models if you were willing to risk the speaker cones you didn’t need to do it. On the 2017 it seems you really do need to do it. Waiting for the iFixit guide to post apocalyptic appendectomy ;)
I changed my battery yesterday according all working steps, shown above. The description is very well, many thanks for sharing that. Unfortunately my MacBook does not show me the new battery at all. I reseted the SMC as described in the Link shown at the end of the description.
What else can I do to “register” the new battery pack to my MacBook? Or what else can I double check. Any help is highly appreciated.
Many thanks in advance.
Disconnect and reconnect both the battery connector and data cable. Check both carefully for damage, contamination, etc. Make sure they’re correctly plugged in and fully seated. If you still have trouble, I’d suspect a defective battery.
A swollen battery was making my laptop chassis warp and the pandemic meant Apple couldn’t fix this laptop for me. I felt uneasy about leaving a potential fire hazard lying around the house so I bought the battery from this site and followed this guide. Although it’s not for the faint hearted, it’s not that bad either. Just be organised, read through the steps at least once and maybe look at some youtube videos of people doing the process. I learned a lot from those and felt the preparation meant the process went smoothly. Took me about 3.5 hours. Have a strategy for managing the screws as you remove them so it’s easy to put the same ones back again. I grouped them by each step in the guide.
After calibrating the battery, it’s obviously decent quality as it took ages to run down from 100% to 0% as recommended. It’s a weight off my mind knowing it’s sorted and the laptop feels better than new. Repairing stuff to make it last longer is cool and hopefully I’ll get another few years out of my Macbook Pro.
Just completed the battery replacement. Excellent guide . I ordered the organizer and install kit, and that helps a lot. 90% successful, but unfortunately broken the right speaker connector. Battery is charging now, now showing as normal, cycle count 1 and capacity of 6793
Thank you for the tutorial. I followed the instructions. After finishing it, I could see the battery sign in the middle of the screen and it was charged to 100%. But I could not turn it on. I tried multiple ways to try to start and didn’t get any response, the button and keyboard did not work. I opened it up again and rechecked all the connections. I took it to Apple authorized Micro Center today and they would not fix it because I used IFIXIT. Could anyone help? Thank you.
I managed to do this without any issues. Nothing broken, everything seems to be working fine. Let’s see how the battery works after initial calibration. I got a battery with 0 cycles, but it is very old, manufactured in 23-Oct-2017 (a few days older than the macbook it goes into…). The age of the battery is pretty disappointing for a new battery, but the repair guide was very good.
After doing a SMC reset and performing the battery recalibration as instructed by the guide (charge to 100% and keep it charging for more than 2h, run it to a full discharge and then recharge), the faulty battery service message is gone and my MacOS reports the battery in good condition.
As said above, the battery is pretty old, even if new. After the recalibration (2 cycles now on the battery), the full charge it can hold (as reported by coconutBattery) is 6139 mAh, approx 8% below the design capacity of 6669 mAh it reports. Definitely not above 6300 mAh as specified in the description of the battery in the online shop.
Let’s see if this degrades rapidly or remains in these parameters.
The previous battery replacement I bought from iFixit was for my Late 2013 Macbook Pro 15” and it behaved in a similar way, dropped after the recalibration from design capacity 8755 mAh (nice capacity compared to 2017 Macbook) to 8130 mAh max capacity, and it remained there for more than a year.
Followed the instructions. Now it will not boot. My advice is not to take out the logic board. Looks like I will have to buy a new logic board or MacBook pro.
Hello, I just finished (need to get the cover on) but my battery works and the computer works. Thank you to the author I have a few notes and tips to anyone doing this as well.
I would have the following on hand before you do this to avoid delays that I encountered.
1. 2-3.0 reader magnifying glasses so you can see clearly when super close up.
2. headlamp or good light source
3. blue locktite for re-assembly of the screws.
4. b-7010 double-sided electronics repair tape I bought 5mm but had to cut some to 1.5mm or so.
a good mini tool kit with magnetic bits and plastic tools for prying stuff like the instructions show.
5. I replaced the usb-c ports with this kit from am… 12.00 as of 11-2021
6. small hair dryer to remove the tape from the battery
7. 20lb or so fishing line about 2-3’ to cut the battery out if you don’t have the solution which I left behind.
8. I tape each screw and number it so I know what step it was from on pieces of paper it makes a big difference later on if you can’t do this in one shot.
4-5 hours
I'd like to echo these suggestions. I used the kit from ifixit, which included all the necessary tools, etc.Just add masking / painters tape. Some screws did have thread locker on them, but I did not reapply under reinstall.
If this is something you don't do all the time (I don't), go slow and take it easy disconnecting / reconnecting things. Find screw threads gently and don't go nuts over tightening things. It's not for the heavy handed or if you're in a rush. Read the comments to see what pitfalls others experienced BEFORE you start tearing into things.
My experience went pretty well with 2 minor issues. Bottom Line: If you're not an expert, be fully prepared for the fact that you may brick your Mac. Otherwise, leave it to the pros with their experience and parts bins!
Jay -
On the logic board replacement be very careful there are a bunch of small cables that need to be held up to get it in I forgot the fan cable then another one and you have to be patient plus don’t cross thread the screws so easy to do…. one of the small brackets actually screws into one of the screws in the back so be careful of numbering the screws… as I said above…. good luck…
replacing the usb c was the biggest improvement!!! but note the rubber washers didn’t go back in on my install from the usb c so hoping that is not a big issue…..
Fantastic guide, this was like dismantling a bomb… so much can go wrong (I had to work around a commonly stripped screw), but the guide and the comments were super helpful. Totally get why the logic board needs to be removed due to the solvent use… the batteries are really stuck in there.
The bundled kit was totally worth it, the only thing missing is the heat gun… but a hairdryer would work in a pinch.
Thanks for everything you do ifixit!
Thanks again iFixit. I was going to have Apple do the replacement, but I didn't want to be without my MBP for however long it was going to be at the Mac hospital, plus I saved some $ doing it myself. With the iFixit instructions and tools it was not that hard. The Torx T3 screws are small, so have good reading glasses if you want to see these tiny little things. I love iFixit
I actually sent the book to apple store to have the battery replace. But once they opened up my working MacBook Pro, they said there is sign of water damage hence the replacement cost would not be $199, but will be $14xx, which they will need to replace everything, on my WORKING FINE book?????? That is insane!
If I had to replace this battery again (2017 MBP), I would not. My fingers are just too large for this kind of work. I've worked with all kinds of fasteners over the years, but I'll let someone else deal with T3 x 1.9mm screws next time. Luckily, I used my magnetic bowl during disassembly., else they all would have been lost. Previous MacBook had a removable battery cover.
Would suggest update guide at step 40 to use more care to disconnect speaker cables. Prying up (gently) on the connector broke the (tiny) solder joints at the logic board. It looks as if the only way to sort this out is to replace the logic board.
Also tore the keyboard to logic board cable. But it looks as if this can be replaced.
I used a plastic putty knife to aid in battery removal.
For the sake of compact internal design (fine/small diameter lead wiring cables, ribbons) and high bond strength battery to case adhesives, servicing / replacement is made unnecessarily difficult, though my guess is Apple Engineering could care less.
Dave
Worked great for me. Although I was a bit disheartened when I discovered that the 65 steps did not include re-assembly.
A suggestion: please expand the list of tools to include the consumables that will be required In this case: aluminium foil, painters tape, paper towels.
There is one thing you might want to add to these instructions, One of the two T8 screws in step 46 has a threaded hole in it. If you confuse them during re-assembly, re-installing the cover bracket in step 29 is impossible, and you get extremely frustrated trying.
These instructions were excellent.
A couple of lessons from my experience: I already owned a precision electric screwdriver that I elected to use. Everything was going great until step 25 when I had the electric screwdriver cam out of a T3. To continue the repair I had to drill out the affected screw. My advice, use the provided iFixit screwdriver set as it worked flawlessly.
For this repair I elected to NOT use a placement mat for my screws. Instead I used several small jewelry/hobby plastic bags to put the screws in, each labeled with the Step Number (and description) it was associated with. This proved to be quite useful in this case.
Lastly, double, triple, quadruple check that you have every single connector, ribbon cable, and antenna passed through the logic board before continuing with the reassembly.
Overall it took me nearly 5 hours to complete this repair and I would recommend it to anyone with the ability to have light hands and a little patience.
Trying to remove the rest of the adhesive strips was the most annoying part of this. Also those washers on the trackpad really are paper thin, do not blow on it lol
I also managed to apply PTM7950 thermal pads on the CPU and GPU which was a dry crusty mess that wasn’t doing anything and slowed the computer down and made the fans kick in straight away. If your mac is more than 3 years old (if you have this one it is) I highly recommend doing this as it’s running practically like new again. You have to take out the logic board anyway so applying thermal pads or repasting is not much more difficult.
Thank you iFixit for the clear tutorial.
Great guide! Took about 3.5 hours for inexperienced me.
Was not looking forward to doing this but I went ahead and following the instructions took me roughly 3 hours of time so definitely set a day aside for anyone not experienced with it. Got to say I have a new battery on my laptop! Thanks IFixit!
Thank you for this thorough guide. The patient made a full recovery.
After my first attempt, my fans maxed out, and the keyboard and trackpad didn't work. The reason was that the flex coming from the trackpad had disconnected slightly on the trackpad itself.
Solution was to disconnect the flex carefully - there is adhesive. Put some kapton tape to cover the adhesive, then reconnect the flex. Put another layer of kapton on top to hold the flex in place. Reconnect everything and it worked! The reason for this to happen was that I had placed the batteries slightly too far down - this caused the flex to be just so slightly too short. So make sure to place the batteries very carefully.
I followed all end and back, it took me 2,5 hour now the mac dont work. Just show me 100% Green Battery Icon when I push the touchbar button. helps!?
I experienced the same problem:
I suspected the keyboard or TouchID sensor wouldn’t work, so I went on and checked every connector.
I missed connecting the left TouchID sensor from step 31.
My macbook wont turn on after installing the battery. It just shows an empty battery with a slight red and a lightening bolt. It has been on the charger for over a day and nothing has changed. I opened it up and it looks like both fans spin up when the red battery icon pops up and then they stop when the icon goes away. So frustrating.
I had a similar problem.
I suspected the keyboard or TouchID sensor wouldn’t work, so I went on and checked every connector.
I missed connecting the left TouchID sensor from step 31.
Same story like https://de.ifixit.com/User/4379923/M473J
It mocks me with a green battery icon (which is increasingly loading).
No reset of NVRAM or PRAM seem to have an effect.
I suspected the keyboard or TouchID sensor wouldn’t work, so I went on and checked every connector.
I missed connecting the left TouchID sensor from step 31.
Definitely give yourself time to do this replacement as you don't want to rush it. I was able to follow these instructions and not F it up, so you probably can too. Be sure to read the comments on each step as they are great tips.
Hardest part was reconnecting the antennas. I used my phone's camera in one hand (zoomed in to the max) and tweezers in the other. When I got it aligned I placed the phone down (without moving the other hand) and grabbed the plastic stick and gave it a little push down.
Great set of instructions, I'm no novice, been building PCs and repairing laptops and phones for friends for years. This sas my first battery replacement on a mac so I took my time.
Only had 2 issues which are not due to the instructions
1. I didn't connect the power switch connector fully... so couldn't boot up, had to go back in and do recheck all the connectors to be sure.
2. Fans were loud and I was in a boot loop when I powered on. Finally realised I should do the SMC Reset.
Now works like a charm, thanks to the iFixit community!!!
Decided to replace the battery after my Macbook suddenly stopped charging from any of the USB C ports, then ran out of charge. I thought this was a charger problem, but replacement chargers and leads didn't solve the problem. Wasn't convinced it was a battery problem, but decided to try and change the battery anyway. Completed the battery replacement without any significant problems. Bought the kit. All the tools worked fine. Dislodging the glued in old battery required a bit of time and patience with the adhesive remover, but was okay. Most difficult bit was removing the speaker cables, which are glued on and required careful patient removal to avoid breaking anything, which the comments warned about. Macbook now working fine, so delighted !
Is this step necessary? I can’t perform this step as I am attempting to repair water damage and need to remove logic board & most likely replace the battery.
Macrepair SF - Replica
@mac_medic You definitely don’t want the power coming on while the board is wet. In your case, I think powering on the machine to disable Auto Boot would do more damage than it prevents. I agree, skip this step and be prepared to disconnect the battery quickly if the laptop automatically powers on. Good luck!
Jeff Suovanen -
Thats right! You don't want power running while working on your logic board.
Dan -
This did not work when running High Sierra.
Kyle B - Replica
Tried this on a 2018 MBP 13” Touchbar (there’s no iFixit guide for this model yet). Need to replace a broken screen.
Luckily I managed to connect to an external screen (Cmd-Down Brightness to switch displays) and enter above command. Seems to work, but there’s another problem with this model - it powers up as soon as any key is pressed……. ffs <gnashes teeth>
Cool_Breeze - Replica
I unscrew the battery first and wrap electrical tape over the logic board battery connector before attempting any repairs to the board. Haven’t had any problems yet and I’ve worked on about 10 of these models already. Also when you open the bottom case use a suction cup at the bottom and pull up then run a plastic spudger along the edges to disconnect the clips. Also only use a plastic spudger on the board. Saw a youtube video from a repair shop and he did not disconnect the power and used all metal tools during the entire process of removing the board. His last step was to disconnect the battery terminal.
Brian - Replica
Is this step necessary if my mac can turn on? Battery fully dead(
Nursat b - Replica
BEFORE YOU START: The included torx head stripped off before I was done (and you might need an additional T4) so stop now and go buy a good one. Also they fail to warn you above to get some blue threadlocker ahead of time.
Jason Sherron - Replica
This command did not work for me and I read that sometime in later 2020 Apple stopped this command from working…any ideas on a work around?
Patrick Machacek - Replica
Not able to do that with damaged screen
richardjgreen - Replica
If you have a damaged screen you can still use a converter from thunderbolt (USB 3) to HDMI and plug your Macbook Pro to your TV as monitor display. Just make sure to chose the right Source (HDMI IN) in your TV. I did it and to make it work I unplug and plug again in my Macbook and so I could disable the Auto boot
Roberto Sanchez Bustos -
Hi. This does not work on 2018 13” MacBook Pro with Touch Bar. I did exactly this to disable auto boot. But when I check by using nvram -p it says: auto-boot true. Am I doing something incorrectly? I did everything step by step. Copied and pasted the sudo command, pressed enter and then entered my password. I have Big Sur 11.1 installed. Is there any other way since I need to replace the screen. Thank you. Adrian
Adrian Vizik - Replica
Hi everyone. This is also a little pointless if you can’t see anything on the screen, and you don’t have a display adapter to USB C to display it. I agree with Brian about removing the back and disconnecting the battery cable before you even think about opening the lid of the MacBook. Applying the insulation tape is also a handy little tip that just makes sure there is no way to discharge from either the board or battery.
Roberto Enrieu - Replica
running `nvram -p | grep 'AutoBoot'` in terminal verifies that it was accepted
result: `AutoBoot %00`
Marek Polák - Replica
Running Big Sur 11.6.7 on a 2019 16" MBP, it's "auto-boot". So it's:
nvram -p | grep 'auto-boot'to display the current state, the default istrue- and then to change it,sudo nvram auto-boot=falsewhich turns it off.Ed Mechem -
This step is completely unnecessary if you follow the guide to disconnect the battery properly. Just put some tape between the battery and logic board connection to prevent it from accidentally touching and therefore powering on the laptop.
Grant Ormsby - Replica
It took me a few tries to make this command work, as I was able to copy and paste the command into Terminal, but could not type in my laptop’s password. I finally typed my password into a text document, copied it (command C), and then pasted it into Terminal and it worked.
tommy404 - Replica
I didn’t do this. Mine never auto-booted before I replaced the battery. Now it does.
hatuxka - Replica
BEFORE YOU DO ANYTHING - CHECK THE BATTERY!
I-fixit sent me a bad battery, which I didn’t realize until it was already install. They sent me a new one, but I wasted hours uninstalling and reinstalled.
Get a volt meter and measure the voltage on the output of the battery pack. If it reads 0 V, SEND IT BACK. It should read over 2 V.
bcardanha - Replica
I've just received my replacement battery and it reads 0,042V between the two main connectors. Do you think it's dead?
peter sussex -
When I did this from Terminal.app within Recovery Mode, the “sudo” was not recognized but I could invoke it without the sudo part. It seems to have been accepted when looking at “nvram -p”
johann beda - Replica
When in Recovery Mode, you already have superuser powers. So you don't need to prefix commands with the sudo command to invoke them with root privileges; you already have them. Do a
pwd(print working directory) after opening Terminal in Recovery Mode, and you'll see that you're in the root user's directory.Ed Mechem -
I received the battery kit for my 2018 MacBook Pro and as per the above comment from bcardanha - Oct 12, 2021, I checked the voltage on the pads marked + and - . It was zero volts so I panicked a bit.
I sent a message on the iFixiT Facebook page and I got no reply. I finally found the customer service email for Ifixit Europe and sent them an email voicing my concern as I was not keen to work for couple of hours just to discover that the battery is faulty. I had an almost instant reply on the email (kudos to them) and they adviced me to go ahead and install the new battery as the voltage measured when battery is not connected is not relevant.
I took a leap of faith and after two hours… the new battery showed 50% charge and everything seems to be working just fine. I am happy it worked.
Mircea Comanici - Replica
After removing the old battery and installing the new battery I powered up the MBP before screwing the bottom on. I discovered the my keyboard would not function. It took a few hours of investigation and frustration that I discovered the track pad power ribbon had become partially dislodged from the trackpad. I was able to see that this through the little machined slot where the battery sat. I had to remove the trackpad to reinsert the power ribbon back into the connector in the trackpad. after reassembling and reinstalling the battery etc the keyboard worked. Just food for thought if your run into the keyboard issue.
Ed Mease - Replica
This should be the default. IMO I tell you to power on - not the lid.
G Sena - Replica
Est ce que cela fonctionne sur un macbook pro 2017 sans touchbar ?
maël muzelet - Replica
Bonjour Maël, oui, ce tutoriel concerne "les MacBook Pro 2016 (et plus récents) et les MacBook Retina 12" 2017 (et plus récents)"
Claire Miesch -
Excellent instructions. I was able to follow and install the new screen. I recommend that you get a good set of tools before you begin. I started with an inexpensive repair kit bought online. The Penta and torx bits failed. I bought an IFIXIT kit with quality bits and I was able to do everything I needed.
Tom Markham - Replica
If you're not running an admin account the sudo command won't work (which honestly, you should not be running admin). Rather than logging in to your admin amount via the OS, in the terminal type "login [admin username]," then the password and you'll be able to do the sudo command as described above. Once you're complete, type "logout [admin username]" and you'll be good to go. Obviously replace [admin username] with whatever the account name for your admin user is.
arichard2401 - Replica
For those unable to complete this step because the screen is too damaged I recommend leaving your macbook on until the battery dies.
Nicholas R Licato - Replica
Just replaced my 2018 15" MBP battery. Running Sonoma.
I found no way to disable AutoBoot (The status can be checked in the Power section of system report).
Anyway, i left my battery completely drain before opening the MBP, and had no issues during the process.
Cédric Bontems - Replica
After sending this command in terminal when I checked what happens if I now open the lid, instead the screen lit slightly up (still black) then a battery symbol showing the charging state showed up.
Now, after replacement of the battery, this is all I get to see.
No reset of NVRAM nor PRAM helped.
Currently the new battery charges (58% atm) and it feels like it‘s mocking me.
webrockers - Replica
I suspected the keyboard or TouchID sensor wouldn’t work, so I went on and checked every connector.
I missed connecting the left TouchID sensor from step 31.
webrockers -
Read the comments section at the bottom of the article before proceeding with the repair. It is unnecessary to remove the logic board. I actually removed the 45mm plastic bar to enable the cables to slip out then in. It is only there to frustrate repairers!
Jack - Replica