Introduzione
L'altoparlante voce dell'iPhone 8 Plus ha un secondo compito come altoparlante per la produzione di suono stereo. Se il tuo altoparlante voce fa i capricci, segui questa guida per rimuoverlo e sostituirlo.
Cosa ti serve
-
-
Spegni il tuo iPhone prima di iniziare lo smontaggio.
-
Rimuovi le due viti pentalobe da 3,4 mm sul lato inferiore dell'iPhone.
-
-
-
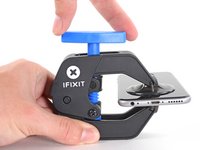
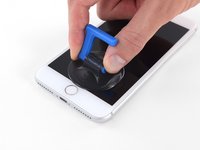
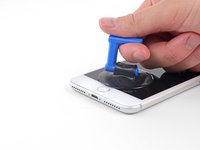
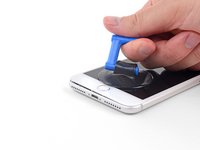
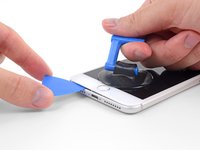
Misura 3 mm dalla punta del plettro e segna questa distanza con un pennarello indelebile.
Got to step 2 and realized the fix kit doesn't include an opening pick! Looks like a guitar pick, and I have those lying around. Is that expected? Looks like the pick is used in many steps below. There's a little blue crowbar that isn't mentioned in the instructions. Perhaps that replaces the opening pick?
Hi! I can't see which guide you were using when writing this comment. Can you reply here with which guide and fix kit you used?
I see you posted this in Meta. I hope it's resolved soon! In the meantime, a guitar pick may work well enough for your repair.
what fix kit?
My fix kit didn't include an opening pick either
My AliExpress refurbished screen came with a pick that has a coin-like circle that pops out, so no modification was necessary
It's not an Ifixit KIT if it doesn't include everything. You'll need to order the opening pic separately. Or head to Walmart like myself and look for guitar pics. Hopefully, this will work just as well.
No pick in mine as well. It’s really not clear that you have to order this separately when ordering an IPhone SE 202/2022 screen repair kit. Is this the case?
Frustrated, I ordered a compact package where everything was encapsulated. Useless suction tools could not separate the screen. If it is unable to decouple the screen, then why sucking suction tools you have provided.
For my kit the triangle pick was stuck inside the box with the screen not with the other tools maybe it's also there for you
Y’all are getting far, FAR too detailed with some of this stuff…. Measuring and marking the pick that you won’t actually use to open the device?!? lol that’s kinda funny. Just heat it up, grab a spudger, and the back just pops right off! The iFixit tech need to stick to the KISS method more often, you know KEEP IT SIMPLE STUPID!!! Like l, for reals, I’ve been doing this stuff for YEARS and using iFixit guides regularly and this is just ridiculous at this point!
Will the phone still work if the sensor assembly on the back of the screen is damaged?
-
-
-
Posiziona strisce sovrapposte di nastro trasparente da pacchi sullo schermo dell'iPhone finché non l'hai coperto tutto.
-
Se non riesci a far aderire la ventosa nei prossimi passi, applica del nastro adesivo resistente (come del nastro americano telato) come una maniglia e alza lo schermo con quello.
-
-
-
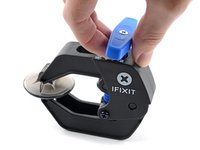
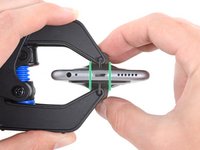
Tira la maniglia blu indietro per sbloccare i bracci dell'Anti-Clamp.
-
Fai scorrere i bracci oltre il bordo sinistro o destro del tuo iPhone.
-
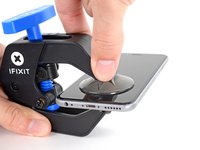
Posiziona le ventose vicino al bordo inferiore dell'iPhone, una di fronte e una sul retro.
-
Premi le ventose insieme per farle aderire sull'area desiderata.
-
-
-
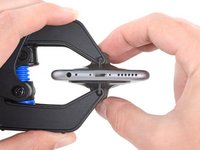
Tira la manopola blu in avanti per bloccare i bracci.
-
Gira la manopola in senso orario di 360° o finché le ventose cominciano ad allungarsi.
-
Accertati che le ventose rimangano allineate fra loro. Se si spostano, allentale leggermente e riallinea i bracci.
-
-
-
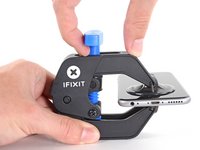
Scalda un iOpener e fallo passare tra i bracci dell'Anti-Clamp.
-
Piega l'iOpener così che sia appoggiato sul bordo inferiore dell'iPhone.
-
Attendi un minuto per dare all'adesivo la possibilità di staccarsi e creare una fessura d'apertura.
-
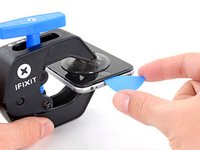
Inserisci un plettro sotto lo schermo quando l'Anti-Clamp avrà creato una fessura abbastanza grande.
-
Salta i prossimi tre passaggi.
-
-
-
Usa un asciugacapelli oppure prepara un iOpener e applicalo per circa 90 secondi al bordo inferiore dell'iPhone per ammorbidire l'adesivo sottostante.
6/14/23 I did this repair but used a heat gun on low for 60 seconds. This allowed me to open the case as the instructions say, but in the end the Home button failed. I probably over heated it. I used this "go around" for a virtual Home button. I don't care about touch ID:
-
-
-
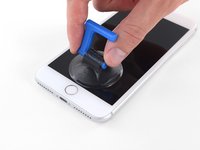
Applica una ventosa nella metà inferiore del pannello frontale, appena sopra il pulsante home.
Using just the single suction cup that is included in the battery replacement kit probably wouldn’t open the device. An iOpener and an iSlack should be the recommended method. However, you can get it open with just the single suction cup and iOpener, but does take a lot of time.
Get an iOpener and iSlack with the battery replacement kit.
I used a flat x-acto (#18) blade knife tool to gently pry back the screen enough to allow me to insert the pick near the bottom corner. I then worked the pick under the screen as mentioned in steps 5 & 6 below then. This worked really well for me.
I used the suction cup without heating the phone - the adhesive came away quite easily without applying any heat. Maybe due to age of phone (nearly 4 years old). Worth trying.
My screen was very shattered, and was quite hard to get suction, as my tape was very low quality. However, after pulling it up a little bit, I was able to insert a regular razor blade into the very small gap and used that as a lever.
Oh my goodness! Don't do that again. You can definitely damage something in the phone if you use a sharp metal razor blade..
cytur -
-
-
-
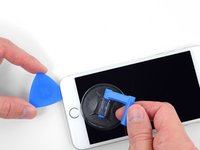
Tira la ventosa applicando una tensione forte e costante fino a creare una piccola fessura tra il gruppo display e il case posteriore.
-
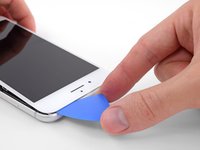
Inserisci nella fessura un plettro di apertura o un altro attrezzo fine per una profondità di qualche millimetro.
After multiple tries and using a very hot iOpener, it will not open.
In sheer frustration, I pulled out my trusty pocket knife and managed to lift the bottom of the screen slightly, but in the process, cracked the glass from the bottom to the home button. The case is open now.
-
-
-
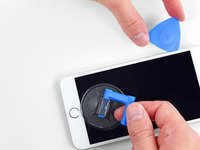
Fai scorrere il tuo attrezzo attorno all'angolo e lungo il bordo sinistro del telefono, spostandoti verso i pulsanti del controllo volume e l'interruttore della modalità silenziosa, per rompere l'adesivo che tiene in posizione il display.
-
Fermati vicino all'angolo superiore sinistro del display.
Do not go over the top otherwise you can crack the screen. Sadly happened to me :(
The instruction should be:
“Stop near BUT BEFORE REACHING the top left corner of the display”
-
-
-
-
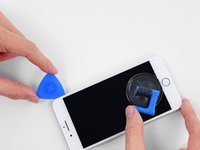
Inserisci nuovamente il tuo attrezzo nell'angolo inferiore destro dell'iPhone e fallo scorrere attorno all'angolo e lungo il lato destro del telefono per separare l'adesivo.
I had really good luck using a hairdryer on some of the more stubborn portions of adhesive.
-
-
-
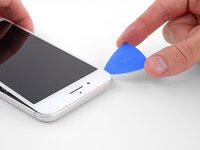
Fai scorrere uno strumento di apertura sotto il display lungo il bordo superiore del telefono per allentare l'adesivo rimasto.
Be very careful at this step. The glass at the top will break very easy when the display is lifted too much.
-
-
-
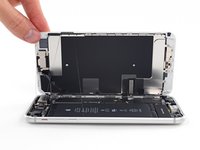
Apri l'iPhone sollevando il display dal lato sinistro, come per sollevare la copertina posteriore di un libro.
-
Appoggia il display contro qualche tipo di supporto per mantenerlo aperto mentre lavori sul telefono.
Das “links” ist auf dem Foto rechts.
-
-
Attrezzo utilizzato in questo passaggio:Magnetic Project Mat$19.95
-
Rimuovi le quattro viti Phillips (JIS) che fissano la staffa del cavo inferiore del display alla scheda logica:
-
Due viti da 1,3 mm
-
Una vite da 1,4 mm
-
Una vite da 2,7 mm
The Phillips screwdriver bit is the PH000. The measurement refers to the screw length.
-
-
-
Usa la punta di uno spudger per staccare il connettore della batteria sollevandolo dal suo zoccolo sulla scheda logica.
-
Piega lievemente da un lato il cavo del connettore per evitare che questo possa fare contatto con lo zoccolo e quindi alimentare il telefono nel corso della tua riparazione.
When I reassembled the iPhone 8 Plus, I had to plug it into a Lightning cable to wake it up (just pushing power button wasn’t sufficient).
-
-
-
Usa la punta di uno spudger oppure un'unghia per staccare il grande connettore inferiore del display tirandolo dritto verso l'alto dal suo alloggiamento.
I got hold of a iPhone 8 Plus with cracked screen that I am planning to fix.
Here is my problem:
When I tried to take out the screen from my phone, (step 15-18) I was curious about the new screen, so I tried to connect it. It was completely dead! Then I tried the old cracked one, and suddenly that was dead to! This is a phone that some fool has been inside earlier and changed battery, but I suspect he has done some more really stupid things. The Taptic Engine is living its own life and vibrating every time I slightly touch the home button. (I have a new Taptic Engine) The phone is also full of dust and small particles that does not belong there. One tri-point Y000 screw (step 18) is even missing! Now the biggest problem is that both screens are black! I know the phone is on, because I hear voice command speak when I turn on the power. The screen worked before I tried to change it? And one last thing: My new LCD screen came with new flex cables. Is it possible to switch over, so I can use the old ones?
Hi,
Is your problem solved?
Be careful of damaging MOSFETs by the LH side of the large lower display cable. After replacing the battery and turning the device on, the phone showed low charge and didn't have a charging symbol even after plugging into multiple cables and chargers. Turns out I had damaged the logic board attempting to disconnect the connector.
-
-
-
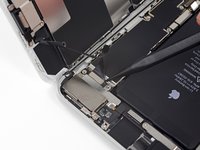
Stacca il secondo connettore inferiore del cavo del display, proprio sotto quello che hai disconnesso nel passo precedente.
I used the other end of the spudger on this connector and it seemed to work a little better for me. I came in from underneath the top-right edge instead of the bottom right.
-
-
-
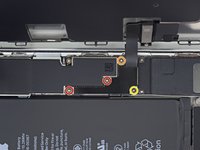
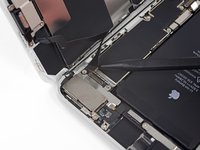
Rimuovi le due viti tri-wing Y000 che tengono in posizione la staffa sopra il connettore del gruppo sensore del pannello frontale:
-
Una vite da 1,0 mm
-
Una vite da 1,2 mm
una vite da 1mm e due viti da 1.2 mm???
Ciao Matteo! Grazie per l’osservazione. Ho appena modificato il testo :) La traduzione è aperta a tutti. Hai quindi la possibilità di fare le tue suggestione direttamente nel testo e sei il benvenuto se vuoi usare di questa possibilità nel futuro. Grazie ancora per la vigilanza! Saluti, Claire
The tool kit does include a 1.0 or1.2mm screwdriver! How am I supposed to remove those screws?
Bought the screwdriver that supposedly fits these screws and it still doesn’t work.
My bracket looks different. Can’t get these screws out.
kit came with wrong bit. i received 2x P02 (penta tips) and no tri point y000.
-
-
-
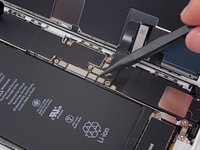
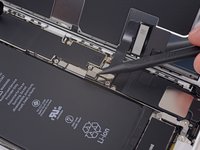
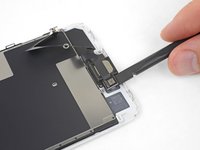
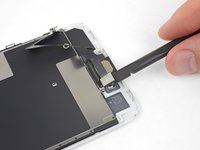
Usa la punta di uno spudger oppure un'unghia per staccare dalla sua sede il connettore del gruppo sensore del pannello frontale.
-
-
-
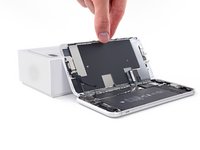
Rimuovi il gruppo display.
Should there be a step somewhere in here to point out when to remove the blue plastic from the new iFixit screen?
-
-
-
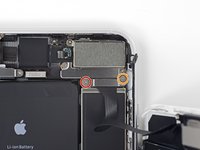
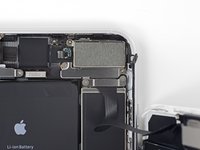
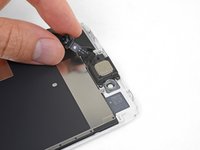
Svita le cinque viti a croce Phillips che fissano la staffa dell'altoparlante voce:
-
Due viti da 1,8 mm
-
Una vite da 2,3 mm
-
Una vite da 2,4 mm
-
Una vite da 2,8 mm
-


Confronta la tua nuova parte di ricambio con la parte originale: prima dell'installazione potrebbe rendersi necessario trasferire alcuni componenti dall'una all'altra o rimuovere dal ricambio eventuali elementi adesivi.
Per rimontare il tuo dispositivo, segui queste istruzioni in ordine inverso.
Porta i tuoi rifiuti elettronici a un riciclatore certificato R2 o e-Stewards.
La riparazione non è andata secondo i piani? Vai alla nostra Comunità Risposte per trovare aiuto nella risoluzione dei problemi.
Annulla: non ho completato questa guida.
Altre 36 persone hanno completato questa guida.
Un ringraziamento speciale a questi traduttori:
100%


Questi traduttori ci stanno aiutando ad aggiustare il mondo! Vuoi partecipare?
Inizia a tradurre ›


3 Commenti
To replace the earpiece speaker, is the 6plus kit you sell compatible?
I'm sure if you kept looking at the cell phone repair shops, or cell phone repair parts you'll find the earpiece part. The iPhone 8 is very popular. I found mine for like $4-$5 in Saudi Arabia. otherwise you can look at amazon or eBay. good luck.
iAziz -
what do I do about super stripped screws?
Ean Palacios - Replica
I’m sorry, your comment slipped past my radar earlier. For future fixers that might see this and ask the same question, you can check out our stripped screw guide for some detailed advice.
Adam O'Camb -
Do you need a toolkit like the essential toolkit
Adam Palmer - Replica
Hi Adam. Having a tool kit with all of the listed parts above is best. The screw heads are very small and each set of screws needs a very specific type of driver to remove them without stripping any of them.
Kyle Luksa -