
Sostituzione Schermo Game Boy
Introduzione
Vai al passo 1Come accedere e sostituire lo schermo LCD in bianco e nero del Game Boy originale. Questa è una riparazione avanzata. Dovrai essere in grado di effettuare una saldatura per completare questa riparazione, quindi assicurati di dare un'occhiata alla guida alla tecnica di saldatura di iFixit.
Nota: Se il display del tuo Game Boy ha il classico problema delle "linee verticali", in realtà è più facile riparare il vecchio schermo che sostituirlo con uno nuovo. Segui questa guida per le istruzioni su come riparare il vecchio schermo.
Cosa ti serve


-
-
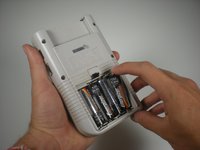
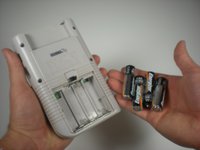
Rimuovi le sei viti di fissaggio dal retro dell'apparecchio.
-
-
-
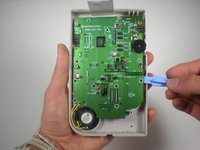
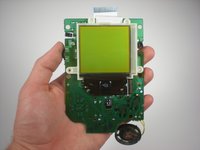
Rimuovi le dieci viti che fissano il circuito stampato all'involucro esterno.
-
-
-
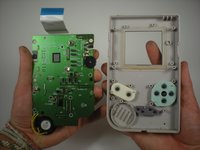
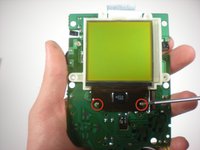
Sgancia le tre clip di plastica che fissano lo schermo al circuito stampato.
I didn’t find this step necessary as the plastic screen holding unit is separate from the screen.
-


Per rimontare il dispositivo, segui queste istruzioni in ordine inverso.
Per rimontare il dispositivo, segui queste istruzioni in ordine inverso.
Annulla: non ho completato questa guida.
Altre 46 persone hanno completato questa guida.
Un ringraziamento speciale a questi traduttori:
100%


Questi traduttori ci stanno aiutando ad aggiustare il mondo! Vuoi partecipare?
Inizia a tradurre ›
Preparati per le riparazioni future
Acquista tutti


Team

Cal Poly, Team 3-2, Johann Summer 2010 Membro di Cal Poly, Team 3-2, Johann Summer 2010
CPSU-JOHANN-R10S3G2
3 Membri
36 Guide realizzate
14Commenti sulla guida
What kind of lcd screen or where can I find one that isn't off of another dmg-01 gameboy?
I was wondering the same. Maybe ebay or Amazon.
Replacement reflective LCDs are not possible to find. You can either purchase a screen salvaged from an old DMG, or get a brand new backlit LCD replacement.
mars -
What about the new display? Where to get it?
No spare part necessary should be replaced with a link where to buy a new one.
You can’t buy a new replacement screen unfortunately. Not only is it very difficult to remove the screen, it’s impossible to buy a replacement. They’d be better showing us how to fix a screen. There’s plenty of videos on YT showing how to fix blank vertical line but hardly any on how to fix horizontal lines, and the ones that do don’t work very well.
I agree. I have horizontal lines, and it has been difficult to find out if it is fixable or if it is damaged beyond repair. I have found no instructions on how to repair this, only one website saying it cannot be fixed and you shouldn't try.
mars -
Where do I buy a replacement screen for a 1989 game boy?
i suggest maybe going on ebay and finding a gameboy thats either just for parts or has a working screen and desoldering it
I tried following the video and ended up with burned tabs and melted plastic. Basically it’s all ruined. OP does a terrible job.
will this guide work to install a backlit LCD for the Game Boy? I have this Rips v4 backlit IPS LCD, and I figured I might as well install it.
if not, that's alright. I'll just find another guide.
AFAIK you can follow through the disassembly guide up to step 10 no problem, then it depends if you bought the full kit you simply swap the old screen and big PCB with the new ones; if you're planning to use the original GB case, notice you'll have to do some mods in order to fit in the new screen. Also, you might have to solder the speaker on the PCB. Here's a video you may want to check out when you're done disassembling the GB and will be ready to start installing the screen upgrade: https://www.youtube.com/watch?v=FMIJTbPe...
Simone -
bonjour ou puis je trouver l'ecran LCD ?
merci
I have the horizontal lines issue on my DMG, and it is unclear if this issue can be resolved. Unfortunately, replacement reflective screens are not available unless you salvage one from another DMG, which is not ideal. You can get brand new backlit LCDs, which I admit would be advantageous in some situations, but backlit LCDs are difficult to see in direct sunlight. While I would like to see brand new reflective LCDs, I don't expect to see them because there isn't much of a market for them and no one is in the business of losing money.