Introduzione
Segui questa guida per sostituire o aggiornare l'SSD nel tuo Steam Deck OLED. L'SSD dello Steam Deck OLED è un M.2 2230 a lato singolo.
Ricordati di seguire le procedure generali di sicurezza contro le scariche elettrostatiche (ESD) durante la riparazione del tuo dispositivo.
Questi passaggi descrivono solo come rimuovere e sostituire fisicamente il tuo SSD. Saranno necessari strumenti e procedure software aggiuntivi per installare un sistema operativo e far sì che l'SSD sostitutivo funzioni come previsto.
Segui le Istruzioni per il ripristino di Steam Deck di Valveper ripristinare, riparare o reinstallare SteamOS sull'SSD del tuo Steam Deck.*** Per l'installazione di Windows, puoi trovare le risorse ufficiali qui .
Cosa ti serve
-
-
Spegni il tuo Steam Deck e scollega tutti i cavi.
-
-
Attrezzo utilizzato in questo passaggio:FixMat$36.95
-
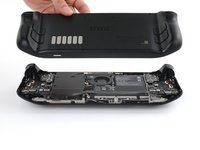
Utilizza un cacciavite Torx T6 per rimuovere le otto viti lunghe 5,8 mm che fissano la copertura posteriore.
-
-
-
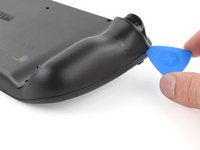
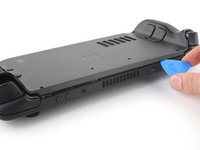
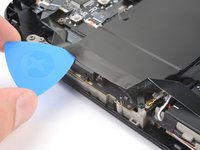
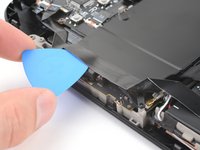
Inserisci un plettro di apertura inclinato verso l'alto tra la copertura posteriore e il guscio anteriore vicino a uno dei grilletti.
-
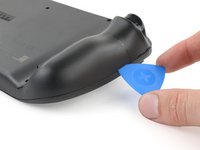
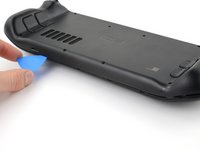
Fai scorrere il tuo plettro lungo il bordo dell'impugnatura per rilasciare le clip che la fissano al guscio anteriore.
-
-
-
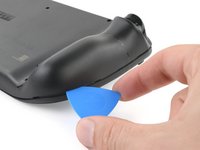
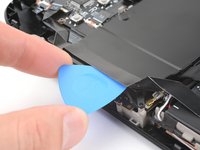
Reinserisci il tuo plettro e fallo scorrere lungo i bordi superiore e inferiore sin quando la cover posteriore non sembrerà allentata.
-
-
-
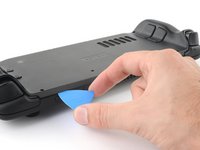
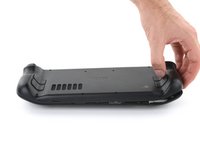
Afferra l'impugnatura non agganciata e tirala via dal guscio anteriore per rilasciare le clip rimanenti.
-
Rimuovi la copertura posteriore.
-
-
-
-
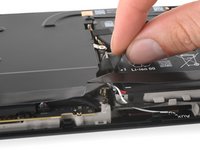
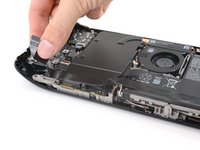
Afferra la linguetta di estrazione del cavo della batteria, posizionata a sinistra della batteria.
-
Tira saldamente il cavo della batteria direttamente lontano dalla copertura della scheda madre (verso la batteria) per disconnetterlo.
-
-
Attrezzo utilizzato in questo passaggio:Tweezers$4.99
-
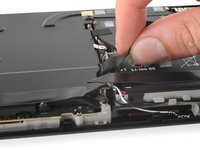
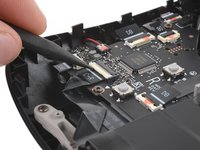
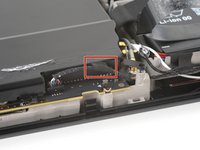
Utilizza uno spudger per sollevare la piccola linguetta di blocco bianca sul connettore ZIF del cavo di interconnessione della scheda del pulsante destro.
-
Utilizza delle pinzette o le dita per afferrare la linguetta di estrazione del cavo e fallo scorrere direttamente fuori dalla sua presa per scollegarlo.
-
-
-
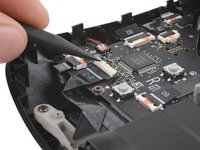
Utilizza un plettro di apertura tra il cavo di interconnessione e la protezione della scheda madre.
-
Fai scorrere il tuo plettro lungo la protezione per separare il cavo.
-
-
-
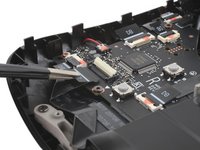
Fissa il cavo con del nastro adesivo lontano dalla protezione della scheda madre.
-
-
-
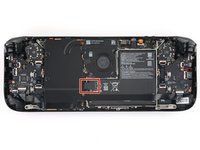
Utilizza il tuo cacciavite Torx T6 per rimuovere le due viti lunghe 3,8 mm che fissano gli angoli in alto a sinistra e in basso a sinistra della protezione della scheda madre.
-
-
-
Se il cavo degli altoparlanti è fissato con nastro adesivo al bordo inferiore della protezione della scheda madre, staccalo delicatamente.
-
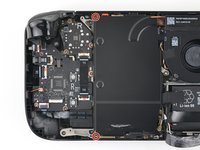
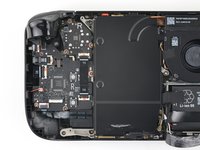
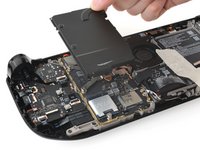
Rimuovi la protezione della scheda madre.
-
-
-
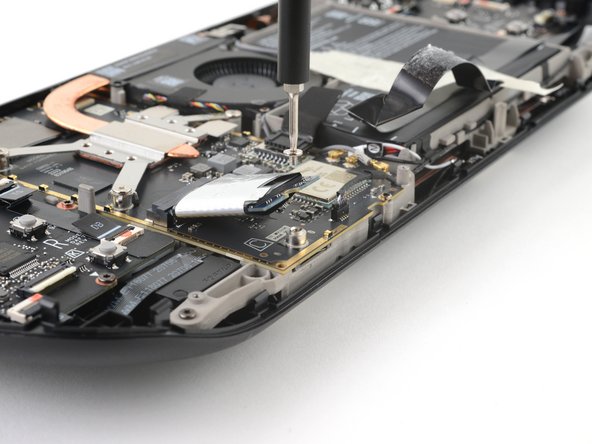
Utilizza il tuo cacciavite Torx T6 per rimuovere la vite lunga 3,3 mm che fissa l'SSD.
-
-
-
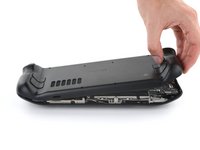
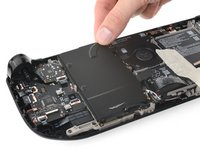
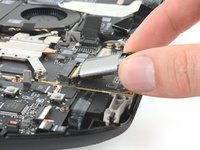
Afferra l'estremità dell'SSD e tiralo via dal connettore della sua scheda M.2 per rimuoverlo.
-
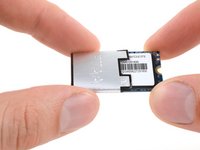
Rimuovi l'SSD.
-
-
-
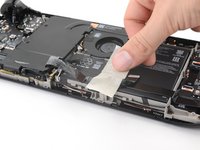
Fai scorrere la protezione dall'SSD.
-
Se la protezione sembra bloccata, staccala e rimuovila. Abbi cura di mantenerla nelle migliori condizioni possibili se desideri riutilizzarla.
-
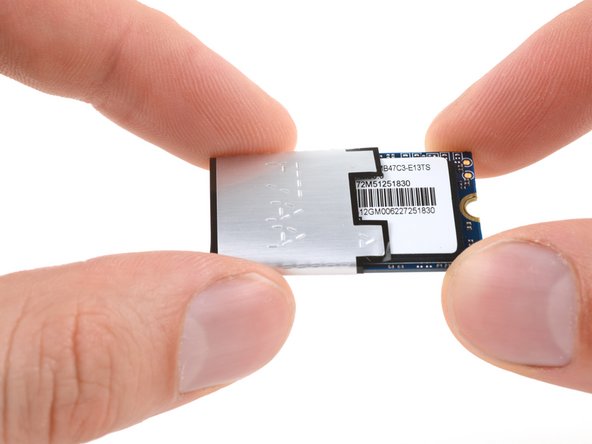
Rimane solo l'SSD.
-


Per rimontare il dispositivo, segui le istruzioni nell'ordine inverso.
Per ripristinare, riparare o ricreare l'immagine dell'SSD del tuo Steam Deck OLED con SteamOS, segui le istruzioni per il ripristino dello Steam Deck di Valve.
Porta i tuoi rifiuti elettronici a un riciclatore certificato R2 o e-Stewards.
La riparazione non è andata come previsto? Prova alcune risoluzioni dei problemi di base o chiedi aiuto alla nostra comunità Risposte Steam Deck OLED.
Annulla: non ho completato questa guida.
Altre 28 persone hanno completato questa guida.
Un ringraziamento speciale a questi traduttori:
100%


Questi traduttori ci stanno aiutando ad aggiustare il mondo! Vuoi partecipare?
Inizia a tradurre ›

Team

4 Commenti
Hardest part is unclipping the clips XD
I have completed this but there are ways this could be done better and safely. I have left comments under each step. Step 6 to disconnect the battery should be after Step 10. In my case, the connector did not come out and the pull tab nearly separated creating a risk for damage if I had proceeded further. Removing the shield gives much better access so you can wiggle the connector out using your nail..
Step 8 is to separate the cable adhesive. Every build may have different amount of adhesive applied making this a risky venture. In trying to separate the cable, a lot of force was needed in my deck which could have damaged the cable. A guide on YouTube was to simply work around this. I wish I had seen it prior to have completely avoided this risk.
All in all, I will say a version 2 of this guide is needed.
Two things that could be helpful for anyone attempting this :
1. If it's your first time opening a deck, the hardest part is to open up the shell. After removing the screws You just need the guitar pick plastic thing. Taking your time is key and will make it way less likely to scratch the case or break a tab as you'll apply just enough force to unclip.
2. If you've already opened a regular deck and it's your first OLED, in some ways it's easier but in others a bit harder: when I attempted step 6 the battery connector wouldn't budge so I just left it plugged (the battery was almost empty and the deck was in battery storage mode, though). I did step 7 but skipped step 8 and simply folded the whole cable + shield part over the battery while replacing the SSD.
On reassembly, no point in tightening the screws too much, it increases the risk of stripping the screw or breaking the screw threads.
Good luck! (and DON'T FORGET TO REMOVE THE SD CARD BEFORE YOU START!)
You can totally skip the step 8 if you unplug the interconnection cable and gently remove ONLY the adesive of the speaker, there is no need to unglue the interconnection cable from the motherboard shield, just remove the two shields' screw and carefully lift it up to easily access to the ssd.