
Sostituzione SSD Dell XPS 13
Introduzione
Vai al passo 1Questa guida ti mostrerà come sostituire l'SSD nel Dell XPS 13. Se il tuo SSD originale funziona ancora, assicurati di creare un backup completo o clonarlo prima di iniziare. Puoi seguire questa guida sia per aumentare la capacità del disco, sia per sostituirne uno difettoso. Se installi un SSD vuoto, Dovrai reinstallare Windows (o il sistema operativo che preferisci) una volta conclusa la riparazione.
Cosa ti serve
Kit di riparazione
Questo kit contiene tutti i ricambi e gli strumenti necessari per completare questa guida.

Ricambi


Strumenti


Mostra di più…
-
-
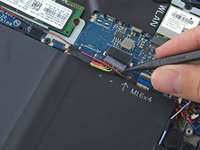
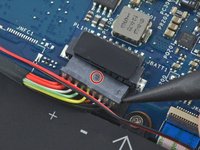
Tira il connettore del cavo della batteria verso la batteria stessa per scollegarlo dalla sua presa.
-
Se il connettore è incastrato, spingilo un po' da un lato, poi spingi l'altro, per "guidarlo" fuori dalla presa.
-
Se hai dei problemi a guidare il connettore fuori dalla presa, usa la punta di uno spudger per spingere delicatamente sull'indentazione del connettore per sfilarlo.
-
Apri lo schermo e premi il tasto di accensione per cinque secondi per scaricare qualsiasi carica dal sistema.
-


Per rimontare il tuo dispositivo, segui le istruzioni in ordine inverso.
Per rimontare il tuo dispositivo, segui le istruzioni in ordine inverso.
Annulla: non ho completato questa guida.
Altre 28 persone hanno completato questa guida.
Un ringraziamento speciale a questi traduttori:
100%
Daniele Carminati ci sta aiutando ad aggiustare il mondo! Vuoi partecipare?
Inizia a tradurre ›
Preparati per le riparazioni future
Acquista tutti


15Commenti sulla guida
I’m kinda new on pc upgrading. So once I install a new m.2 I’ll need to install a new window 10 right
Yes, you have to install windows again. or you can clone your existing ssd onto the new one using some adapters easily found online
You will have to reinstall unless you are buying a samsung m.2 which comes with a disk duplicator utility. The xps 13 cames with a samsung early life evo disk (128GB) and transferring from 1 evo to another is very easy with the app. I believe its the same with every disk though I havent tried the latter.
Dell has some nice recovery tools:
https://www.dell.com/support/kbdoc/en-us...
I downloaded a recovery image to use from a USB drive. I am using it to reinstall the Windows that came with the PC. You don't have to be the original owner but you do need to have the Dell asset number usually stored in the bios
https://www.laptopmag.com/articles/upgra...
helpful resource
My screws were a T6 not T5 and it took about 20 minutes not 15. I suspect different versions of the XPS 13 have different screws etc. mines a 9370.
it would have been helpful if the guide title or preamble mentioned the specific model these instructions were written against.
The process was the same though and the guide helpful, thanks!
I viewed another video before this one and was surprised to learn how easily the back snapped off after removing all of the screws and following the instructions to start near the back. Nice
Back up your data: Before you begin, make sure you have backed up all your important data to an external hard drive or cloud storage.
Shut down your laptop and unplug it from the power source.
Open the laptop: Use a Torx screwdriver to remove the screws on the bottom of the laptop. You may need to use a plastic spudger tool to pry open the bottom cover.
Locate the SSD: The SSD is a small rectangular chip connected to the motherboard. It may be covered by a metal shield or tape.
Remove the SSD: Unscrew any screws holding the metal shield or tape in place. Gently lift the SSD out of its socket, being careful not to bend any pins.
Install the new SSD: Carefully insert the new SSD into the socket, making sure it's properly aligned. Tighten any screws or clips to secure the SSD in place.
Close the laptop: Replace the bottom cover and secure it with screws.
Power on the laptop: Plug in the power source and turn on the laptop. Check to make sure the new SSD is detected in the BIOS.
check this here: Back up your data: Before you begin, make sure you have backed up all your important data to an external hard drive or cloud storage.
Shut down your laptop and unplug it from the power source.
Open the laptop: Use a Torx screwdriver to remove the screws on the bottom of the laptop. You may need to use a plastic spudger tool to pry open the bottom cover.
Locate the SSD: The SSD is a small rectangular chip connected to the motherboard. It may be covered by a metal shield or tape.
Remove the SSD: Unscrew any screws holding the metal shield or tape in place. Gently lift the SSD out of its socket, being careful not to bend any pins.
Install the new SSD: Carefully insert the new SSD into the socket, making sure it's properly aligned. Tighten any screws or clips to secure the SSD in place.
Close the laptop: Replace the bottom cover and secure it with screws.
Power on the laptop: Plug in the power source and turn on the laptop. Check to make sure the new SSD is detected in the BIOS.
check here: https://www.lenovo.com/ca/en/faqs/pc-lif...
Hey, thanks for the help. What's the max SSD capacity allowed on this XPS model ?
Is it true this doesn't work for the 9315 because the SSD is soldered to the motherboard?
I heard about that too. I opened mine (ie.9315) but the SSD seems to be covered by a "black part". I was too frightened to go on.
Can I put in a larger NVME? 1tb -4tb?
Hi is the Crucial P3 Plus NVMe PCIe M.2 2280SS SSD compatible with dell xps 13 9360 please? Will this improve the speed of the laptop? I'm a little limited on the technical knowledge and would appreciate all the help.