
PowerBook G3 Pismo Display Replacement

Introduzione
Vai al passo 1Change out the entire display assembly, including the hinges and plastic casing.
Cosa ti serve
Ricambi
Strumenti


Mostra di più…
-
-
Turn the keyboard locking screw so that it is parallel to the space bar.
-
Pull the keyboard release tabs toward you and lift up on the keyboard until it pops free.
-
Lift the keyboard out by pulling it up and away from you. Rest the keyboard, face down, on top of the track pad.
-
-
-
Remove the two silver Phillips #1 screws that attach the heat shield to the internal metal framework.
-
Lift the heat shield up and pull it toward you.
-
-
-
Firmly grasp the plastic tab attached to the Airport card and pull up and then to the right.
-
-
-
Disconnect the antenna cable from the Airport card.
To disconnect the cable, you just pull on it with enough force. It's just a straight up plug, no special tabs to unhook. I was a little shy as I never want to yank on old electronics, but just slowly turn up the amount of force you're pulling with until it comes loose.
-
-
-
Pull the battery cable directly up from the logic board.
-
Remove the battery from its holder by pulling up and to the left.
-
-
-
Remove the long silver Phillips #1 screw from the heat sink.
-
Remove the two T8 Torx screws that attach the heat sink to the processor.
-
-
-
-
Grasp the plastic tab on the processor's right side and pull it directly up.
-
-
-
Remove the black Torx screw from the right side of the modem.
-
Remove the small black plastic rectangle with four holes.
-
-
-
Grasp the orange cable at the left end of the hard drive and disconnect it from the logic board.
-
-
-
Grasp the plastic tab and pull the hard drive up and to the left, making sure that the metal bracket doesn't catch on the black plastic casing.
The edge of the hard drive cage was getting caught on the side of the case as I tried to pull up. If you look at the photo in Step 18, you can see the left hand index finger putting pressure on the edge of that hard drive cage/rail. You'll want to use a tool or a finger to similarly squeeze the cage, so it can slip out of the bay without catching.
-
-
-
Push the display back so that it lies flat.
-
Slip your index finger or a nylon tool under the clutch cover near the power button and pull gently upward until you feel it come free.
-
Repeat the previous step on the left side.
-
-
-
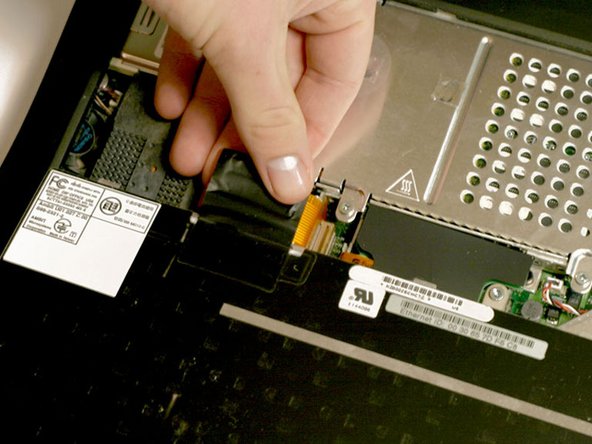
Grasp the orange display data cable and disconnect it from the logic board.
-
-
-
Turn the laptop around so that its back faces you.
-
Open the port door located at the back of the laptop.
-
Remove the four black Torx screws.
-


To reassemble your device, follow these instructions in reverse order.
To reassemble your device, follow these instructions in reverse order.
Annulla: non ho completato questa guida.
Altre 6 persone hanno completato questa guida.
Documenti Allegati

2Commenti sulla guida
just ruined a new screen and a Pismo. I'm a genius
This guide worked pretty well for getting the display out. However, I only have a replacement LCD screen, so now I'm scratching my head about how to actually open the removed display unit, and get at the insides so I can swap out the LCD panel. Will report back here if I find anything.