Salta al contenuto principale
Unisciti alla Community delle riparazioni - Crea un account
Mac mini Model A1283 RAM Replacement

Mac mini Model A1283 RAM Replacement

Walter Galan

Walter Galan e 9 altri collaboratori

Ultimo aggiornamento il 5 lug 2025

20 minuti - 1 ora
Moderato
Guida In Evidenza

Introduzione

Vai al passo 1

Accessing the RAM requires the removal of the internal frame.

Cosa ti serve

Kit di riparazione

Questo kit contiene tutti i ricambi e gli strumenti necessari per completare questa guida.

Ricambi

Strumenti

  • Phillips #00 Screwdriver
    Phillips #00 Screwdriver
  • Spudger
    Spudger

Mostra di più…

  1. Mac mini Model A1283 RAM Replacement, Top Housing: passo 1, immagine 1 di 2 Mac mini Model A1283 RAM Replacement, Top Housing: passo 1, immagine 2 di 2
    • Power down your Mac mini, disconnect all of the cables, and flip it over.

    • Insert the Jimmy into the crack between the aluminum top housing and the plastic lower housing.

    • The Jimmy should reach a stop about 3/8" down.

  2. Mac mini Model A1283 RAM Replacement: passo 2, immagine 1 di 3 Mac mini Model A1283 RAM Replacement: passo 2, immagine 2 di 3 Mac mini Model A1283 RAM Replacement: passo 2, immagine 3 di 3
    • Gently bend the Jimmy outwards to pry the crack open a little larger and lift the lower housing up a small amount.

    • There are several plastic clips on the lower housing that fit into a channel in the aluminum top housing. Your goal is to use the Jimmy to push these clips inward enough to free them from the channel, while gently pulling up on the lower housing.

  3. Mac mini Model A1283 RAM Replacement: passo 3, immagine 1 di 2 Mac mini Model A1283 RAM Replacement: passo 3, immagine 2 di 2
    • Once you have the first side free, rotate the Mac mini and start prying up on the front edge.

    • Use the same prying motion to both bend the clips inward and lift the lower housing up out of the top housing.

  4. Mac mini Model A1283 RAM Replacement: passo 4, immagine 1 di 2 Mac mini Model A1283 RAM Replacement: passo 4, immagine 2 di 2
    • You may need to move the Jimmy along the edge to pry up all of the clips. Be patient and do a little bit at a time.

  5. Mac mini Model A1283 RAM Replacement: passo 5, immagine 1 di 2 Mac mini Model A1283 RAM Replacement: passo 5, immagine 2 di 2
    • Keep working around the perimeter, freeing the clips along the final edge.

  6. Mac mini Model A1283 RAM Replacement: passo 6, immagine 1 di 2 Mac mini Model A1283 RAM Replacement: passo 6, immagine 2 di 2
    • Flip the Mac mini back over and lift the top housing off of the lower housing.

  7. Mac mini Model A1283 RAM Replacement, Internal Frame: passo 7, immagine 1 di 1
    • In the next few steps you will be removing the AirPort and Bluetooth antennas (shown in red) from the internal frame. Be very careful, as breaking the brackets will require replacing the internal frame.

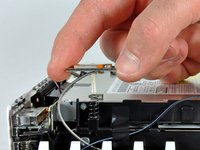
    • We will first remove the AirPort antenna, located in the lower left corner of this picture.

  8. Mac mini Model A1283 RAM Replacement: passo 8, immagine 1 di 2 Mac mini Model A1283 RAM Replacement: passo 8, immagine 2 di 2
    • Slightly squeeze the two retaining arms toward each other and lift the AirPort antenna off its post.

    • Squeezing the two posts excessively will surely break them off the internal frame. Work delicately.

    • During reinstallation, you will have to slightly squeeze the two posts together so they fit into the openings on the AirPort antenna board.

  9. Mac mini Model A1283 RAM Replacement: passo 9, immagine 1 di 2 Mac mini Model A1283 RAM Replacement: passo 9, immagine 2 di 2
    • The two Bluetooth antenna boards simply lift off the internal frame.

    • Grab the Bluetooth antenna nearest the port side of the computer by the edges of the board and pull it straight up off the internal frame.

    • Pull carefully, as it may offer significant resistance and release suddenly.

  10. Mac mini Model A1283 RAM Replacement: passo 10, immagine 1 di 1
    • Remove the antenna board near the front of the mini by pulling it straight up off the internal frame.

    • If necessary, remove the piece of tape securing the antenna leads to the internal frame.

    • Be sure to keep track of the springs under each of the three antenna boards.

  11. Mac mini Model A1283 RAM Replacement: passo 11, immagine 1 di 1
    • Use the flat end of a spudger to pry the audio ribbon cable connector up off the audio board.

  12. Mac mini Model A1283 RAM Replacement: passo 12, immagine 1 di 1
    • Remove the following four screws securing the internal frame to the bottom housing:

    • Three 6.7 mm Phillips #00 screws

    • One 9.5 mm Phillips #00 screw

    • The screw in the lower right corner of this image is recessed deep in the internal frame and longer than the other three screws. A flashlight and a thin screwdriver aid in removal.

  13. Mac mini Model A1283 RAM Replacement: passo 13, immagine 1 di 1
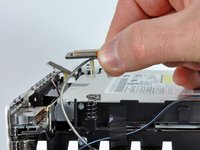
    • Lift the internal frame off the bottom housing, starting at the rear edge, until you feel the concealed edge connector on the motherboard disconnect. Then lift straight off, minding the bluetooth and 802.11 antenna cables.

    • When reassembling, the wifi antenna wire routes to the inside of the vent and then over the top of the vent.

    Be VERY careful when reassembling that your wifi/bluetooth cables don't get caught between the internal frame header and its connector on the motherboard. They're so thin that you will hardly feel this (considering this connector requires a lot of pressure). If you then tighten the screws the connector and the stuck wifi cable will be severely damaged.

    This damaged my mini's wifi cable and the connector that the internal frame plugs into. I was able to repair the connector by squeezing the plastic sides back together but it's never been quite right and my wifi cable was completely cut. I removed the wireless daughterboard completely now, as I didn't need it anyway and the mini is working again.

    I know I should have checked but I didn't think of it. So this is just a word of warning to others trying the same :)

    GekkePrutser - Replica

    If you accidentally disconnect the antennas, see Mac mini Model A1283 Antennas Replacement to reconnect them.

    eric - Replica

    I second the comment about trapping wires on reassembly, particularly the WiFi one. The cable's natural tendency is to trap itself between the black plastic airduct section of the internal frame and the corresponding moulding on the base / port side.

    In the absence of a third hand, I found that resting the WiFi antenna on top of the optical drive as you lower the internal frame back into position helps position the cable in the right place, rather than leaving the antenna outside the port area.

    Brian - Replica

    Very tricky to line up the longer screw on reassembly,. I found it easier to put all the screws in place in the plastic frame before carefully reassembling the internal frame with the outer casing. Just be careful not to disconnect the antenna wires, before tightening the screws.

    wmdel - Replica

  14. Mac mini Model A1283 RAM Replacement, RAM: passo 14, immagine 1 di 2 Mac mini Model A1283 RAM Replacement, RAM: passo 14, immagine 2 di 2
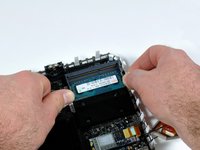
    • Simultaneously pull the tabs on each side of the RAM chip away from the center of the chip. These tabs lock the chip in place and releasing them will cause the chip to "pop" up.

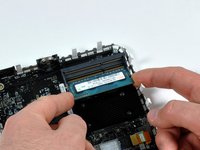
    • Pull the RAM chip directly out from its connector.

    • If there are two RAM chips installed, repeat the above procedure for the second chip.

Conclusione

To reassemble your device, follow these instructions in reverse order.

Altre 399 persone hanno completato questa guida.

Preparati per le riparazioni future

Acquista tutti

8Commenti sulla guida

if you are upgrading to 8g it may not work. my system would only recognize a mismatched 4g and 2g for 6g. even the 2g boost from 4g made some speed improvement

walang - Replica

Well done! Easy to follow and thorough! Took me 10 minutes start to finish!

Bill Finch - Replica

You probably need to install Mac Mini EFI firmware update 1.2:

https://support.apple.com/kb/DL888

Kevin Moorman - Replica

Wife has the Late 2009 Macmini (MM) originally with 2GB. We upgraded to 4GB a couple of years ago, and it has been running very slow with Yosemite (10.10.5) for far too long.

Ordered the 8GB upgrade kit and set for 2 day delivery. Bummer it came in 1 day via UPS. Thanks for the surprise iFixit. The tools were unnecessary for me (as I have most), but they are totally outstanding and the real deal. So I decided to use them all. ;)

The upgrade took about 15 min (even for this experienced Mac repair guy). Fired it up and the MM recognized all 8GB. It doesn’t scream, however, it is probably 2-3 times faster and can handle the amazing multi-takser that is my wife; 16 Safari pages, Mac Mail, Calendar, and 7 other apps open at all the same dang time. Thanks iFixit for the absolute best in repair universe parts, service, tech commitment, and guides.

ToddR - Replica

It worked!!! Love it!!! The websites installation guide was very easy to understand. However, the small screwdriver that was shipped with the kit didn’t fit the screws for step-12, almost stripping the screws. luckily, I had another small screwdriver (for glasses) that worked.

Thank you ifixit!!! Totally worth it.

Justin Basl - Replica

Did it in about 5 Min. The Old Macs are great to work with. One Thing i can recommend is a longer bit for your Skrewdriver.

Tobias Leidinger - Replica

It worked!!! Got a Mac Mini Late 2009 and the Apple Website told me it just supports 4 GB. Just built in 2 x 4GB RAM and it’ running… Thanks for the great how to guide. I love my Mako Driver Kit from iFixit, best screwdriver kit!!!

Andrea Schieder - Replica

Worked, very helpful. The one thing I needed that was different was a prying tool to open the case. The Jimmy was too flimsy on its own. Had to use the Jimmy on one and the painter's tool on the other. The Jimmy by itself was to flimsy, and instead of the case opening, the Jimmy would bend. Note that you need to be careful with this; I ended up bending one of the pins that hold the chassis in place.

https://www.amazon.com/Hyde-Tools-02970-...

Burvil Chang - Replica

Aggiungi Commento

Visualizza Statistiche:

Ultime 24 Ore: 16

Ultimi 7 Giorni: 59

Ultimi 30 Giorni: 276

Tutti i Tempi: 223,057