
Linee/Bande sul Display del Game Boy
Introduzione
Vai al passo 1Risolvi il problema frequente delle linee/bande sul Nintendo Game Boy originale.
Cosa ti serve
Strumenti


Mostra di più…
-
Attrezzo utilizzato in questo passaggio:Tri-point Y1 Screwdriver$5.49
-
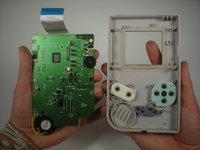
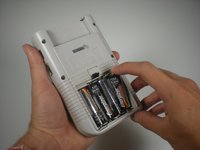
Rimuovi il coperchio posteriore svitando le 6 viti Tri-Point o Philips.
-
-
-
-
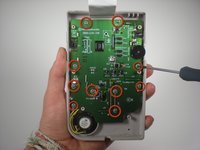
Ora imposta il contrasto (lo slider a sinistra) al massimo e prendi il ferro da saldare, muovendolo delicatamente avanti e indietro sul cavo a nastro sotto lo schermo.
one picture should show where to exactly put the soldering iron.
The picture does not completely match the description.
You should set it to 450, according to another repair demonstration.
There are two screws indicated but not mentioned and there is no ribbon cable in sight, unless it's behind that brown plastic cover looking thing. I have to assume I'm to remove the indicated screws and would see a ribbon cable behind it and under the screen? Otherwise, maybe you run the iron in between the two screws and the brown thing is somehow the cable? This is the most I've ever been puzzled by one of these guides. I'd just hope when I got to this part I'll be able to determine what's being said.
https://www.youtube.com/watch?v=-OEXhxoT... shows the repair and includes additional details about the area to place the iron.
The red circled screws have no part of this step.You need to remove the rubber strip you see in the picture that's below and along the bottom of the screen.
Set iron to 450
Run iron along areas that coincide with the problem lines.
Replace rubber strip when done. -


Per rimontare il tuo dispositivo, segui queste istruzioni in ordine inverso.
Per rimontare il tuo dispositivo, segui queste istruzioni in ordine inverso.
Annulla: non ho completato questa guida.
Altre 6 persone hanno completato questa guida.
Un ringraziamento speciale a questi traduttori:
100%

Daniele Abate ci sta aiutando ad aggiustare il mondo! Vuoi partecipare?
Inizia a tradurre ›
2Commenti sulla guida
Hi, this is the second time I attempt this fix, the first time it worked perfectly. The problem is that with this second machine there's a couple of pixel lines that have not tickled back to black even though I have been patiently going over them for quite some time (2 rounds of 10-15 min) is there anything else that I could try or should I just go on over the same area until I see something happen? Thanks in advance
Use this guide linked below understand where to place the iron under the screen. Step 4 doesn't seem to contain the proper images or details of this step here well enough.
https://www.youtube.com/watch?v=-OEXhxoT...