Salta al contenuto principale
IBM ThinkPad T42 Display Replacement

IBM ThinkPad T42 Display Replacement

Austin Kidd

Austin Kidd e 5 altri collaboratori

Ultimo aggiornamento il June 29, 2019

15 - 25 minuti
Moderato
Necessarie Immagini Migliori
Passi mancanti
Foto Azione

Introduzione

Vai al passo 1

Removal/repair of the display

Cosa ti serve

Strumenti

  1. IBM ThinkPad T42 Display Replacement, Bottom cover: passo 1, immagine 1 di 1
    • Use a Phillips #0 screwdriver to remove the twenty screws on the underside of the T42.

  2. IBM ThinkPad T42 Display Replacement, Rear screws: passo 2, immagine 1 di 1
    • Remove the four Phillips screws located on either side of the rear of the T42 (there are two on each end.)

    leave these four screws alone. No need to remove them.

    fredwb - Replica

    There are tiny numbers showing the lengths of the screws. 1-2-3-4 where 1 is the shortest.

    The dark red circles are not very easy to see. How about white ones?

    mattikaki - Replica

  3. IBM ThinkPad T42 Display Replacement, Keyboard and Trackpad: passo 3, immagine 1 di 1
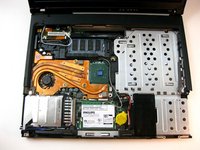
    • Flip the laptop over and open the screen to access the keyboard and trackpad.

    • The keyboard and trackpad are connected to the motherboard. Before removing the keyboard and trackpad, disconnect both components from the motherboard, as shown in the following step.

    • The bezel and keyboard will be loose, be careful.

  4. IBM ThinkPad T42 Display Replacement: passo 4, immagine 1 di 2 IBM ThinkPad T42 Display Replacement: passo 4, immagine 2 di 2
    • Carefully maneuver the palm rest away from the keyboard, as both the keyboard and palm rest/trackpad will come off together.

    • Remember, both the keyboard and trackpad have connectors to the motherboard. Disconnect these before completely removing either component.

  5. IBM ThinkPad T42 Display Replacement, Bezel Removal: passo 5, immagine 1 di 2 IBM ThinkPad T42 Display Replacement, Bezel Removal: passo 5, immagine 2 di 2
    • Remove the plastic bezel along the edges, you may need to pry the areas circled with a spudger to remove the bezel.

  6. IBM ThinkPad T42 Display Replacement, Display Screws: passo 6, immagine 1 di 1
    • Unscrew the screws holding down the display.

    • Along with the one pictured in red, there is another one along the top right edge.

    could you post a pic of all the screws and where they go?

    Seth King - Replica

  7. IBM ThinkPad T42 Display Replacement, Display and Ribbon Cable Removal: passo 7, immagine 1 di 1
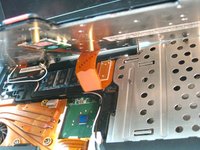
    • Carefully unplug the display ribbon on the motherboard, then carefully lift the display free from the device.

Conclusione

To reassemble your device, follow these instructions in reverse order.

Altre 6 persone hanno completato questa guida.

Austin Kidd

Membro da: 04/21/10

317 Reputazione

3 Guide realizzate

Team

Cal Poly, Team 29-76, Johann Spring 2010 Membro di Cal Poly, Team 29-76, Johann Spring 2010

CPSU-JOHANN-S10S29G76

4 Membri

37 Guide realizzate

2Commenti sulla guida

@Seth

Just use the pic numbering left to right each of the 4 rows.

Start at the top and remove in sequence, placing each on a strip of heavy tape to keep the screws in sequence.

Place a second strip on top when finished to secure the sequence until it's time to re-assemble.

Michael G - Replica

Very poor & sketchy guide! NO mention at all of how to handle the other wires involved in disconnecting the screen (lid) from the laptop base, eg: the wireless antenna connections and instructions like: "Unscrew the screws holding it down" are far too vague! holding WHAT down ffs!!!!

wbcam - Replica

Aggiungi Commento

Visualizza Statistiche:

Ultime 24 Ore: 1

Ultimi 7 Giorni: 3

Ultimi 30 Giorni: 41

Tutti i Tempi: 13,247