Salta al contenuto principale
Harman Kardon Onyx Studio 2 Control Board Replacement

Harman Kardon Onyx Studio 2 Control Board Replacement

Alexandra Achtenberg

Alexandra Achtenberg e un altro collaboratore

Ultimo aggiornamento il May 5, 2021

10 - 20 minuti
Facile

Introduzione

Vai al passo 1

If the buttons on your device aren't working, it may be time to replace your control board. Follow this guide to do so.

Cosa ti serve

Strumenti

  1. Harman Kardon Onyx Studio 2 Control Board Replacement, Front Panel: passo 1, immagine 1 di 3 Harman Kardon Onyx Studio 2 Control Board Replacement, Front Panel: passo 1, immagine 2 di 3 Harman Kardon Onyx Studio 2 Control Board Replacement, Front Panel: passo 1, immagine 3 di 3
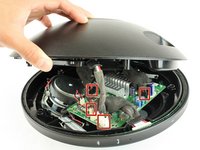
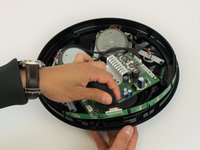
    • Using a plastic opening tool, pry off the front grill by wedging it in the notch on the front of the device.

  2. Harman Kardon Onyx Studio 2 Control Board Replacement: passo 2, immagine 1 di 2 Harman Kardon Onyx Studio 2 Control Board Replacement: passo 2, immagine 2 di 2
    • Remove the five 14.4 mm T10 Torx screws.

  3. Harman Kardon Onyx Studio 2 Control Board Replacement: passo 3, immagine 1 di 1
    • Gently pull the front apart from the back.

  4. Harman Kardon Onyx Studio 2 Control Board Replacement: passo 4, immagine 1 di 2 Harman Kardon Onyx Studio 2 Control Board Replacement: passo 4, immagine 2 di 2
    • Remove the four wires connecting the front and back panels.

    • Pinch the connector tab and pull gently upwards.

    • Repeat for the other three connectors.

  5. Harman Kardon Onyx Studio 2 Control Board Replacement, Control Board: passo 5, immagine 1 di 1
    • Pull the silicone button band off of the outer edge of the speaker.

  6. Harman Kardon Onyx Studio 2 Control Board Replacement: passo 6, immagine 1 di 2 Harman Kardon Onyx Studio 2 Control Board Replacement: passo 6, immagine 2 di 2
    • Disconnect the two pressure connections from the circuit board.

  7. Harman Kardon Onyx Studio 2 Control Board Replacement: passo 7, immagine 1 di 2 Harman Kardon Onyx Studio 2 Control Board Replacement: passo 7, immagine 2 di 2
    • Gently remove the control board band by placing fingers in contact with it through the button openings.

    • Work from the outer edges in so as not to bend the band.

Conclusione

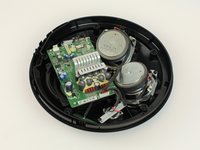
To reassemble your device, follow these instructions in reverse order.

Altre 4 persone hanno completato questa guida.

Team

USF Tampa, Team 16-5, Blackwell Spring 2017 Membro di USF Tampa, Team 16-5, Blackwell Spring 2017

USFT-BLACKWELL-S17S16G5

3 Membri

24 Guide realizzate

9Commenti sulla guida

Do you guys know where to get a control board, because my board is broken so i am looking for one

Zhou Yuqi - Replica

Where to get control board onyx 2.

Mike Champagne - Replica

My on/off button keeps blinking…..would somebody please email me cause I am a techno nitwit……..i’m gonna bring this piece of non chargeable crap outside and go Italian on it with the 12 gauge! SERENITY NOW!

Sincerely,

email ; jorcal3318@aol.com

Frank Vitolo - Replica

power button continually blinks. Won’t turn on, can’t pair, no other action can be taken, just the blinking power button. what’s the solution? Please share….

rachael friesen -

Speaker plays for split second then fades away like wtf

Paul Berrellez - Replica

Aggiungi Commento

Visualizza Statistiche:

Ultime 24 Ore: 1

Ultimi 7 Giorni: 11

Ultimi 30 Giorni: 70

Tutti i Tempi: 14,920