
HTC Vive Controller Saucer Replacement
Introduzione
Vai al passo 1Use this guide to replace the HTC Vive controller saucer panels. You will need to remove these panels before you can access any other components of the controller. Remove the top and bottom saucer panels gently. The plastic clips that hold the saucer panels on can break if handled too roughly.
Cosa ti serve
Ricambi

Strumenti


Mostra di più…
-
-
Turn over the Vive controller so that the bottom saucer is facing up.
-
Use the T5 Torx screwdriver to remove three black 21mm screws from the bottom saucer.
-
-
-
Use the nylon spudger to separate the top and bottom saucer covers all around the edges.
-
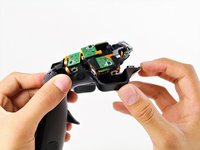
Remove only the top saucer cover by pulling up with your hand.
My top saucer was REALLY stubborn. Don’t force it with your hand, use the spudger to separate it at the seam. Try not to poke your spudger in too deep, there are internals just inside the seam.
The second time around, I learned why it was so stubborn. The picture suggests that you should start at the base of the saucer and work your way around, but that’s backwards.
Start separating with your spudger at the distal side of the saucer and work your way toward the handle. Then for the last part, pull the piece up and away, like peeling a banana. See the second picture for the bottom half of the saucer, below. Do the same on the top.
-
-
-
-
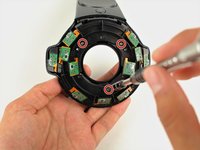
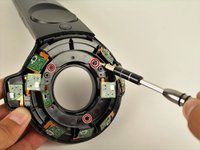
Use the Phillips 00 screwdriver to remove the three silver 12.8mm screws from the exposed upper sensor panel.
It’s Phillips 0, not 00.
You do not need to remove these screws to remove the bottom saucer. They provide stability to the two halves of the donut.
I had the same experience. Putting the screws back in made the bottom shell easier to remove.
I concur, you don’t need to remove these screws to take the bottom shell off.
I found mine had ph#000 screws size, not ph#00.
please do not remove the Phillips-head screws it is not necessary to remove them.
-
-
-
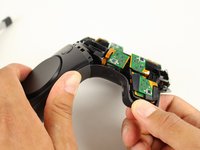
Carefully pull away the bottom saucer cover with your hand.
From what I can tell, there are two clicks on each side? one is quite easy, then the other one seems to require considerable force pushing down and on the side, I had to do it one side at a time and found two YouTube videos performing this step to use as reference. I have the vive pro wands and not the originals, so this may explain the difference. This felt very wrong to me.
-


To reassemble your device, follow these instructions in reverse order.
To reassemble your device, follow these instructions in reverse order.
Annulla: non ho completato questa guida.
Altre 6 persone hanno completato questa guida.
Team

Cal Poly, Team S15-G5, Livingston Fall 2017 Membro di Cal Poly, Team S15-G5, Livingston Fall 2017
CPSU-LIVINGSTON-F17S15G5
4 Membri
51 Guide realizzate
3Commenti sulla guida
Where do you get the replacement parts?
Vive dont less these parts we need to 3D print them its a Nightmare RN for business especially arcades
My controller only has 2 screws that are different sizes than a t5 and the 3rd is completely covered up by plastic. I have the sticky button problem, halp pls
Where can I buy new t5 21 mm screws? Mine are getting stripped out!
jeremyvanwoerden - Replica
Where can you get replacement batteries?
Mike Justice - Replica
The middle bottom screw may have some form of warranty sticker on it if you have a Vive Pro wand (which is purple). Mine had this. Easy enough to remove and get on with it.
sodiboo - Replica