
Galaxy Tab S 10.5 Charge port Replacement
Introduzione
Vai al passo 1This guide will show how to replace the charge port of the device.
Cosa ti serve
Ricambi

Strumenti
Mostra di più…
-
-
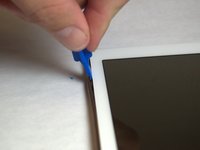
Place the plastic opening tool into the SD card slot or charge port.
-
Try in an upward motion until you see a separation between the tablet and back cover.
-
-
-
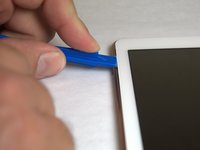
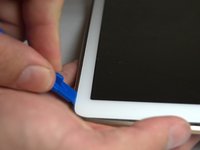
Work around the entire device by sliding the plastic opening tool around the rim.
Both plastic tools broke within the first two minutes of use. Had to resort to a narrow conventional flat screwdriver.
-
-
-
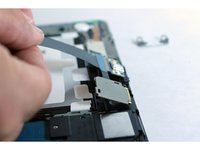
Remove the back cover once all links have been separated.
I’ve taken the back cover off my Samsung tablet, and in the process I have torn one of the little orange plastic connectors that are attached to the back cover. The connector I’ve damaged is the second one in on top left in the picture above. Can you please tell me if I need to replace this before I can get the tablet to work?
Thanks.
If you remove just the back cover - which to the uninitiated does look less scary than trying to get between the bezel and the display - you will destroy the tiny plastic rivets that lock the cover onto the bezel. More importantly, you will then find that getting to the parts you need to replace is rendered impossible because they will be hidden under the bezel, which of course will still be in place. So the correct way to take this tablet apart is the more challenging way i.e. separate the front display from the bezel and rear. But with care and the right tools this is still not too difficult. And if you are in any doubt about this, it is worth pointing out that in all of the photos below from Step 4 onwards, the work shown is taking place with the bezel removed. There is nothing written in this guide to indicate that this had to be done.
Have just gone through this process, successfully having read this and other guides and I totally agree with PhilipHN that the most reliable is the slightly scarier approach of removing the front display from the bezel and rear. It is easier overall, you just have to attack it confidently (but gently!).
-
-
-
Place the plastic opening tool in between the outer rim.
-
Move the tool in a downward motion to separate the 2 parts.
-
Run the tool along the rim to disconnect all connectors holding the outer rim to the back of the device.
-
-
-
-
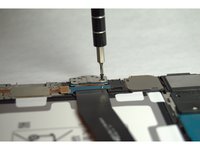
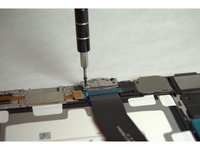
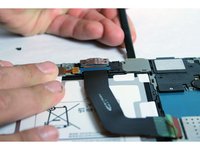
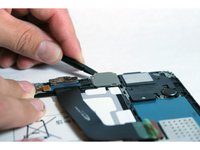
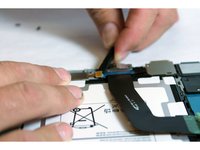
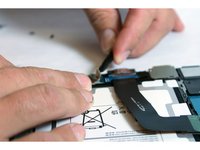
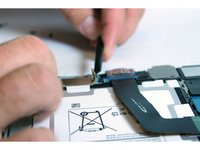
Using the spudger, pry out the SD card slot.
I have samsung t800 tablet, I have already replace new bettery, it operated just time, but after dead, It has no disply the battery charge while added on chaging. What have been the problem in the tablet, one point look while the charging the table it’s IC warm iside the iron cover.
-
-
-
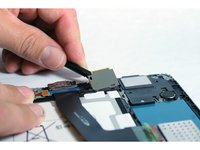
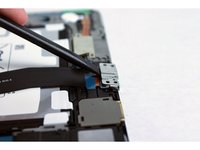
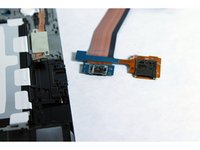
Pull out the charge port and the SD card slot.
Das Lösen des Flachbandkabels könnte noch dabei sein. Schutz ablösen und Verriegelung hochheben.
Ansonsten eine tolle Anleitung
Hat mir sehr geholfen.
Die Anleitung für das Flachbandkabel gehört unbedingt dazu wie schon einer vor mir geschrieben hat.
Vielen Dank für die Anleitung.
-


To reassemble your device, follow these instructions in reverse order.
To reassemble your device, follow these instructions in reverse order.
Annulla: non ho completato questa guida.
Altre 53 persone hanno completato questa guida.
Team

USF Tampa, Team 3-2, Eyestone Fall 2015 Membro di USF Tampa, Team 3-2, Eyestone Fall 2015
USFT-EYESTONE-F15S3G2
3 Membri
20 Guide realizzate
27 Commenti
Very easy, but first part was bad... SD card wouldn't latch. So TIL to test ports for mechanical function before doing the repair.
You might want to add a description on how to disconnect / reconnect the ribbon cable at the other end of the port. I pried up and did not slide out the ribbon cable. Thus breaking off the connector. Totally my fault and not reflective on your tutorial. I just want others not to experience my goof.
I broke mine as well. Do you know where I can purchase a new connector??
Abby -
Same happened to me. I broke that connector and I had to stick it with a tape and put some paper to strengthen it before covering the back. It is a very fragile and tricky part. The correct way is just to pull the cable back without moving it up. Please add this note to step 10
Alright tutorial. Missed 2 things: 1) I was able to spludge around the rim and easily removed it and the back at the same time. 2) Forgetting to include how to disconnect the ribbon on the inside end could be problematic for first timers.
However, the pictures of how to get the port out were first rate (another tutorial showed different and potentially damaging way to remove it). I am glad I read both. All together it took less than 10 minutes to get everything back together and now it is charging like a champ! Thanks for taking the time to make this.
where the white line is across ribbon cable, very gently use a thin pry tool under edge of black connector lock and very carefully lift up black strip, you will see it start to move, work your way along strip lifting pry tool a little higher each time, you will then here it click as it comes unlocked and it will lift up all the way along releasing old ribbon cable. refit new cable in exact position then gently press down on black strip until it clicks in place. re-assemble bezel refit simm and sd cards and away you go. Tablet now charges okay. Well mine did anyway.
Just did it. Hardest part is to remove the frame (it was for me anyway). Make sure to read carefully Ralph Nelson comment to know how to remove properly the other end of the ribbon cable (it's held in place by a black plastic lock). After that, putting the frame and the back cover back in place is rather easy. Now my tablet is charging again, yay :)
It was very easy to fix it !!! 15 minutes work and so simple.
I broke the connector too! Very fragile! Did anyone figure out a way to fix/replace the connector? Now it's like watching a slow death for my tablet - when the battery goes, it's done! AHHHH!!!
@abby7518 - ever get an answer? Can the connector to the motherboard be replaced?
10/5/2017
just replaced my charging port took about 15 minutes. be careful re the black locking strip as it locates into the two small holes in the ribbon once it is pushed all the way in. please read all the comments and you wont go wrong.
take your time and be careful. thanks for the instructions.
Hello Dear
I'm from Cambodian and i error charger port Tap S 10"5
How to Order?
I have followed these instructions and it now charges, however, the replacement power port causes the screen to go off. when i unplug the port the tablet screen stays on, the screen also stays on in boot mode . it only has the issue one android boots normally. any ideas? is it just a dodgy replacement part?
Can you fix the ribbon connector? Broke during replacement
Did you get a fix for this? Same issue and I need to replace again .
Super easy! I didnt use step 4-5 as Ive seen too many people complain about getting that back on. I went with the method of just detaching the portion near the port without taking it off completely that I saw on youtube ("How to Replace the Charger Port on a Samsung Galaxy Tab S" by CellularProz). And to think, I was about to chunk my Galaxy Tab and possibly buy a ipad pro. Whoever thought of making this website is the greatest!
I replaced mine and like many posts I damaged ribbon connector , charges very slow and dies really fast . Anyone got a fix for this ?
Good tutorial but there is a missing step to explain how to take off the inside end of the ribbon. I finally managed to do it but it’s no so easy without a proper explanation… I would recommend to read all the comments or watch a video tutorial :)
Nice website, very helpful!
I had my tablet 1 year, was under extended warranty. Sent it into service for battery problems & extreme overheating, one year later the charge port failed, I opened it up to replace the part and lifted the black flap on FPC connector to release the ribbon cable. It literally crumbled into pieces. I'm assuming the part was brittle from the extreme heat problem. Truly disappointed with this tablet because, I see everyone else having the same issues.
So I've decided to buy the tools needed to start repairing devices myself. Replacement parts are inexpensive and this way I can help others with repairs just like this website is trying to do.
These devices should least at last 4-5 years… obviously not going to be the case as we go into the future.
How can I replace the 45 pin connector for the charging port ribbon on my galaxy ta s 10.5 it needs to be soldered.