Lenovo ThinkPad X1 Gen 1 Extreme Battery Replacement

Introduction
Go to step 1If your Lenovo ThinkPad X1 Gen 1 Extreme (model number 20MF-000LUS) is having trouble charging, overheating, or not holding a charge, use this guide to replace the battery pack.
A battery in good condition will power the computer for 15 hour periods and charge to 80% capacity in an hour. A faulty battery will not charge properly and will lose power quicker than expected.
Before replacing the battery, refer to the trouble shooting page for the Lenovo ThinkPad Gen 1 Extreme to see if the problem is fixable without purchasing and installing another battery.
Please keep in mind that a swollen lithium ion battery is dangerous and read the page attached to the link before repair. Be sure to disconnect the computer from any power and turn the computer completely off. It is also important to be careful when removing the battery; any damage can easily make the computer not functional.
What you need
Fix Kit
This kit contains all the parts and tools needed to complete this guide.

Parts

Tools


Show more…

-
-
Orient the laptop so that it is bottom up, and the trackpad is closest to you.
-
Unscrew the seven captive screws with a Phillips #00 screwdriver.
-
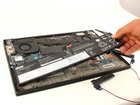
Slide a blue opening pick in the gap between the bottom panel and chassis, and pry off the one clip on each side.
-
Remove the back cover from the device.
-
-
-
Use a Phillips #00 head screwdriver to remove the four 4 mm screws above the battery.
-
-
-
Tool used on this step:Tweezers$4.99
-
Use tweezers to peel the plastic cover off the connector.
-
Use a spudger or your fingernail to pry up the battery straight up from the motherboard.
-


To reassemble your device, follow these instructions in reverse order.
Take your e-waste to an R2 or e-Stewards certified recycler.
Repair didn’t go as planned? Try some basic troubleshooting, or ask our Answers community for help.
To reassemble your device, follow these instructions in reverse order.
Take your e-waste to an R2 or e-Stewards certified recycler.
Repair didn’t go as planned? Try some basic troubleshooting, or ask our Answers community for help.
Cancel: I did not complete this guide.
5 other people completed this guide.
Gear Up For Future Repairs
Shop all


Team

Cal Poly, Team S7-G3, Regan Winter 2020 Member of Cal Poly, Team S7-G3, Regan Winter 2020
CPSU-REGAN-W20S7G3
4 Members
8 Guides authored
2 Guide Comments
Thank you so much for this illustration on how to take off the battery. I was like already stuck at just the screws not coming off. This helped immensely.