Introduzione
La batteria non dura molto? Cambiala.
Cosa ti serve
-
-
Inclinandolo da un lato, inserisci con cura una spatola per circa 3 mm nella fessura tra i due utensili di apertura.
-
Una volta che la spatola metallica ha liberato il bordo del pannello posteriore, ruotala in modo che sia verticale, e con attenzione (ma con fermezza) muovila in modo che entri nello spazio tra gli strumenti di apertura.
-
-
-
-
Inclinandolo da un lato, inserisci con cura una spatola di metallo per circa 3 mm nella fessura tra i due utensili di apertura.
-
Una volta che la spatola ha liberato il bordo del pannello posteriore, ruotala in posizione verticale e con attenzione (ma con fermezza) spingila, facendola oscillare, nell'iPod nello spazio lasciato tra gli strumenti di apertura.
-
Fai pressione con le dita sul pannello posteriore dietro la spatola in modo da minimizzare la flessione. Fletti leggermente la spatola in modo tale da assicurarti che le linguette di metallo su questo lato dell'iPod si siano sganciate.
-
-
-
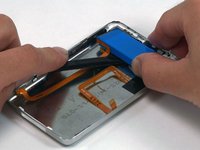
Afferra il gruppo del pannello anteriore con una mano e il pannello posteriore con l'altra.
-
Delicatamente (DELICATAMENTE) sgancia le clip rimaste sul pannello posteriore allontanando i lati superiori dei pannelli anteriore e posteriore l'uno dall'altro (immagina che il lato posteriore dell'iPod sia un cardine), facendo molta attenzione a non danneggiare i due cavi piatti che tengono insieme i due lati.
-
-
Attrezzo utilizzato in questo passaggio:Tweezers$3.99
-
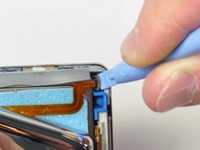
Utilizza delle pinzette angolate o un attrezzo di apertura per sollevare la linguetta di blocco marrone diritta di 1 mm. Assicurati di tirare da entrambi i lati della linguetta.
-
Afferra il cavo flessibile con le dita o con delle pinzette e tiralo dritto verso l'alto per disconnetterlo.
-
-
-
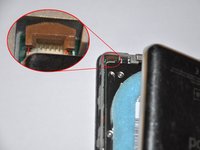
Solleva l'hard drive con una mano in modo tale da accedere al sottostante cavo a nastro del jack cuffie.
-
Usa uno spudger per ruotare l'aletta di fissaggio che fissa il cavo piatto del jack cuffie nella sua sede. L'aletta deve ruotare di 90 gradi per rilasciare il cavo a nastro.
-
Fai scorrere fuori dal suo connettore il cavo piatto del jack cuffie.
-
Adesso il pannello posteriore è libero dall'iPod.
-
-
-
Ora bisogna riparare i danni causati liberando le parti interne dell'iPod Classic! È molto probabile che almeno una delle clip metalliche nel pannello posteriore si sia piegata verso l'alto. Queste clip devono puntare tutte verso il basso per poter reinstallare il pannello posteriore.
-
-
-
Usando l'estremità piatta di uno spudger di metallo spingi la clip in basso, facendo attenzione a non strappare il sottile binario di metallo dal pannello posteriore. Come alternativa puoi utilizzare un paio di pinze a punta piatta per ridurre il rischio di scivolare e quindi danneggiare il jack cuffie.
-


Per rimontare il tuo dispositivo, segui queste istruzioni in ordine inverso.
Annulla: non ho completato questa guida.
Altre 642 persone hanno completato questa guida.
Un ringraziamento speciale a questi traduttori:
100%


Questi traduttori ci stanno aiutando ad aggiustare il mondo! Vuoi partecipare?
Inizia a tradurre ›

88Commenti sulla guida
Bought an extra pair of the blue opening tools ... they both broke trying to open the case. Guess this one was a bit more stubborn. What saved me was the mini-screwdriver on a Leatherman Micro multitool & the iFixIt Metal Spudger.
Insert a plastic opening tool into the seam between the front and back of the iPod.
This is not possible for ipod 6th gen, I think ifitit may did for 5th gen?
It IS possible and it's really REALLY tough. The plastic tool included in this set is enough to keep seams open where they show in steps 2 and 3 just wide enough for you to put something else in there. But to start them, I used an exacto like blade. When I did this job, I had 3 regular spudgers, the 2 tools provided here, 4 different style green spudgers from somewhere else, 5 large 'guitar picks' sold here to cut the glue holding new iMac screens to the case, the metal spudger, and an exacto type blade.
It was still an incredibly laborious job and although the iPod is back together and works perfectly, one of the seams is bent out a little.
Well, *that* was interesting!
Firstly, as a few have mentioned here, the 6th-generation classics are more tightly-sealed than their immediate forebears, so the otherwise-useful plastic tools included in the battery-replacement kit won't cut it all by themselves; artful (and careful!) application of the metal spudger tool was also required. Thankfully, years of freelance IT work on recalcitrant Macs of all stripes helped prepare me for this bit of improvisation, even though this was the first time I've taken a crack at an iPod (my own 120GB classic - thin version). Happily, other than twisting that one metal clip near the headphone jack - apparently impossible to avoid - and some very minor cosmetic damage, the balance of work went without a hitch. I speculate why Apple makes us go though this, but that's for another thread. Thanks for the kit and tools!
LOL! The reason they make it hard to service is that Apple Authorized repair wants $360.00 US to replace the battery!