
iPod 5th Generation (Video) Click Wheel Button Replacement

Introduzione
Vai al passo 1This guide shows how to remove the click wheel button from an iPod Video.
Cosa ti serve


-
-
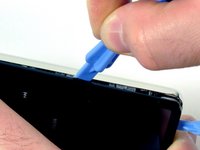
Insert the iPod opening tool into the left side of the iPod, with the edge of the tool pointing towards the metal back.
-
A small guitar pick can be extremely helpful in opening the iPod. Simply insert it and slide the pick around the case to free the clips to streamline the process.
-
Gently enlarge the existing crevice by wiggling the iPod opening tool and moving it to the left.
-
Continue doing so until the entire side of the iPod is loose.
-
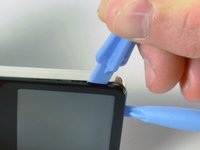
You can then insert an iPod opening tool to the right of the Hold button. Be very careful while inserting the tool, as the display is very fragile.
-
-
-
Gently glide the iPod opening tool on the top of the display, making sure to free the retaining clips.
-
The other sides of the iPod should now easily come loose. If they do not, use iPod opening tools on the right side of the iPod in the same way as on the left side of the iPod.
-
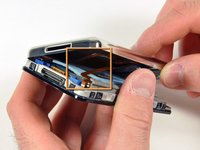
Separate the front of the iPod from the back about an inch (or a couple of centimeters).
-
-
Attrezzo utilizzato in questo passaggio:Tweezers$3.99
-
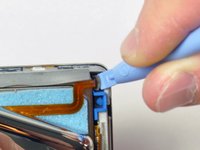
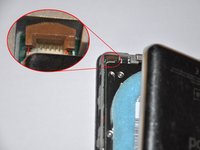
Use angled tweezers or an iPod opening tool to slide up the brown connector latch, holding the orange battery ribbon cable in place. Make sure you pull from both sides of the latch. You only need to lift the brown connector latch up about 1-2mm to free the cable. Do not lift more or remove the latch, or you might pull the white connector with it!
-
Remove the cable from the connector.
-
-
-
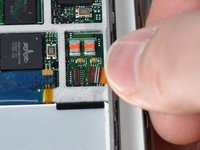
With the iPod opening tool, gently lift the brown tab of the headphone ribbon cable connector. The tab will rotate up 90 degrees, releasing the ribbon cable.
-
Using your fingers, pull out the headphone jack ribbon cable.
Take great care in lifting this tiny brown tab. It is easy to break. Also, take extra great care when re-installing the cable and setting the tab back down on the cable. The cable slightly "sticks" in place before you place the tab back on it. I cannot stress how much gentleness is key with these miniscule tabs.
Also to elaborate on euphoria's comment on the brown retaining clip, it does flip back to open, so do be very careful with this clip, but dont freak out when the clip flips back on itself, cause when i did it i thought i had snapped the clip in half... but turns out its fine. Hope this takes a little of the stress out of this delicate process.
Citazione da euphoria:
Take great care in lifting this tiny brown tab. It is easy to break. Also, take extra great care when re-installing the cable and setting the tab back down on the cable. The cable slightly "sticks" in place before you place the tab back on it. I cannot stress how much gentleness is key with these miniscule tabs.
Umm if the brown retaining clip breaks, is there anyway to fix it
Citazione da dreamer92:
Umm if the brown retaining clip breaks, is there anyway to fix it
I didn't break the tab, but I did lose it. Anyway to replace this? Don't even know what it's called to search for it...
Citazione da dreamer92:
Umm if the brown retaining clip breaks, is there anyway to fix it
I need to know if this is possible to purchase just the retaining clip that connects the battery to the top of the iPod (the delicate clip everyone is warning about).. Mine broke and on top of that i dropped it and lost it... Am i pretty much screwed?
I've seen a few comments regarding leaving the headphone ribbon cable attached thus making it unnecessary to lift the hard drive when replacing a battery. I just replaced the battery in my iPod Video 30GB and I started with the intention of not doing that. After going through the process, I'd recommend following the instructions as stated. Those ribbon cables can be fragile and not removing the headphone cable forces you to torque it around while trying to remove the battery, and plus it's difficult to maneuver around it. It's better to remove it so you have more room to work and less possibility of damaging it when the battery finally comes free.
This Step is very tricky!!!!
How to detach is not very hard, but to put it back is a nightmare, please be careful. After spent 1hour fighting with this step I found myself a hard time dealing with a small little tiny golden ribbon, and desperately tried to put the ribbon back to origin. Eventually I successfully ended up this step by placed the ribbon underneath the lock and quickly threw the HD back to press the weight on the ribbon, so it won't be moved. Luckily, It works and Hope this is help u out of the dark, in case u have a same problem as mine.
This step (and Step 8) is not required to replace/upgrade the HDD!
hi , C145 is burned on mine, did anyone know ref to replace ?
-
-
-
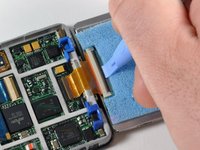
Use a small iPod opening tool to release the black hinge holding the hard drive ribbon cable. The tab will rotate up 90 degrees towards the logic board, releasing the ribbon cable.
-
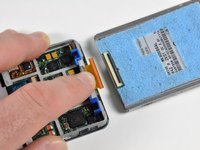
Use your forefinger to hold the ribbon cable in place; disconnect the drive from the ribbon cable.
-
-
-
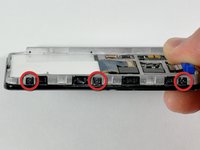
Remove the three black Phillips screws securing the front panel to the metal framework.
-
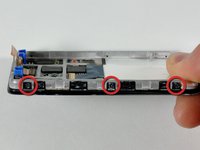
Rotate the iPod laterally 180 degrees and remove the three black Phillips screws securing the front panel to the metal framework on the other side.
-
-
-
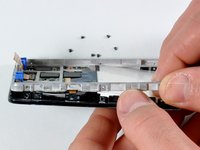
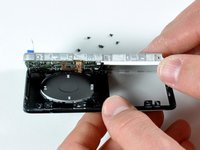
Gently turn the iPod over to the other side. The click wheel button can now be removed from the rest of the iPod.
-


To reassemble your device, follow these instructions in reverse order.
To reassemble your device, follow these instructions in reverse order.
Annulla: non ho completato questa guida.
Altre 94 persone hanno completato questa guida.
Preparati per le riparazioni future
Acquista tutti


7Commenti sulla guida
thanks i know my ipod is old but if you can buy replacement parts shoot im gonna keep it .
Great guide! I had a “stuck” click wheel button, but taking it apart, I was able to find out that the tiny soft pad underneath the click wheel button plastic was simply off-center. All fixed!
I had thesame problem like you,and i also got mine fixed.
Same here! That was a cheap repair!
it is perfect,you helped me fix my stuck center wheel button.Thank you!!