
iPhone 3GS Camera Replacement

Introduzione
Vai al passo 1Want to replace or take out the camera? Here's how.
Cosa ti serve
Ricambi
Strumenti


Mostra di più…
-
-
If your display glass is cracked, keep further breakage contained and prevent bodily harm during your repair by taping the glass.
-
Lay overlapping strips of clear packing tape over the iPhone's display until the whole face is covered.
-
-
-
Remove the two Phillips #00 screws from the dock-connector end of the iPhone.
-
-
-
-
Ribbon cable "3" is held in place by an FPC style connector. Unlocking this connector is a must before removing the ribbon cable: use a plastic spudger to flip up the white plastic tab holding the remaining ribbon cable in place. The white tab will rotate up 90 degrees, releasing the ribbon cable.
-
Slide the black ribbon cable out of its connector, and remove the display assembly from the iPhone.
-
-
-
Remove the following 8 screws:
-
Five 2.3 mm Phillips #00 screws with partial threads securing the logic board to the rear panel.
-
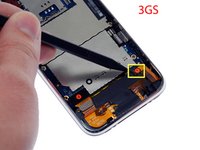
Two 2.3 mm Phillips #00 screws with full threads securing the logic board and camera.
-
One 2.9 mm Phillips #00 screw from beneath the "Do not remove" sticker.
-
-
-
Use a spudger to disconnect the camera from the logic board.
There is a little silver clip that needs to go on top of the camera to secure it. If this is not done correctly the camera will not work. Ensure the small silver clip is secured the exact same way as you saw it initially, and ensure the cable is fitted correctly.
Can we get a picture or video of this. I tried to fix my iPhone using this guide and your comment is exactly why my camera will not work. It would be very helpful to see the position of the clip the way it is supposed to be connected.
Also the screw that holds the camera clip down is held by one of the small screws,
THE ONLY ONE WITH THREAD ALL THE WAY UP TO THE HEAD, the others only only 3/4's threaded. The correct position of that clip is in picture 11, I think.
Chewtah -
-


To reassemble your device, follow these instructions in reverse order.
To reassemble your device, follow these instructions in reverse order.
Annulla: non ho completato questa guida.
Altre 75 persone hanno completato questa guida.
