Salta al contenuto principale
Toshiba Satellite C55D-A5108 Heat Sink Replacement

Toshiba Satellite C55D-A5108 Heat Sink Replacement

Ryan Smith

Ryan Smith e un altro collaboratore

Ultimo aggiornamento il December 14, 2022

15 - 25 minuti
Moderato

Introduzione

Vai al passo 1

A quick guide on how to replace a faulty heat sink in a Toshiba Satellite C55D-A5108.

Follow this guide to reapply thermal paste.

Cosa ti serve

Ricambi

Strumenti

Mostra di più…

iFixit guadagna commissioni quando acquisti tramite questi link.
  1. Toshiba Satellite C55D-A5108 Heat Sink Replacement, Battery: passo 1, immagine 1 di 1
    • Flip over the device so that the model stickers are facing up.

  2. Toshiba Satellite C55D-A5108 Heat Sink Replacement: passo 2, immagine 1 di 1
    • Move the right notch to the unlock position by sliding it to the right.

  3. Toshiba Satellite C55D-A5108 Heat Sink Replacement: passo 3, immagine 1 di 1
    • Hold the left notch in an unlocked position with one hand and use the other hand to slide the battery out.

  4. Toshiba Satellite C55D-A5108 Heat Sink Replacement, Hard Drive: passo 4, immagine 1 di 1
    • Remove the Phillips #0 screw from the memory cover.

  5. Toshiba Satellite C55D-A5108 Heat Sink Replacement: passo 5, immagine 1 di 1
    • Grasp the side of the hard drive opposite the circular battery, and carefully pull out the drive by moving it away from the circular battery.

  6. Toshiba Satellite C55D-A5108 Heat Sink Replacement, Back Cover: passo 6, immagine 1 di 3 Toshiba Satellite C55D-A5108 Heat Sink Replacement, Back Cover: passo 6, immagine 2 di 3 Toshiba Satellite C55D-A5108 Heat Sink Replacement, Back Cover: passo 6, immagine 3 di 3
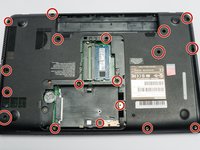
    • Remove the 16 screws holding the back cover with a Phillips #0 screwdriver.

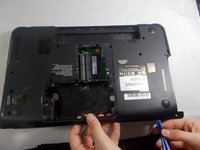
    • Pry the cover off with an opening tool.

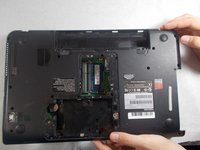
    • Gently remove the cover with your hands and place to the side.

  7. Toshiba Satellite C55D-A5108 Heat Sink Replacement, Heat Sink: passo 7, immagine 1 di 2 Toshiba Satellite C55D-A5108 Heat Sink Replacement, Heat Sink: passo 7, immagine 2 di 2
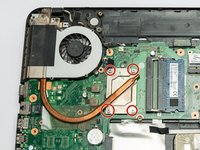
    • Remove the four Phillips #0 screws from each corner of the heat sink.

    • Gently lift the heat sink out of the computer.

Conclusione

To reassemble your device, follow these instructions in reverse order.

Un'altra persona ha completato questa guida.

Ryan Smith

Membro da: 10/25/19

187 Reputazione

2 Guide realizzate

Team

0 Commenti

Aggiungi Commento

Visualizza Statistiche:

Ultime 24 Ore: 0

Ultimi 7 Giorni: 0

Ultimi 30 Giorni: 0

Tutti i Tempi: 318