Salta al contenuto principale
Toshiba Excite 7 Screen Replacement

Toshiba Excite 7 Screen Replacement

Sean Ulch

Sean Ulch e 8 altri collaboratori

Ultimo aggiornamento il December 18, 2023

15 - 25 minuti
Moderato

Introduzione

Vai al passo 1

A Toshiba Excite 7 tablet's screen replacement can be difficult, but with the correct equipment, and cautious measures, you can finish the repair. This guide will guide you step-by-step through the process of replacing the screen on a Toshiba Excite 7 tablet. The Toshiba Excite 7 tablet features a 7-inch TFT LCD touchscreen display with a resolution of 1024 x 600 pixels for vibrant visuals. If your tablet screen is cracked or broken please refer to these instructions on shattered glass displays before starting this guide. For positive results, make sure you have the appropriate tools and a replacement screen.

Cosa ti serve

Strumenti

Mostra di più…

  1. Toshiba Excite 7 Screen Replacement, Battery Removal: passo 1, immagine 1 di 3 Toshiba Excite 7 Screen Replacement, Battery Removal: passo 1, immagine 2 di 3 Toshiba Excite 7 Screen Replacement, Battery Removal: passo 1, immagine 3 di 3
    • Remove the back cover.

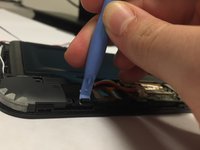
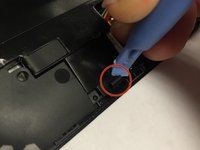
    • Work your fingernail or flat object under the cover’s seal. Start at the top right corner just above the front facing camera this is the device “Weak Spot”.

    • After you pry open the first clip slide the flat object along the perimeter of the cover until the cover is removable. You should hear the clips pop open.

  2. Toshiba Excite 7 Screen Replacement, Remove Tape: passo 2, immagine 1 di 2 Toshiba Excite 7 Screen Replacement, Remove Tape: passo 2, immagine 2 di 2
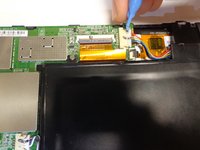
    • Remove any black tape from the device.

    • Keep the tape, you will need to put it back on when you are done.

  3. Toshiba Excite 7 Screen Replacement, Unplug Wires: passo 3, immagine 1 di 2 Toshiba Excite 7 Screen Replacement, Unplug Wires: passo 3, immagine 2 di 2
    • Unplug the wires from the battery.

    • The battery is the black rectangle in the middle of the device. The device has two wiring harnesses attached to it, one just above the battery and one just to the right.

  4. Toshiba Excite 7 Screen Replacement, remove screws: passo 4, immagine 1 di 2 Toshiba Excite 7 Screen Replacement, remove screws: passo 4, immagine 2 di 2
    • Unscrew the battery from the device.

    • The device has 5 screws to remove, keep the screws.

  5. Toshiba Excite 7 Screen Replacement, Unclip and remove battery: passo 5, immagine 1 di 2 Toshiba Excite 7 Screen Replacement, Unclip and remove battery: passo 5, immagine 2 di 2
    • The battery has one clip you will need to remove. The clip is located at the bottom right corner of the battery just above the right speaker. The speakers and wires are not secured to the battery, they may fall off.

    • Push the clip back then lift the battery up.

  6. Toshiba Excite 7 Screen Replacement, Remove Data cable: passo 6, immagine 1 di 1
    • The screen is connected to the circuit board by 2 “Data Cables” (orange ribbons). Data cables include 3 working components, data cables, the white harness plug, and the black lever.

    • Gently flip the black lever up and unplug data cables.

  7. Toshiba Excite 7 Screen Replacement, Removing the Circuit Board: passo 7, immagine 1 di 1
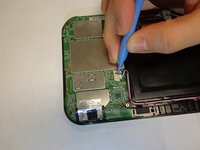
    • Remove the circuit board by gently coaxing it from the clips located just to the right of the circuit board.

  8. Toshiba Excite 7 Screen Replacement, Installing the Replacement Screen Assembly: passo 8, immagine 1 di 2 Toshiba Excite 7 Screen Replacement, Installing the Replacement Screen Assembly: passo 8, immagine 2 di 2
    • The screen has a rubber device used to support the volume control switch.

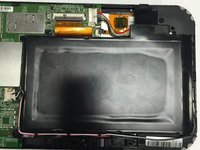
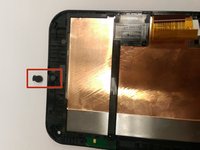
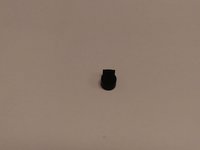
    • Remove the rubber device from the old screen.

    • Make sure you keep the rubber device to be install into the new screen.

    • Repeat other steps in reverse to install replacement screen.

Conclusione

To reassemble your device, follow these instructions in reverse order.

Sean Ulch

Membro da: 01/15/15

340 Reputazione

3 Guide realizzate

Team

USF Tampa, Team 1-3, Tanski Winter 2015 Membro di USF Tampa, Team 1-3, Tanski Winter 2015

USFT-TANSKI-W15S1G3

4 Membri

12 Guide realizzate

0 Commenti

Aggiungi Commento

Visualizza Statistiche:

Ultime 24 Ore: 0

Ultimi 7 Giorni: 6

Ultimi 30 Giorni: 9

Tutti i Tempi: 1,314