Introduzione
Se il tuo computer portatile Dell XPS 15 9550 non si accende se non è collegato all'alimentatore oppure se non tiene la carica a lungo, può essere necessario sostituire la batteria.
Cosa ti serve
-
-
Disponi il laptop al contrario.
-
Usa un cacciavite Torx T5 per rimuovere le dieci viti lunghe 3 mm posizionate sul perimetro della faccia inferiore del computer.
-
-
-
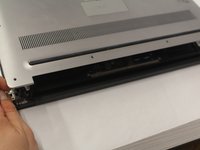
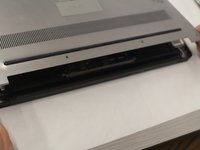
Apri lo sportello del pannello informativo (a metà della faccia posteriore).
-
Mentre tieni aperto lo sportello, usa un cacciavite a croce Phillips #00 per rimuovere le due viti lunghe 10 mm.
use a J1, fits a lot better. no risk of rounding
Size is Philips #0 not #00
-
-
-
-
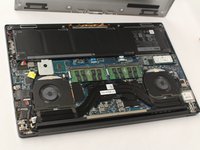
Solleva con delicatezza i due angoli, vicino all'asse di cerniera, del pannello posteriore per liberare l'intero pannello.
Dégouté d'avoir suivi cette étape à la lettre ?
N'ouvrez SURTOUT PAS le panneau par les deux coins arrières du côté de la charnière !!!
Et N'utiliser SURTOUT PAS une spatule en plastique pour l'ouvrir si le panneau ne se détache pas facilement !!!
Le panneau est fait pour s'ouvrir par les coins avant!!! A l'arrière des picots servent justement à l'empêcher de s'ouvrir !!!
Le résultat si vous utiliser uns spatule à l'arrière… c'est que ces picots cassent… ?
IL FAUT DONC OUVRIR LE PANNEAU PAR L'AVANT !! Et il est juste posé donc inutile d'utiliser une spatule…
Voilà voilà je suis dégoûté d'avoir fait cette connerie alors qu'en cliquant sur un autre tuto (lien juste en dessous sur Google) ils le disent…
J'espère qu'après mon commentaire l'auteur de ce tuto fera la modif…
Sur ce… merci pour le tuto…
Bonjour Tanguy ! Désolée de votre mésaventure :( Et merci de ce retour fort précieux à qui voudra effectuer la réparation ! Votre commentaire est visible par tous, donc les utilisateurs seront avertis. iFixit est un wiki ; si vous le souhaitez, vous pouvez également adapter le tutoriel d’origine pour inclure votre retour d’expérience.
-
-
-
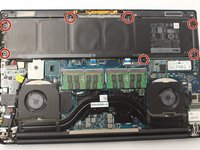
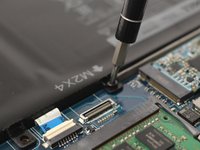
Usa un cacciavite a croce Phillips #00 per rimuovere le sette viti lunghe 3 mm dal perimetro della batteria.
Everything went great to this point … but the #00 Philips screws securing the battery will not move! The seven screws holding the battery are torqued down so crazy tight the #00 Phillips screwdriver is stripping the heads of the screws. I stopped trying before damaging the screw heads any further. A quick Google search indicates this is not an uncommon problem, but there are no clear solutions (other than sending the computer to Dell). Does anyone know how to get these screws to move without heavily damaging them?
iFixit has a guide with several tips on removing stripped screws here. Just make sure to take care as you work through the guide and stop and move on to the next method immediately once you notice the current one isn’t working so you don’t further strip the screws. One last tip: instead of using a rotary tool with a cutting wheel like in the last few steps of the guide, you can use a flat head that is oversized for the stripped screw as a small chisel to slowly and carefully carve out a notch in the screw head. This works just like the cutting wheel (albeit slowly) to create a notch you can use to remove the screws. Damaging the screws isn’t ideal, but replacement screws are fairly inexpensive and widely available. Good Luck!
-


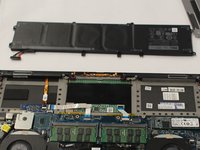
Per rimontare il tuo dispositivo, segui queste istruzioni in ordine inverso.
Per rimontare il tuo dispositivo, segui queste istruzioni in ordine inverso.
Annulla: non ho completato questa guida.
Altre 55 persone hanno completato questa guida.
Un ringraziamento speciale a questi traduttori:
100%


Questi traduttori ci stanno aiutando ad aggiustare il mondo! Vuoi partecipare?
Inizia a tradurre ›
Team

UW Stout, Team S6-G1, Ogden Fall 2018 Membro di UW Stout, Team S6-G1, Ogden Fall 2018
UWSTOUT-OGDEN-F18S6G1
4 Membri
23 Guide realizzate
12Commenti sulla guida
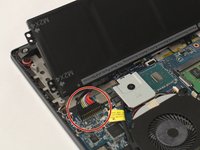
… Mais avec un prix imbattable, la batterie made in RPC arrive avec un connecteur très très épais !
Finalement il m’a fallu me résigner à forcer très durement l’intromission avec deux paires de pinces !!!
Barbare mais efficace ! C’est le contraire de out ce que j’ai enseigné pendant des années : “le connecteur approprié doit toujours s’insérer en douceur” Ben là … NON !
English translation:
… But with an unbeatable price, the battery made in RPC comes with a very very thick connector!
Finally, I had to resign myself to forcing the intromission very hard with two pairs of pliers !!!
Barbarian but effective! It’s the opposite of what I’ve taught for years: “the right connector should always fit smoothly” Well there… NO!
Hallo, ich habe alles nach Anleitung durchgeführt, allerdings kommt eine Fehlermeldung, dass der Akku nicht akzeptiert wird, da kein Original Ersatzteil.
Den Haken im Bios bei Adapter Warnings habe ich bereits entfernt. Hat jemand eine Idee?
Hallo Thomas, wo kommt denn die Fehlermeldung? Im BIOS? In deinem Betriebssystem? In einem bestimmten Programm? Was läuft denn auf deinem Dell?
Geht mir auch so: Fehlermeldung im BIOS auf Windows 10. Ob ein BIOS-Update das Problem lösen würde weiß ich nicht, weil ich dafür 10% Akkuladestand bräuchte.
Fuchs -
Dell hat eine eigene Supportseite für Akkus, unter anderem mit der Info, wie du das BIOS-Update unter 10% erzwingen kannst. Und in diesem Thread heißt es, dass es Akkus gibt, die eigentlich für einen anderen Dell sind und deshalb passen, sich aber nicht laden lassen, weil Dell diese nicht als Original anerkennt.
Is this battery a little thicker then the original? When I replace the case the track pad doesn't have quite enough room to travel anymore so it's hard to click and I can't click and drag.
Having the same issue. Atm I am considering to send the battery back! Any progress on your half on this?
Akra -
also had the same issue. i used some of the foam that the battery came in to shim around the trackpad. that seemed to give it enough room to click. so far so good.
Easy installation of the new battery but it is not charging. I'm getting message at start up that it's not a Dell battery. I have done some research but can't figure out a way to get the system to recognize and accept the battery and charge it.
Instructions were clear and concise. No problems with the battery supplied. There was a screw holding the battery that was damaged. Managed to get that out and the new battery slipped in place. Took a bit longer than the 10minutes but that's because of me being a bit more careful not wanting to drop the little screws into the laptop.